
构建一个LVS-DR模型的高性能集群,并实现Nginx、PHP、MySQL分离
搭建一个LVS-DR模型的高性能集群,并实现以下功能:
(1)、wordpress程序通过nfs共享给个个realserver;
(2)、后端realserver中的nginx和php分离;
配置信
|
操作系统 |
CentOS release 6.7 (Final) 64bit |
|
|
IP地址 |
LVS-DR |
VIP:192.168.2.210 |
|
DIP:192.168.2.211 |
||
|
Real server1:192.168.2.212 |
||
|
Real Server2:192.168.2.213 |
||
|
PHP Server:192.168.2.214 |
||
|
MySQL Server:192.168.2.215 |
||
平台介绍:
OS Version:CentOS release 6.7 (Final)nginx version: nginx/1.8.1PHP 5.6.24 (fpm-fcgi) Mysql version: 5.6.31 kernel version: 2.6.32-573.el6.x86_64关闭iptables、selinux,例如:[root@php-server www]service iptables stop [root@php-server www]chkconfig iptables off [root@php-server www]getenforce 0
安装并同步各个节点的时间,例如
[root@lvs-dr ~]# yum install -y ntpdate.x86_64
[root@lvs-dr ~]# ntpdate cn.ntp.org.cn
192.168.2.212(realserver1):
#编译nginx环境前需要先把gcc等开发库之类提前装好;
[root@realserver1 ~]# yum -y install gcc gcc-c++ automake autoconf libtool make
#安装pcre是为了支持rewrite,
#zlib是为了支持gzip压缩
#openssl是为了支持https;
[root@realserver1 ~]# yum install -y pcre-devel.x86_64 pcre-devel.x86_64  zlib.x86_64 zlib-devel.x86_64  openssl-devel.x86_64 openssl.x86_64
[root@realserver1 ~]# groupadd www
[root@realserver1 ~]# useradd -r -g www www  -s /sbin/nologin   #运行nginx的用户和用户组
[root@realserver1 nginx-1.8.1]# mkdir -pv /opt/application/nginx
mkdir: created directory `/opt/application'
mkdir: created directory `/opt/application/nginx'
[root@realserver1 tools]# tar -xf nginx-1.8.1.tar.gz
[root@realserver1 tools]# cd nginx-1.8.1
[root@realserver1 nginx-1.8.1]# ./configure --prefix=/opt/application/nginx/ --user=www --group=www --with-http_stub_status_module --with-http_ssl_module --with-http_spdy_module --with-http_gzip_static_module --with-http_realip_module --with-ipv6
# --with-http_stub_status_module 启用nginx状态监控
# --with-http_ssl_module 启用HTTPS加密
# --with-http_spdy_module 启用spdy支持,缩短为网页加载时间
# --with-http_gzip_static_module  启用静态压缩
# --with-http_realip_module 做代理时获取客户端真实IP
# --with-ipv6 支持ipv6
[root@realserver1 nginx-1.8.1]# make ;make install
创建nginx启动脚本
[root@realserver1 ~]# vim /etc/rc.d/init.d/nginx
[root@realserver1 ~]# chmod 755 /etc/rc.d/init.d/nginx
[root@realserver1 ~]# service nginx start
Starting nginx:                                            [  OK  ]
[root@realserver1 ~]# chkconfig --add nginx
[root@realserver1 ~]# chkconfig nginx on
[root@realserver1 ~]# chkconfig --list nginx
nginx              0:off      1:off  2:on  3:on    4:on     5:on     6:off
测试成功:
[root@realserver1 ~]# curl -I http://192.168.2.212
HTTP/1.1 200 OK
Server: nginx/1.8.1
Date: Thu, 11 Aug 2016 20:26:13 GMT
Content-Type: text/html
Content-Length: 612
Last-Modified: Thu, 11 Aug 2016 19:21:49 GMT
Connection: keep-alive
ETag: "57acd04d-264"
Accept-Ranges: bytes
Nginx脚本内容如下:
#!/bin/sh
#
# nginx - this script starts and stops the nginx daemin
#
# chkconfig:   - 85 15
# description:  Nginx is an HTTP(S) server, HTTP(S) reverse \
#               proxy and IMAP/POP3 proxy server
# processname: nginx
# config:      /usr/local/nginx/conf/nginx.conf
# pidfile:     /usr/local/nginx/logs/nginx.pid
# Source function library.
. /etc/rc.d/init.d/functions
# Source networking configuration.
. /etc/sysconfig/network
# Check that networking is up.
[ "$NETWORKING" = "no" ] && exit 0
nginx="/opt/application/nginx/sbin/nginx"
prog=$(basename $nginx)
NGINX_CONF_FILE="/opt/application/nginx/conf/nginx.conf"
lockfile=/var/lock/subsys/nginx
start() {
    [ -x $nginx ] || exit 5
    [ -f $NGINX_CONF_FILE ] || exit 6
    echo -n $"Starting $prog: "
    daemon $nginx -c $NGINX_CONF_FILE
    retval=$?
    echo
    [ $retval -eq 0 ] && touch $lockfile
    return $retval
}
stop() {
    echo -n $"Stopping $prog: "
    killproc $prog -QUIT
    retval=$?
    echo
    [ $retval -eq 0 ] && rm -f $lockfile
    return $retval
}
restart() {
    configtest || return $?
    stop
    start
}
reload() {
    configtest || return $?
    echo -n $"Reloading $prog: "
    killproc $nginx -HUP
    RETVAL=$?
    echo
}
force_reload() {
    restart
}
configtest() {
  $nginx -t -c $NGINX_CONF_FILE
}
rh_status() {
    status $prog
}
rh_status_q() {
    rh_status >/dev/null 2>&1
}
case "$1" in
    start)
        rh_status_q && exit 0
        $1
        ;;
    stop)
        rh_status_q || exit 0
        $1
        ;;
    restart|configtest)
        $1
        ;;
    reload)
        rh_status_q || exit 7
        $1
        ;;
    force-reload)
        force_reload
        ;;
    status)
        rh_status
        ;;
    condrestart|try-restart)
        rh_status_q || exit 0
            ;;
    *)
        echo $"Usage: $0 {start|stop|status|restart|condrestart|try-restart|reload|force-reload|configtest}"
        exit 2
esac
192.168.2.213(realserver2) :如同realserver1配置。
二、安装Mysql
192.168.2.215(mysql-server):
[root@mysql-server ~]# wget http://ftp.jaist.ac.jp/pub/mysql/Downloads/MySQL-5.6/mysql-5.6.31.tar.gz
[root@mysql-server ~]# tar -zxf mysql-5.6.31.tar.gz
[root@mysql-server mysql-5.6.31]# ls
BUILD           cmd-line-utils   dbug                 include   libmysqld    mysys      README   sql-bench   support-files  vio
client          config.h.cmake   Docs                 INSTALL   libservices  mysys_ssl  regex    sql-common  tests          win
cmake           configure.cmake  Doxyfile-perfschema  libevent  man          packaging  scripts  storage     unittest       zlib
CMakeLists.txt  COPYING          extra                libmysql  mysql-test   plugin     sql      strings     VERSION

[root@mysql-server mysql-5.6.31]# yum -y install  gcc gcc-c++  autoconf automake zlib*  libxml* ncurses-devel  libtool-ltdl-devel* make cmake
[root@mysql-server mysql-5.6.31]# groupadd mysql
[root@mysql-server mysql-5.6.31]# useradd -r -g mysql mysql -s /sbin/nologin
[root@mysql-server mysql-5.6.31]# cmake . \
-DCMAKE_INSTALL_PREFIX=/opt/application/mysql/ \
-DMYSQL_DATADIR=/opt/application/mysql/data \
-DMYSQL_UNIX_ADDR=/var/lib/mysql/mysql.sock \
-DSYSCONFDIR=/etc \
-DMYSQL_TCP_PORT=3306 \
-DWITH_MYISAM_STORAGE_ENGINE=1 \
-DWITH_INNOBASE_STORAGE_ENGINE=1 \
-DWITH_MEMORY_STORAGE_ENGINE=1 \
-DWITH_READLINE=1 \
-DENABLED_LOCAL_INFILE=1 \
-DWITH_PARTITION_STORAGE_ENGINE=1 \
-DEXTRA_CHARSETS=all \
-DDEFAULT_CHARSET=utf8 \
-DDEFAULT_COLLATION=utf8_general_ci
#编译时间很长,耐心等待...
#DCMAKE_INSTALL_PREFIX  安装根目录
#DMYSQL_DATADIR         数据存储目录
#DMYSQL_UNIX_ADDR       连接数据库socket路径
#DSYSCONFDIR            配置文件(my.cnf)目录
#DMYSQL_TCP_PORT        mysql启用的TCP/IP端口
#DWITH_MYISAM_STORAGE_ENGINE    启用MYISAM引擎支持
#DWITH_INNOBASE_STORAGE_ENGINE  启用INNOBASE引擎支持
#DWITH_MEMORY_STORAGE_ENGINE    启用Memory引擎支持
#DWITH_READLINE                 快捷键功能
#DENABLED_LOCAL_INFILE          允许从本地导入数据
#DWITH_PARTITION_STORAGE_ENGINE 安装支持数据库分区
#DEXTRA_CHARSETS                安装所有的字符集
#DDEFAULT_CHARSET               默认字符集
#DDEFAULT_COLLATION             默认编码
Mysql官方参考文件:http://dev.mysql.com/doc/refman/5.6/en/source-configuration-options.html
[root@mysql-server mysql-5.6.31]# make -j 4
[root@mysql-server mysql-5.6.31]# make install
[root@mysql-server mysql-5.6.31]# chown -R mysql.mysql /opt/application/mysql #改变目录所有者
[root@mysql-server mysql-5.6.31]# /opt/application/mysql/scripts/mysql_install_db --user=mysql --basedir=/opt/application/mysql --datadir=/opt/application/mysql/data #初始化数据库
[root@mysql-server support-files]# cp /opt/application/mysql/support-files/my-default.cnf /etc/my.cnf           #使用默认配置文件
[root@mysql-server support-files]# cp /opt/application/mysql/support-files/mysql.server /etc/rc.d/init.d/mysql  #注册服务
[root@mysql-server support-files]# chkconfig --add mysql
[root@mysql-server support-files]# chkconfig mysql on  #添加开机启动
[root@mysql-server support-files]# service mysql start #启动mysql服务
Starting MySQL. SUCCESS!
[root@mysql-server support-files]# netstat -tunlpa |grep 3306
tcp        0      0 :::3306                     :::*                        LISTEN      24982/mysqld
[root@mysql-server ~]# vim /etc/bashrc
#把mysql的bin命令添加到path
PATH=/opt/application/mysql/bin:$PATH
export PATH
三、安装PHP
安装php依赖工具
[root@php-server ~]# yum -y install libmcrypt libmcrypt-devel mhash mhash-devel  libxml2-devel openssl openssl-devel bzip2-devel libcurl-devel gd gd-devel.x86_64
[root@php-server ~]# groupadd www
[root@php-server ~]# useradd -r -g www www -s /sbin/nologin #运行php-fpm的用户和用户组
[root@php-server ~]# wget http://cn.php.net/distributions/php-5.6.24.tar.gz
[root@php-server ~]# tar -zxf php-5.6.24.tar.gz
[root@php-server ~]# cd php-5.6.24
[root@php-server php-5.6.24]# ls
acinclude.m4      configure.in     install-sh       missing              README.EXT_SKEL               README.RELEASE_PROCESS            sapi                     TSRM
aclocal.m4        CREDITS          LICENSE          mkinstalldirs        README.GIT-RULES              README.SELF-CONTAINED-EXTENSIONS  scripts                  UPGRADING
build             ext              ltmain.sh        netware              README.input_filter           README.STREAMS                    server-tests-config.php  UPGRADING.INTERNALS
buildconf         EXTENSIONS       main             NEWS                 README.MAILINGLIST_RULES      README.SUBMITTING_PATCH           server-tests.php         vcsclean
buildconf.bat     footer           makedist         pear                 README.md                     README.TESTING                    snapshot                 win32
CODING_STANDARDS  generated_lists  Makefile.frag    php5.spec.in         README.namespaces             README.TESTING2                   stamp-h.in               Zend
config.guess      genfiles         Makefile.gcov    php.gif              README.NEW-OUTPUT-API         README.UNIX-BUILD-SYSTEM          stub.c
config.sub        header           Makefile.global  php.ini-development  README.PARAMETER_PARSING_API  README.WIN32-BUILD-SYSTEM         tests
configure         INSTALL          makerpm          php.ini-production   README.REDIST.BINS            run-tests.php                     travis
[root@php-server php-5.6.24]# mkdir -pv /opt/application/php
mkdir: created directory `/opt/application'
mkdir: created directory `/opt/application/php'
[root@php-server php-5.6.24]# ./configure \
--prefix=/opt/application/php \
--with-config-file-path=/etc \
--with-fpm-user=www  \
--with-fpm-group=www \
--enable-fpm \
--enable-ftp \
--enable-zip \
--enable-soap \
--enable-xml \
--enable-bcmath \
--enable-shmop \
--enable-exif \
--enable-pcntl \
--enable-opcache \
--enable-sysvsem \
--enable-mbregex \
--enable-mbstring \
--enable-sockets \
--enable-gd-native-ttf \
--enable-inline-optimization \
--with-zlib \
--with-curl \
--with-gd \
--with-mcrypt \
--with-openssl \
--with-mhash \
--with-xmlrpc \
--with-gettext \
--with-iconv-dir \
--with-freetype-dir \
--with-mysql=mysqlnd \
--with-mysqli=mysqlnd \
--with-libxml-dir=/usr \
--with-pdo-mysql=mysqlnd \
--disable-rpath \
--disable-ipv6 \
--disable-debug \
--disable-fileinfo \
或者:
./configure --prefix=/opt/application/php --with-config-file-path=/etc --with-fpm-user=www  --with-fpm-group=www --enable-fpm --enable-ftp --enable-zip --enable-soap --enable-xml --enable-bcmath --enable-shmop --enable-exif --enable-pcntl --enable-opcache --enable-sysvsem --enable-mbregex --enable-mbstring --enable-sockets --enable-gd-native-ttf --enable-inline-optimization --with-zlib --with-curl --with-gd --with-mcrypt --with-openssl --with-mhash --with-xmlrpc --with-gettext --with-iconv-dir --with-freetype-dir --with-mysql=mysqlnd --with-mysqli=mysqlnd --with-libxml-dir=/usr --with-pdo-mysql=mysqlnd --disable-rpath --disable-ipv6 --disable-debug --disable-fileinfo
#这里可能报错:configure: error: mcrypt.h not found. Please reinstall libmcrypt,解决方法如下:
1、安装第三方yum源
wget http://www.atomicorp.com/installers/atomic
sh ./atomic
2、使用yum命令安装
yum  install  php-mcrypt  libmcrypt  libmcrypt-devel
四、修改nginx和php的配置文件
192.168.2.212(realserver1):如下图;
192.168.2.213(realserver2):参照192.168.2.212(realserver1)
[root@realserver1 ~]# cp /opt/application/nginx/conf/nginx.conf /opt/application/nginx/conf/nginx.confbak  #习惯把配置文件先备份,可以不做
[root@realserver1 ~]# vim /opt/application/nginx/conf/nginx.conf
        location / {
            root   /data/www;#第1处修改
            index  index.html index.htm;
        }
        location ~ \.php$ {
            root           /data/www;#第2处修改
            fastcgi_pass   192.168.2.214:9000; #第3处修改
            fastcgi_index  index.php;
            fastcgi_param  SCRIPT_FILENAME  $document_root$fastcgi_script_name;
            include        fastcgi_params;
        }
五、安装NFS挂载wordpress
192.168.2.214(php-server):
[root@php-server ~]# yum install -y nfs-utils.x86_64 nfs-utils-lib.x86_64  nfs-utils-lib-devel.x86_64
# yum安装nfs程序
[root@php-server ~]# /etc/init.d/rpcbind start
Starting rpcbind:                                          [  OK  ]
[root@php-server ~]# /etc/init.d/nfs start
Starting NFS services:                                     [  OK  ]
Starting NFS mountd:                                       [  OK  ]
Starting NFS daemon:                                       [  OK  ]
Starting RPC idmapd:                                       [  OK  ]
[root@php-server ~]# netstat -tulnp |grep -E '(rpc|nfs)'
tcp        0      0 0.0.0.0:48254               0.0.0.0:*                   LISTEN      65830/rpc.mountd
tcp        0      0 0.0.0.0:54949               0.0.0.0:*                   LISTEN      65830/rpc.mountd
tcp        0      0 0.0.0.0:39822               0.0.0.0:*                   LISTEN      65830/rpc.mountd
tcp        0      0 0.0.0.0:111                 0.0.0.0:*                   LISTEN      65785/rpcbind
tcp        0      0 :::37923                    :::*                        LISTEN      65830/rpc.mountd
tcp        0      0 :::47075                    :::*                        LISTEN      65830/rpc.mountd
tcp        0      0 :::111                      :::*                        LISTEN      65785/rpcbind
tcp        0      0 :::46353                    :::*                        LISTEN      65830/rpc.mountd
udp        0      0 0.0.0.0:664                 0.0.0.0:*                               65785/rpcbind
udp        0      0 0.0.0.0:59076               0.0.0.0:*                               65830/rpc.mountd
udp        0      0 0.0.0.0:59472               0.0.0.0:*                               65830/rpc.mountd
udp        0      0 0.0.0.0:49502               0.0.0.0:*                               65830/rpc.mountd
udp        0      0 0.0.0.0:111                 0.0.0.0:*                               65785/rpcbind
udp        0      0 :::664                      :::*                                    65785/rpcbind
udp        0      0 :::36008                    :::*                                    65830/rpc.mountd
udp        0      0 :::54987                    :::*                                    65830/rpc.mountd
udp        0      0 :::44906                    :::*                                    65830/rpc.mountd
udp        0      0 :::111                      :::*                                    65785/rpcbind
[root@php-server data]# mkdir -pv /data/www
mkdir: created directory `/data'
mkdir: created directory `/data/www'
[root@php-server data]# cat /etc/exports
/data/www   192.168.2.0/24(rw,no_root_squash)
[root@php-server data]# ll -d /data/www/
drwxrwxrwx 2 root root 4096 Aug 13 04:02 /data/www/
[root@php-server data]# service nfs restart
shell-init: error retrieving current directory: getcwd: cannot access parent directories: No such file or directory
chdir: error retrieving current directory: getcwd: cannot access parent directories: No such file or directory
Shutting down NFS daemon:                                  [  OK  ]
Shutting down NFS mountd:                                  [  OK  ]
Shutting down RPC idmapd:                                  [  OK  ]
Starting NFS services:                                     [  OK  ]
Starting NFS mountd:                                       [  OK  ]
Starting NFS daemon:                                       [  OK  ]
Starting RPC idmapd:                                       [  OK  ]
[root@php-server data]# showmount -e 192.168.2.214
Export list for 192.168.2.214:
/data/www 192.168.2.0/24
#下载wordpress到php-server并解压缩
[root@php-server www]# chown -R www.www *
192.168.2.211(realserver1):
#安装nfs
[root@realserver1 html]# yum install -y nfs-utils.x86_64 nfs-utils-lib.x86_64  nfs-utils-lib-devel.x86_64
#把192.168.2.214上的程序挂载到realserver1、realserver2对应目录上
[root@realserver1 html]# mount -t nfs 192.168.2.214:/data/www/ /data/www/
#查看realserver1的mount信息
[root@realserver1 html]# mount
/dev/mapper/VolGroup-lv_root on / type ext4 (rw)
proc on /proc type proc (rw)
sysfs on /sys type sysfs (rw)
devpts on /dev/pts type devpts (rw,gid=5,mode=620)
tmpfs on /dev/shm type tmpfs (rw,rootcontext="system_u:object_r:tmpfs_t:s0")
/dev/sda1 on /boot type ext4 (rw)
none on /proc/sys/fs/binfmt_misc type binfmt_misc (rw)
192.168.2.214:/data/www/ on /data/www/ type nfs (rw,vers=4,addr=192.168.2.214,clientaddr=192.168.2.212)
192.168.2.212(realserver2): 参考192.168.2.211(realserver1),具体操作这里忽略;
192.168.2.214(mysql-server):
root@mysql-server ~]# mysql
mysql> CREATE DATABASE `wordpress` CHARACTER SET utf8 COLLATE utf8_general_ci;
mysql> GRANT ALL ON wordpress.* TO 'wordpress'@'192.168.2.214' IDENTIFIED BY '123456';
mysql> flush privileges;
打开浏览器输入:http://192.168.2.212;
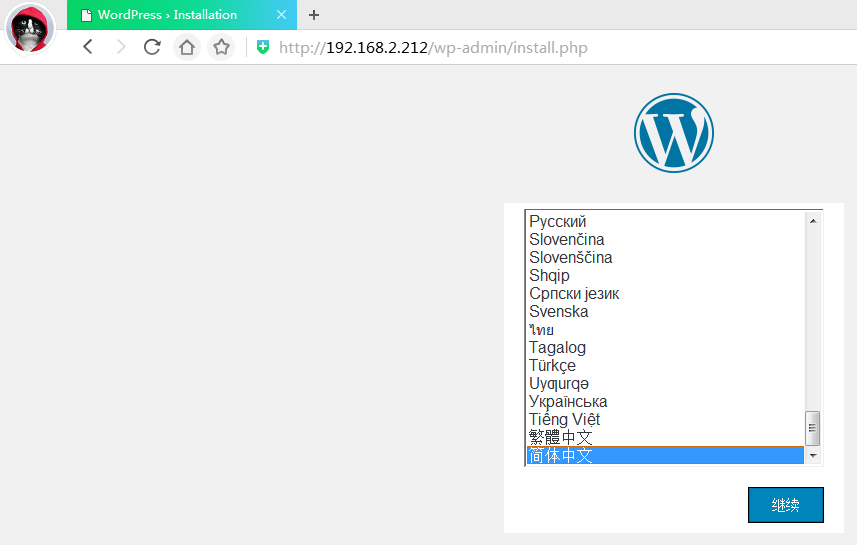
填写相关数据
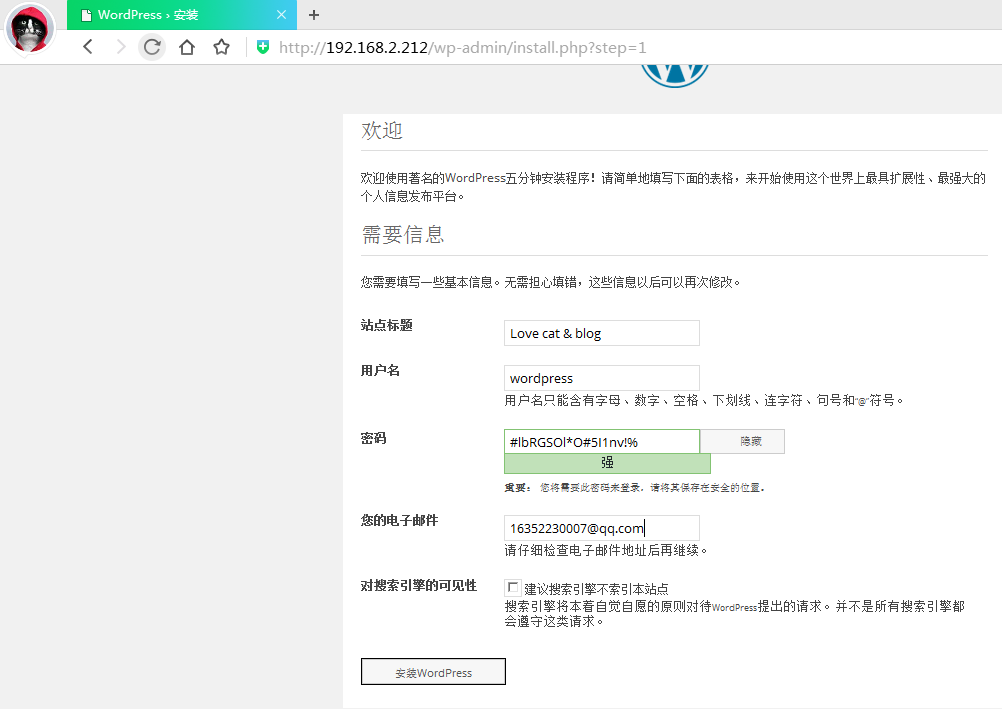
选中 “安装WordPress”
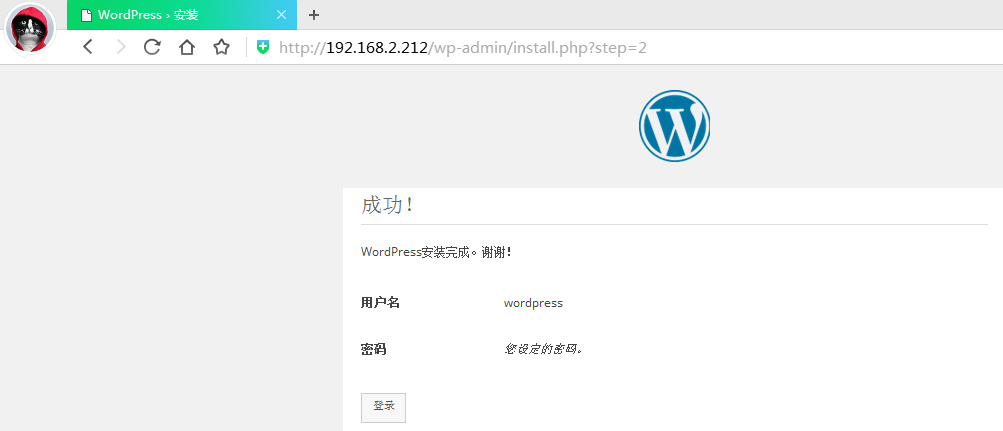
选中"登录",跳转页面如下:
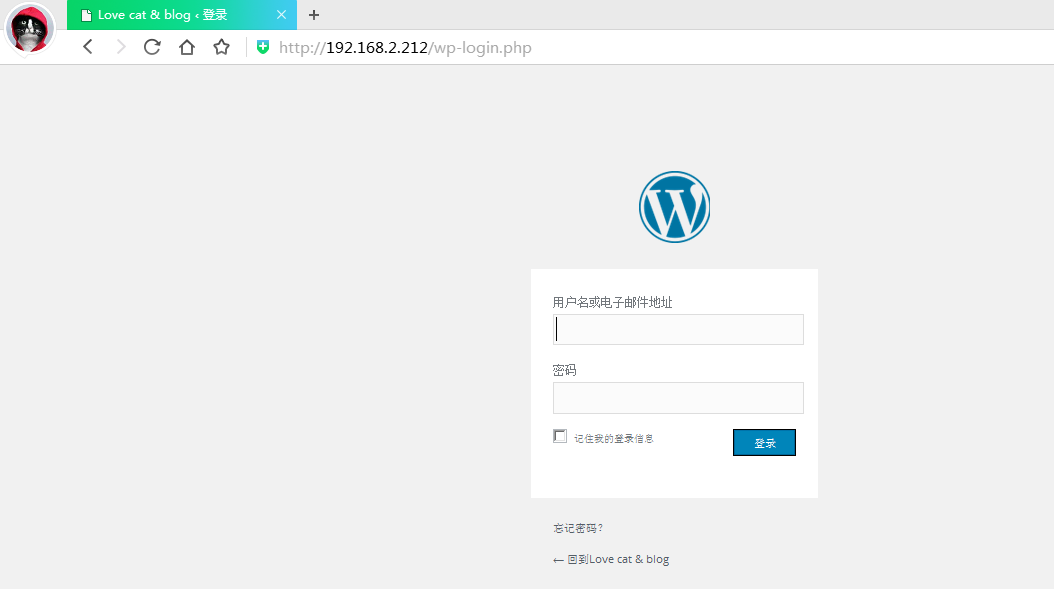
我们回到blog界面:

六、LVS安装
192.168.2.211:
[root@lvs-dr ~]# yum install -y ipvsadm
[root@lvs-dr ~]# ifconfig eth0:0 192.168.2.210/24 broadcast 192.168.2.210 up
[root@lvs-dr ~]# route add -host 192.168.2.210 dev eth0:0
[root@lvs-dr ~]# ip a
1: lo: <LOOPBACK,UP,LOWER_UP> mtu 65536 qdisc noqueue state UNKNOWN
    link/loopback 00:00:00:00:00:00 brd 00:00:00:00:00:00
    inet 127.0.0.1/8 scope host lo
    inet6 ::1/128 scope host
       valid_lft forever preferred_lft forever
2: eth0: <BROADCAST,MULTICAST,UP,LOWER_UP> mtu 1500 qdisc pfifo_fast state UP qlen 1000
    link/ether 00:0c:29:3d:6a:9d brd ff:ff:ff:ff:ff:ff
    inet 192.168.2.211/24 brd 192.168.2.255 scope global eth0
    inet 192.168.2.210/24 brd 192.168.2.210 scope global secondary eth0:0
    inet6 fe80::20c:29ff:fe3d:6a9d/64 scope link
       valid_lft forever preferred_lft forever
[root@lvs-dr ~]#
192.168.2.212(realserver1):
[root@realserver1 ~]# echo "1" > /proc/sys/net/ipv4/conf/all/arp_ignore
[root@realserver1 ~]# echo "1" > /proc/sys/net/ipv4/conf/lo/arp_ignore
[root@realserver1 ~]# echo "2" > /proc/sys/net/ipv4/conf/lo/arp_announce
[root@realserver1 ~]# echo "2" > /proc/sys/net/ipv4/conf/all/arp_announce
[root@realserver1 ~]# ifconfig lo:0 192.168.2.210 netmask 255.255.255.255 broadcast 192.168.2.210
[root@realserver1 ~]# route add -host 192.168.2.210 dev lo:0
[root@realserver1 ~]# ifconfig
eth0 Link encap:Ethernet HWaddr 00:0C:29:B8:03:1C
inet addr:192.168.2.212 Bcast:192.168.2.255 Mask:255.255.255.0
inet6 addr: fe80::20c:29ff:feb8:31c/64 Scope:Link
UP BROADCAST RUNNING MULTICAST MTU:1500 Metric:1
RX packets:9435 errors:0 dropped:0 overruns:0 frame:0
TX packets:6582 errors:0 dropped:0 overruns:0 carrier:0
collisions:0 txqueuelen:1000
RX bytes:2278123 (2.1 MiB) TX bytes:2171329 (2.0 MiB)

lo Link encap:Local Loopback
inet addr:127.0.0.1 Mask:255.0.0.0
inet6 addr: ::1/128 Scope:Host
UP LOOPBACK RUNNING MTU:65536 Metric:1
RX packets:144 errors:0 dropped:0 overruns:0 frame:0
TX packets:144 errors:0 dropped:0 overruns:0 carrier:0
collisions:0 txqueuelen:0
RX bytes:12523 (12.2 KiB) TX bytes:12523 (12.2 KiB)

lo:0 Link encap:Local Loopback
inet addr:192.168.2.210 Mask:255.255.255.255
UP LOOPBACK RUNNING MTU:65536 Metric:1

[root@realserver1 ~]#
192.168.2.213(realserver2):参考192.168.2.212
192.168.2.211(lvs-dr):
[root@lvs-dr ~]# ipvsadm -a -t 192.168.2.210:80 -r 192.168.2.112 -g -w 1
[root@lvs-dr ~]# ipvsadm -a -t 192.168.2.210:80 -r 192.168.2.213 -g -w 2
[root@lvs-dr ~]# ipvsadm -L -n
IP Virtual Server version 1.2.1 (size=4096)
Prot LocalAddress:Port Scheduler Flags
  -> RemoteAddress:Port           Forward Weight ActiveConn InActConn
TCP  192.168.2.210:80 rr
  -> 192.168.2.112:80             Route   1      0          0
  -> 192.168.2.213:80             Route   2      0          0
[root@lvs-dr ~]#
0我们通过浏览器打开vip:192.168.2.21地址,能正常访问;

现在关闭192.168.2.212的nginx服务,看看lvs是能正常工作:
[root@realserver1 ~]# service nginx stop
Stopping nginx:                                            [  OK  ]
[root@realserver1 ~]#

其他的切换,博客里就不贴出来了,实验中试过OK,现在大功告成!

