
分享在winform下实现模块化插件编程
其实很早之前我就已经了解了在winform下实现插件编程,原理很简单,主要实现思路就是:先定一个插件接口作为插件样式及功能的约定,然后具体的插件就去实现这个插件接口,最后宿主(应用程序本身)就利用反射动态获取实现了插件接口的类型作为合法的插件,从而完成动态加载及宿主与插件之间的互动。因为之前一段时间一直搞B/S架构开发没有时间去实践,而恰好现在公司领导要求我对我公司原有的ERP系统架构进行重整,我们的ERP系统采用的基于分布式的三层架构,核心业务逻辑放在服务端,展示层与业务层之间采用基于WEB服务等技术进行通信与交互资源,而展示层则主要是由WINFORM的多个父子窗口构成。从业务与安全的角度来说,我们的ERP系统基于分布式的三层架构是合理的,也无需改动,其最大的核心问题是在三层中的展示层,前面也说了展示层是由许多的WINFORM父子窗口构成,而且全部都在一个程序集中(即一个项目文件中),每次只要有一个窗体发生更改,就需要整个项目重新编译,由于文件太多,编译也就比较慢,而且也不利于团队合作,经常出现SVN更新冲突或团队之间更新不及时,造成编译报错等各种问题。为了解决这个问题,我与公司领导首先想到的是拆分展示层,由一个程序集拆分成多个程序集,由单一文件结构变成主从文件结构,这样就能大大的减少上述发生问题的机率,那么如何实现呢?自然就是本文的主题:实现模块化插件编程,有人可能不解,这个模块化插件编程与插件编程有区别吗?从原理上来讲是没有区别的,与本文开头讲的一样,区别在于,普通的插件编程一般是基于单个类型来进行判断且以单个类型进行操作,而我这里的模块化(也可以说是组件化)插件编程,是以程序集为单位进行判断并通过方法回调的形式来被动收集符合插件的多个类型,好处是避免了每个类型都需要进行判断,从而搞高运行效率。这种模块化插件编程的思想,我参考了ASP.NET 路由注册机制,如下面的代码:
    public static class WebApiConfig
    {
        public static void Register(HttpConfiguration config)
        {
            config.Routes.MapHttpRoute(
                name: "DefaultApi",
                routeTemplate: "api/{controller}/{id}",
                defaults: new { id = RouteParameter.Optional }
            );

        }
    }
这段代码的好处是,让你只关注config的事情,其它的都不用管。而我在代码中也利用了这种实现原理,具体的步骤与代码如下:
1.创建一个类库项目文件(PlugIn),该类库需主要是实现模块化插件编程的规范(即:各种接口及通用类),到时候宿言主及其它组件都必需引用它。
IAppContext:应用程序上下文对象接口,作用:用于收集应用程序必备的一些公共信息并共享给整个应用程序所有模块使用(含动态加载进来的组件)
using System;
using System.Collections.Generic;
using System.Linq;
using System.Text;
using System.Threading.Tasks;
using System.Windows.Forms;

namespace PlugIn
{
    /// <summary>
    /// 应用程序上下文对象接口
    /// 作用:用于收集应用程序必备的一些公共信息并共享给整个应用程序所有模块使用(含动态加载进来的组件)
    /// 作者:Zuowenjun
    /// 2016-3-26
    /// </summary>
    public interface IAppContext
    {
        /// <summary>
        /// 应用程序名称
        /// </summary>
        string AppName { get;}

        /// <summary>
        /// 应用程序版本
        /// </summary>
        string AppVersion { get; }

        /// <summary>
        /// 用户登录信息,这里类型是STRING,真实项目中为一个实体类
        /// </summary>
        string SessionUserInfo { get; }

        /// <summary>
        /// 用户登录权限信息,这里类型是STRING,真实项目中为一个实体类
        /// </summary>
        string PermissionInfo { get; }

        /// <summary>
        /// 应用程序全局缓存,整个应用程序(含动态加载的组件)均可进行读写访问
        /// </summary>
        Dictionary<string, object> AppCache { get; }

        /// <summary>
        /// 应用程序主界面窗体,各组件中可以订阅或获取主界面的相关信息
        /// </summary>
        Form AppFormContainer { get; }

        /// <summary>
        /// 动态创建在注册列表中的插件窗体实例
        /// </summary>
        /// <param name="formType"></param>
        /// <returns></returns>
        Form CreatePlugInForm(Type formType);

        /// <summary>
        /// 动态创建在注册列表中的插件窗体实例
        /// </summary>
        /// <param name="formTypeName"></param>
        /// <returns></returns>
        Form CreatePlugInForm(string formTypeName);

    }
}
ICompoent:组件信息描述接口,作用:描述该组件(或称为模块,即当前程序集)的一些主要信息,以便宿主(应用程序)可以动态获取到
using System;
using System.Collections.Generic;
using System.Linq;
using System.Text;
using System.Threading.Tasks;

namespace PlugIn
{
    /// <summary>
    /// 组件信息描述接口
    /// 作用:描述该组件(或称为模块,即当前程序集)的一些主要信息,以便应用程序可以动态获取到
    /// 作者:Zuowenjun
    /// 2016-3-26
    /// </summary>
    public interface ICompoent
    {
        /// <summary>
        /// 组件名称
        /// </summary>
        string CompoentName { get;}

        /// <summary>
        /// 组件版本,可实现按组件更新
        /// </summary>
        string CompoentVersion { get; }

        /// <summary>
        /// 向应用程序预注册的窗体类型列表
        /// </summary>
        IEnumerable<Type> FormTypes { get; }
    }
}
ICompoentConfig:组件信息注册接口,作用:应用程序将会第一时间从程序集找到实现了该接口的类并调用其CompoentRegister方法,从而被动的收集该组件的相关信息
using System;
using System.Collections.Generic;
using System.Linq;
using System.Text;
using System.Threading.Tasks;

namespace PlugIn
{
    /// <summary>
    /// 组件信息注册接口
    /// 作用:应用程序将会第一时间从程序集找到实现了该接口的类并调用其CompoentRegister方法,从而被动的收集该组件的相关信息
    /// 作者:Zuowenjun
    /// 2016-3-26
    /// </summary>
    public interface ICompoentConfig
    {
        void CompoentRegister(IAppContext context, out ICompoent compoent);
    }
}
Compoent:组件信息描述类(因为后续所有的插件模块都需要实现ICompoent,故这里直接统一实现,避免重复实现)
using System;
using System.Collections.Generic;
using System.Linq;
using System.Text;
using System.Threading.Tasks;
using PlugIn;
using System.Windows.Forms;

namespace PlugIn
{
    /// <summary>
    /// 组件信息描述类
    /// 作者:Zuowenjun
    /// 2016-3-26
    /// </summary>
    public class Compoent : ICompoent
    {
        private List<Type> formTypeList = new List<Type>();

        public string CompoentName
        {
            get;
            private set;
        }

        public string CompoentVersion
        {
            get;
            private set;
        }

        public IEnumerable<Type> FormTypes
        {
            get
            {
                return formTypeList.AsEnumerable();
            }
        }

        public Compoent(string compoentName, string compoentVersion)
        {
            this.CompoentName = compoentName;
            this.CompoentVersion = compoentVersion;
        }

        public void AddFormTypes(params Type[] formTypes)
        {
            Type targetFormType = typeof(Form);
            foreach (Type formType in formTypes)
            {
                if (targetFormType.IsAssignableFrom(formType) && !formTypeList.Contains(formType))
                {
                    formTypeList.Add(formType);
                }
            }
        }
    }
}
2.宿主(主应用程序)需引用上述类库,并同时实现IAppContext的实现类:AppContext
using PlugIn;
using System;
using System.Collections.Generic;
using System.Linq;
using System.Text;
using System.Threading.Tasks;
using System.Windows.Forms;

namespace WinFormPlugin
{
    /// <summary>
    /// 应用程序上下文对象类
    /// 作者:Zuowenjun
    /// 2016-3-26
    /// </summary>
    public class AppContext : IAppContext
    {

        internal static AppContext Current;

        internal Dictionary<string, Type> AppFormTypes
        {
            get;
            set;
        }

        public string AppName
        {
            get;
            private set;
        }

        public string AppVersion
        {
            get;
            private set;
        }

        public string SessionUserInfo
        {
            get;
            private set;
        }

        public string PermissionInfo
        {
            get;
            private set;
        }

        public Dictionary<string, object> AppCache
        {
            get;
            private set;
        }

        public System.Windows.Forms.Form AppFormContainer
        {
            get;
            private set;
        }


        public AppContext(string appName, string appVersion, string sessionUserInfo, string permissionInfo, Form appFormContainer)
        {
            this.AppName = appName;
            this.AppVersion = appVersion;
            this.SessionUserInfo = sessionUserInfo;
            this.PermissionInfo = permissionInfo;
            this.AppCache = new Dictionary<string, object>();
            this.AppFormContainer = appFormContainer;
        }

        public System.Windows.Forms.Form CreatePlugInForm(Type formType)
        {
            if (this.AppFormTypes.ContainsValue(formType))
            {
                return Activator.CreateInstance(formType) as Form;
            }
            else
            {
                throw new ArgumentOutOfRangeException(string.Format("该窗体类型{0}不在任何一个模块组件窗体类型注册列表中!", formType.FullName), "formType");
            }
        }

        public System.Windows.Forms.Form CreatePlugInForm(string formTypeName)
        {
            Type type = Type.GetType(formTypeName);
            return CreatePlugInForm(type);
        }
    }
}
实现了AppContext之后,那么就需要来实例化并填充AppContext类,实例化的过程放在主窗体(父窗体)的Load事件中,如下:
        private void ParentForm_Load(object sender, EventArgs e)
        {

            AppContext.Current = new AppContext("文俊插件示例程序", "V16.3.26.1", "admin", "administrator", this);
            AppContext.Current.AppCache["loginDatetime"] = DateTime.Now;
            AppContext.Current.AppCache["baseDir"] = AppDomain.CurrentDomain.BaseDirectory;
            AppContext.Current.AppFormTypes = new Dictionary<string, Type>();
            LoadComponents();
            LoadMenuNodes();
        }


        private void LoadComponents()
        {
            string path = AppContext.Current.AppCache["baseDir"] + "com\\";
            Type targetFormType = typeof(Form);
            foreach (string filePath in Directory.GetFiles(path, "*.dll"))
            {
                var asy = Assembly.LoadFile(filePath);
                var configType = asy.GetTypes().FirstOrDefault(t => t.GetInterface("ICompoentConfig") != null);
                if (configType != null)
                {
                    ICompoent compoent=null;
                    var config = (ICompoentConfig)Activator.CreateInstance(configType);
                    config.CompoentRegister(AppContext.Current,out compoent);//关键点在这里,得到组件实例化后的compoent
                    if (compoent != null)
                    {
                        foreach (Type formType in compoent.FormTypes)//将符合的窗体类型集合加到AppContext的AppFormTypes中
                        {
                            if (targetFormType.IsAssignableFrom(formType))
                            {
                                AppContext.Current.AppFormTypes.Add(formType.FullName, formType);
                            }
                        }
                    }
                }
            }
        }


        private void LoadMenuNodes() //实现情况应该是从数据库及用户权限来进行动态创建菜单项
        {
            this.treeView1.Nodes.Clear();
            var root = this.treeView1.Nodes.Add("Root");

            foreach (var formType in AppContext.Current.AppFormTypes)
            {
                var node = new TreeNode(formType.Key) { Tag = formType.Value };
                root.Nodes.Add(node);
            }
        }
下面是实现菜单双击并打开窗口,代码如下:
        private void treeView1_NodeMouseDoubleClick(object sender, TreeNodeMouseClickEventArgs e)
        {
            if (e.Node.Nodes.Count <= 0)//当非父节点(即:实际的功能节点)
            {
                ShowChildForm(e.Node.Tag as Type);
            }
        }


        private void ShowChildForm(Type formType)
        {
            var childForm= Application.OpenForms.Cast<Form>().SingleOrDefault(f=>f.GetType()==formType);
            if (childForm == null)
            {
                childForm = AppContext.Current.CreatePlugInForm(formType);  //(Form)Activator.CreateInstance(formType);

                childForm.MdiParent = this;
                childForm.Name = "ChildForm - " + DateTime.Now.Millisecond.ToString();
                childForm.Text = childForm.Name;
                childForm.Show();
            }
            else
            {
                childForm.BringToFront();
                childForm.Activate();
            }

        }
3.实现一个插件模块,创建一个类库项目(可以先创建为WINDOWS应用程序项目,然后再将其属性中的输出类型改为:类库,这样就省得去引用一些FORM相关的组件)Com.First,同时引用前面的插件规范类库(PlugIn),并实现ICompoentConfig接口的类:CompoentConfig
using System;
using System.Collections.Generic;
using System.Linq;
using System.Text;
using System.Threading.Tasks;
using PlugIn;

namespace Com.First
{
    /// <summary>
    /// 组件信息注册类(每一个插件模块必需实现一个ICompoentConfig)
    /// 作者:Zuowenjun
    /// 2016-3-26
    /// </summary>
    public class CompoentConfig : ICompoentConfig
    {
        public static IAppContext AppContext;

        public void CompoentRegister(IAppContext context,out ICompoent compoent)
        {
            AppContext = context;
            var compoentInfo = new Compoent("Com.First", "V16.3.26.1.1");
            compoentInfo.AddFormTypes(typeof(Form1), typeof(Form2));//将认为需要用到的窗体类型添加到预注册列表中

            compoent = compoentInfo;//回传Compoent的实例
        }
    }
}
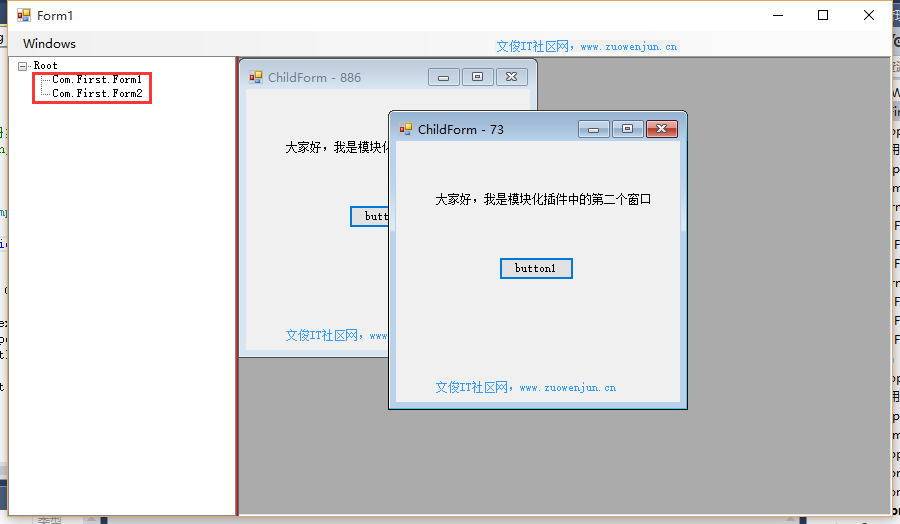
这样三大步就完整了一个简单的模块化插件编程框架,运行前请先将上面的插件DLL(Com.First.Dll)放到调试应用程序目录下的com目录下,整体效果如下:(该主界面左右布局实现方法可见我的博文:分享在winform下实现左右布局多窗口界面-续篇)
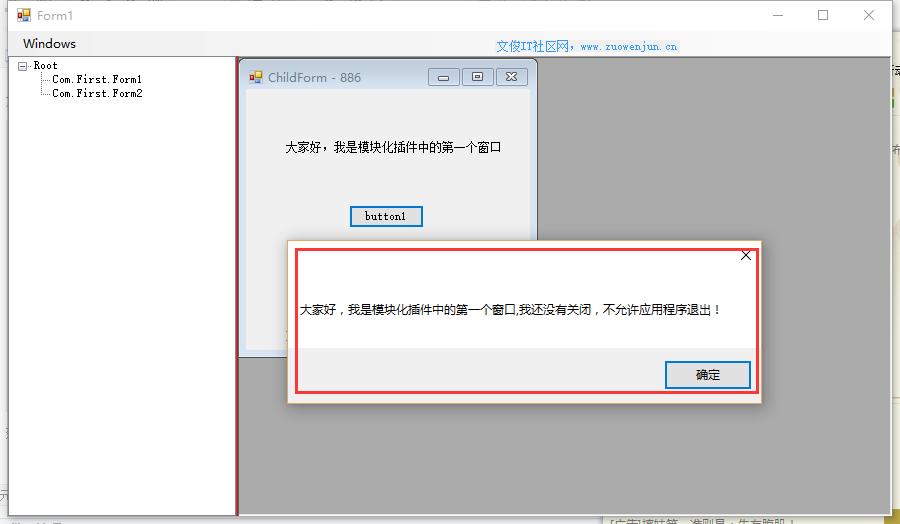
为了测试插件与主应用程序之前的交互性,我先对插件程序集(Com.First)中的第一个窗口Form1,增加实现若Form1处于打开状态,那么主程序就不能正常退出,代码如下:
        private void Form1_Load(object sender, EventArgs e)
        {
            CompoentConfig.AppContext.AppFormContainer.FormClosing += AppFormContainer_FormClosing;
        }

        void AppFormContainer_FormClosing(object sender, FormClosingEventArgs e)
        {
            MessageBox.Show(label1.Text + ",我还没有关闭,不允许应用程序退出!");
            e.Cancel = true;
        }

        private void Form1_FormClosed(object sender, FormClosedEventArgs e)
        {
            CompoentConfig.AppContext.AppFormContainer.FormClosing -= AppFormContainer_FormClosing;
        }
效果如下图示:
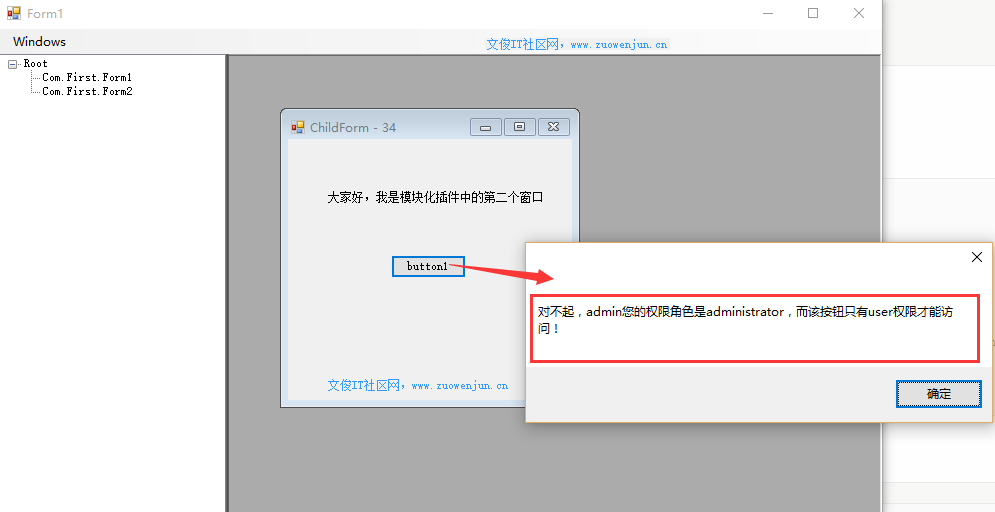
第二个测试,在第二个窗口Form2中,增加实现依据用户登录信息来限制某些功能(点击按钮)不能使用,代码如下:
        private void button1_Click(object sender, EventArgs e)
        {
            if (CompoentConfig.AppContext.PermissionInfo.Equals("user",StringComparison.OrdinalIgnoreCase))
            {
                MessageBox.Show(this.Name);
            }
            else
            {
                MessageBox.Show("对不起," + CompoentConfig.AppContext.SessionUserInfo + "您的权限角色是" + CompoentConfig.AppContext.PermissionInfo + ",而该按钮只有user权限才能访问!");
            }
        }
效果如下图示:
由于上述代码仅供演示,故可能存在不完善甚至错误的地方,写这篇文章的目的在于分享一下实现思路,大家也可以相互交流一下,谢谢!
附上源代码,大家可以下载并进行测试与改时,同时也欢迎更好的实现思路在这里交流一下。
