


1:安装好centos 7 操作系统;
虚拟机安装centos 7,在vmware中一步步来就可以成功。
2:安装vim
最小化安装的系统只有vi编辑器,这里装一下vim,个人习惯,可以不安装, 那么后续的vim命令请自行换成vi。
[root@localhost ~]# yum install vim
3:配置静态IP
使用root用户登录系统,编辑文件:
[root@localhost ~]# vim /etc/sysconfig/network-scripts/ifcfg-eno16777736
(文件名可能不同,只要是ifcfg-eno***的就是了)
编辑如下:
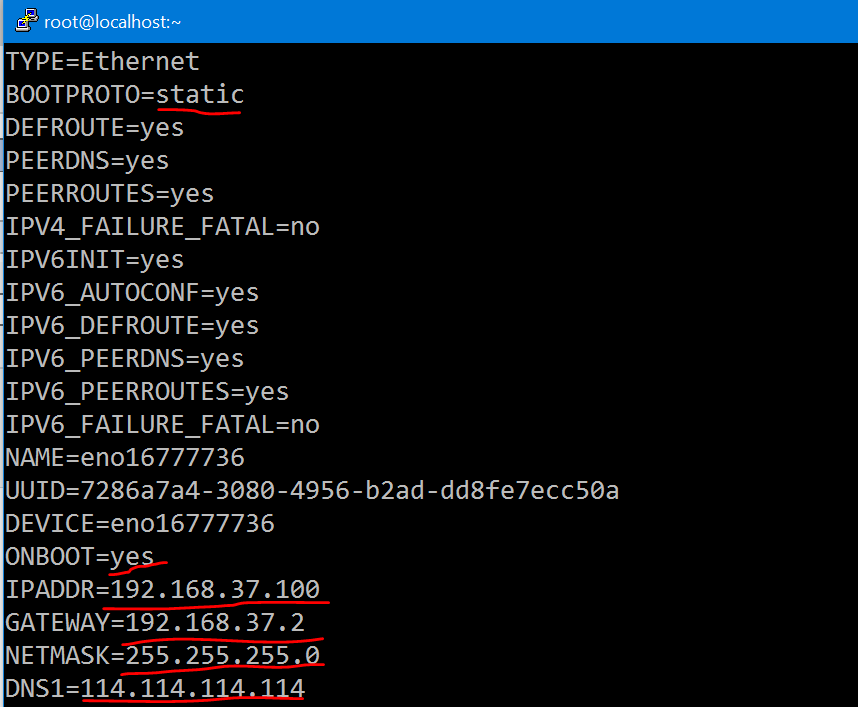
划红线的部分是修改或者新增的。
4:更新系统
[root@localhost ~]# yum update -y
5:禁用SELINUX,关闭防火墙
[root@localhost ~]# vim /etc/sysconfig/selinux

[root@localhost ~]# systemctl stop firewalld.service
[root@localhost ~]# systemctl disable firewalld.service
6:安装依赖包,这一步比较关键:
[root@localhost ~]# yum install gcc make binutils gcc-c++ compat-libstdc++-33 elfutils-libelf-devel elfutils-libelf-devel-static ksh libaio libaio-devel numactl-devel sysstat unixODBC unixODBC-devel pcre-devel –y
7:添加oracle用户和组
[root@localhost ~]# groupadd oinstall
[root@localhost ~]# groupadd dba
[root@localhost ~]# useradd -g oinstall -G dba oracle
[root@localhost ~]# passwd oracle
8:配置系统内核参数
[root@localhost ~]# vim /etc/sysctl.conf
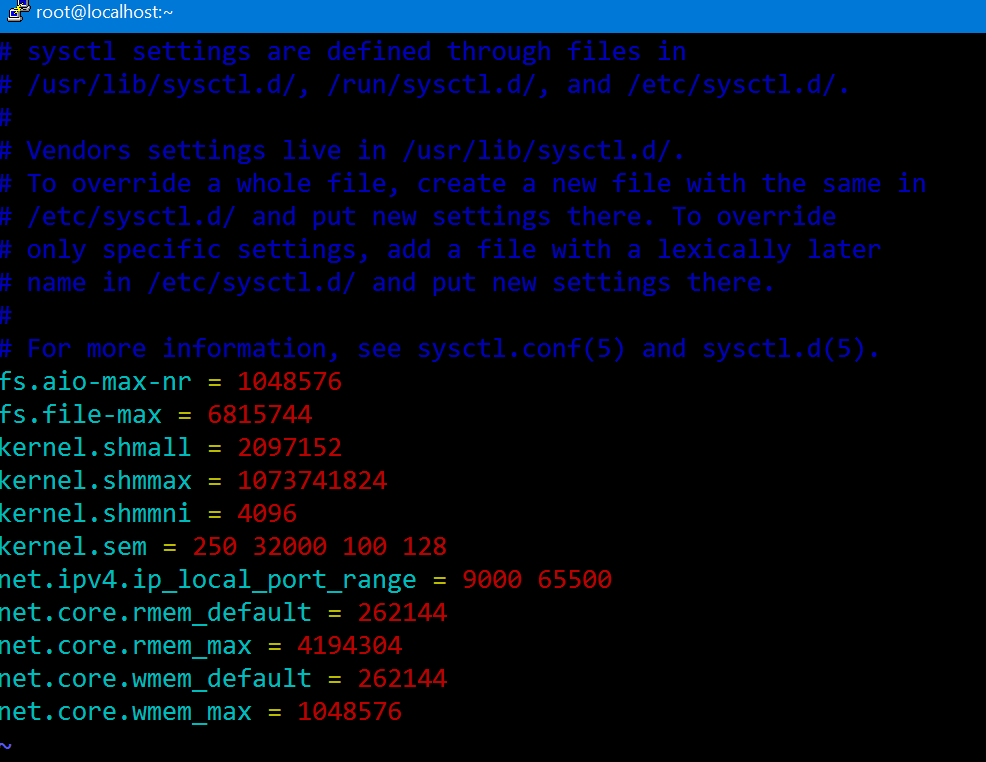
复制文本在此:
fs.aio-max-nr = 1048576
fs.file-max = 6815744
kernel.shmall = 2097152
kernel.shmmax = 1073741824
kernel.shmmni = 4096
kernel.sem = 250 32000 100 128
net.ipv4.ip_local_port_range = 9000 65500
net.core.rmem_default = 262144
net.core.rmem_max = 4194304
net.core.wmem_default = 262144
net.core.wmem_max = 1048576
修改完成后执行命令使配置生效:
[root@localhost ~]# sysctl -p
9:修改用户限制:
[root@localhost ~]# vim /etc/security/limits.conf
文件末尾增加:
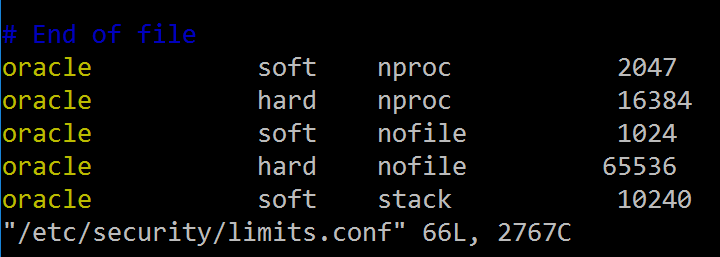
复制文本在此:
oracle soft nproc 2047
oracle hard nproc 16384
oracle soft nofile 1024
oracle hard nofile 65536
oracle soft stack 10240
10:修改 /etc/pam.d/login 文件:
[root@localhost ~]# vim /etc/pam.d/login
文件末尾增加:
![]()
复制文本在此:
session required /lib64/security/pam_limits.so
session required pam_limits.so
11:修改~/.bash_profile文件
很多文章写的是修改/etc/profile文件,这里我修改oracle用户自己的环境变量配置文件:
[root@localhost ~]# su - oracle
[oracle@localhost ~]$ vim ~/.bash_profile
修改如下:

最后五行自行加入。复制文本在此:
export ORACLE_BASE=/data/oracle
export ORACLE_HOME=$ORACLE_BASE/product/11.2.0
export ORACLE_SID=orcl
export PATH=$ORACLE_HOME/bin:/usr/sbin:$PATH
export LD_LIBRARY_PATH=$ORACLE_HOME/lib:/lib:/usr/lib
(根据自己实际情况修改)
12:创建安装目录,设置权限:
[root@localhost ~]# mkdir -p /data/oracle/product/11.2.0
[root@localhost ~]# mkdir /data/oracle/oradata
[root@localhost ~]# mkdir /data/oracle/inventory
[root@localhost ~]# mkdir /data/oracle/fast_recovery_area
[root@localhost ~]# chown -R oracle:oinstall /data/oracle
[root@localhost ~]# chmod -R 775 /data/oracle
13:上传oracle安装文件到centos系统
可以用winscp从本地的windows上传,不细写了。上传解压后如下:
![]()
(修改了整个database文件夹的权限)
14:复制response文件夹下所有内容到home目录:
[oracle@localhost database]$ cp ./response/* ~/
15:编辑数据库安装的响应文件:

修改的内容如下:
oracle.install.option=INSTALL_DB_AND_CONFIG
ORACLE_HOSTNAME=192.168.37.100
UNIX_GROUP_NAME=oinstall
INVENTORY_LOCATION=/data/oracle/inventory
SELECTED_LANGUAGES=en
ORACLE_HOME=/data/oracle/product/11.2.0
ORACLE_BASE=/data/oracle
oracle.install.db.InstallEdition=EE
oracle.install.db.DBA_GROUP=dba
oracle.install.db.OPER_GROUP=dba
oracle.install.db.config.starterdb.type=GENERAL_PURPOSE
oracle.install.db.config.starterdb.globalDBName=orcl11g
oracle.install.db.config.starterdb.SID=orcl
oracle.install.db.config.starterdb.characterSet=AL32UTF8
oracle.install.db.config.starterdb.memoryLimit=1024
oracle.install.db.config.starterdb.password.ALL=123456
oracle.install.db.config.starterdb.password.SYS=123456
oracle.install.db.config.starterdb.password.SYSTEM=123456
oracle.install.db.config.starterdb.password.SYSMAN=123456
oracle.install.db.config.starterdb.password.DBSNMP=123456
oracle.install.db.config.starterdb.storageType=FILE_SYSTEM_STORAGE
oracle.install.db.config.starterdb.fileSystemStorage.dataLocation=/data/oracle/oradata
oracle.install.db.config.starterdb.fileSystemStorage.recoveryLocation=/data/oracle/fast_recovery_area
SECURITY_UPDATES_VIA_MYORACLESUPPORT=false
DECLINE_SECURITY_UPDATES=true
上面列出的各项按照配置修改,有其他文章写的修改项要少很多,我试过,安装后会出问题,登陆数据库提示TNS-12547: TNS:lost contact。不知为什么,所以还是上面列出的都配置完整吧。
密码用的最简单的安装时会有警告,可以自己设置高强度的密码。
16:静默安装数据库并创建数据库
[oracle@localhost database]$ ./runInstaller -silent -ignorePrereq -responseFile ~/db_install.rsp
这过程可能会提示.oui,unzip没权限的问题,执行chmod u+x /文件位置 后,再执行上面的命令就可以
安装完成会提示
The following configuration scripts need to be executed as the "root" user.
#!/bin/sh
#Root scripts to run
/data/oracle/inventory/orainstRoot.sh
/data/oracle/product/11.2.0/db_1/root.sh
To execute the configuration scripts:
1. Open a terminal window
2. Log in as "root"
3. Run the scripts
4. Return to this window and hit "Enter" key to continue
Successfully Setup Software.
新开一个终端,使用root登录执行上述脚本即可:
[root@localhost ~]# /data/oracle/inventory/orainstRoot.sh
[root@localhost ~]# /data/oracle/product/11.2.0/db_1/root.sh
数据库软件安装完成,并且安装了一个实例名为orcl的数据库。
17:静默配置监听
[oracle@localhost ~]$ netca /silent /responsFile ~/netca.rsp
18:启动监听
[oracle@localhost ~]$ lsnrctl start
19:启动数据库
[oracle@localhost ~]$ sqlplus / as sysdba

静默安装数据库完成。
