

一. python基础知识
第一章.变量与判断语句
1.第一个python程序
#  -*- coding:utf-8 -*-
#  Author: Raymond

print  ("hello world")
print ("hello,raymond!")

输出:
hello world
hello,raymond!
2.变量的定义
#  -*- coding:utf-8 -*-
#  Author: Raymond

name = "raymond"
age = 23
long_name="zgfraymond"
# 8name,@age,name of san  ---数字、字母不能开头,不可以有空格!!!
print(name, age,long_name)
上述代码声明了各种数据类型的变量
变量定义的规则:
- 变量名只能是字母、数字或下划线的任意组合
- 变量名的第一个字符不能是数字
- python代码语句中的关键字不可以做变量
- 以下关键字不能声明变量
- ['and', 'as', 'assert', 'break', 'class', 'continue', 'def', 'del', 'elif', 'else', 'except', 'exec', 'finally', 'for', 'from', 'global', 'if', 'import', 'in', 'is', 'lambda', 'not', 'or', 'pass', 'print', 'raise', 'return', 'try', 'while', 'with', 'yield']
3.字符编码
在Linux中,python解释器在加载 .py 文件中的代码时,会对内容进行编码(默认ascill),如果是如下代码的话:
报错:ascii码无法表示中文
#!/usr/bin/env python

print "你好,世界"
改正:应该显示的告诉python解释器,用什么编码来执行源代码,即:
#!/usr/bin/env python
# -*- coding: utf-8 -*-

print "你好,世界"
4.代码注释
当行注释:#被注释的内容(单行注释最多不超过80个字符)
多行注释:"""被注释的内容""" 或 '''被注释的内容'''
5.格式化字符串
#  -*- coding:utf-8 -*-
#  Author: Raymond

name = input("What is your name?-->:")
print("Hello" + name)
格式化输出示例:
#  -*- coding:utf-8 -*-
#  Author: Raymond

name = input("input your name:")
age = int(input("input your age:"))   #input默认输出是字符串,int使其由字符串转化为整型。
job = input("input your job:")

msg= '''
Infomation of user %s
----------------------------------------
name:  raymond     %s
age:   30          %d
job:   Engineer    %s

-----------------End--------------------

'''   % (name,name,age,job)
print(msg)


输出结果:
input your name:aaa
input your age:33
input your job:cto

Infomation of user aaa
----------------------------------------
name:  raymond     aaa
age:   30          33
job:   Engineer    cto

-----------------End--------------------
6.常用模块初识
- getpass模块
#  -*- coding:utf-8 -*-
#  Author: Raymond

import getpass
# 以下代码在PyCharm测试无法通过,linux测试通过
username = input("username:")
password = getpass.getpass("password:")

print(username,password)
- os模块
#  -*- coding:utf-8 -*-
#  Author: Raymond

import os

os.system ("df -h")   #命令执行正确返回0,执行错误返回非0 .
os.mkdir("yourdir")
cmd_res = os.popen("df -h").read()
- sys模块
#  -*- coding:utf-8 -*-
#  Author: Raymond

import sys

print(sys.path)
- Linux系统python tab 补全


import sys
import readline
import rlcompleter

if sys.platform == 'darwin' and sys.version_info[0] == 2:
    readline.parse_and_bind("bind ^I rl_complete")
else:
    readline.parse_and_bind("tab: complete")  # linux and python3 on mac

for mac
#!/usr/bin/env python
# python startup file
import sys
import readline
import rlcompleter
import atexit
import os
# tab completion
readline.parse_and_bind('tab: complete')
# history file
histfile = os.path.join(os.environ['HOME'], '.pythonhistory')
try:
    readline.read_history_file(histfile)
except IOError:
    pass
atexit.register(readline.write_history_file, histfile)
del os, histfile, readline, rlcompleter

for Linux
7.基本的if判断和if else语句
#  -*- coding:utf-8 -*-
#  Author: Raymond

user = "raymond"
passwd = "123456"

username = input("username:")
password = input("password:")

if user == username and  passwd == password :
     print("welcome login....")
else :
    print("Invalid user or password")
简单if elif 判断
#  -*- coding:utf-8 -*-
#  Author: Raymond

age = 22

guess_num = int(input("input your guess num:"))
if guess_num == age :
    print("Congratulations!you got it")
elif guess_num > age :
    print("think smaller !")
else :
    print("Think Big !")
8.猜年龄游戏
#  -*- coding:utf-8 -*-
#  Author: Raymond


age = 22
for i in range(5):
    guess_num = int(input("input your guess num:"))
    if guess_num == age :
        print("Congratulations!you got it")
        break       #代码执行到此处,跳出整个循环!
    elif guess_num > age :
        print("think smaller !")
    else :
        print("Think Big !")
else :
    print("今天尝试最多5次,明天继续!")
9.for循环语句
#  -*- coding:utf-8 -*-
#  Author: Raymond

for i in range(10):
    print("loop:", i )

输出结果:
loop: 0
loop: 1
loop: 2
loop: 3
loop: 4
loop: 5
loop: 6
loop: 7
loop: 8
loop: 9

for i in range(10):
    if i<5:
        continue #不往下走了,直接进入下一次loop
    print("loop:", i )


for i in range(10):
    if i>5:
        break    #不往下走了,直接跳出整个loop
    print("loop:", i )
10.作业需求
登陆认证:
#  -*- coding:utf-8 -*-
#  Author: Raymond

user = "raymond"
passwd = "123456"

for i in range(5) :
    username = input("username:")
    password = input("password:")
    if user == username and passwd == password:
        print("欢迎登陆")
        break
    elif user != username or passwd != password:
        print("用户名或密码无效")
else :
    print("今天最多尝试5次,明天继续!")
三级菜单:
第二章.数据类型与列表
1.pyc是个什么鬼
2.常用数据类型
3.列表的语法和使用
列表是我们以后最常用的数据类型之一,通过列表可以对数据实现最方便的存储、修改等操作
# python 13期 day1

names = ["Alex", "Tenglan", "Eric", "Rain", "Tom", "Amy"]

#列表取值
print(names[0])
print(names[2])
print(names[-1])
print(names[-2])
#切片:取多个元素
print("取下标1至下标4之间的数字,包括1,不包括4 :",names[1:4])  #取下标1至下标4之间的数字,包括1,不包括4
print(names[1:-1])  #取下标1至-1的值,不包括-1
print(names[0:3])   #取下标1至下标4之间的数字,包括1,不包括4
print(names[:3])    #如果是从头开始取,0可以忽略,跟上句效果一样
print(names[3:])    #如果想取最后一个,必须不能写-1,只能这么写
print(names[3:-1])  #这样-1就不会被包含了
print(names[0::2])  #后面的2是代表,每隔一个元素,就取一个
print(names[::2])   #和上句效果一样
#追加
names.append("新来的")
print(names)
#插入
names.insert(2,"从Eric前面插入")
print(names)
names.insert(4,"从Eric后面插入")
print(names)
#修改
names[2] = "换人了"
print(names)
#按列表下标删除
del names[2]
print(names)
del names[4]
print(names)
#用指定方法删除
names.remove("Eric")  #删除指定元素
print(names)
names.pop()  #删除列表最后一个值
print(names)
#扩展
names = ['Alex', 'Tenglan', 'Rain', 'Tom', 'Amy']
b = [1,2,2,2,3]
names.extend(b)
print(names)
#拷贝
name_copy = names.copy()
print(name_copy)
#统计
a = names.count(2)
print(a)
#排序&反转
names = ['Alex', 'Tenglan', 'Rain', 'Tom', 'Tom','Amy']
names.sort()
print(names)

names.reverse()  #反转排序
print(names)
#获取下标
names = ['Alex', 'Tenglan', 'Rain', 'Tom', 'Tom','Amy']
a = names.index('Tom')      #只返回找到的第一个元素下标
print(a)
4. 元组的使用
元组其实跟列表差不多,也是存一组数,只不是它一旦创建,便不能再修改,所以又叫只读列表
语法:
names = ("alex","jack","eric")
它只有2个方法,一个是count,一个是index,完毕。
5.字符串常用操作
name.capitalize()  首字母大写
name.casefold()   大写全部变小写
name.center(50,"-")  输出 '---------------------Alex Li----------------------'
name.count('lex') 统计 lex出现次数
name.encode()  将字符串编码成bytes格式
name.endswith("Li")  判断字符串是否以 Li结尾
 "Alex\tLi".expandtabs(10) 输出'Alex      Li', 将\t转换成多长的空格
 name.find('A')  查找A,找到返回其索引, 找不到返回-1

format :
    >>> msg = "my name is {}, and age is {}"
    >>> msg.format("alex",22)
    'my name is alex, and age is 22'
    >>> msg = "my name is {1}, and age is {0}"
    >>> msg.format("alex",22)
    'my name is 22, and age is alex'
    >>> msg = "my name is {name}, and age is {age}"
    >>> msg.format(age=22,name="ale")
    'my name is ale, and age is 22'
format_map
    >>> msg.format_map({'name':'alex','age':22})
    'my name is alex, and age is 22'


msg.index('a')  返回a所在字符串的索引
'9aA'.isalnum()   True

'9'.isdigit() 是否整数
name.isnumeric
name.isprintable
name.isspace
name.istitle
name.isupper
 "|".join(['alex','jack','rain'])
'alex|jack|rain'


maketrans
    >>> intab = "aeiou"  #This is the string having actual characters.
    >>> outtab = "12345" #This is the string having corresponding mapping character
    >>> trantab = str.maketrans(intab, outtab)
    >>>
    >>> str = "this is string example....wow!!!"
    >>> str.translate(trantab)
    'th3s 3s str3ng 2x1mpl2....w4w!!!'

 msg.partition('is')   输出 ('my name ', 'is', ' {name}, and age is {age}')

 >>> "alex li, chinese name is lijie".replace("li","LI",1)
     'alex LI, chinese name is lijie'

 msg.swapcase 大小写互换


 >>> msg.zfill(40)
'00000my name is {name}, and age is {age}'


>>> n4.ljust(40,"-")
'Hello 2orld-----------------------------'
>>> n4.rjust(40,"-")
'-----------------------------Hello 2orld'


>>> b="ddefdsdff_哈哈"
>>> b.isidentifier() #检测一段字符串可否被当作标志符,即是否符合变量命名规则
True
示例:
1. 移除空格
#  -*- coding:utf-8 -*-
#  Author: Raymond

username = input("user:")
if username.strip() == " raymond" :  #strip()函数去掉字符串两边的空格
    print("welcome")
2. 分割
#  -*- coding:utf-8 -*-
#  Author: Raymond

names = "alex, jack,rain"
name = names.split(",")   #spilt(",")函数用逗号拆开,并合并成列表。
print(name)
print("|".join(name))

输出结果:
['alex', ' jack', 'rain']
alex| jack|rain
3. 长度
#  -*- coding:utf-8 -*-
#  Author: Raymond

names = "raymond"
print(len(names))   #len(string) 表示字符串长度,并从1开始计数

输出结果:7
4. 索引
#  -*- coding:utf-8 -*-
#  Author: Raymond

names = "raymond abc"
print("m" in names)     #表示字符m是否在names字符串中,在为true,不在为false
print(names.find('m'))  #返回字符串的索引(下标)
print(names.find('n'))


输出结果:
True
3
5
5. 切片
#  -*- coding:utf-8 -*-
#  Author: Raymond

names = "raymond abc"
print( names[2:4])     #从下标2开始,不包括下标4的字符

输出结果: ym
6. 格式化
#  -*- coding:utf-8 -*-
#  Author: Raymond

msg = "Hello,{name},I'm {age}"    #从下标2开始,不包括下标4的字符
msg1 = msg.format(name="raymond" , age=30)
print(msg1)

msg = "aaa{0},bbb{1}"
print(msg.format("raymond",30))


输出结果:
Hello,raymond,I'm 30
aaaraymond,bbb30
7.其他
#  -*- coding:utf-8 -*-
#  Author: Raymond

age = input("your age:")
if age.isdigit():     #判断输入是否为数字
    age = int(age)
else :
    print("无效的数据类型")

a = "raymond234ABC"
b = "raymond234$%abc"
print(a.isalnum())             #判断字符串是否有特殊字符,无为True
print(b.isalnum())             #有为False
print(a.startswith("ray"))   #是否以ray字符串开始
print(a.endswith("bc"))      #是否以bc字符串结束
print(a.upper())               #把字符串转为大写
print(a.lower())               #把字符串转为小写
6.数据运算
7.海枯石烂死循环
无限循环:
count = 0
while True:
    print("你是风儿我是沙,缠缠绵绵到天涯...",count)
    count +=1
循环100次退出:
count = 0
while True:
    print("你是风儿我是沙,缠缠绵绵到天涯...",count)
    count +=1
    if count == 100:
        print("去你妈的风和沙,你们这些脱了裤子是人,穿上裤子是鬼的臭男人..")
        break
8.NB数据类型之字典的使用
字典一种key - value 的数据类型,使用就像我们上学用的字典,通过笔划、字母来查对应页的详细内容。
- dict是无序的
- dict不可重复
dict的普通用法:
>>> dict = {
...     "001":{
...         "name": "aaa",
...         "age" : "24",
...         "addr": "北京",
...     },
...     "002":{
...         "name": "bbb",
...         "age" : "26",
...         "addr": "天津",
...     },
...     "003":{
...         "name": "ccc",
...         "age" : "28",
...         "addr": "上海",
...     },
...
... }
>>> print(dict)
{'001': {'name': 'aaa', 'age': '24', 'addr': '北京'}, '002': {'name': 'bbb', 'age': '26', 'addr': '天津'}, '003': {'name': 'ccc', 'age': '28', 'addr': '上海'}}
>>> print(dict.items())
dict_items([('001', {'name': 'aaa', 'age': '24', 'addr': '北京'}), ('002', {'name': 'bbb', 'age': '26', 'addr': '天津'}), ('003', {'name': 'ccc', 'age': '28', 'addr': '上海'})])
>>> print(dict.keys())
dict_keys(['001', '002', '003'])
>>> print(dict.values())
dict_values([{'name': 'aaa', 'age': '24', 'addr': '北京'}, {'name': 'bbb', 'age': '26', 'addr': '天津'}, {'name': 'ccc', 'age': '28', 'addr': '上海'}])
>>> "002" in dict     #判断是否有此key值
True
>>> print(dict.setdefault("003"))         #如果存在key值"003" ,输出对应值
{'name': 'ccc', 'age': '28', 'addr': '上海'}
>>> print(dict.setdefault("004"))       #如果不存在key值,生成此key值,并返回value值为None
None
>>> print(dict)
{'001': {'name': 'aaa', 'age': '24', 'addr': '北京'}, '002': {'name': 'bbb', 'age': '26', 'addr': '天津'}, '003': {'name': 'ccc', 'age': '28', 'addr': '上海'}, '004': None}
dict 的特殊用法:
>>> a=dict.fromkeys([1,2,34,4,5,6],"aaa") #把列表中数字分别作为key值与aaa值对应,生成一个新的字典
>>> print(a)
{1: 'aaa', 2: 'aaa', 34: 'aaa', 4: 'aaa', 5: 'aaa', 6: 'aaa'}
>>> dict.update(a)     #把字典a中的键值对添加到字典dict中,dict项元素是上个代码段中的示例
>>> print(dict)
{'001': {'name': 'aaa', 'age': '24', 'addr': '北京'}, '002': {'name': 'bbb', 'age': '26', 'addr': '天津'}, '003': {'name': 'ccc', 'age': '28', 'addr': '上海'}, '004': None, 1: 'aaa
', 2: 'aaa', 34: 'aaa', 4: 'aaa', 5: 'aaa', 6: 'aaa'}
>>> print(dict.popitem())    #随机删除一个字典项
(6, 'aaa')
>>> print(dict)
{'001': {'name': 'aaa', 'age': '24', 'addr': '北京'}, '002': {'name': 'bbb', 'age': '26', 'addr': '天津'}, '003': {'name': 'ccc', 'age': '28', 'addr': '上海'}, '004': None, 1: 'aaa
', 2: 'aaa', 34: 'aaa', 4: 'aaa', 5: 'aaa'}
>>> print(dict.get('001'))     #若key值存在字典中,返回字典中key对应的值
{'name': 'aaa', 'age': '24', 'addr': '北京'}
>>> print(dict.get(6,"bbb"))  #若key值不存在字典中,则返回default值,默认为None
bbb
>>> print(dict.get(6))
None
>>> print(dict.pop(5))  #和get方法相似,如果字典中存在key值,删除并返回key对应的values
aaa
>>> print(dict)
{'001': {'name': 'aaa', 'age': '24', 'addr': '北京'}, '002': {'name': 'bbb', 'age': '26', 'addr': '天津'}, '003': {'name': 'ccc', 'age': '28', 'addr': '上海'}, '004': None, 1: 'aaa
', 2: 'aaa', 34: 'aaa', 4: 'aaa'}
>>> print(dict.pop(6))    # #和get方法相似,如果字典中不存在key值,且没有给出default值时,则引发keyerror异常
Traceback (most recent call last):
  File "<stdin>", line 1, in <module>
KeyError: 6
dict的循环用法:
#方法1
for key in dict:           #效率高,适用于大数据量
    print(key,dict[key])

#方法2
for k,v in dict.items(): #会先把dict转成list,数据里大时莫用
    print(k,v)
9.完美购物作业需求
功能要求和基础要求:1、启动程序后,输入用户名密码后,让用户输入工资,然后打印商品列表
2、允许用户根据商品编号购买商品
3、用户选择商品后,检测余额是否够,够就直接扣款,不够就提醒
4、可随时退出,退出时,打印已购买商品和余额
5、在用户使用过程中, 关键输出,如余额,商品已加入购物车等消息,需高亮显示 扩展需求:
- 用户下一次登录后,输入用户名密码,直接回到上次的状态,即上次消费的余额什么的还是那些,再次登录可继续购买
- 允许查询之前的消费记录
10.完美购物车程序练习
#  -*- coding:utf-8 -*-
#  Author: Raymond

salary = input("请您输入账户金额:")
if salary.isdigit():
    salary = int(salary)
else:
    exit("无效数据类型")
welcome_msg = '欢迎您来到商品购物中心'.center(50,'-')
print(welcome_msg)

exit_flag = False
product_list = [
    ('苹果手机',5888),
    ('戴尔电脑',8000),
    ('Mac pro',9000),
    ('风衣',899),
    ('咖啡',30),
    ('奶茶',18),
    ('自行车',800),
    ('上衣',200),]

shop_car = []
while exit_flag is not True:
    print("商品列表如下".center(50,'-'))
    for item in enumerate(product_list):
        index = item[0]
        p_name = item[1][0]
        p_price = item[1][1]
        print(index,'.',p_name,p_price)
    user_choice = input("[q=quit,c=check]请选择商品的ID号即可购买:-->")
    if user_choice.isdigit():   #选择商品
        user_choice = int(user_choice)
        if user_choice < len(product_list):
            p_item = product_list[user_choice]
            if  p_item[1] <= salary: #买的起
                shop_car.append(p_item)  #放入购物车
                salary -= p_item[1]   #扣款
                print("[%s]已购买,您的当前余额为: \033[31;1m[%s]\033[0m" %(p_item,salary))
            else:
                print("您的余额为: \033[31;1m[%s]\033[0m , 无法支付此件商品!" %salary)

    else:
        if  user_choice=='q' or  user_choice=='quit':
            print("已购买商品列表如下:".center(40,'*'))
            for item in shop_car:
                print(item)
            print("END".center(40,'*'))
            print("您的余额为: \033[31;1m[%s]\033[0m" %salary)

            exit_flag = True
        elif user_choice =='c' or user_choice=='quit':
            print("已购买商品列表如下:".center(40, '*'))
            for item in shop_car:
                print(item)
            print("END".center(40, '*'))
            print("您的余额为: \033[31;1m[%s]\033[0m" % salary)
第三章.集合、函数与文件操作
1.set集合
总结:
- 列表:有序,可重复的; 例:[1,2,2,3,4 ]
- 元组:有序,不可重复的; 例:(1,2,3,4 )
- 字典:无序,key值不可重复,values值可重复; 例: {"name" : "raymond", "age" : 24,"addr" : "内蒙"}
- 集合:无序,不可重复的序列;例: {"123","456","789"}
创建:
s = set()            #创建一个空列表
print(s,type(s))
#输出结果:set() <class 'set'>

li = [11,22,22,33,44]
s1 = set(li)            #把列表转为集合,输出结果去掉重复元素
print(s1,type(s1))
#输出结果:{33, 11, 44, 22} <class 'set'>
添加:
s = set()
print(s)
s.add(123)   #只能添加一个元素
print(s)

输出结果:
set()
{123}
****************************************************************************
li = [11,22,33]
s.update(li)  #b把li列表中的元素批量添加到s集合中
print(s)

输出结果:{11, 33, 123, 22}
****************************************************************************
s1 = s.copy()  #复制集合s到s1
print("复制:", s1)
s1.clear()     #清空结合s1
print("清空:", s1)

输出结果:
复制: {11, 33, 123, 22}
清空: set()
差集:
s1 = {11,22,33,44}         #差集
s2 = {22,33,44,55}
s3 = s1.difference(s2)  #s1中存在,s2中不存在的元素
s4 = s2.difference(s1)  #s2中存在,s1中不存在的元素
print(s3,s4)

输出结果:
{11} {55}
#######################################################################
a = s1.symmetric_difference(s2)    #把s1,s2集合中共同存在的元素去掉后所组成的集合
print(a)

输出结果:
{11,55}
########################################################################
s1.difference_update(s2)       #把s1中存在,s2中不存在的集合更新到s1集合中
print(s1)

输出结果:
{11}
########################################################################
s1.symmetric_difference_update(s2)    #把s1,s2集合中共同存在的元素去掉后所组成的集合更新到s1集合中
print(s1)

输出结果:
{33, 11, 44, 22, 55}
移除:
s1 = {11,22,33,44}
s1.discard(55)   #删除项不存在,还保留原集合,不报错。
print(s1)
s1.discard(44)   #只能删除一个元素
print(s1)

#s1.remove(55)    #移除元素不存在,引发 KeyError: 55 错误!

ret = s1.pop()   #随机移除任一个元素
print(ret)       #把移除的元素打印出来
print(s1)
交、并集:
s1 = {11,22,33,44}
s2 = {22,33,44,55}

s3 = s1.union(s2)    #求并集
print(s3)
#################################################################################
s3 = s1.intersection(s2)     #取交集
print(s3)
#################################################################################
s1.intersection_update(s2)   #取交集并更新到s1中
print(s1)
#################################################################################
s1.isdisjoint(s2)    #判断是否有交集,如果没有交集,返回 True; 否则返回False
#################################################################################
s1 = {11,22,33,44}
s2 = {22,33,44}
s1.issubset(s2)      #是否是子序列
s1.issuperset(s2)    #是否是父序列
2.set集合练习题
3.set集合练习题实现
4.函数之初识函数
- def关键字,创建函数
- 函数名()
- 函数体
- 返回值
格式:def f1():
pass
f1()
5.函数之函数的返回值
示例如下:
def f1():            #函数定义后不执行
    print("hello")
    return "end"     #在函数中,一旦执行return,函数执行过程立即终止;没有return,函数默认返回None
    print("raymond") #永远不会执行

r = f1()            #函数调用时开始执行
print(r)

输出结果:
hello
end
6.函数之基本参数和动态参数
##########################################################################################
def sendmail(name):                   #name为形式参数,类似一个变量
    print(name)
    return "end"
ret = sendmail("raymond")         #raymond为实际参数,传递给name参数,类似给name赋一个值
print

输出结果:
raymond
end
##########################################################################################
def send(email,content,status):       # 形式参数(对应参数)
    print(email,content,status)
    print("发送邮件成功",email,content)
    return  True
while True:
    em = input("请输入邮箱地址:")
    result = send(em,"hello","ok")     # 三个实际参数对应第一行的三个形式参数
    if result == True:
        print("发送成功")
        break
    else:
        print("发送失败")

输出结果:
请输入邮箱地址:zgf@163.com
zgf@163.com hello ok
发送邮件成功 zgf@163.com hello
发送成功
###########################################################################################
def send(email,content,status="ok"):      # 默认参数
    print(email,content,status)
    print("发送邮件成功",email,content)
    return  True
while True:
    em = input("请输入邮箱地址:")
    result = send(em,"hello","abc") #第三个实际参数"abc"替代了形式参数的"ok";去掉"abc"后,只传递前两个实际参数,第三个默认为"ok"
    if result == True:
        print("发送成功")
        break
    else:
        print("发送失败")

输出结果:
请输入邮箱地址:zgf@163.com
zgf@163.com hello abc
发送邮件成功 zgf@163.com hello
发送成功
###########################################################################################
def send(email,content):          # 指定参数
    print(email,content)
    return True

send(content="raymond",email="zgf@163.com")

输出结果:
zgf@163.com raymond
###########################################################################################
总结:
普通参数:严格按照顺序,将实际参数赋值给形式参数
默认参数:必须放置在参数列表的最后
指定参数:把实际参数赋值给指定的形式参数参数
*args   :默认将传入的参数,全部放置在元组中
*kwargs :默认将传入的参数,全部放置在字典中
*args,*kwargs :万能参数
###########################################################################################
def f1(*args):              # *args可接受n个实参传递,args代表一个元组
    print(args,type(args))
f1(11,22,"raymond","zgf")

输出结果:
(11, 22, 'raymond', 'zgf') <class 'tuple'>
############################################################################################
def f1(*args):
    print(args,type(args))
f1(11)
li = [11,22,"hello","zgf"]     #定义一个li列表
f1(li,'12')       #把列表当一个元素传递给元组
f1(*li)           #把li列表中每个元素传递后成为元组的每个元素

li="raymond"
f1(*li)           #带*的把要传递的每个元素for循环后传递

输出结果:
(11,) <class 'tuple'>
([11, 22, 'hello', 'zgf'], '12') <class 'tuple'>
(11, 22, 'hello', 'zgf') <class 'tuple'>
('r', 'a', 'y', 'm', 'o', 'n', 'd') <class 'tuple'>
############################################################################################
def f1(**kwargs):       # 两个**代表字典类型,传递k,v两个值
    print(kwargs,type(kwargs))
f1(n1="raymond",n2=18)  # n1,n2代表key值,后面代表values,传递给形参kwargs后形成一个字典

dic = {'k1':'v1','k2':'v2'}
f1(**dic)               # 把dic字典中每一个元素赋值给kwargs,本质上还是生成原来的dic字典

输出结果:
{'n1': 'raymond', 'n2': 18} <class 'dict'>
{'k1': 'v1', 'k2': 'v2'} <class 'dict'>
############################################################################################
def f1(*args,**kwargs):      #万能参数
    print(args)
    print(kwargs)
f1(11,22,33,44,k1="v1",k2="v2")

输出结果:
(11, 22, 33, 44)
{'k1': 'v1', 'k2': 'v2'}
7.利用动态参数实现format功能
# str.format用于字符串格式化输出,还有一种 %s,%d的格式化方式
s1 = "I am {0},age{1}".format("raymond",35)
print(s1)
s2 = "I am {0},age{1}".format(*["raymond",30])
print(s2)
s3 = "I am {a},age{b}".format(a="zgf",b=33)
print(s3)

dict = {"name":"zgfraymond","age":23}
s4 = "I am {name},age{age}".format(**dict)
print(s4)

输出结果:
I am raymond,age35
I am raymond,age30
I am zgf,age33
I am zgfraymond,age23
8.函数之内容补充
def f1(a1,a2):   # 函数f1指针先开辟第一个a1+a2的内存空间,然后又指向第二个a1*a2的空间。所以实参传递到第二个f1函数
    return a1+a2
def f1(a1,a2):
    return a1*a2
ret = f1(8,8)
print(ret)

输出结果:
64
###########################################################################################
def f1(a1):
    a1.append(999)
    print(a1)
li = [11,22,33,44]
f1(li)            #函数传递的值是一个引用
print(li)

输出结果:
[11, 22, 33, 44, 999]
[11, 22, 33, 44, 999]
###########################################################################################
全局变量,所有作用域都可读,
对全局变量进行重新赋值,需要: global 变量名="新值"
特殊变量:列表,字典,可修改,不可重新赋值。
NAME = "raymond"
def f1():
    age = 32
    global NAME      #重新声明下面的name变为全局变量
    NAME = "ZGF"
    print(age,NAME)#

def f2():
    age =20
    print(age,NAME)

f1()
f2()

输出结果:
32 ZGF
20 ZGF
9.实例:函数式编程实现登陆和注册
10.三元运算及lambda表达式
if 1==1:         #这段代码等价于:name="zgf" if 1==1 else "raymond" ,if 条件为真,执行前面;为假,执行后面。
    name = "zgf"
else:
    name = "raymond"
###########################################################################################
def f1(a1):         #a1表示f2函数的参数,a1+100表示函数体,还可传两个参数a1,a2
    return a1+100
f2 = lambda a1,a2:a1+a2+100
r2 = f2(9,19)
print(r2)

输出结果:
128
11.内置函数
python内置函数如下图:
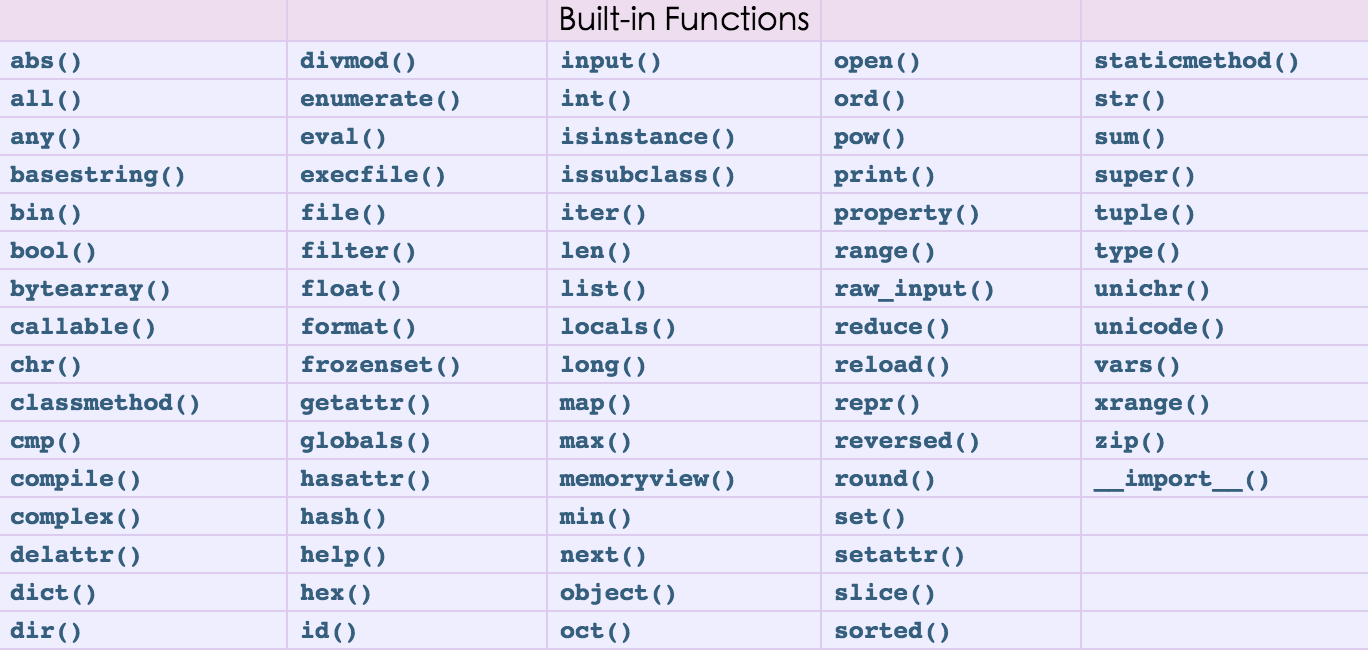
# abs()取绝对值
n = abs(-1)
print(n)

输出结果:1
###########################################################################################
# all(),any(),bool()
print(bool(""))     # false值有:0,None,"",[ ],( )

n1 = all([1,2,3])  #all()函数包含一个可迭代的参数,里面每个元素为真,则为真;有一个为假,则为假
n2 = all([0,1,2,3])
print(n1,n2)

n3 = any([[],0,"",None])  # any()函数里有一个元素为真,则为真;否则为假
n4 = any([[],0,"",None,1])
print(n3,n4)

# 输出结果:
False
True False
False True
###########################################################################################
# bin(),oct(),hex()
print(bin(10))  # 转为二进制
print(oct(10))  # 转为八进制
print(hex(10))  # 转为十六进制

输出结果:
0b1010
0o12
0xa
###########################################################################################
# bytes()   *****   均转为16进制字节码
# utf-8编码:一个汉字占三个字节;gbk编码:一个汉字占二个字节
s = "张三"
n = bytes(s,encoding="utf-8")
print(n)
n = bytes(s,encoding="gbk")
print(n)

输出结果:
b'\xe5\xbc\xa0\xe4\xb8\x89'
b'\xd5\xc5\xc8\xfd'
###########################################################################################
# str()   把字节转化为字符串,同时要以同样编码类型反编回字符串
s = str(bytes("张三",encoding="utf-8"),encoding="utf-8")
print(s)

输出结果:张三
12.文件操作之打开模式
注:python中打开文件有两种方式,即:open(...) 和 file(...) ,本质上前者在内部会调用后者来进行文件操作,推荐使用 open。
打开文件时,需要指定文件路径和以何等方式打开文件,打开后,即可获取该文件句柄,日后通过此文件句柄对该文件操作。
打开文件的模式有:
- r, 只读模式(默认)。常用
- w,只写模式。【不可读;不存在则创建;存在则删除内容;】
- x, 只写模式。【不可读;不存在则创建;存在则报错;】
- a,追加模式。 【可读; 不存在则创建;存在则只追加内容;】
"+" 表示可以同时读写某个文件
- r+,可读写文件。【可读;可写;可追加】
- w+,写读
- x+,写读
- a+,同a
"U"表示在读取时,可以将 \r \n \r\n自动转换成 \n (与 r 或 r+ 模式同使用)
- rU
- r+U
"b"表示以字节方式处理二进制文件(如:FTP发送上传ISO镜像文件,linux可忽略,windows处理二进制文件时需标注)
- rb 或 r+b
- wb 或 w+b
- xb 或 x+b
- ab 或 a+b
- 注:以b方式打开时,读取到的内容是字节类型,写入时也需要提供字节类型
示例:
f = open('aaa','r',encoding="utf-8")  # 以只读方式打开文件
data = f.read()     # 操作文件,通过源码查看功能
print(data)         # 打印文件内容
f.close()           # 关闭文件

输出文件内容结果:
abcdef
zgf
###########################################################################################
with open('db') as f:   # 打开db文件,执行功能,完成后自动关闭
    data = f.read()
    print(data)

输出文件内容结果:
abcdef
zgf
###########################################################################################
文件打开方式不同,效果不同
f = open('db','r')  # r只读方式打开字符串格式文件; rb只读方式打开字节类型文件。以下都加b后同理。
f = open('db','w')  # 清空后只写
f = open('db','x')  # 文件存在报错;不存在,创建文件并只写内容
f = open('db','a')  # 原文件打开后追加
###########################################################################################
f = open("db","r+",encoding="utf-8")  # r+表示按每个字符读取,r+b表示按每个字节读取
data = f.read(1)
print(data)
print(f.tell())    # 获取当前指针位置,按每个字节计数,一个字符=3个字节
f.seek(3)          # 调整文件内指针位置,表示跳过一个字符后写入,按字节调整
f.write("222")     # 写入后,按当前指针位置开始向后覆盖
f.seek(f.tell())
print(f.tell())
f.close()
20.文件操作之文件操作功能
- f=open( ) 默认对文件对象进行内部循环,读取全部内容。
- f.read( ) 无参数,读文件全部内容;有参数b,按字节读取;无参数b,按字符读取。
- f.tell( ) 获取文件中当前指针位置(按字节计数)
- f.seek(3) 指针跳转到指定位置,本例跳到第3个字节处。(按字节跳转)
- f.write( ) 写数据。有b: 按字节写入;无b: 按字符写入。
- f.close( ) 关闭文件
- f.fileno( ) 文件描述符
- f.flush( ) 把写的内容强制刷新到硬盘
- f.truncate(size) 把指针后的字符都截断清空,只保留指针前面内容
逐行读取文件内容示例:
f = open("db","r+",encoding="utf-8")
for line in f:     #打开文件逐行读取内容
    print(line)
21.文件操作之with处理上下文
with open("db1") as f1,open("db2") as f2:   # 可同时打开几个文件
    pass            # 应用场景:可将文件1内容前几行写入文件2中
# ###########################################################################################
with open('db1','r',encoding="utf-8") as f1,open('db','w',encoding="utf-8") as f2:
    times = 0
    for line in f1:         # 功能描述:逐行读取db1文件内容,并把前10行内容写入db2文件中,最后跳出循环。
        times += 1
        if times <= 9:
            f2.write(line)   # 读取前10行
        else:
            break
22.本节作业

 浙公网安备 33010602011771号