

模块
模块
函数完成一个功能,其他代码用来调用,提供了代码的重用性和代码间的耦合。而对于一个复杂的功能来,可能需要多个函数才能完成(函数又可以在不同的.py文件中),n个.py 文件组成的代码集合就称为模块。
模块的类型
- 自定义模块
- 内置模块
- 开源模块
一、自定义dj模块
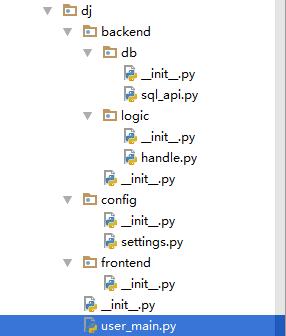
user_main.py文件内容
1 import sys
2 print(sys.path)  #全局环境变量
3 from backend.logic import handle  #导入backend.logic下的handle文件
4 handle.home()  #执行handle下的home函数
handle.py文件内容
 1 from backend.db.sql_api import select  #导入backend.db.sql_api下的select函数
 2
 3 def home():
 4     print("welcome to home page")
 5     q_data =  select("user",'ddd')  #执行select函数
 6     print("query res:",q_data)
 7 def movie():
 8     print("welcome to movie page")
 9 def tv():
10     print("welcome to tv page")
sql_api.py文件内容
 1 import sys
 2 import os
 3 base_dir = os.path.dirname(os.path.dirname(os.path.dirname(os.path.abspath(__file__))))  #获取dj的路径
 4 sys.path.append(base_dir)
 5 #print(__file__)  #打印当前程序的路径
 6 #print(os.path.abspath(__file__))  #当前绝对路径
 7 from config import settings
 8
 9 def db_auth(configs):
10     if configs.DATABASE["user"] == 'root' and configs.DATABASE["password"] == '123':
11         print("db authentication passed!")
12         return True
13     else:
14         print("db login error...")
15
16 def select(table,column):
17
18     if db_auth(settings):
19         if table == 'user':
20             user_info = {
21                 "001":['yoyo',22,'engineer'],
22                 "002": ['nima', 49, 'chef'],
23                 "003": ['nimei', 18, '13baoan'],
24             }
25             return user_info
settings.py文件
1 DATABASE = {
2     "engine":"mysql",
3     "host":"localhost",
4     "port":3306,
5     "user":"root",
6     "password":"123"
7 }
二、开源模块
安装和使用
开源模块的上传下载地址:https://pypi.python.org/pypi/
使用pip下载 c:\program files\python35\scripts>pip3.5.exe install openunipay
三、内置模块
1.pickle与json
用于序列化,两者的区别
- pickle:Python专有,Python数据类型转换,只能用于Python之间
- json:可用于任何语言之间的数据类型转换
pickle
一个文件进行序列化
import pickle
f = open("test.txt","wb")
info  = {
    "nima":"22",
    "nimei":"25"
}
print(pickle.dumps(info))
f.write(pickle.dumps(info))
f.close()
1 另一个文件进行反序列化
2 import pickle
3 f = open("test.txt","rb")
4 a = pickle.loads(f.read())
5 print(a)
6
7 #输出结果{'nima': '22', 'nimei': '25'}
json
1 f = open("test.txt","w")
2 info ={
3     "nima":"22",
4     "nimei":"25"
5 }
6 f.write(json.dumps(info))
7 f.close()
1 f = open("test.txt","r")
2 a = json.loads(f.read())
3 print(a)
2.shutil
高级的 文件、文件夹、压缩包 处理模块
import shutil
shutil.copyfileobj(fsrc, fdst[, length]),将文件内容拷贝到另一个文件中,可以部分内容
shutil.copyfile(src, dst),拷贝文件
shutil.copymode(src, dst),仅拷贝权限。内容、组、用户均不变
shutil.copystat(src, dst),拷贝状态的信息,包括:mode bits, atime, mtime, flags
shutil.copy(src, dst),拷贝文件和权限
shutil.copy2(src, dst),拷贝文件和状态信息
shutil.ignore_patterns(*patterns)
shutil.copytree(src, dst, symlinks=False, ignore=None),递归的去拷贝文件
shutil.rmtree(path[, ignore_errors[, onerror]]),递归的去删除文件
shutil.move(src, dst),递归的去移动文件
shutil.make_archive(base_name, format,...),创建压缩包并返回文件路径
例子:ret = shutil.make_archive("test", 'gztar', root_dir='/Users/administrator/Downloads/test')
3.hashlib
用于加密相关的操作,代替了md5模块和sha模块,主要提供 SHA1, SHA224, SHA256, SHA384, SHA512 ,MD5 算法
1 import hashlib
2
3 hash = hashlib.md5()
4 hash.update(b"admin")
5 print(hash.digest())   #二进制格式hash
6 print(hash.hexdigest())   #16进制格式hash
 1 hash = hashlib.sha1()
 2 hash.update(b'admin')
 3 print(hash.hexdigest())
 4
 5 hash = hashlib.sha256()
 6 hash.update(b'admin')
 7 print(hash.hexdigest())
 8
 9 hash = hashlib.sha384()
10 hash.update(b'admin')
11 print(hash.hexdigest())
12
13 hash = hashlib.sha512()
14 hash.update(b'admin')
15 print(hash.hexdigest())
hmac 模块,它内部对我们创建 key 和 内容 再进行处理然后再加密
1 import hmac
2 h = hmac.new(b"dongwushijie")
3 h.update(b"nihao")
4 print(h.hexdigest())
4.logging
日志记录模块
日志的级别
| Level | When it’s used |
|---|---|
DEBUG |
Detailed information, typically of interest only when diagnosing problems. |
INFO |
Confirmation that things are working as expected. |
WARNING |
An indication that something unexpected happened, or indicative of some problem in the near future (e.g. ‘disk space low’). The software is still working as expected. |
ERROR |
Due to a more serious problem, the software has not been able to perform some function. |
CRITICAL |
A serious error, indicating that the program itself may be unable to continue running. |
用法
1 import logging
2 logging.warning("aaaaaa")
3 logging.critical("ddddd")
4 #输出结果 WARNING:root:aaaaaa
5 #输出结果 CRITICAL:root:ddddd
把日志写入文件
把日志纪录级别设置为INFO,只有比日志是INFO或比INFO级别更高的日志才会被纪录到文件里
1 import logging
2 logging.basicConfig(filename="test.txt",level=logging.INFO)
3 logging.warning("aaaaaa")
4 logging.critical("ddddd")
为日志添加上时间
logging.basicConfig(format='%(asctime)s %(message)s',datefmt='%m/%d/%Y %I:%M:%S %p')
logging.warning("aaaaaa")
#输出结果  07/21/2016 10:40:10 AM aaaaaa
同时把log打印在屏幕和文件日志里
 1 #create logger
 2 logger = logging.getLogger('TEST-LOG')
 3 logger.setLevel(logging.DEBUG)
 4
 5
 6 # create console handler and set level to debug
 7 ch = logging.StreamHandler()
 8 ch.setLevel(logging.DEBUG)
 9
10 # create file handler and set level to warning
11 fh = logging.FileHandler("access.log")
12 fh.setLevel(logging.WARNING)
13 # create formatter
14 formatter = logging.Formatter('%(asctime)s - %(name)s - %(levelname)s - %(message)s')
15
16 # add formatter to ch and fh
17 ch.setFormatter(formatter)
18 fh.setFormatter(formatter)
19
20 # add ch and fh to logger
21 logger.addHandler(ch)
22 logger.addHandler(fh)
23
24 # 'application' code
25 logger.debug('debug message')
26 logger.info('info message')
27 logger.warn('warn message')
28 logger.error('error message')
29 logger.critical('critical message')
5.time
 1 import time
 2 print (time.time())
 3 print (time.mktime(time.localtime()))
 4 print (time.gmtime())
 5 print (time.localtime())
 6 print (time.strptime('2014-11-11', '%Y-%m-%d'))
 7
 8 print (time.strftime('%Y-%m-%d'))  #2016-07-21
 9 print (time.strftime('%Y-%m-%d',time.localtime()))
10 print (time.asctime())  #Thu Jul 21 10:55:35 2016
11 print (time.asctime(time.localtime()))  #Thu Jul 21 10:55:35 2016
12 print (time.ctime(time.time()))  #Thu Jul 21 10:55:35 2016
13
14 import datetime
15 print (datetime.datetime.now())  #2016-07-21 10:55:35.321624
6.shelve
shelve模块是一个简单的k,v将内存数据通过文件持久化的模块,可以持久化任何pickle可支持的python数据格式
 1 import shelve
 2
 3 d = shelve.open('shelve_test') #打开一个文件
 4
 5 class Test(object):
 6     def __init__(self,n):
 7         self.n = n
 8
 9
10 t = Test(123)
11 t2 = Test(123334)
12
13 name = ["alex","rain","test"]
14 d["test"] = name #持久化列表
15 d["t1"] = t      #持久化类
16 d["t2"] = t2
17
18 d.close()
 1 >>> import shelve
 2 >>> a = shelve.open("shelve_test")
 3 >>> dir(a)
 4 >>> a.get("test")
 5 ['alex', 'rain', 'test']
 6 >>> a.get("t1")
 7 <shelve模块.Test object at 0x026C73B0>
 8 >>> b = a.get("t1")
 9 >>> b
10 <shelve模块.Test object at 0x026C7350>
11 >>> b2 = a.get("t2")
12 >>> b2.n
13 123334
7.ConfigParser
用于生成和修改常见配置文档
 1 import configparser
 2
 3 config = configparser.ConfigParser()
 4 config["DEFAULT"] = {'ServerAliveInterval': '45',
 5                       'Compression': 'yes',
 6                      'CompressionLevel': '9'}
 7
 8 config['bitbucket.org'] = {}
 9 config['bitbucket.org']['User'] = 'hg'
10 config['topsecret.server.com'] = {}
11 topsecret = config['topsecret.server.com']
12 topsecret['Host Port'] = '50022'     # mutates the parser
13 topsecret['ForwardX11'] = 'no'  # same here
14 config['DEFAULT']['ForwardX11'] = 'yes'
15 with open('example.ini', 'w') as configfile:
16    config.write(configfile)
生成一个example.ini文件,如下
 1 [DEFAULT]
 2 compression = yes
 3 compressionlevel = 9
 4 serveraliveinterval = 45
 5 forwardx11 = yes
 6
 7 [bitbucket.org]
 8 user = hg
 9
10 [topsecret.server.com]
11 host port = 50022
12 forwardx11 = no
读取example.ini文件
 1 >>> import configparser
 2 >>> config = configparser.ConfigParser()
 3 >>> config.sections()
 4 []
 5 >>> config.read('example.ini')
 6 ['example.ini']
 7 >>> config.sections()
 8 ['bitbucket.org', 'topsecret.server.com']
 9 >>> 'bitbucket.org' in config
10 True
11 >>> 'bytebong.com' in config
12 False
13 >>> config['bitbucket.org']['User']
14 'hg'
15 >>> config['DEFAULT']['Compression']
16 'yes'
17 >>> topsecret = config['topsecret.server.com']
18 >>> topsecret['ForwardX11']
19 'no'
20 >>> topsecret['Port']
21 '50022'
22 >>> for key in config['bitbucket.org']: print(key)
23 ...
24 user
25 compressionlevel
26 serveraliveinterval
27 compression
28 forwardx11
29 >>> config['bitbucket.org']['ForwardX11']
30 'yes'
增删改查
 1 import configparser
 2
 3 config = configparser.ConfigParser()
 4 config.read('example.ini')
 5
 6 options = config.options('bitbucket.org')
 7 print (options)
 8
 9 sec = config.remove_section('bitbucket.org')
10 config.write(open('i.cfg', "w"))
11
12 config.remove_option('bitbucket.org','user')
13 config.write(open('i.cfg', "w"))

