
HPDL380G8平台11.2.0.3 RAC实施手册
HPDL380G8平台11.2.0.3 RAC实施手册
1 前言
此文档详细描述了Oracle 11gR2 数据库在HPDL380G上的安装RAC的检查及安装步骤。文档中#表示root用户执行,$表示grid或oracle用户执行。
2 系统环境
1.操作系统环境
|
说明项 |
节点1 |
节点2 |
|
硬件型号 |
HPDL380pGen8 |
HPDL380pGen8 |
|
操作系统 |
Oel6.4 |
Oel6.4 |
|
集群件 |
oracle grid |
oracle grid |
|
服务器主机名 |
Rbdb81 |
Rbdb82 |
|
IP地址 |
192.168.1.108 |
192.168.1.109 |
|
语言环境 |
中文/英文 |
中文/英文 |
|
时区 |
中国 |
中国 |
|
本地硬盘 |
RAID1 300G |
RAID1 300G |
|
|
RAID5 1.8T |
无 |
|
/ |
260G |
260G |
|
文件系统/boot |
100M |
100M |
|
文件系统/swap |
64G |
64G |
|
文件系统/rmanbak |
1.8T |
1.8T |
|
系统用户 |
root |
root |
|
grid |
grid |
|
|
oracle |
oracle |
|
|
系统组 |
oinstall |
oinstall |
|
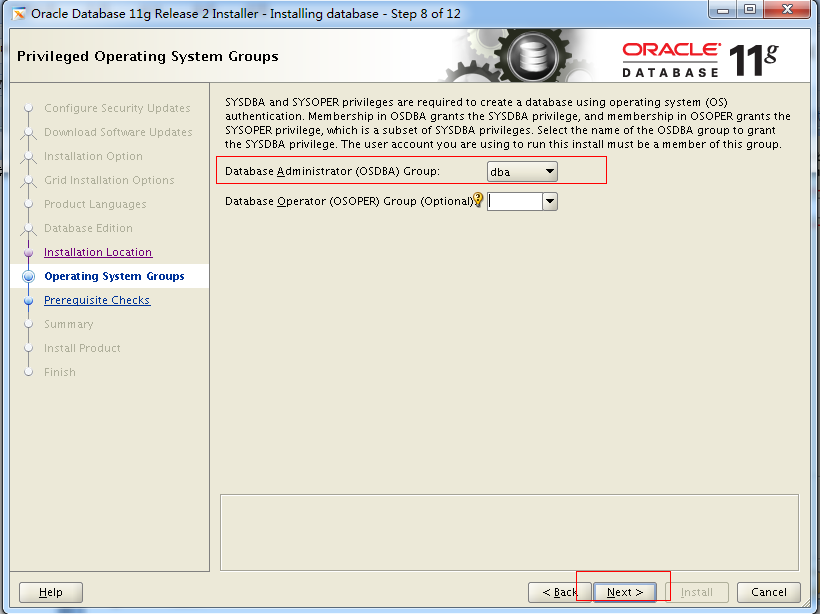
dba |
dba |
|
|
asmdba |
asmdba |
|
|
asmadmin |
asmadmin |
|
|
asmoper |
asmoper |
2.存储环境
|
说明项 |
节点1 |
点节2 |
|
存储型号 |
HP p2000 |
|
|
多路径软件 |
HPDM multipath |
|
|
磁盘划分 |
Mpath0 2G Mpath1 2G Mpath2 2G Mpath3 1.5T Mpath4 0.9T Mpath4 1.2T |
|
3.数据库环境
|
说明项 |
节点1 |
点节2 |
|
服务器主机名 |
rbdb81 |
rbdb82 |
|
存储型号 |
HP p2000 |
|
|
光纤交换机 |
无 |
|
|
public IP |
192.168.1.108 |
192.168.1.109 |
|
vip IP |
192.168.1.208 |
192.168.1.209 |
|
private IP |
102.168.2.108 |
102.168.2.109 |
|
scan IP |
192.168.1.210 |
|
|
DATABASE NAME |
rbdbon8 |
|
|
ORACLE RAC SID |
rbdbon81 |
rbdbon82 |
|
集群实例名称 |
rbdb8 |
|
|
OCRVOTE |
+OCRVOTE |
+OCR_VOTE |
|
OCRVOTEMO1 |
+OCRVOTEMO1 |
+OCRVOTEMO1 |
|
数据文件 |
+DATA01 |
+DATA01 |
|
|
+DATA02 |
+DATA02 |
|
归档文件 |
+ARCH |
+ARCH |
|
RMAN备份 |
/rmanbak/rbdbon8 |
无 |
|
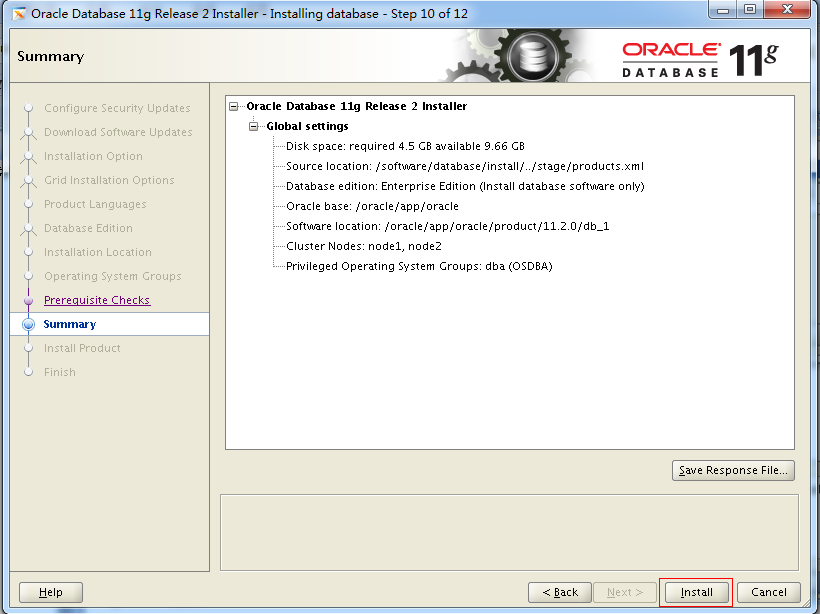
数据库版本 |
Oracle Database 11g Enterprise Edition Release 11.2.0.3.0 - 64bit Production |
|
|
GRID BASE目录 |
/u01/app |
|
|
GRID HOME目录 |
/u01/app/grid/product/11.2.0/ |
|
|
数据库BASE目录 |
/u01/app/oracle |
|
|
数据库HOME目录 |
/u01/app/oracle/product/11.2.0/db_1 |
|
|
数据库监听端口 |
1521 |
|
|
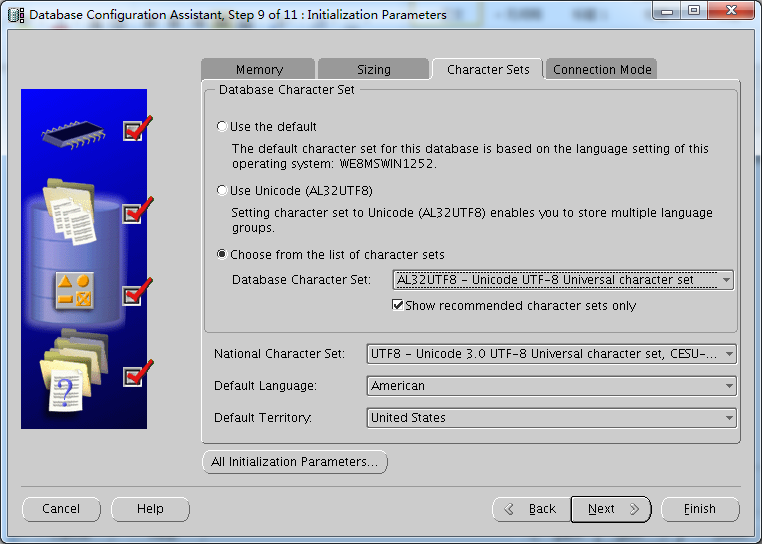
数据库字符集 |
UTF8 |
|
|
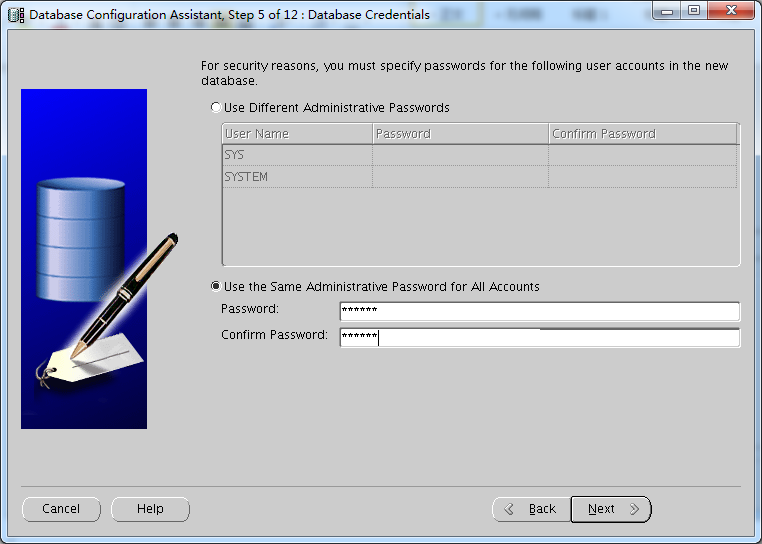
数据库系统帐号与初始密码 |
sys/recbok system/recbok |
|
|
数据库实例建库方式 |
ASM |
|
|
数据库块大小 |
8192byte |
|
|
ASM磁盘组 |
+OCRVOTE(mpath0) |
|
|
+OCRVOTEMO1(mpath1) |
||
|
+DATA01(mpath3) |
||
|
+DATA02(mpath4) |
||
|
|
+ARCH(mpath5) |
|
4.存储规划
存储划分设计
见存储规划与风险评估报告
安装光纤卡驱动
查看系统信息
[root@rbdb82 ~]# dmidecode |grep -A16 "System Information$"
System Information
Manufacturer: HP
Product Name: ProLiant DL380p Gen8
Version: Not Specified
Serial Number: 6CU3260KP7
UUID: 32333536-3030-4336-5533-3236304B5037
Wake-up Type: Power Switch
SKU Number: 653200-001
Family: ProLiant
Handle 0x0300, DMI type 3, 21 bytes
Chassis Information
Manufacturer: HP
Type: Rack Mount Chassis
Lock: Not Present
Version: Not Specified
Serial Number: 6CU3260KP7
[root@rbdb82 ~]#
[root@rbdb82 ~]# cat /etc/issue | grep Linux
Red Hat Enterprise Linux Server release 6.4 (Santiago)
上传光纤卡驱动到服务器,运行(两边都要装)
[root@rbdb81 soft]# rpm -Uvh kmod-hpqlgc-qla2xxx-8.04.00.12.06.0_k2-1.rhel6u4.x86_64.rpm
然后执行lspci 检查所有的PCI接口的硬件设置。
[root@rbdb81 sw]# lspci
查看如下光纤卡,就说明光纤卡驱动安装正常
07:00.0 Fibre Channel: QLogic Corp. ISP2532-based 8Gb Fibre Channel to PCI Express HBA (rev 02)
0a:00.0 Fibre Channel: QLogic Corp. ISP2532-based 8Gb Fibre Channel to PCI Express HBA (rev 02)
5.多路径软件multipath
安装multipath(两边都要)
先装device-mapper-multipath-libs-0.4.9-64.0.1.el6.x86_64.rpm
[root@rbdb81 soft]# rpm -Uvh device-mapper-multipath-libs-0.4.9-64.0.1.el6.x86_64.rpm
再装rpm -Uvh device-mapper-multipath-0.4.9-64.0.1.el6.x86_64.rpm
[root@rbdb81 soft]# rpm -Uvh device-mapper-multipath-0.4.9-64.0.1.el6.x86_64.rpm
Multipath相关说明
使用Multipath进行多链路聚合并对聚合后的设备固定命名
配置multipath
1、启用Multipath:
(1)启动multipathd服务
#service multipathd start 或者 #/etc/init.d/multipathd start
(2)修改multipath配置文件/etc/multipath.conf:
# cp /usr/share/doc/device-mapper-multipath-0.4.9/multipath.conf
/etc/multipath.conf
(可以vi /etc/multipath/ bindings查看)
[oracle@rbdb81 ~]$ vi /etc/multipath.conf
|
defaults { user_friendly_names yes path_grouping_policy multibus find_multipaths yes } blacklist { wwid 3600508b1001cb4c7c0d68a3645bf5dde #这是一号节点备份盘. devnode "^(ram|raw|loop|fd|md|dm-|sr|scd|st)[0-9]*" devnode "^hd[a-z]" }
multipaths { multipath { wwid 3600c0ff0001977f5d5a0835201000000 alias mpath0 path_grouping_policy multibus path_selector "round-robin 0" failback immediate rr_weight uniform no_path_retry 18 } multipath { wwid3600c0ff0001977f5eba0835201000000 alias mpath1 path_grouping_policy multibus path_selector "round-robin 0" failback immediate rr_weight uniform no_path_retry 18 } multipath { wwid3600c0ff0001977f5a0a0835201000000 alias mpath2 path_grouping_policy multibus path_selector "round-robin 0" failback immediate rr_weight uniform no_path_retry 18 } multipath { wwid3600c0ff0001977f5eda3845201000000 alias mpath3 path_grouping_policy multibus path_selector "round-robin 0" failback immediate rr_weight uniform no_path_retry 18 } multipath { wwid3600c0ff0001977f53da4845201000000 alias mpath4 path_grouping_policy multibus path_selector "round-robin 0" failback immediate rr_weight uniform no_path_retry 18 } multipath { wwid3600c0ff00019869012a1835201000000 alias mpath5 path_grouping_policy multibus path_selector "round-robin 0" failback immediate rr_weight uniform no_path_retry 18 } }
|
(3)重启multipathd服务(修改multipath.conf文件之后都应该重启multipath服务)
multipath -F
(4)扫描磁盘
#multipath -v2
使用上面命令之后,系统中会出现链路聚合之后的dm设备,同时也会在/dev/mapper/、/dev/mpath/目录下生成相应的设备。
查看multipath拓扑结构
#multipath -ll
|
[root@rbdb81 ~]# multipath -ll mpath2 (3600c0ff0001977f5a0a0835201000000) dm-0 HP,P2000 G3 FC size=1.9G features='1 queue_if_no_path' hwhandler='0' wp=rw `-+- policy='round-robin 0' prio=70 status=active |- 0:0:0:1 sda 8:0 active ready running `- 1:0:0:1 sdi 8:128 active ready running mpath1 (3600c0ff0001977f5eba0835201000000) dm-4 HP,P2000 G3 FC size=1.9G features='1 queue_if_no_path' hwhandler='0' wp=rw `-+- policy='round-robin 0' prio=70 status=active |- 0:0:0:3 sdc 8:32 active ready running `- 1:0:0:3 sdk 8:160 active ready running mpath0 (3600c0ff0001977f5d5a0835201000000) dm-3 HP,P2000 G3 FC size=1.9G features='1 queue_if_no_path' hwhandler='0' wp=rw `-+- policy='round-robin 0' prio=70 status=active |- 0:0:0:2 sdb 8:16 active ready running `- 1:0:0:2 sdj 8:144 active ready running mpath5 (3600c0ff00019869012a1835201000000) dm-2 HP,P2000 G3 FC size=1.1T features='1 queue_if_no_path' hwhandler='0' wp=rw `-+- policy='round-robin 0' prio=70 status=active |- 0:0:0:5 sde 8:64 active ready running `- 1:0:0:5 sdm 8:192 active ready running mpath4 (3600c0ff0001977f53da4845201000000) dm-5 HP,P2000 G3 FC size=831G features='1 queue_if_no_path' hwhandler='0' wp=rw `-+- policy='round-robin 0' prio=70 status=active |- 0:0:0:6 sdf 8:80 active ready running `- 1:0:0:6 sdn 8:208 active ready running mpath3 (3600c0ff0001977f5eda3845201000000) dm-1 HP,P2000 G3 FC size=1.4T features='1 queue_if_no_path' hwhandler='0' wp=rw `-+- policy='round-robin 0' prio=70 status=active |- 0:0:0:4 sdd 8:48 active ready running `- 1:0:0:4 sdl 8:176 active ready running |
(5)关掉其它节点的multipathd 服务
service multipathd stop
(6) 拷贝multipath.conf 到其它节点
scp /etc/multipath.conf rbdb82:/etc/
(7) 起动其它节点服务
|
multipath –F multipath –v2 multipath –ll |
(8)设置自动启服务(所有节点都设)
|
/etc/init.d/multipathd restart chkconfig --list multipathd chkconfig --level 3456 multipathd on |
3安装检查及配置
1.检查硬件
内存,swap,tmp,安装软件的磁盘空间,shared storage
2.网卡
最少两块网卡
最好5块网卡,2块绑定为public,2块绑定为private,一块作为archive log用。不要把一卡上面的多个口子绑定在一起。
保证所有节点上public,private的接口名称相同。例如:en0在node1上是public,那么在node2上面,它的en0也必须是public。private同理。集群中所有节点的private接口必须能互相访问,配通。
3.创建用户组及用户
(两节点都要执行)
groupadd -g 501 oinstall
groupadd -g 502 dba
groupadd -g 503 asmadmin
groupadd -g 504 asmdba
groupadd -g 505 asmoper
useradd -u 501 -g oinstall -G asmadmin,asmdba,asmoper grid
useradd -u 502 -g oinstall -G dba,asmdba oracle
# passwd oracle
Changing password for user oracle.
New UNIX password:
BAD PASSWORD: it is based on a dictionary word
Retype new UNIX password:
passwd: all authentication tokens updated successfully.
# passwd grid
Changing password for user grid.
New UNIX password:
BAD PASSWORD: it is based on a dictionary word
Retype new UNIX password:
passwd: all authentication tokens updated successfully.
[root@node1 ~]#
4.网络
注意:下划线不能用作主机名。最好使用小写,不带下划线,中划线。
说明:推荐使用网卡绑定,并且最还使用主备模式。
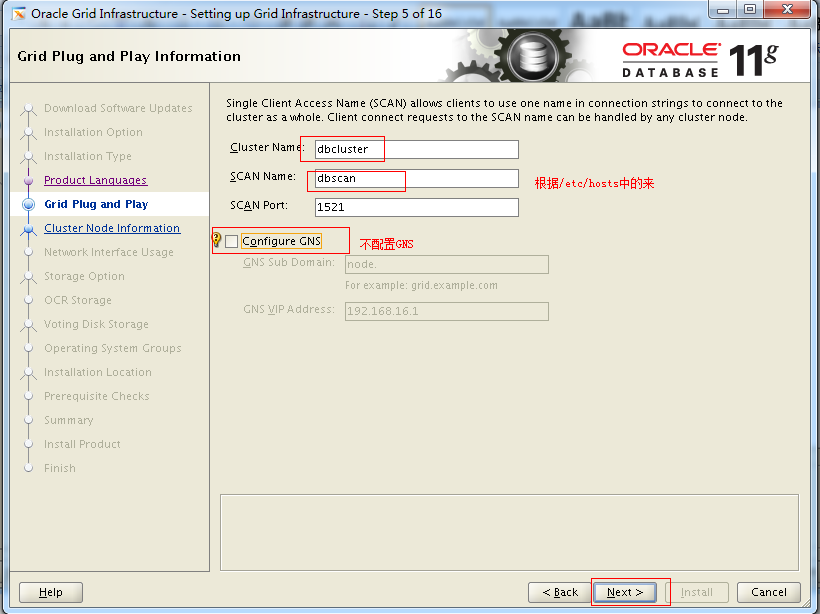
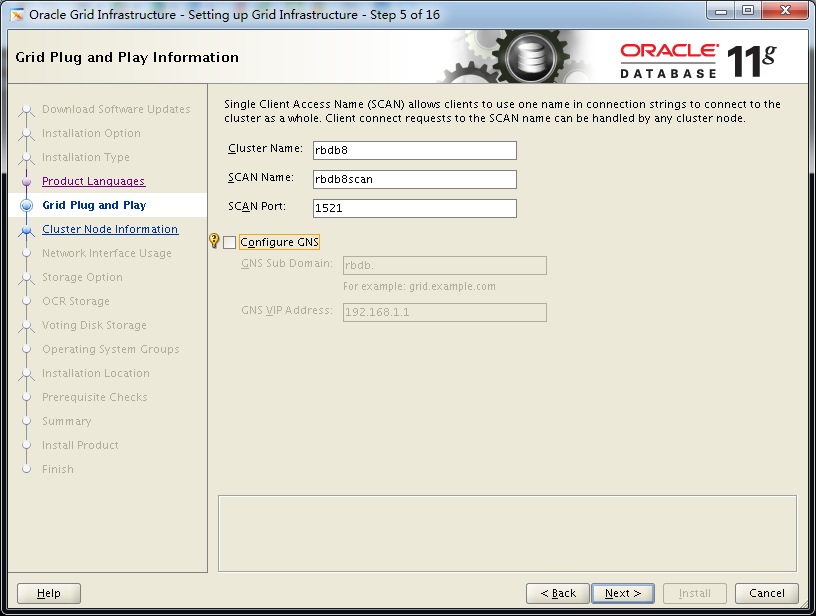
cluster name必须满足:在整个域中的globally unique。最少一个字符,小于15个字符,与hostname的字符集相同
public host name:使用每个主机的primary host name。即:使用hostname命令显示出来的名称。
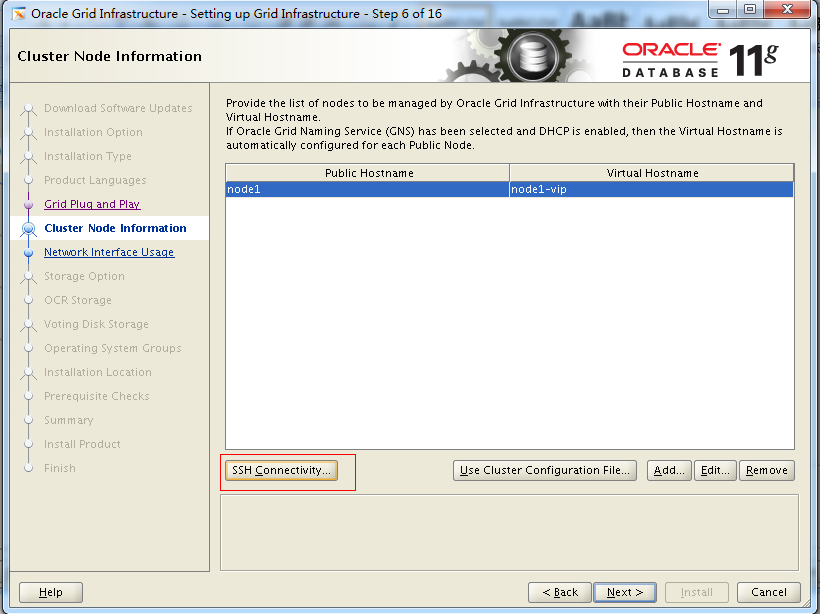
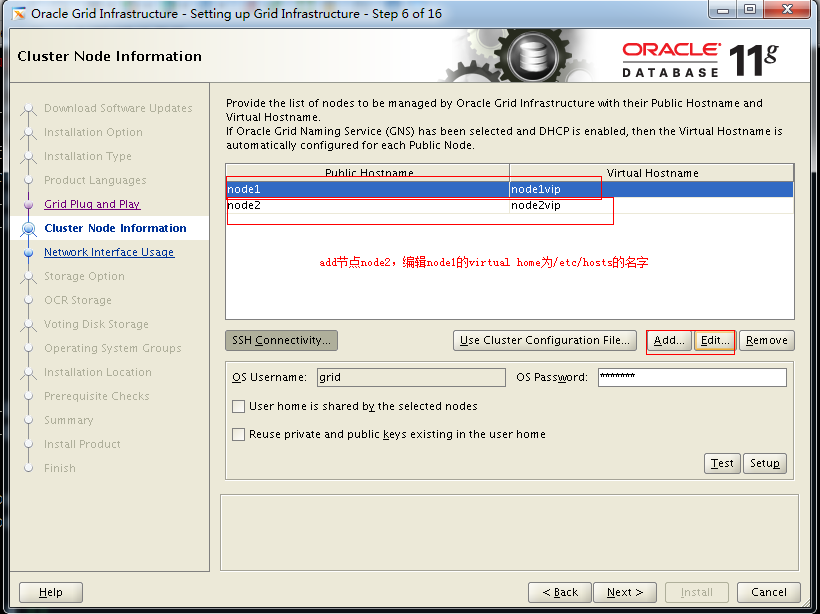
virtual hostname:The virtual host name is a public nodename that is used to reroute client requests sent to the node if the node is down。推荐的命名方式<public hostname>-vip,最好还是别用中划线。
VIP:必须没有使用,与public ip处于同一个子网段。必须解析(/etc/hosts或者dns)
private hostname:不需要经过dns解析,但是必须在/etc/hosts中配置。推荐命名方式<public hostname>pvt。也最好别用中划线。
private ip:不能被集群之外的servers访问;private net应该在独立的交换网络上;private net不应该是大环境的网络top的一部分;private net应该部署在千兆或者更好的以太网上。
SCANIP:多个scanIP的话不能配置在/etc/hosts,只能在DNS中,不然就只有一个生效。如果在dns中配置了ip,那么就得在所有节点上更改主机的搜索顺序
/etc/hosts配置:
(两节点都要执行)
|
#Public 192.168.1.108 rbdb81 192.168.1.109 rbdb82 #VIP 192.168.1.208 rbdb81vip 192.168.1.209 rbdb82vip
#Private 192.168.2.108 rbdb81priv 192.168.2.109 rbdb82priv #scan 192.168.1.210 rbdb8scan
192.168.1.100 rbdb1 192.168.1.101 rbdb2 192.168.1.102 rbdb3 192.168.1.104 rbdb4 192.168.1.105 rbdb05 192.168.1.106 rbdb06 192.168.1.107 rbdb07 192.168.1.200 vip-rbdb1 192.168.1.201 vip-rbdb2 192.168.1.205 rbdb05-vip 192.168.1.206 rbdb06-vip |
5.时间同步
如果使用ntp同步,那么需要额外配置,如果使用Oracle Cluster Time Synchronization
Service (ctssd)同步,那么就不需要配置了。使用ctssd要做以下操作:
#Network Time Protocol Setting
停掉服务
/sbin/service ntpd stop
chkconfig ntpd off
删除ntp.conf 文件或改名:
rm /etc/ntp.conf
或
mv /etc/ntp.conf to /etc/ntp.conf.org
6.内核参数
(两节点都要执行)
root用户更改(以下改系统参数据都在ROOT)
/etc/sysctl.conf
|
kernel.shmmni = 4096 kernel.sem = 250 32000 100 128 fs.file-max = 6553600 net.ipv4.ip_local_port_range = 9000 65500 net.core.rmem_default = 262144 net.core.rmem_max = 4194304 net.core.wmem_default = 262144 net.core.wmem_max = 1048576 kernel.shmall = 8388608 fs.file-max = 6815744 fs.aio-max-nr = 1048576
|
#/sbin/sysctl -p立即生效
说明:由于 kernel.shmall设置的为默认的2097152也就是最小值设置,
我的机器是64GB内存的 应该设置为如下 ,或者更大才行。
kernel.shmall =8388608
For example, if the sum of all the SGAs on the system is 16Gb and the result of '$ getconf PAGE_SIZE' is 4096 (4Kb) then set shmall to 4194304 (4Mb)
7.限制参数
/etc/security/limits.conf
|
grid hard nproc 16384 grid soft nofile 1024 grid hard nofile 65536 oracle soft nproc 2047 oracle hard nproc 16384 oracle soft nofile 1024 oracle hard nofile 65536 |
/etc/pam.d/login file,如果不存在就加上一下行
|
session required pam_limits.so |
/etc/profile,增加以下内容
|
if [ $USER = "oracle" ] || [ $USER = "grid" ]; then if [ $SHELL = "/bin/ksh" ]; then ulimit -p 16384 ulimit -n 65536 else ulimit -u 16384 -n 65536 fi umask 022 fi |
如果是C-shell
For the C shell (csh or tcsh), add the following lines to the /etc/csh.login file:
if ( $USER = "oracle" || $USER = "grid" ) then
limit maxproc 16384
limit descriptors 65536
endif
在其他节点上重复上述操作
8.创建目录
(在ROOT下,两节点都要执行)
oracle Inventory Directory
其实可以不用创建,初始目录只要权限够了,那么安装时会自动创建。
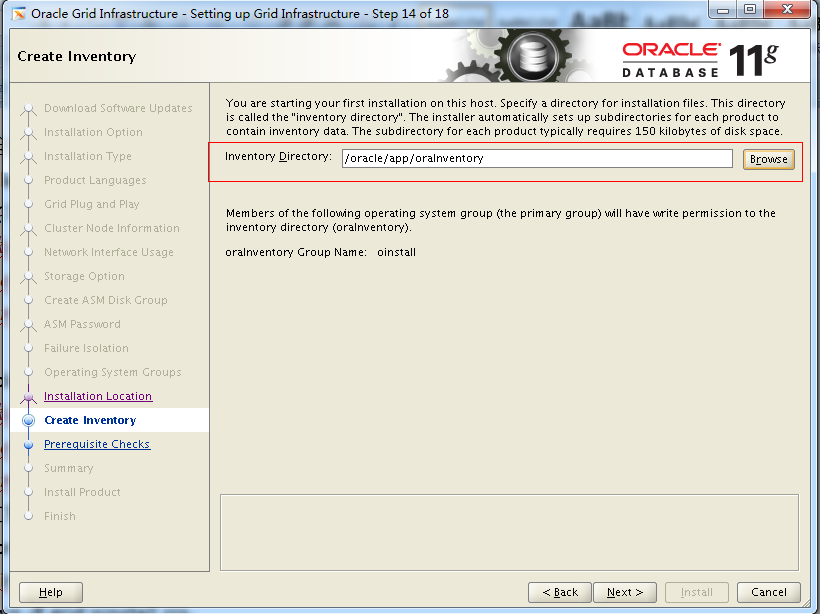
mkdir -p /u01/app/oraInventory
chown -R grid:oinstall /u01/app/oraInventory
chmod -R 775 /u01/app/oraInventory
创建grid 的 ORACLE_HOME 目录
mkdir -p /u01/app/grid/product/11.2.0
chown -R grid:oinstall /u01/app/grid/product/11.2.0
chmod -R 775 /u01/app/grid/product/11.2.0
创建oracle 的ORACLE_BASE目录
mkdir -p /u01/app/oracle
mkdir /u01/app/oracle/cfgtoollogs
chown -R oracle:oinstall /u01/app/oracle
chmod -R 775 /u01/app/oracle
创建rdbms 的 ORACLE_HOME目录
mkdir -p /u01/app/oracle/product/11.2.0/db_1
chown -R oracle:oinstall /u01/app/oracle/product/11.2.0/db_1
chmod -R 775 /u01/app/oracle/product/11.2.0/db_1
9.检查软件环境
以下是Oracle Enterprise Linux 5 64位系统需要的包
binutils-2.15.92.0.2
compat-libstdc++-33-3.2.3
compat-libstdc++-33-3.2.3 (32 bit)
elfutils-libelf-0.97
elfutils-libelf-devel-0.97
expat-1.95.7
gcc-3.4.6
gcc-c++-3.4.6
glibc-2.3.4-2.41
glibc-2.3.4-2.41 (32 bit)
glibc-common-2.3.4
glibc-devel-2.3.4
glibc-headers-2.3.4
libaio-0.3.105
libaio-0.3.105 (32 bit)
libaio-devel-0.3.105
libaio-devel-0.3.105 (32 bit)
libgcc-3.4.6
libgcc-3.4.6 (32-bit)
libstdc++-3.4.6
libstdc++-3.4.6 (32 bit)
libstdc++-devel 3.4.6
make-3.80
pdksh-5.2.14
sysstat-5.0.5
unixODBC-2.2.11
unixODBC-2.2.11 (32 bit)
unixODBC-devel-2.2.11
unixODBC-devel-2.2.11 (32 bit)
rpm -q --qf '%{NAME}-%{VERSION}-%{RELEASE} (%{ARCH})\n' binutils \
compat-libstdc++-33 \
elfutils-libelf \
elfutils-libelf-devel \
gcc \
gcc-c++ \
glibc \
glibc-common \
glibc-devel \
glibc-headers \
ksh \
libaio \
libaio-devel \
libgcc \
libstdc++ \
libstdc++-devel \
make \
sysstat \
unixODBC \
unixODBC-devel
如果发现有包没安装,进入光盘的目录下,进入Server目录下安装.
10.关闭SELINUX和服务
Vi /etc/selinux/config
SELINUX=disabled
关掉防火墙
[root@rbdb81 Packages]# chkconfig --level 2345 ip6tables off
[root@rbdb81 Packages]# chkconfig --level 2345 iptables off
关服务
chkconfig --level 35 autofs off
chkconfig --level 35 acpid off
chkconfig --level 35 sendmail off
chkconfig --level 35 cups-config-daemon off
chkconfig --level 35 cpus off
chkconfig --level 35 xfs off
chkconfig --level 35 lm_sensors off
chkconfig --level 35 gpm off
chkconfig --level 35 openibd off
chkconfig --level 35 iiim off
chkconfig --level 35 pcmcia off
chkconfig --level 35 cpuspeed off
chkconfig --level 35 nfslock off
chkconfig --level 35
ip6tables off
chkconfig --level 35 rpcidmapd off
chkconfig --level 35 apmd off
chkconfig --level 35 sendmail off
chkconfig --level 35 arptables_jf off
chkconifg --level 35 microcode_ctl off
chkconfig --level 35 rpcgssd off
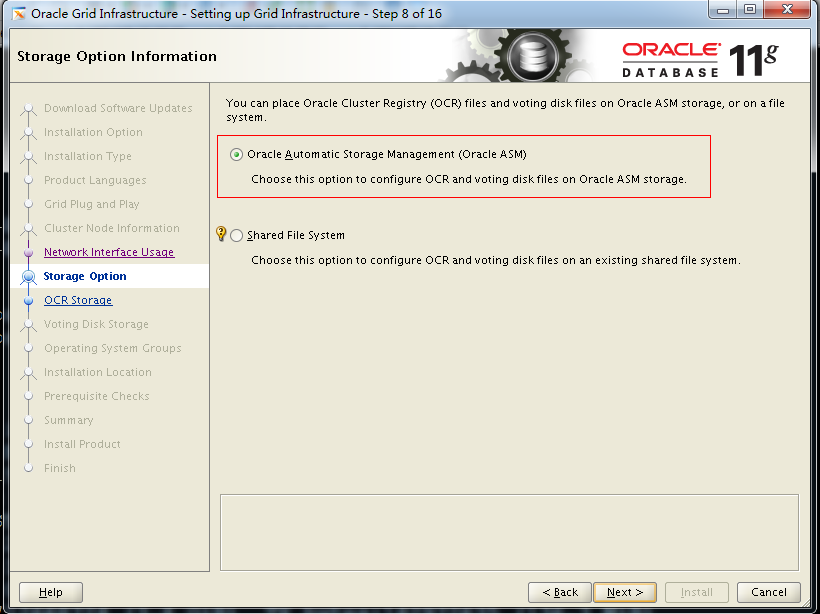
11. ASM
有两个不同方法可在 Linux 上配置 ASM:
使用 ASMLib I/O 的 ASM:此方法使用 ASMLib 调用在由 ASM 管理的原始块设备上创建所有 Oracle 数据库文件。由于 ASMLib 使用块设备,因此该方法不需要原始设备。
使用标准 Linux I/O 的 ASM:此方法使用标准 Linux I/O 系统调用在 ASM 管理的原始字符设备上创建所有 Oracle 数据库文件。您将需要为 ASM 使用的所有磁盘分区创建原始设备。 (裸设备)
我们将在此处介绍“使用 ASMLib I/O 的 ASM”。
安装ASM
下载ASMLib
首先,从 Red Hat找到 kmod-oracleasm来安装oracleasm ,oracleasm-2.6.9-22.ELsmp-2.0.0-1.x86_64.rpm -(适用于多处理器)从这个网址(http://www.oracle.com/technology/global/cn/tech/linux/asmlib/install.html)下载ASMLib 软件。首先,下载适用于多处理器 Linux 服务器的为 ASM 库提供内核驱动程序:
还将需要下载以下两个支持文件:
oracleasmlib-2.0.0-1.x86_64.rpm -(提供实际的 ASM 库)
oracleasm-support-2.0.0-1.x86_64.rpm -(提供用来使 ASM 驱动程序启动并运行的公用程序)
安装ASMLib
我们将把ASMLib文件安装到两台多处理器计算机中。安装过程只需要您以 root 用户帐户的身份在集群中的所有节点上运行以下命令即可:
[root@rbdb82 asm]# ls -l
total 128
-rwxr-xr-x 1 oracle oinstall 33840 May 31 11:48 kmod-oracleasm-2.0.6.rh1-2.el6.x86_64.rpm
-rwxr-xr-x 1 oracle oinstall 13300 Oct 12 17:30 oracleasmlib-2.0.4-1.el6.x86_64.rpm
-rwxr-xr-x 1 oracle oinstall 74984 Oct 12 17:30 oracleasm-support-2.1.8-1.el6.x86_64.rpm
[root@rbdb82 asm]#
rpm -ivh oracleasm-support-2.1.8-1.el6.x86_64.rpm
rpm -ivh kmod-oracleasm-2.0.6.rh1-2.el6.x86_64.rpm
rpm -ivh oracleasmlib-2.0.4-1.el6.x86_64.rpm
配置 ASMLib
现在已经安装了 ASMLib 软件,系统管理员必须执行几个步骤来使 ASM 驱动程序可用。需要加载 ASM 驱动程序,并且需要装载驱动程序文件系统。数据库以 ' grid ' 用户和 ' oinstall' 用户组身份运行,安装过程只需要您以 root 用户帐户的身份在集群中的所有节点上运行以下命令即可:
/etc/init.d/oracleasm configure
|
Configuring the Oracle ASM library driver. This will configure the on-boot properties of the Oracle ASM library driver. The following questions will determine whether the driver is loaded on boot and what permissions it will have. The current values will be shown in brackets ('[]'). Hitting <ENTER> without typing an answer will keep that current value. Ctrl-C will abort. Default user to own the driver interface []:grid Default group to own the driver interface []:asmadmin Start Oracle ASM library driver on boot (y/n) [n]:y Scan for Oracle ASM disks on boot (y/n) [y]:y Writing Oracle ASM library driver configuration: done Initializing the Oracle ASMLib driver: [ OK ] Scanning the system for Oracle ASMLib disks: [ OK ] |
这应加载 oracleasm.o 驱动程序模块并装载 ASM 驱动程序文件系统。通过在配置期间选择 enabled = 'y',系统将始终在启动时加载该模块并装载文件系统。
使磁盘对 ASMLib 可用
(注意:与本节中的其他任务不同,创建ASMLib文件系统应只在一个节点上执行。我们将只从 linux1执行本节中的所有命令。)
系统管理员有最后一项任务。需要使 ASMLib 要访问的每一个磁盘可用。这是通过创建一个 ASM 磁盘来实现的。/etc/init.d/oracleasm 脚本将再次用于这个任务:
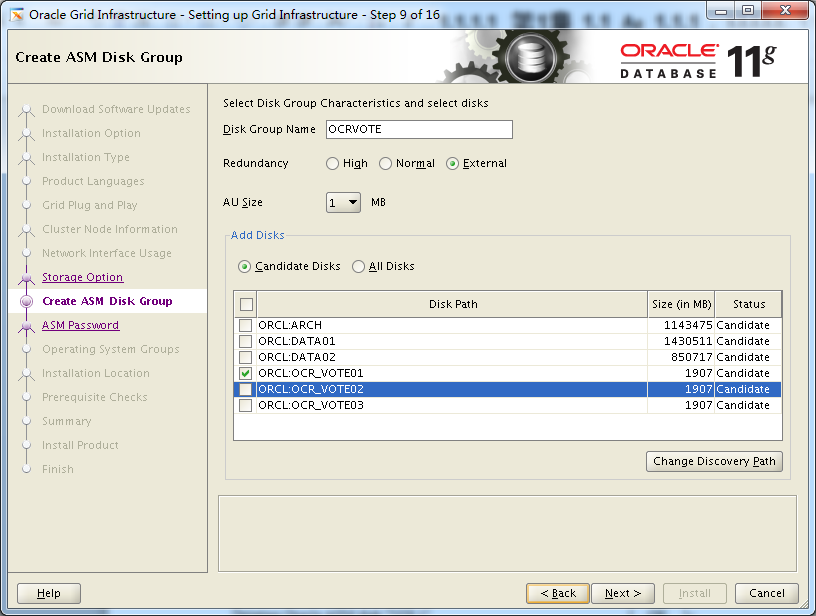
/etc/init.d/oracleasm createdisk OCR_VOTE01 /dev/mapper/mpath0
/etc/init.d/oracleasm createdisk OCR_VOTE02 /dev/mapper/mpath1
/etc/init.d/oracleasm createdisk OCR_VOTE03 /dev/mapper/mpath2
/etc/init.d/oracleasm createdisk DATA01 /dev/mapper/mpath3
/etc/init.d/oracleasm createdisk DATA02/dev/mapper/mpath4
/etc/init.d/oracleasm createdisk ARCH /dev/mapper/mpath5
如果要删除,需要执行:
/etc/init.d/oracleasm deletedisk DATA01
/etc/init.d/oracleasm deletedisk /dev/mapper/mpath3
当向 RAC 设置中添加磁盘时,需要通知其他节点该磁盘的存在。在一个节点上运行 'createdisk' 命令,然后在其他每一个节点上运行 'scandisks':
/etc/init.d/oracleasm scandisks
列出和查询现有的磁盘
我们可以使用以下命令在所有节点上以 root用户帐户的身份测试是否成功创建了 ASM 磁盘:
/etc/init.d/oracleasm listdisks;
ARCH
DATA01
DATA02
OCR_VOTE01
OCR_VOTE02
OCR_VOTE03
其他命令说明
可以利用 /etc/init.d/oracleasm 的 'enable' 和 'disable' 选项来启用或禁用自动启动。
/etc/init.d/oracleasm disable
Writing Oracle ASM library driver configuration [ OK ]
Unmounting ASMlib driver filesystem [ OK ]
Unloading module "oracleasm" [ OK ]
/etc/init.d/oracleasm enable
Writing Oracle ASM library driver configuration [ OK ]
Loading module "oracleasm" [ OK ]
Mounting ASMlib driver filesystem [ OK ]
Scanning system for ASM disks [ OK ]
磁盘名称是 ASCII 大写字母、数字和下划线。它们必须以字母开始。
不再被 ASM 使用的磁盘也可以取消标记:
/etc/init.d/oracleasm deletedisk VOL1
Deleting Oracle ASM disk "VOL1" [OK ]
可以查询任意的操作系统磁盘,以了解它是否被 ASM 使用:
/etc/init.d/oracleasm querydisk
/etc/init.d/oracleasm querydisk ASM1
Checking if device "/dev/sdg" is an Oracle ASM disk [ OK ]
Linux ASMLib 的发现字符串
ASMLib 使用发现字符串来确定 ASM 正在请求哪些磁盘。一般的 Linux ASMLib 使用 glob 字符串。字符串必须以 "ORCL:" 为前缀。磁盘通过名称来指定。可以通过发现字符串 "ORCL:VOL1" 在 ASM 中,发现以名称 "VOL1" 创建的磁盘。类似地,可以用发现字符串 "ORCL:VOL*" 来查询所有以字符串 "VOL" 开始的磁盘。
不能在发现字符串中用路径名称来发现磁盘。如果缺少前缀,那么一般的 Linux ASMLib 将完全忽略发现字符串,认为它适用于一个不同的 ASMLib。唯一的例外是空字符串 (""),它被认为是一个全通配符。这与发现字符串 "ORCL:*" 完全等价。
注意:一旦您用 Linux ASMLib 标记了磁盘,那么OUI 将不能发现您的磁盘。建议您完成“仅限于软件” (Software Only) 的安装,然后使用 DBCA 来创建数据库(或者使用自定义安装)。
检查 SAM磁盘权限:
[root@rbdb81 ~]# ll /dev/oracleasm/disks/
total 0
brw-rw---- 1 grid asmadmin 8, 64 Nov 15 15:36 ARCH
brw-rw---- 1 grid asmadmin 8, 48 Nov 15 15:36 DATA01
brw-rw---- 1 grid asmadmin 8, 80 Nov 15 15:36 DATA02
brw-rw---- 1 grid asmadmin 8, 16 Nov 15 15:36 OCR_VOTE01
brw-rw---- 1 grid asmadmin 8, 32 Nov 15 15:36 OCR_VOTE02
brw-rw---- 1 grid asmadmin 8, 0 Nov 15 15:36 OCR_VOTE03
注意2两个问题:
1,如果ASM服务无法自启动,则加以下两条命令
su – root
cd /etc/rc5.d/
ln -s ../init.d/oracleasm S99oracleasm
ln -s ../init.d/oracleasm K01oracleasm
2,修改所有节点/etc/sysconfig/oracleasm文件(很重要)
ORACLEASM_ENABLED=true
ORACLEASM_UID=grid
ORACLEASM_GID=asmadmin
ORACLEASM_SCANBOOT=true
ORACLEASM_SCANORDER="mpath sd"
ORACLEASM_SCANEXCLUDE=""
|
[root@rbdb82 ~]# ll /dev/oracleasm/disks/ total 0 brw-rw---- 1 grid asmadmin 8, 64 Nov 15 15:36 ARCH brw-rw---- 1 grid asmadmin 8, 48 Nov 15 15:36 DATA01 brw-rw---- 1 grid asmadmin 8, 80 Nov 15 15:36 DATA02 brw-rw---- 1 grid asmadmin 8, 16 Nov 15 15:36 OCR_VOTE01 brw-rw---- 1 grid asmadmin 8, 32 Nov 15 15:36 OCR_VOTE02 brw-rw---- 1 grid asmadmin 8, 0 Nov 15 15:36 OCR_VOTE03 |
[root@rbdb81 ~]# ll /dev/oracleasm/disks/ total 0 brw-rw---- 1 grid asmadmin 8, 64 Nov 15 15:36 ARCH brw-rw---- 1 grid asmadmin 8, 48 Nov 15 15:36 DATA01 brw-rw---- 1 grid asmadmin 8, 80 Nov 15 15:36 DATA02 brw-rw---- 1 grid asmadmin 8, 16 Nov 15 15:36 OCR_VOTE01 brw-rw---- 1 grid asmadmin 8, 32 Nov 15 15:36 OCR_VOTE02 brw-rw---- 1 grid asmadmin 8, 0 Nov 15 15:36 OCR_VOTE03 |
12.上传11G和RAC安装包解压
unzip p10404530_112030_Linux-x86-64_1of7.zip
unzip p10404530_112030_Linux-x86-64_2of7.zip
unzip p10404530_112030_Linux-x86-64_3of7.zip
chown -R grid:oinstall grid
chown -R oracle:oinstall database
4.GI安装
su - grid
grid的环境变量:rbdb81和rbdb82相同
vi /home/grid/.bash_profile
|
ORACLE_BASE=/u01/app/oracle ORACLE_HOME=/u01/app/grid/product/11.2.0 ORACLE_SID=+ASM1#在2节点为+ASM2 LANG=C PATH=$ORACLE_HOME/bin:$PATH:$HOME/bin export PATH ORACLE_BASE ORACLE_HOME ORACLE_SID LANG |
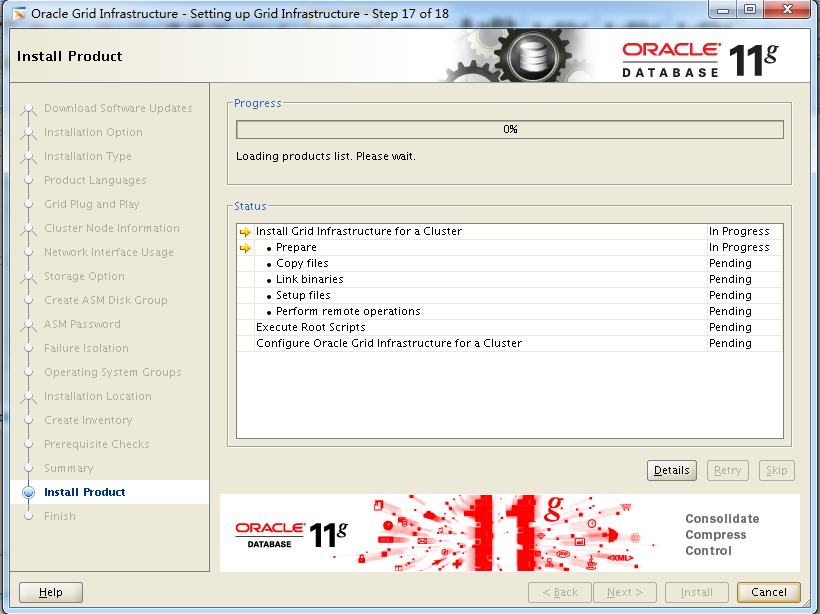
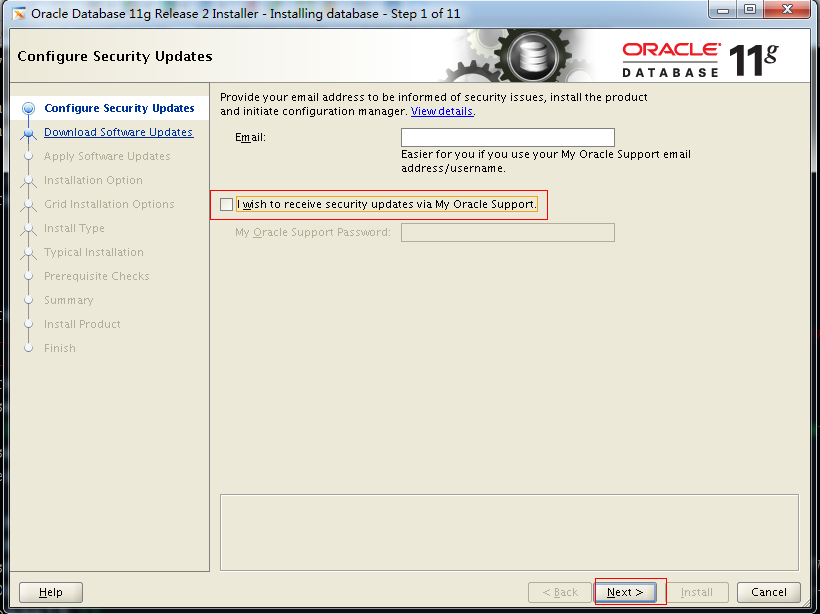
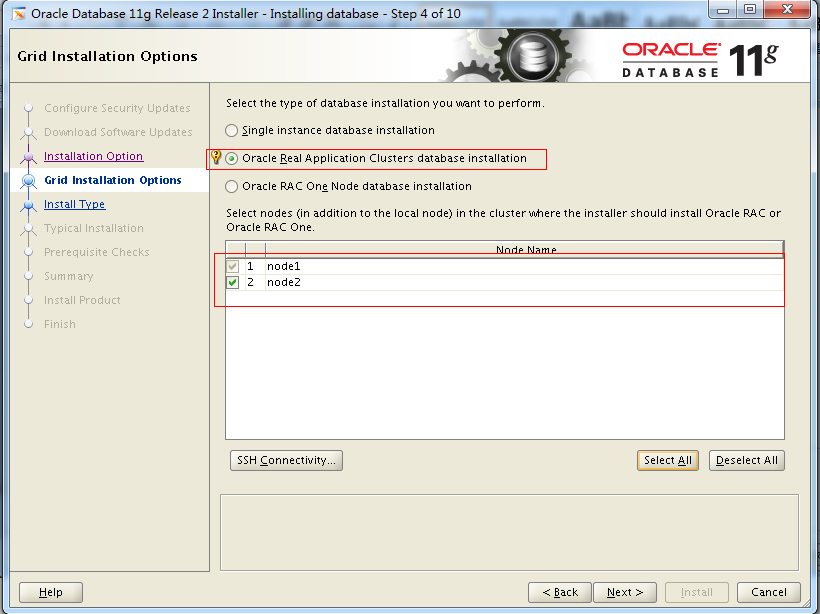
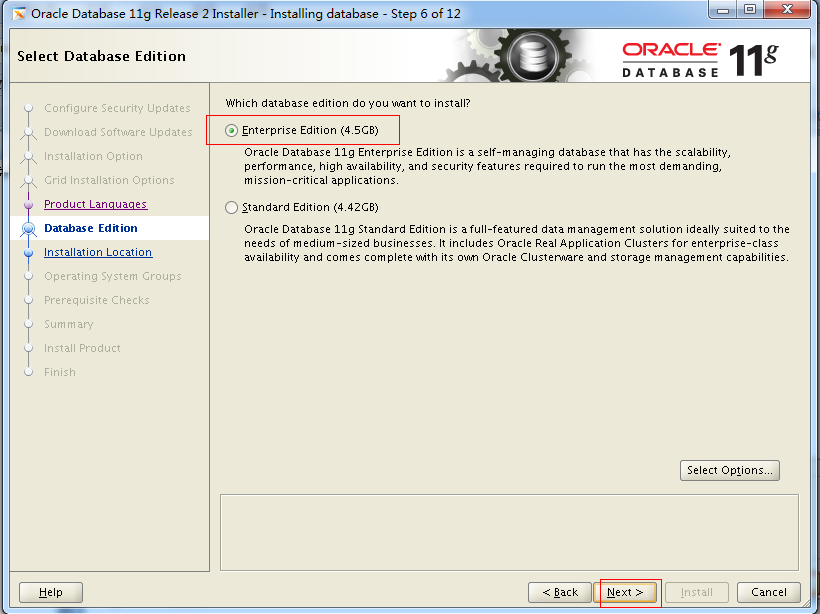
开始安装GI
cd /soft/11grac/grid
./runInstaller
安装之前检查节点时间要差不多相同,因为自动同步服务还没有,只有安装完成后才有。


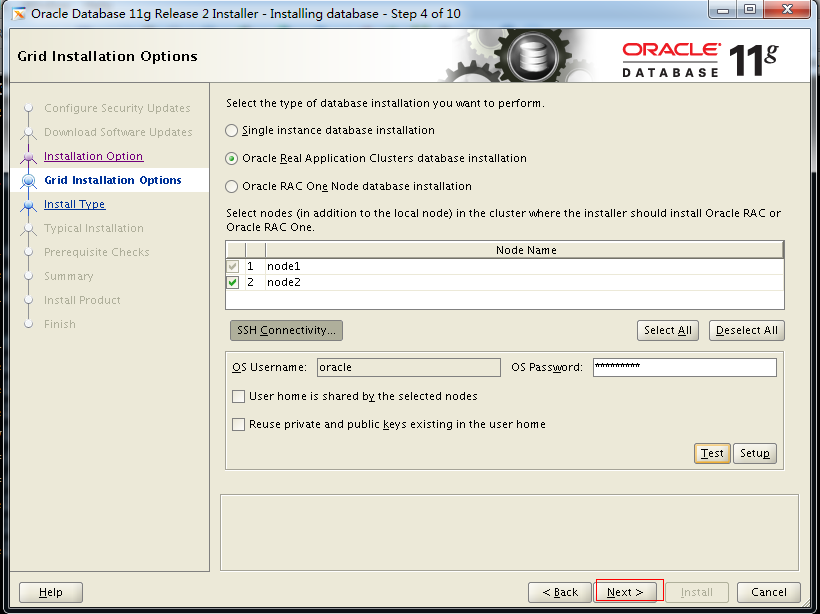
上面一步添加好以后点击setup创建互信
可以在test一下
rbdb81->grid>上执行
[grid@rbdb81 ~]$ ssh rbdb82 date
2013年 11月 5日 星期四 17:27:58 CST
[grid@node1 ~]$
rbdb82上执行
[grid@rbdb82 ~]$ ssh rbdb81 date
2013年 11月 5日 星期四 17:28:09 CST
[grid@ rbdb82 ~]$
以上如果都不需要密码那么互信就好了


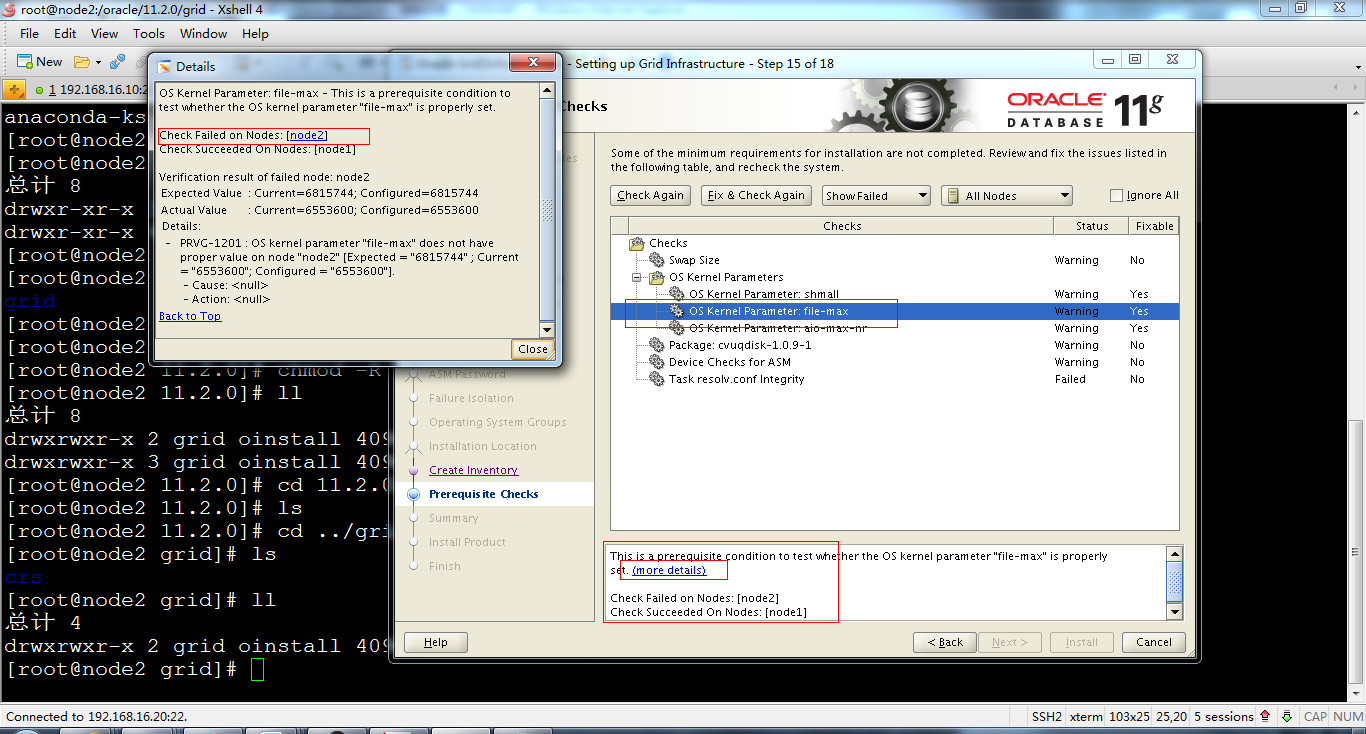
检查结果:有几个内核
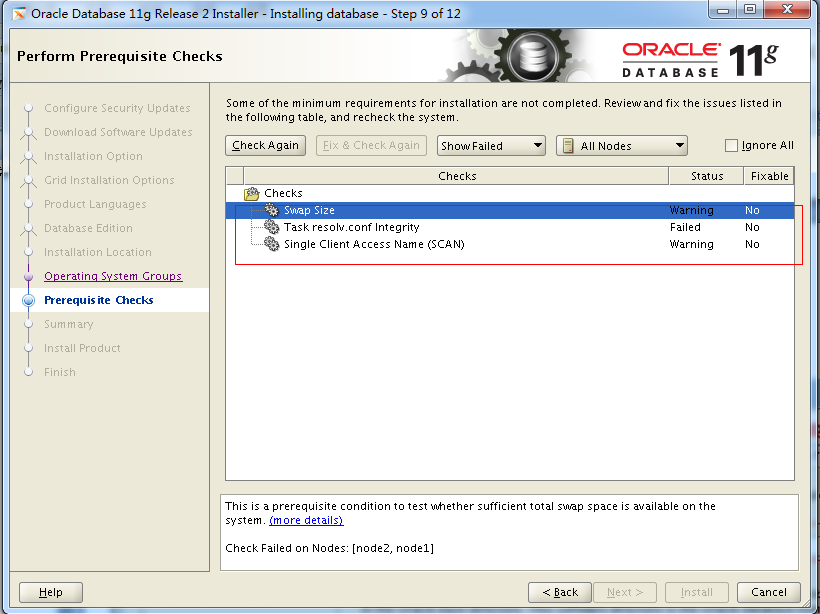
参数检测失败,更改时必须两个节点都更改
kernel.shmall = 2097152
fs.file-max = 6815744
fs.aio-max-nr = 1048576
对于包:(rbdb82可以使用scp拷贝rbdb81上面的包)
[root@node1 rpm]# rpm -ivh cvuqdisk-1.0.9-1.rpm
Preparing...########################################### [100%]
Using default group oinstall to install package
1:cvuqdisk########################################### [100%]
[root@node1 rpm]# pwd
/software/grid/rpm
[root@node1 rpm]#
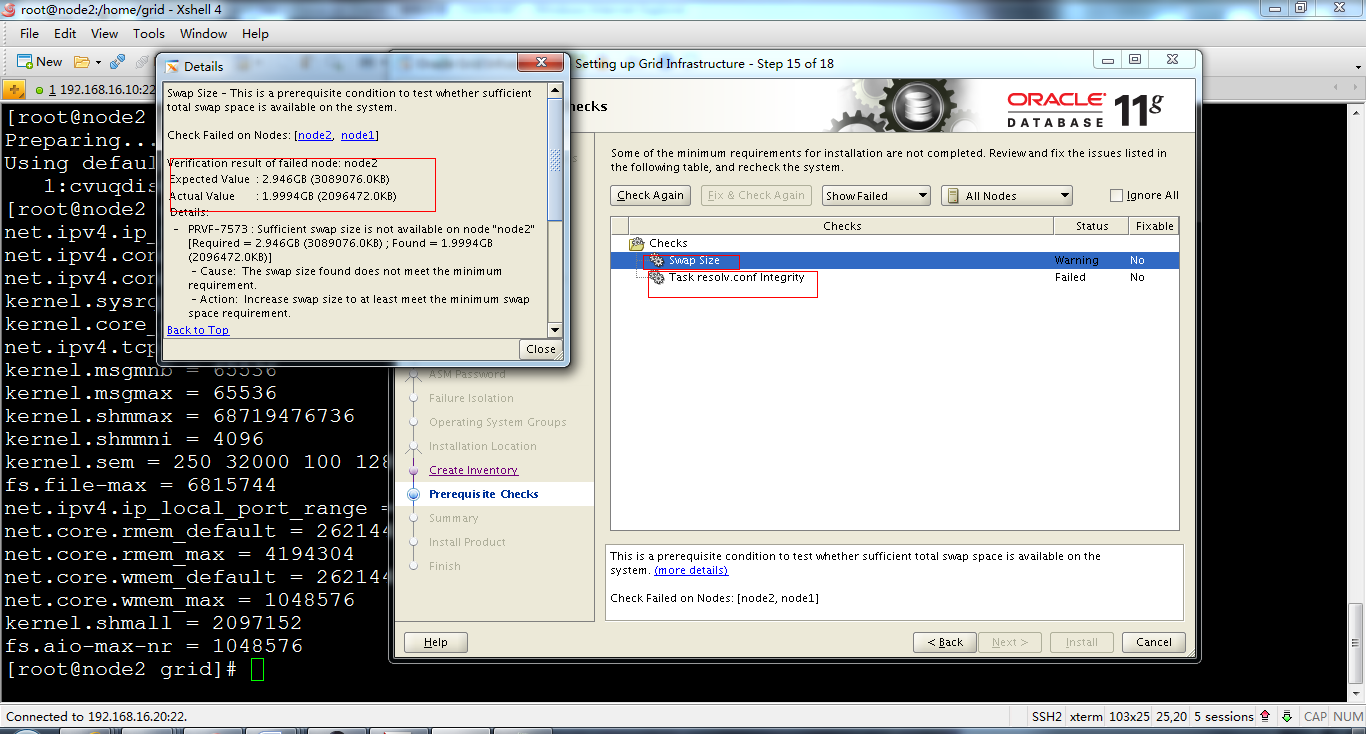
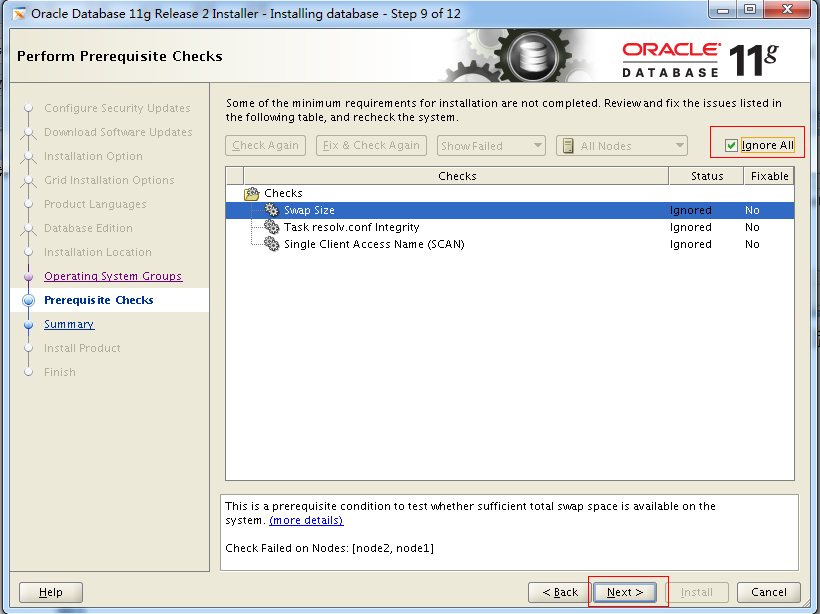
重新检查后,剩下swap和DNS的错误,swap错误现在不能解决,没有虚拟磁盘了,加盘需要重启。DNS不需要配置,所以就直接下一步

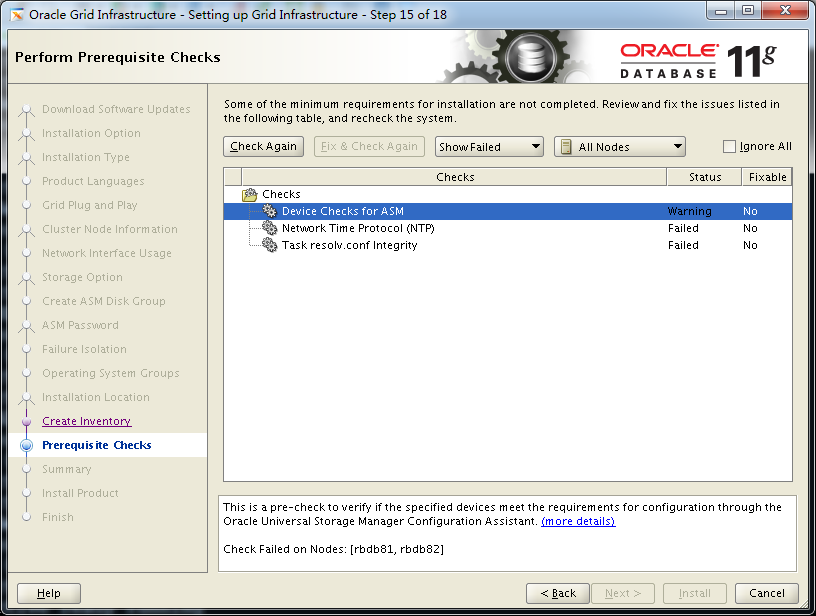
如果碰到以上问题,就要解决ASM的共享问题,在ASM节中有说明

进入安装光盘安装
[root@rbdb81 Packages]# rpm -ivh compat-libcap1-1.10-1.x86_64.rpm
warning: compat-libcap1-1.10-1.x86_64.rpm: Header V3 RSA/SHA256 Signature, key ID ec551f03: NOKEY
Preparing... ########################################### [100%]
1:compat-libcap1 ########################################### [100%]
[root@rbdb81 Packages]# pwd
/media/OL6.4 x86_64 Disc 1 20130225/Packages

跑脚本时一定要依次跑,第一个在node1跑完成功后,再在node2上跑,第一个在所有节点上都跑完成功后才跑第二个,跑法与第一个相同。跑的时候最好grid用户登录后再直接[grid@node1 ~]$ su进入root用户,这样能保留grid用户的环境变量。
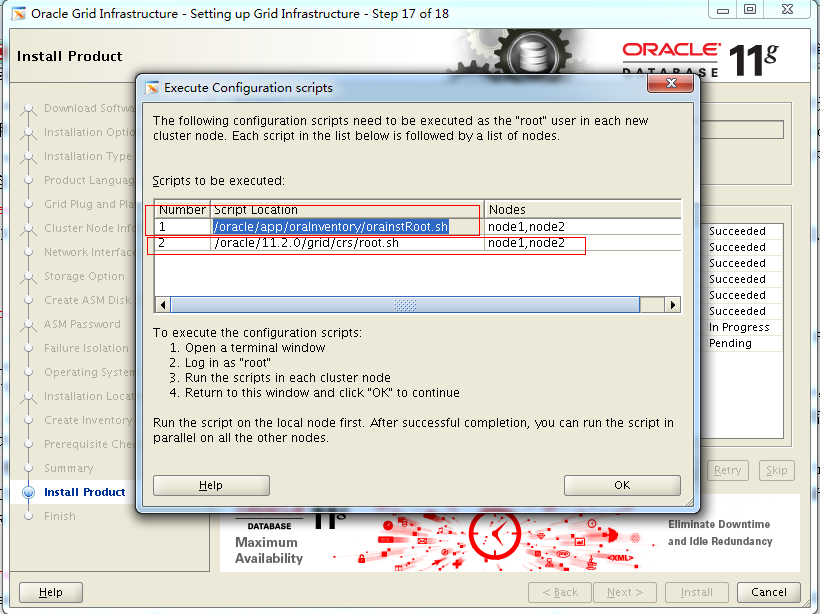
rbdb81:脚本一:/u01/app/oraInventory/orainstRoot.sh
[grid@node1 ~]$ id
uid=501(grid) gid=501(oinstall) groups=501(oinstall),503(asmadmin),504(asmdba),505(asmoper)
[grid@node1 ~]$ su
Password:
[root@node1 grid]# /oracle/app/oraInventory/orainstRoot.sh
Changing permissions of /oracle/app/oraInventory.
Adding read,write permissions for group.
Removing read,write,execute permissions for world.
Changing groupname of /oracle/app/oraInventory to oinstall.
The execution of the script is complete.
[root@node1 grid]# id
uid=0(root) gid=0(root) groups=0(root),1(bin),2(daemon),3(sys),4(adm),6(disk),10(wheel)
[root@node1 grid]#
rbdb82脚本一:/u01/app/oraInventory/orainstRoot.sh
[grid@node2 ~]$ id
uid=501(grid) gid=501(oinstall) groups=501(oinstall),503(asmadmin),504(asmdba),505(asmoper)
[grid@node2 ~]$ su
Password:
[root@node2 grid]# id
uid=0(root) gid=0(root) groups=0(root),1(bin),2(daemon),3(sys),4(adm),6(disk),10(wheel)
[root@node2 grid]# /oracle/app/oraInventory/orainstRoot.sh
Changing permissions of /oracle/app/oraInventory.
Adding read,write permissions for group.
Removing read,write,execute permissions for world.
Changing groupname of /oracle/app/oraInventory to oinstall.
The execution of the script is complete.
[root@node2 grid]#
rbdb81脚本二:/oracle/11.2.0/grid/crs/root.sh
[root@node1 grid]# id
uid=0(root) gid=0(root) groups=0(root),1(bin),2(daemon),3(sys),4(adm),6(disk),10(wheel)
[root@node1 grid]# /oracle/11.2.0/grid/crs/root.sh
Performing root user operation for Oracle 11g
The following environment variables are set as:
ORACLE_OWNER= grid
ORACLE_HOME= /oracle/11.2.0/grid/crs
Enter the full pathname of the local bin directory: [/usr/local/bin]: --回车
Copying dbhome to /usr/local/bin ...
Copying oraenv to /usr/local/bin ...
Copying coraenv to /usr/local/bin ...
Creating /etc/oratab file...
Entries will be added to the /etc/oratab file as needed by
Database Configuration Assistant when a database is created
Finished running generic part of root script.
Now product-specific root actions will be performed.
Using configuration parameter file: /oracle/11.2.0/grid/crs/crs/install/crsconfig_params
Creating trace directory
User ignored Prerequisites during installation
OLR initialization - successful
root wallet
root wallet cert
root cert export
peer wallet
profile reader wallet
pa wallet
peer wallet keys
pa wallet keys
peer cert request
pa cert request
peer cert
pa cert
peer root cert TP
profile reader root cert TP
pa root cert TP
peer pa cert TP
pa peer cert TP
profile reader pa cert TP
profile reader peer cert TP
peer user cert
pa user cert
Adding Clusterware entries to inittab
CRS-2672: Attempting to start 'ora.mdnsd' on 'node1'
CRS-2676: Start of 'ora.mdnsd' on 'node1' succeeded
CRS-2672: Attempting to start 'ora.gpnpd' on 'node1'
CRS-2676: Start of 'ora.gpnpd' on 'node1' succeeded
CRS-2672: Attempting to start 'ora.cssdmonitor' on 'node1'
CRS-2672: Attempting to start 'ora.gipcd' on 'node1'
CRS-2676: Start of 'ora.gipcd' on 'node1' succeeded
CRS-2676: Start of 'ora.cssdmonitor' on 'node1' succeeded
CRS-2672: Attempting to start 'ora.cssd' on 'node1'
CRS-2672: Attempting to start 'ora.diskmon' on 'node1'
CRS-2676: Start of 'ora.diskmon' on 'node1' succeeded
CRS-2676: Start of 'ora.cssd' on 'node1' succeeded
已成功创建并启动 ASM。
已成功创建磁盘组OCR_VOTE。
clscfg: -install mode specified
Successfully accumulated necessary OCR keys.
Creating OCR keys for user 'root', privgrp 'root'..
Operation successful.
CRS-4256: Updating the profile
Successful addition of voting disk 16a36bc2d6d04fb2bf0f1da5fab701a9.
Successfully replaced voting disk group with +OCR_VOTE.
CRS-4256: Updating the profile
CRS-4266: Voting file(s) successfully replaced
## STATE File Universal Id File Name Disk group
-- ----- ----------------- --------- ---------
1. ONLINE 16a36bc2d6d04fb2bf0f1da5fab701a9 (/dev/raw/raw1) [OCR_VOTE]
Located 1 voting disk(s).
CRS-2672: Attempting to start 'ora.asm' on 'node1'
CRS-2676: Start of 'ora.asm' on 'node1' succeeded
CRS-2672: Attempting to start 'ora.OCR_VOTE.dg' on 'node1'
CRS-2676: Start of 'ora.OCR_VOTE.dg' on 'node1' succeeded
CRS-2672: Attempting to start 'ora.registry.acfs' on 'node1'
CRS-2676: Start of 'ora.registry.acfs' on 'node1' succeeded
Configure Oracle Grid Infrastructure for a Cluster ... succeeded
[root@node1 grid]#
rbdb82脚本二:/oracle/11.2.0/grid/crs/root.sh
[root@node2 grid]# id
uid=0(root) gid=0(root) groups=0(root),1(bin),2(daemon),3(sys),4(adm),6(disk),10(wheel)
[root@node2 grid]# /oracle/11.2.0/grid/crs/root.sh
Performing root user operation for Oracle 11g
The following environment variables are set as:
ORACLE_OWNER= grid
ORACLE_HOME= /oracle/11.2.0/grid/crs
Enter the full pathname of the local bin directory: [/usr/local/bin]:
Copying dbhome to /usr/local/bin ...
Copying oraenv to /usr/local/bin ...
Copying coraenv to /usr/local/bin ...
Creating /etc/oratab file...
Entries will be added to the /etc/oratab file as needed by
Database Configuration Assistant when a database is created
Finished running generic part of root script.
Now product-specific root actions will be performed.
Using configuration parameter file: /oracle/11.2.0/grid/crs/crs/install/crsconfig_params
Creating trace directory
User ignored Prerequisites during installation
OLR initialization - successful
Adding Clusterware entries to inittab
CRS-4402: The CSS daemon was started in exclusive mode but found an active CSS daemon on node node1, number 1, and is terminating
An active cluster was found during exclusive startup, restarting to join the cluster
Configure Oracle Grid Infrastructure for a Cluster ... succeeded
[root@node2 grid]#
跑完脚本然后点OK
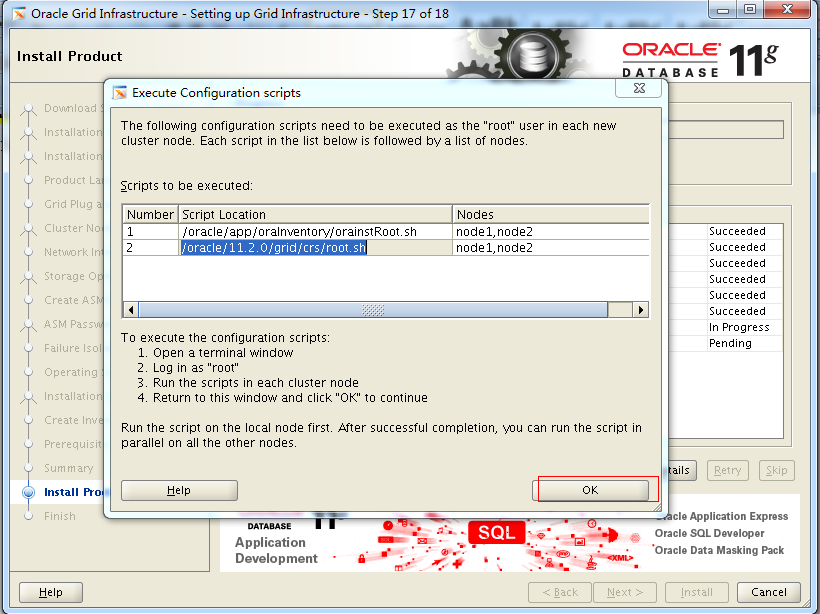
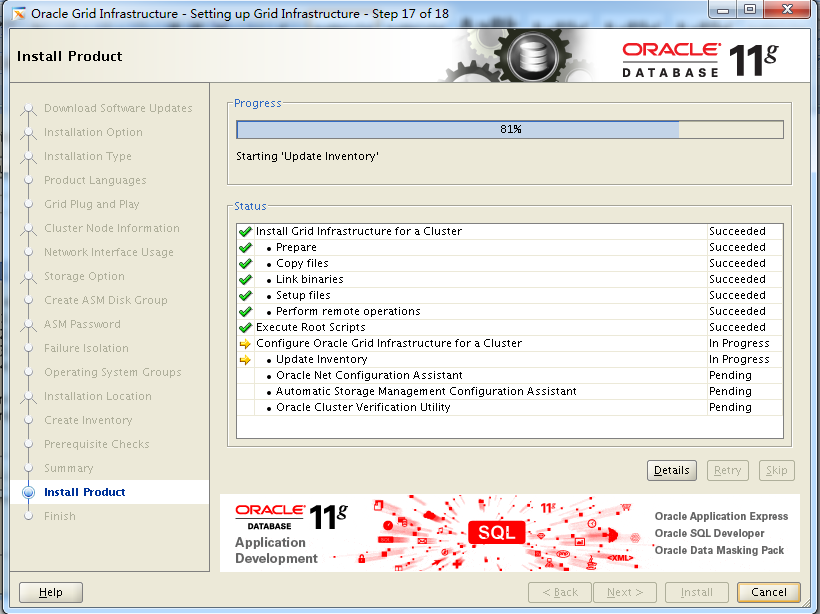
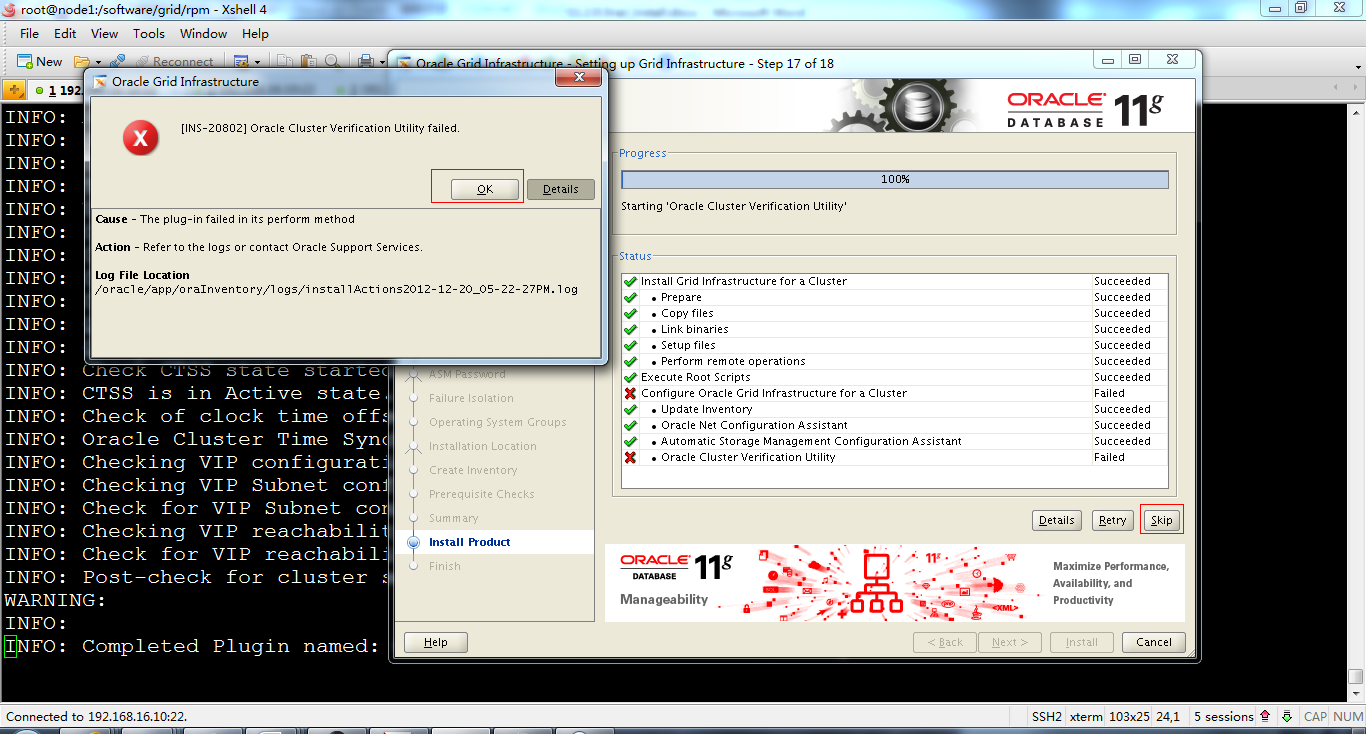
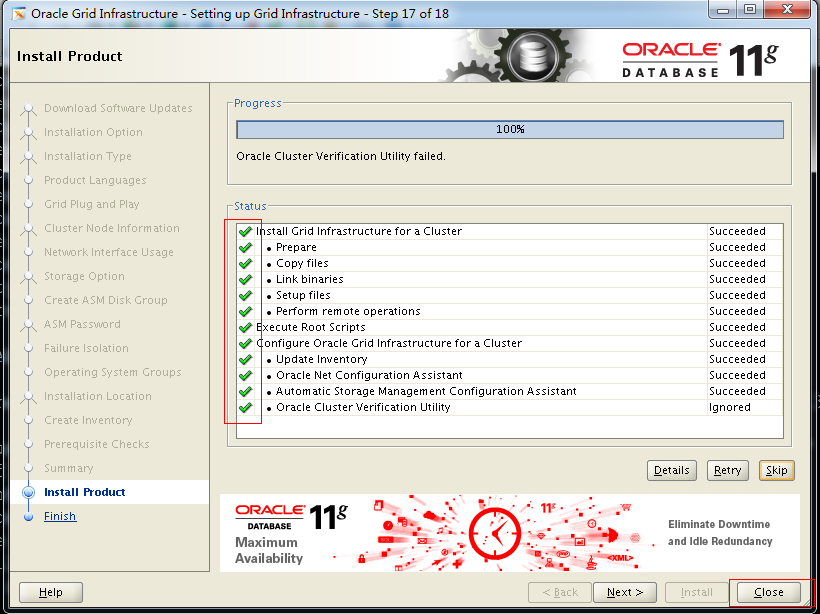
到100%的时候报错,可以直接点击OK,然后skip。查看日志发现几个error,
INFO: Checking name resolution setup for "dbscan"...
INFO: ERROR:
INFO: PRVG-1101 : SCAN name "dbscan" failed to resolve
INFO: ERROR:
INFO: PRVF-4657 : Name resolution setup check for "dbscan" (IP address: 192.168.16.30) failed
INFO: ERROR:
INFO: PRVF-4664 : Found inconsistent name resolution entries for SCAN name "dbscan"
INFO: Verification of SCAN VIP and Listener setup failed
INFO: Checking OLR integrity...
INFO: Checking OLR config file...
INFO: OLR config file check successful
INFO: Checking OLR file attributes...
INFO: OLR file check successful
INFO: WARNING:
INFO: Checking name resolution setup for "dbscan"...
INFO: ERROR:
INFO: PRVG-1101 : SCAN name "dbscan" failed to resolve
INFO: ERROR:
INFO: PRVF-4657 : Name resolution setup check for "dbscan" (IP address: 192.168.16.30) failed
INFO: ERROR:
INFO: PRVF-4664 : Found inconsistent name resolution entries for SCAN name "dbscan"
INFO: Verification of SCAN VIP and Listener setup failed
INFO: Checking OLR integrity...
INFO: Checking OLR config file...
INFO: OLR config file check successful
INFO: Checking OLR file attributes...
INFO: OLR file check successful
这个错误是scan解析失败,在os中ping一下scanip和scan name如果能ping通的话,那就没问题,直接ok,然后skip

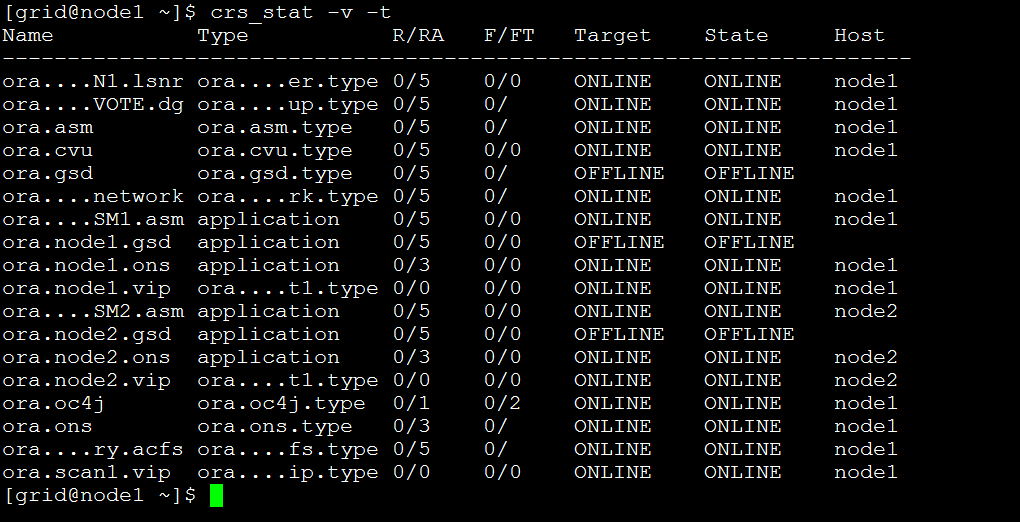
安装完成后,启动的asm实例自动加上了1和2
[grid@node1 grid]$ ps -ef|grep asm
grid 17770 1 0 18:23 ? 00:00:00 asm_pmon_+ASM1
grid 17772 1 0 18:23 ? 00:00:00 asm_psp0_+ASM1
grid 17776 1 0 18:23 ? 00:00:00 asm_vktm_+ASM1
[root@node2 grid]# ps –ef | grep asm
grid 23639 1 0 18:30 ? 00:00:00 asm_pmon_+ASM2
grid 23641 1 0 18:30 ? 00:00:00 asm_psp0_+ASM2
grid 23643 1 0 18:30 ? 00:00:00 asm_vktm_+ASM2
5.ORACLE安装
su - oracle
准备环境变量
rbdb81,rbdb82只需要更改sid。(可能在这里配置sid无效了,最后也会自动加上1和2,就像asm的sid一样)
vi /home/oracle/.bash_profile
|
ORACLE_BASE=/u01/app/oracle ORACLE_HOME=$ORACLE_BASE/product/11.2.0/db_1 ORACLE_SID=rbdb81 PATH=$ORACLE_HOME/bin:$ORACLE_HOME/OPatch:$PATH:$HOME/bin LANG=C export PATH ORACLE_BASE ORACLE_HOME ORACLE_SID LANG |
运行runInstaller 开始安装
./runInstaller


配置oracle用户的互信,与GI中的类似

[oracle@node1 ~]$ ssh node2 date
2012年 12月 20日 星期四 19:15:06 CST
[oracle@node1 ~]$
[oracle@node2 ~]$ ssh node1 date
2012年 12月 20日 星期四 19:15:13 CST
[oracle@node2 ~]$


后面两个错误都是DNS解析的问题,可以不管。第一个错误现在没有虚拟磁盘,不能解决。直接全部忽略,next


跑脚本,node1跑完成功后再在node2跑
node1
[root@node1 db_1]# id
uid=0(root) gid=0(root) groups=0(root),1(bin),2(daemon),3(sys),4(adm),6(disk),10(wheel)
[root@node1 db_1]# /oracle/app/oracle/product/11.2.0/db_1/root.sh
Performing root user operation for Oracle 11g
The following environment variables are set as:
ORACLE_OWNER= oracle
ORACLE_HOME= /oracle/app/oracle/product/11.2.0/db_1
Enter the full pathname of the local bin directory: [/usr/local/bin]: --回车
The contents of "dbhome" have not changed. No need to overwrite.
The contents of "oraenv" have not changed. No need to overwrite.
The contents of "coraenv" have not changed. No need to overwrite.
Entries will be added to the /etc/oratab file as needed by
Database Configuration Assistant when a database is created
Finished running generic part of root script.
Now product-specific root actions will be performed.
Finished product-specific root actions.
[root@node1 db_1]#
node2:
[root@node2 db_1]# id
uid=0(root) gid=0(root) groups=0(root),1(bin),2(daemon),3(sys),4(adm),6(disk),10(wheel)
[root@node2 db_1]# /oracle/app/oracle/product/11.2.0/db_1/root.sh
Performing root user operation for Oracle 11g
The following environment variables are set as:
ORACLE_OWNER= oracle
ORACLE_HOME= /oracle/app/oracle/product/11.2.0/db_1
Enter the full pathname of the local bin directory: [/usr/local/bin]:
The contents of "dbhome" have not changed. No need to overwrite.
The contents of "oraenv" have not changed. No need to overwrite.
The contents of "coraenv" have not changed. No need to overwrite.
Entries will be added to the /etc/oratab file as needed by
Database Configuration Assistant when a database is created
Finished running generic part of root script.
Now product-specific root actions will be performed.
Finished product-specific root actions.
[root@node2 db_1]#
跑完后点OK

6.ASM磁盘组
用ASMCA创建磁盘组
[root@rbdb81 ~]# su - grid
[grid@rbdb81 ~]$ asmca
Create 新建DG

选定磁盘点,用external,点OK

7.DBCA建库
[grid@rbdb81 ~]$ su - oracle
Password:
[oracle@rbdb81 ~]$ dbca


Recbok

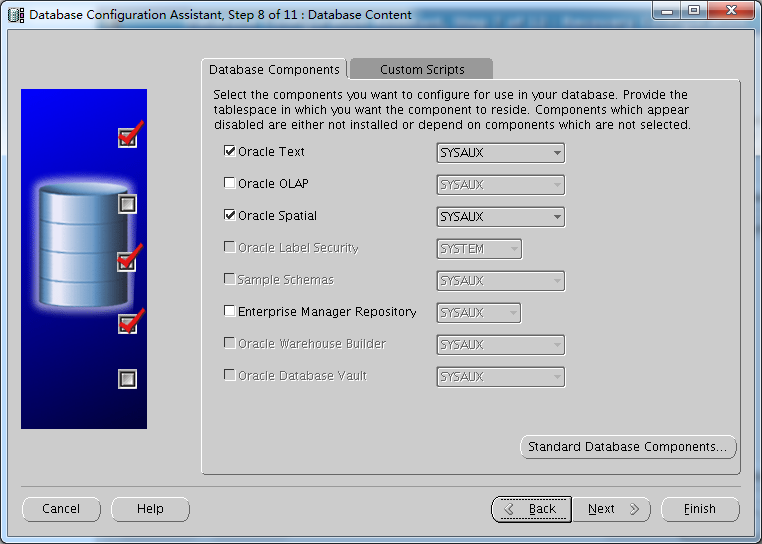
这里重要,要设置好字符集


8.参数设定
1.设置归档路径
SQL> show parameter log_archive_dest;
SQL> alter system set log_archive_dest_1='location=+ARCH' scope=spfile sid='*';
2.开启归档,在mount状态下
SQL> startup mount;
ORACLE instance started.
Total System Global Area 2.0243E+10 bytes
Fixed Size 2237088 bytes
Variable Size 2952793440 bytes
Database Buffers 1.7247E+10 bytes
Redo Buffers 41189376 bytes
Database mounted.
SQL> alter database archivelog;
Database altered.
SQL> alter database open;
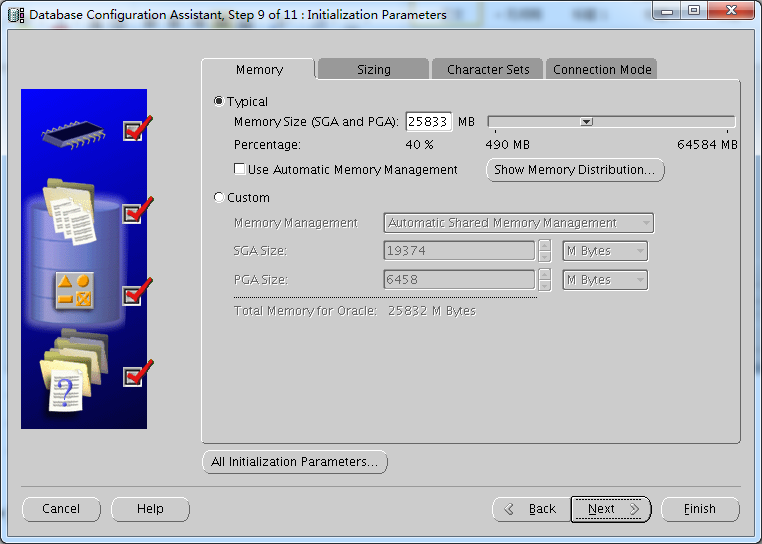
3.设置SGA =40%
SQL> show parameter sga
NAME TYPE VALUE
------------------------------------ ----------- ------------------------------
lock_sga boolean FALSE
pre_page_sga boolean FALSE
sga_max_size big integer 19392M
sga_target big integer 19392M
SQL> alter system set sga_target=25000M scope=spfile sid='*';
System altered.
4.设置PGA=20%
SQL> show parameter pga
NAME TYPE VALUE
------------------------------------ ----------- ------------------------------
pga_aggregate_target big integer 6458M
SQL> alter system set pga_aggregate_target=12000M scope=spfile sid='*';
System altered.
5.job 参数
SQL> show parameter job
NAME TYPE VALUE
------------------------------------ ----------- ------------------------------
job_queue_processes integer 1000
SQL> alter system set job_queue_processes=100 scope=spfile sid='*';
System altered.
6.增加控制文件
SQL> shutdown immediate
Database closed.
Database dismounted.
ORACLE instance shut down.
SQL> startup nomount;
ORACLE instance started.
[oracle@rbdb81 ~]$ rman target /
RMAN> restore controlfile to '+DATA02/rbdbon8/controlfile/control01.ctl'
from '+DATA01/rbdbon8/controlfile/current.256.831579049';
Starting restore at 18-NOV-13
using target database control file instead of recovery catalog
allocated channel: ORA_DISK_1
channel ORA_DISK_1: SID=82 instance=rbdbon81 device type=DISK
channel ORA_DISK_1: copied control file copy
Finished restore at 18-NOV-13
RMAN>exit
su - grid
asmcmd
ASMCMD> ls
control01.ctl
current.256.831809041
ASMCMD> ls -s
Block_Size Blocks BytesSpace Name
control01.ctl => +DATA02/RBDBON8/CONTROLFILE/current.256.831809041
16384 112918497536 25165824 current.256.831809041
ASMCMD> pwd
+data02/rbdbon8/controlfile
进入sqlplus / as sysdba
SQL> alter system set control_files='+DATA01/rbdbon8/controlfile/current.256.831579049',
'+DATA02/rbdbon8/controlfile/control01.ctl' scope=spfile sid='*';
System altered.
验证
SQL> select value from v$spparameter where name='control_files';
VALUE
--------------------------------------------------------------------------------
+DATA01/rbdbon8/controlfile/current.256.831579049
+DATA02/rbdbon8/controlfile/control01.ctl
重启数据库验证
SQL> set linesize 250
SQL> col name for a50
SQL> select * from v$controlfile;
STATUS NAME IS_ BLOCK_SIZE FILE_SIZE_BLKS
------- -------------------------------------------------- --- ---------- --------------
+DATA01/rbdbon8/controlfile/current.256.831579049 NO 16384 1128
+DATA02/rbdbon8/controlfile/control01.ctl NO 16384 1128
SQL> select value from v$spparameter where name='control_files';
VALUE
-----------------------------------------------------
+DATA01/rbdbon8/controlfile/current.256.831579049
+DATA02/rbdbon8/controlfile/control01.ctl
7.ocr镜像
先用ASM增加一个名为OCRVOTEMO1的磁盘组,然后按以下完成
[root@rbdb81 rmanbak]# su - grid
[grid@rbdb81 ~]$ ocrcheck
Status of Oracle Cluster Registry is as follows :
Version : 3
Total space (kbytes) :262120
Used space (kbytes) : 2888
Available space (kbytes) : 259232
ID : 1532418355
Device/File Name : +OCRVOTE
Device/File integrity check succeeded
Device/File not configured
Device/File not configured
Device/File not configured
Device/File not configured
Cluster registry integrity check succeeded
Logical corruption check bypassed due to non-privileged user
[grid@rbdb81 ~]$ ocrconfig -add +OCRVOTEMO1
PROT-20: Insufficient permission to proceed. Require privileged user
[grid@rbdb81 ~]$ su root
Password:
[root@rbdb81 grid]# ocrconfig -add +OCRVOTEMO1
[root@rbdb81 grid]# cd /etc/oracle
[root@rbdb81 oracle]# ls
lastgasp ocr.loc ocr.loc.origolr.loc olr.loc.orig oprocdscls_scr setasmgid
[root@rbdb81 oracle]# cat ocr.loc
#Device/file getting replaced by device +OCRVOTEMO1
ocrconfig_loc=+OCRVOTE
ocrmirrorconfig_loc=+OCRVOTEMO1
local_only=false[root@rbdb81 oracle]#
[root@rbdb81 oracle]# ocrcheck
Status of Oracle Cluster Registry is as follows :
Version : 3
Total space (kbytes) :262120
Used space (kbytes) :2904
Available space (kbytes) : 259216
ID : 1532418355
Device/File Name :+OCRVOTE
Device/File integrity check succeeded
Device/File Name : +OCRVOTEMO1
Device/File integrity check succeeded
Device/File not configured
Device/File not configured
Device/File not configured
Cluster registry integrity check succeeded
Logical corruption check succeeded
8.日志组设置
两边数据库启动时,使用以下脚本在sqlplus / as sysdba 中运行
1,创建4组日志组,大小为512M
alter database add logfile thread 1 group 5 '+DATA01' size 512M;
alter database add logfile thread 2 group 6 '+DATA01' size 512M;
alter database add logfile thread 1 group 7 '+DATA01' size 512M;
alter database add logfile thread 2 group 8 '+DATA01' size 512M;
2,切归档,切到原来4组不在current状态
alter system archive log current;
3,删除原来的日志组(只有52M,不够用,删掉)
alter database drop logfile group 1;
alter database drop logfile group 2;
alter database drop logfile group 3;
alter database drop logfile group 4;
4,增加4组新的日志组
alter database add logfile thread 1 group 1 '+DATA01' size 512M;
alter database add logfile thread 2 group 2 '+DATA01' size 512M;
alter database add logfile thread 1 group 3 '+DATA01' size 512M;
alter database add logfile thread 2 group 4 '+DATA01' size 512M;


9.processes
SQL> show parameter proces
NAME TYPE VALUE
------------------------------------ ----------- ------------------------------
aq_tm_processes integer 1
cell_offload_processing boolean TRUE
db_writer_processes integer 4
gcs_server_processes integer 3
global_txn_processes integer 1
job_queue_processes integer 100
log_archive_max_processes integer 4
processes integer 150
processor_group_name string
SQL> alter system set processes=5000 scope=spfile sid='*';
System altered.
10.设置RMAN策略
1, 设置备份为2份
CONFIGURE RETENTION POLICY TO REDUNDANCY 2;
2,设置控制文件自动备份
CONFIGURE CONTROLFILE AUTOBACKUP ON;
CONFIGURE CONTROLFILE AUTOBACKUP FORMAT FOR DEVICE TYPE DISK TO '/rmanbak/autocontrol/%F';
3,全备脚本
|
见RMAN备份计划手册 |
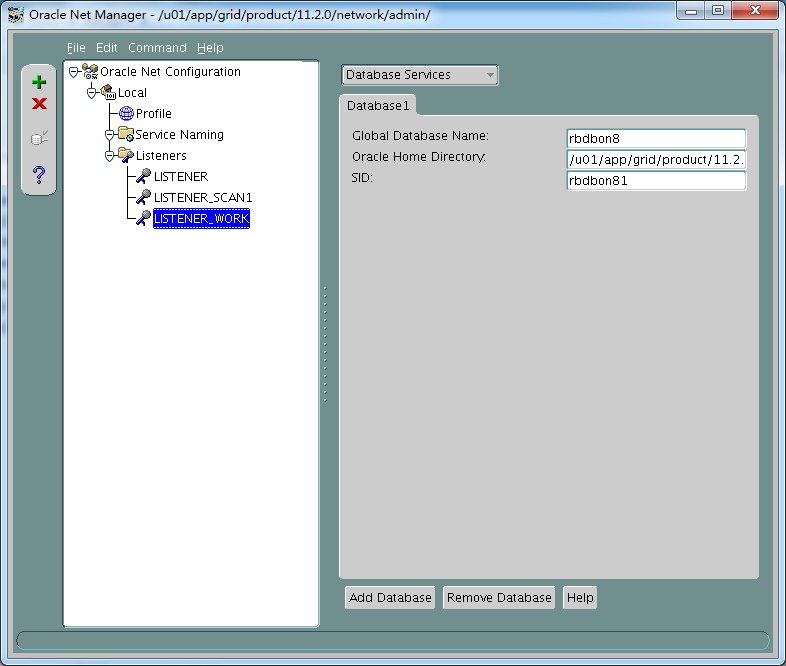
11.增加静态监听
Netca
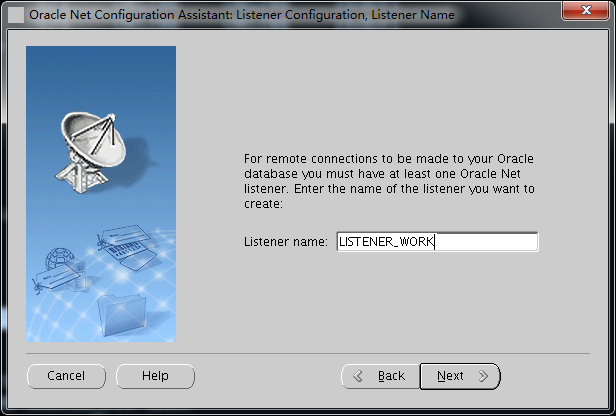
设置端口

Netmgr(两节点都要做)
12.tnsnames.ore文件
在客服端,HOSTS文件要增加
192.168.1.208 rbdb81
192.168.1.209 rbdb82
192.168.1.210 rbdb8scan
|
RBSCAN= (DESCRIPTION = (ADDRESS_LIST = (ADDRESS = (PROTOCOL = TCP)(HOST = rbdb8scan)(PORT = 1521)) ) (CONNECT_DATA = (SERVER = DEDICATED) (SERVICE_NAME = rbdbon8) ) )
RBVIP= (DESCRIPTION = (ADDRESS_LIST = (ADDRESS = (PROTOCOL = TCP)(HOST = rbdb81vip)(PORT = 1521)) (ADDRESS = (PROTOCOL = TCP)(HOST = rbdb82vip)(PORT = 1521)) ) (CONNECT_DATA = (SERVER = DEDICATED) (SERVICE_NAME = rbdbon8) ) )
RB55VIP= (DESCRIPTION = (ADDRESS_LIST = (LOAD_BALANCE=ON) (ADDRESS = (PROTOCOL = TCP)(HOST = rbdb81vip)(PORT = 1555)) (ADDRESS = (PROTOCOL = TCP)(HOST = rbdb82vip)(PORT = 1555)) ) (CONNECT_DATA = (SERVER = DEDICATED) (SERVICE_NAME = rbdbon8) ) ) |

