
SpringBoot的几个使用技巧
SpringBoot的几个使用技巧
首先提供几个SpringBoot开发过程中常用的网站:
- Spring Boot官方文档:http://docs.spring.io/spring-boot/docs
- SpringBoot项目初始化网站:https://start.spring.io/
- Maven依赖中心仓库:http://search.maven.org/#search|ga|1|g%3A"com.tacitknowledge.flip"
- 国内真正常用的Maven仓库:http://www.mvnrepository.com/
- Spring Boot讲的不错的博客:http://blog.csdn.net/isea533/article/details/50281151
本文不是为了全面的讲解基础知识,希望可以帮助新手少走一点弯路。(当然lz也是新手一枚,共同进步吧😄)
第一章 简单介绍
1.1 为什么使用Spring Boot
用于简化Spring应用的初始搭建和开发过程。
第二章 一些小问题
首先贴出简单地pom.xml配置文件:
<?xml version="1.0" encoding="UTF-8"?>
<project xmlns="http://maven.apache.org/POM/4.0.0" xmlns:xsi="http://www.w3.org/2001/XMLSchema-instance"
	xsi:schemaLocation="http://maven.apache.org/POM/4.0.0 http://maven.apache.org/xsd/maven-4.0.0.xsd">
	<modelVersion>4.0.0</modelVersion>

	<groupId>com.blog</groupId>
	<artifactId>MyBlog</artifactId>
	<version>0.0.1-SNAPSHOT</version>
	<packaging>jar</packaging>

	<name>MyBlog</name>
	<description>我的博客项目</description>

	<parent>
		<groupId>org.springframework.boot</groupId>
		<artifactId>spring-boot-starter-parent</artifactId>
		<version>1.3.8.RELEASE</version>
		<relativePath/> <!-- lookup parent from repository -->
	</parent>

        <!-- 项目属性 -->
	<properties>
		<project.build.sourceEncoding>UTF-8</project.build.sourceEncoding>
		<project.reporting.outputEncoding>UTF-8</project.reporting.outputEncoding>
		<java.version>1.8</java.version>
                <mybatis.version>1.1.1</mybatis.version>
                <mysql.version>5.1.38</mysql.version>
	</properties>

	<dependencies>
		<dependency>
			<groupId>org.springframework.boot</groupId>
			<artifactId>spring-boot-starter-web</artifactId>
		</dependency>

		<dependency>
			<groupId>org.springframework.boot</groupId>
			<artifactId>spring-boot-starter-test</artifactId>
			<scope>test</scope>
		</dependency>


		<dependency>
			<groupId>org.mybatis.spring.boot</groupId>
			<artifactId>mybatis-spring-boot-starter</artifactId>
			<version>${mybatis.version}</version>
		</dependency>

		<dependency>
			<groupId>mysql</groupId>
			<artifactId>mysql-connector-java</artifactId>
			<version>${mysql.version}</version>
			<scope>runtime</scope>
		</dependency>
	</dependencies>

	<build>
		<plugins>
			<plugin>
				<groupId>org.springframework.boot</groupId>
				<artifactId>spring-boot-maven-plugin</artifactId>
			</plugin>
		</plugins>
	</build>
</project>
2.1 为什么有些依赖不用标出版本
比如:
        <dependency>
            <groupId>org.springframework.boot</groupId>
            <artifactId>spring-boot-starter-web</artifactId>
        </dependency>
解答:由于父节点spring-boot-starter-parent包含了大量配置好的依赖管理,在自己项目添加这些依赖的时候不需要写
详细包含可见:Spring Boot starter
简单贴出一些,帮助自己记忆:
spring-boot-starter-web //对web开发的支持,包括内置的Tomcat和spring-webmvc
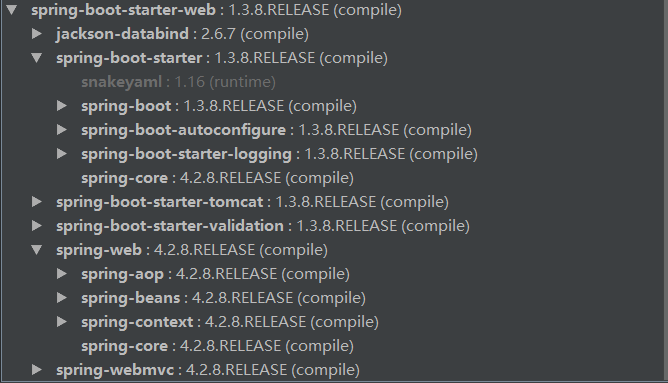
spring-boot-starter  //Spring Boot starter的核心,包括自动配置的支持, logging 和 yml配置
spring-boot-starter-actuator //为应用添加了管理特性
spring-boot-starter-aop  //面向切面编程的支持,包括spring-aop和AspectJ
spring-boot-starter-jdbc  //jdbc数据库的支持
spring-boot-starter-mail  //对javax.mail的支持
spring-boot-starter-redis //对redis的支持,包括spring-redis
spring-boot-starter-security   //对spring-security的支持
spring-boot-starter-test  //常见的测试依赖,包括JUnit, Hamcrest, Mockito 和 spring-test 模块
spring-boot-starter-thymeleaf   //对渲染模板引擎的支持
2.2 每次更改都要重启项目,怎么办
可以考虑启用热部署
方法1 添加springloaded依赖
    <dependency>
        <groupId>org.springframework</groupId>
        <artifactId>springloaded</artifactId>
        <version>1.2.5.RELEASE</version>
    </dependency>
启动项目→修改文件→右击修改的文件→重新编译,或者打开IDE的自动编译功能
方法2 添加spring-boot-devtools依赖
    <dependency>
        <groupId>org.springframework.boot</groupId>
        <artifactId>spring-boot-devtools</artifactId>
    </dependency>
启动项目→修改文件→右击修改的文件→重新编译,或者打开IDE的自动编译功能
原理:spring-boot-devtools 是一个为开发者服务的一个模块,其中最重要的功能就是自动应用代码更改到最新的App上面去。原理是在发现代码有更改之后,重新启动应用,但是速度比手动停止后再启动还要更快,更快指的不是节省出来的手工操作的时间。其深层原理是使用了两个ClassLoader,一个Classloader加载那些不会改变的类(第三方Jar包),另一个ClassLoader加载会更改的类,称为 restart ClassLoader,这样在有代码更改的时候,原来的restart ClassLoader 被丢弃,重新创建一个restart ClassLoader,由于需要加载的类相比较少,所以实现了较快的重启时间(5秒以内)。
第三章 配置文件
在 spring boot 中,有两种配置文件,一种是application.properties,另一种是application.yml,两种都可以配置spring boot 项目中的一些变量的定义,参数的设置等。下面来说说两者的区别。
区别
假设我们简单地配置MySQL数据库,application.properties如下所示:
spring.datasource.url=jdbc:mysql://localhost:3306/myblog?useUnicode=true&characterEncoding=utf8&useSSL=false
spring.datasource.username=root
spring.datasource.password=root
application.yml如下所示:
spring:
  datasource:
    url: jdbc:mysql://localhost:3306/myblog?useUnicode=true&characterEncoding=utf8&useSSL=false
    username: root
    password: root
可以看出来,yml 文件在写的时候层次感强,而且少写了代码。所以现在很多人都使用yml配置文件。
❗使用.yml时,属性名的值和冒号中间必须有空格。同时,yml属性文件不支持@PropertySource注解。
针对不同环境的配置方法:
详细可看:Spring Boot 属性配置和使用
针对开发(development)环境的配置文件:
application-dev.yml
#Windows开发环境下的配置文件
server:
    port: 80
    tomcat:
          maxThreads: 10
          minSpareThreads: 3
          accesslog:
            #注意这里G:/home/myblog/log/server_log也可以
            directory: G:\home\myblog\log\server_log
            pattern: combined
            enabled: true
针对生产(production)环境下的配置文件:
application-prod.yml
#Centos生产环境下的配置文件
server:
    port: 80
    tomcat:
          maxThreads: 10
          minSpareThreads: 3
          accesslog:
            directory: /home/myblog/log/server_log
            pattern: combined
            enabled: true
如何定义使用哪种配置文件呢?
在主配置文件application.yml中配置如下:
spring:
  profiles:
    active: prod
**在定义配置文件时,可以使用占位符:
app.name=MyApp
app.description=${app.name} is a Spring Boot application
app.id=${random.int[1024,65536]}
如何在类中应用配置文件
优先级:
当前目录子目录的/config > 当前目录 > classpath的/config包 > classpath的根目录
即:越靠近的优先级越高
**指定配置文件
@PropertySource 和 SpringApplication.setDefaultProperties,比如:
SpringApplication application = new SpringApplication(Application.class);
Map<String, Object> defaultMap = new HashMap<String, Object>();
defaultMap.put("name", "Isea-Blog");
//还可以是Properties对象
application.setDefaultProperties(defaultMap);
application.run(args);
**应用属性
@Value(“${xxx}”)和@ConfigurationProperties,比如:
配置文件:
my.name=Isea533
my.port=8080
my.servers[0]=dev.bar.com
my.servers[1]=foo.bar.com
对应对象:
@ConfigurationProperties(prefix="my")
public class Config {
    private String name;
    private Integer port;
    private List<String> servers = new ArrayList<String>();

    public String geName(){
        return this.name;
    }

    public Integer gePort(){
        return this.port;
    }
    public List<String> getServers() {
        return this.servers;
    }
}
Spring Boot 会自动将prefix="my"前缀为my的属性注入进来。当然若不指定前缀,则将名字对应的注入,可能冲突。
比如我在文件中配置了一个
massage:
  data:
    name: qibaoyi
我在类中想要获取他 需要这样去写:
@Value("${message.data.name}")
private String name;


 浙公网安备 33010602011771号