
JAVAEE——BOS物流项目07:WebService入门、apache CXF入门、基于CXF发布CRM服务
1 学习计划
1、WebService入门
n 什么是WebService
n 调用网络上的WebService服务
n SOAP和WSDL概念
n 基于JDK1.7发布一个简单的WebService服务
n 使用JDK的wsimport命令生成本地代码调用WebService服务
2、apache CXF入门
n CXF简介
n CXF入门案例(服务端开发)
n CXF入门案例(客户端开发)
1)使用WSDL2Java命令生成本地代码调用
2)在配置文件中注册代理对象调用
3、基于CXF发布CRM服务
n 创建CRM数据库和CRM客户表
n 发布服务
2 WebService入门
2.1 什么是WebService
Web service是一个平台独立的,低耦合的,自包含的、基于可编程的web的应用程序,可使用开放的XML(标准通用标记语言下的一个子集)标准来描述、发布、发现、协调和配置这些应用程序,用于开发分布式的互操作的应用程序。[1]
Web Service技术, 能使得运行在不同机器上的不同应用无须借助附加的、专门的第三方软件或硬件, 就可相互交换数据或集成。依据Web Service规范实施的应用之间, 无论它们所使用的语言、 平台或内部协议是什么, 都可以相互交换数据。Web Service是自描述、 自包含的可用网络模块, 可以执行具体的业务功能。Web Service也很容易部署, 因为它们基于一些常规的产业标准以及已有的一些技术,诸如标准通用标记语言下的子集XML、HTTP。Web Service减少了应用接口的花费。Web Service为整个企业甚至多个组织之间的业务流程的集成提供了一个通用机制。
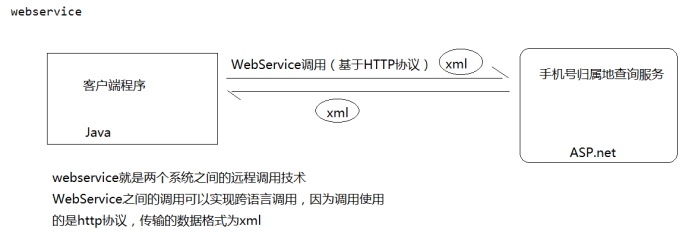
l WebService的特点
- WebService通过HTTP POST方式接受客户的请求
- WebService与客户端之间一般使用SOAP协议传输XML数据
- 它本身就是为了跨平台或跨语言而设计的
2.2 调用网络上的WebService服务
http://webxml.com.cn/
2.3 SOAP和WSDL概念
2.3.1 SOAP(Simple Object Access Protocol):简单对象访问协议
n SOAP作为一个基于XML语言的协议用于在网上传输数据。
n SOAP = 在HTTP的基础上+XML数据。
n SOAP是基于HTTP的。
u SOAP的组成如下:
l Envelope – 必须的部分。以XML的根元素出现。
l Headers – 可选的。
l Body – 必须的。在body部分,包含要执行的服务器的方法。和发送到服务器的数据。
示例:
POST /WebServices/IpAddressSearchWebService.asmx HTTP/1.1
Host: ws.webxml.com.cn
Content-Type: text/xml; charset=utf-8
Content-Length: length
SOAPAction: "http://WebXml.com.cn/getCountryCityByIp"

<?xml version="1.0" encoding="utf-8"?>
<soap:Envelope xmlns:xsi="http://www.w3.org/2001/XMLSchema-instance" xmlns:xsd="http://www.w3.org/2001/XMLSchema" xmlns:soap="http://schemas.xmlsoap.org/soap/envelope/">
  <soap:Body>
    <getCountryCityByIp xmlns="http://WebXml.com.cn/">
      <theIpAddress>string</theIpAddress>
    </getCountryCityByIp>
  </soap:Body>
</soap:Envelope>
2.3.2 WSDL Web服务描述语言
WSDL(WebService Description Language):web 服务描述语言
就是一个xml文档,用于描述当前服务的一些信息(服务名称、服务的发布地址、服务提供的方法、方法的参数类型、方法的返回值类型等)
3 基于jdk1.7发布一个WebService服务
3.1 服务端发布
第一步:创建一个Java项目
第二步:创建一个类,加入Webservice注解
第三步:提供一个方法sayHello
第四步:在main方法中调用jdk提供的发布服务的方法
第五步:访问服务的wsdl文档(服务的发布地址+?wsdl)http://192.168.115.87:8080/hello?wsdl
@WebService
public class HelloService {
    public String sayHello(String name,int i){
        System.out.println("服务端的sayHello方法被调用了。。。。");
        return "helle" + name;
    }

    public static void main(String[] args) {
        String address = "http://192.168.115.87:8080/hello";
        Object implementor = new HelloService();
        Endpoint.publish(address, implementor);
    }
}
3.2 客户端调用
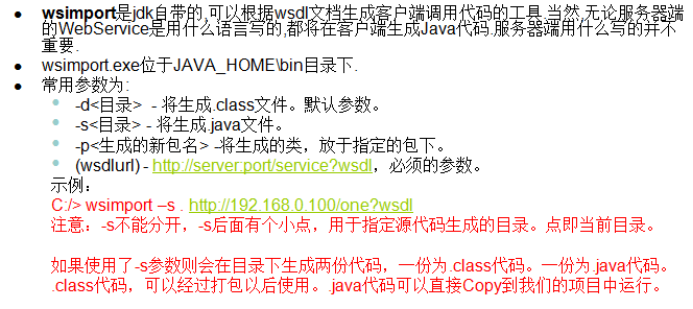
3.2.1 jdk中wsimport命令使用
作用:解析wsdl文件,生成客户端本地代码
3.2.2 客户端调用
1、使用wsimport命令解析wsdl文件生成本地代码
2、通过本地代码创建一个代理对象
3、通过代理对象实现远程调用
/**
 * 1、使用wsimport命令解析wsdl文件生成本地代码
 * 2、通过本地代码创建一个代理对象
 * 3、通过代理对象实现远程调用
 * @author zhaoqx
 *
 */
public class App {
    public static void main(String[] args) {
        HelloServiceService ss = new HelloServiceService();
        //创建客户端代理对象,用于远程调用
        HelloService proxy = ss.getHelloServicePort();
        String ret = proxy.sayHello("小明", 10);
        System.out.println(ret);
    }
}
4 apache CXF入门
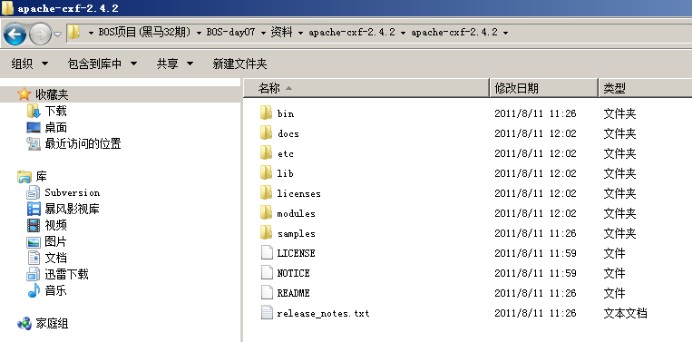
4.1 下载
官网:cxf.apache.org
下载CXF的开发包:


解压上面的zip文件:
l Apache CXF = Celtix + Xfire
l 支持多种协议:
- SOAP1.1,1.2
- XML/HTTP
- CORBA(Common Object Request Broker Architecture公共对象请求代理体系结构,早期语言使用的WS。C,c++,C#)
- 并可以与Spring进行快速无缝的整合
- 灵活的部署:可以运行在Tomcat,Jboss,Jetty(内置),IBMWS,BeaWL上面。
4.2 入门案例(服务端开发)
第一步:创建动态web项目
第二步:导入CXF相关jar包

第三步:在web.xml中配置CXF框架提供的一个Servlet
  <!-- 配置CXF框架提供的Servlet -->
  <servlet>
      <servlet-name>cxf</servlet-name>
      <servlet-class>org.apache.cxf.transport.servlet.CXFServlet</servlet-class>
      <!-- 通过初始化参数指定CXF框架的配置文件位置 -->
      <init-param>
          <param-name>config-location</param-name>
          <param-value>classpath:cxf.xml</param-value>
      </init-param>
  </servlet>
  <servlet-mapping>
      <servlet-name>cxf</servlet-name>
      <url-pattern>/service/*</url-pattern>
  </servlet-mapping>
第四步:在类路径下提供cxf.xml
<?xml version="1.0" encoding="UTF-8"?>
<beans xmlns="http://www.springframework.org/schema/beans"
xmlns:xsi="http://www.w3.org/2001/XMLSchema-instance"
xmlns:jaxws="http://cxf.apache.org/jaxws"
xmlns:soap="http://cxf.apache.org/bindings/soap"
xsi:schemaLocation="http://www.springframework.org/schema/beans
                    http://www.springframework.org/schema/beans/spring-beans.xsd
                    http://cxf.apache.org/bindings/soap
                    http://cxf.apache.org/schemas/configuration/soap.xsd
                    http://cxf.apache.org/jaxws
                    http://cxf.apache.org/schemas/jaxws.xsd">
    <!-- 引入CXF Bean定义如下,早期的版本中使用 -->
    <import resource="classpath:META-INF/cxf/cxf.xml" />
    <import resource="classpath:META-INF/cxf/cxf-extension-soap.xml" />
    <import resource="classpath:META-INF/cxf/cxf-servlet.xml" />

</beans>
第五步:开发一个接口和实现类

第六步:在cxf.xml中注册服务

4.3 入门案例(客户端开发)
l 方式一:使用jdk提供的wsimport命令生成本地代码完成调用
l 方式二:使用CXF提供的方式(重点)
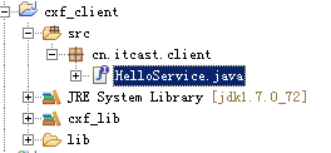
第一步:创建Java项目并导入CXF相关jar包
第二步:使用wsimport或者CXF提供wsdl2java生成本地代码,只需要生成接口文件

第三步:将接口文件复制到项目中
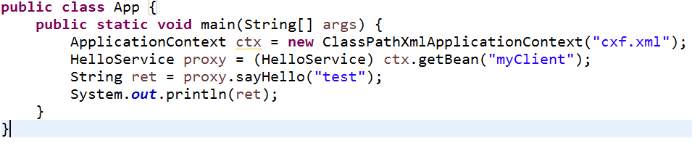
第四步:提供spring配置文件,注册客户端代理对象

第五步:读取spring配置文件,创建spring工厂,从工厂中获取代理对象,实现远程调用
5 基于CXF开发crm服务
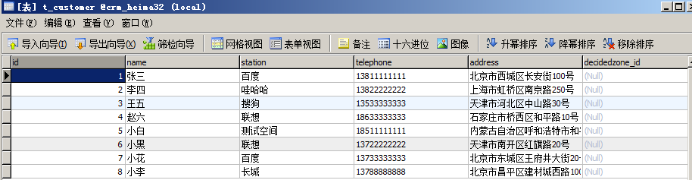
5.1 数据库环境搭建

执行sql脚本:
5.2 web项目环境搭建
第一步:创建动态web项目
第二步:导入CXF相关jar包
第三步:配置web.xml
 <context-param>
      <param-name>contextConfigLocation</param-name>
      <param-value>classpath:cxf.xml</param-value>
  </context-param>

  <listener>
      <listener-class>org.springframework.web.context.ContextLoaderListener</listener-class>
  </listener>

  <!-- 配置CXF框架提供的Servlet -->
  <servlet>
      <servlet-name>cxf</servlet-name>
      <servlet-class>org.apache.cxf.transport.servlet.CXFServlet</servlet-class>
  </servlet>
  <servlet-mapping>
      <servlet-name>cxf</servlet-name>
      <url-pattern>/service/*</url-pattern>
  </servlet-mapping>
第四步:在类路径下提供cxf.xml
<?xml version="1.0" encoding="UTF-8"?>
<beans xmlns="http://www.springframework.org/schema/beans"
xmlns:xsi="http://www.w3.org/2001/XMLSchema-instance"
xmlns:jaxws="http://cxf.apache.org/jaxws"
xmlns:soap="http://cxf.apache.org/bindings/soap"
xsi:schemaLocation="http://www.springframework.org/schema/beans
                    http://www.springframework.org/schema/beans/spring-beans.xsd
                    http://cxf.apache.org/bindings/soap
                    http://cxf.apache.org/schemas/configuration/soap.xsd
                    http://cxf.apache.org/jaxws
                    http://cxf.apache.org/schemas/jaxws.xsd">
    <!-- 引入CXF Bean定义如下,早期的版本中使用 -->
    <import resource="classpath:META-INF/cxf/cxf.xml" />
    <import resource="classpath:META-INF/cxf/cxf-extension-soap.xml" />
    <import resource="classpath:META-INF/cxf/cxf-servlet.xml" />
</beans>
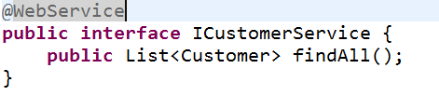
第五步:针对t_customer表创建一个Customer客户实体类
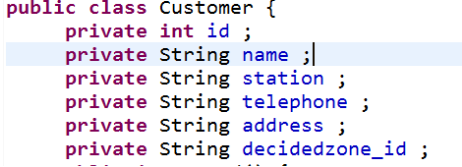
Customer的空参方法需要保留,在wsimport生成代码的时候才会有相应的java
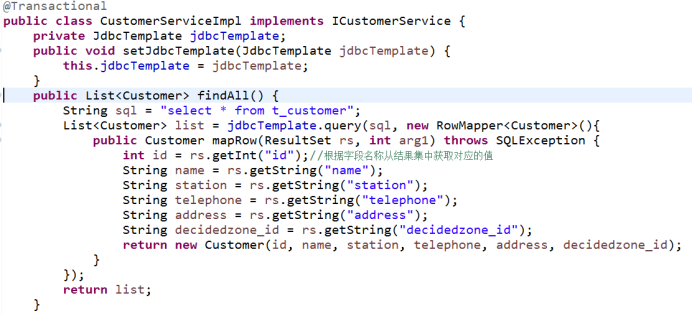
第六步:开发一个接口和实现类
第七步:配置cxf.xml
    <!-- 配置数据源 -->
    <bean id="dataSource" class="org.springframework.jdbc.datasource.DriverManagerDataSource">
        <property name="driverClassName" value="com.mysql.jdbc.Driver"/>
        <property name="url" value="jdbc:mysql:///crm_heima32"/>
        <property name="username" value="root"/>
        <property name="password" value="root"/>
    </bean>

    <!-- 事务管理器 -->
    <bean id="txManager" class="org.springframework.jdbc.datasource.DataSourceTransactionManager">
        <property name="dataSource" ref="dataSource"/>
    </bean>

    <!-- 支持事务注解 -->
    <tx:annotation-driven transaction-manager="txManager"/>

    <bean id="jdbcTemplate" class="org.springframework.jdbc.core.JdbcTemplate">
        <property name="dataSource" ref="dataSource"/>
    </bean>

    <bean id="customerService" class="com.itheima.crm.service.CustomerServiceImpl">
        <property name="jdbcTemplate" ref="jdbcTemplate"/>
    </bean>

    <!-- 注册服务 -->
    <jaxws:server id="myService" address="/customer">
        <jaxws:serviceBean>
            <ref bean="customerService"/>
        </jaxws:serviceBean>
    </jaxws:server>
作者: kent鹏
出处: http://www.cnblogs.com/xieyupeng/
关于作者:专注JAVAEE领域,请多多赐教!
本文版权归作者和博客园共有,欢迎转载,但未经作者同意必须保留此段声明,且在文章页面明显位置给出原文链接。

