

IOS开发基础知识--碎片39
1:UIWindow知识点
- (BOOL)application:(UIApplication *)application didFinishLaunchingWithOptions:(NSDictionary *)launchOptions {

    self.window=[[UIWindow alloc]initWithFrame:[[UIScreen mainScreen]bounds]];

    self.window.backgroundColor=[UIColor redColor];

    self.window.rootViewController=[[ViewController alloc]init];

    [self.window makeKeyAndVisible];

    return YES;

}
iOS9要求所有UIWindow都有rootViewController,如果没有rootViewController就会报错了;
(a)【self.window makekeyandvisible】让窗口成为主窗口,并且显示出来。有这个方法,才能把信息显示到屏幕上。
(b) 因为Window有makekeyandvisible这个方法,可以让这个Window凭空的显示出来,而其他的view没有这个方法,所以它只能依赖于Window,Window显示出来后,view才依附在Window上显示出来。
(c)【self.window make keywindow】//让uiwindow成为主窗口,但不显示。
(d)[UIApplication sharedApplication].windows 在本应用中打开的UIWindow列表,这样就可以接触应用中的任何一个UIView对象(平时输入文字弹出的键盘,就处在一个新的UIWindow中)
(d)[UIApplication sharedApplication].keyWindow(获取应用程序的主窗口)用来接收键盘以及非触摸类的消息事件的UIWindow,而且程序中每个时刻只能有一个UIWindow是keyWindow。
提示:如果某个UIWindow内部的文本框不能输入文字,可能是因为这个UIWindow不是keyWindow
(f)view.window获得某个UIView所在的UIWindow
2:UINavigationController知识点
a.把子控制器添加到导航控制器中的四种方法
第一种:
1.创建一个导航控制器
UINavigationController *nav=[[UINavigationControlleralloc]init];
2.设置导航控制器为window的根视图
self.window.rootViewController=nav;
3.添加
YYOneViewController *one = [[YYOneViewController alloc] init];
[nav pushViewController:one animated:YES];
第二种:
1.创建一个导航控制器
UINavigationController *nav=[[UINavigationControlleralloc]init];
2.设置导航控制器为window的根视图
self.window.rootViewController=nav;
3.添加
YYOneViewController *one = [[YYOneViewController alloc] init];
[nav addChildViewController:one];
第三种:
1.创建一个导航控制器
UINavigationController *nav=[[UINavigationControlleralloc]init];
2.设置导航控制器为window的根视图
self.window.rootViewController=nav;
3.添加
YYOneViewController *one = [[YYOneViewController alloc] init];
nav.viewControllers=@[one];(添加到导航控制器的栈中)
说明:nav.viewControllers;== nav.childViewControllers;注意该属性是只读的,因此不能像下面这样写。nav.childViewControllers = @[one];
第四种:最常用的方法
YYOneViewController *one=[[YYOneViewController alloc]init];
UINavigationController *nav=[[UINavigationController alloc]initWithRootViewController:one];
b.当前子控制器界面导航栏的标题以及对应返回标题的设置
self.navigationItem.title=@"第一个界面";
self.navigationItem.backBarButtonItem=[[UIBarButtonItemalloc]initWithTitle:@"返回一" style:UIBarButtonItemStylePlain target:nilaction:nil];
c.给导航栏添加按钮
说明:可添加一个,也可以添加多个(数组)
添加导航栏左边的按钮(添加一个相机图标的按钮),会盖掉返回
self.navigationItem.leftBarButtonItem=[[UIBarButtonItem alloc]initWithBarButtonSystemItem:UIBarButtonSystemItemCamera target:nil action:nil];
d.界面跳转
跳转到第二个界面(当前为第三个,移除当前栈顶的控制器)
[self.navigationController popViewControllerAnimated:YES];
移除处理栈底控制器之外的所有控制器
[self.navigationController popToRootViewControllerAnimated:YES];
只要传入栈中的某一个控制器,就会跳转到指定控制器 [self.navigationController popToViewController:<#(UIViewController *)#> animated:<#(BOOL)#>];
说明:
导航控制器是通过栈的形式来管理子控制器的(先进后出),显示在导航控制器上得view永远是栈顶控制器的view,一个导航控制器只有一个导航条,也就是说所有的自控制器公用一个导航条。
附:打印当前window下面的所有子控件,并通过xml文件来保存
// 应用程序获取焦点(代表着可以和用户交互)
- (void)applicationDidBecomeActive:(UIApplication *)application
{
    NSLog(@"applicationDidBecomeActive");


    UINavigationController *nav =  (UINavigationController *)self.window.rootViewController;
    UINavigationBar *bar =  nav.navigationBar;
//    NSLog(@"%@", NSStringFromCGRect(bar.frame));

    NSString *str =  [self digView:self.window];
    [str writeToFile:@"/Users/apple/Desktop/ios6.xml" atomically:YES];

}

/**
 *  返回传入veiw的所有层级结构
 *
 *  @param view 需要获取层级结构的view
 *
 *  @return 字符串
 */
- (NSString *)digView:(UIView *)view
{
    if ([view isKindOfClass:[UITableViewCell class]]) return @"";
    // 1.初始化
    NSMutableString *xml = [NSMutableString string];

    // 2.标签开头
    [xml appendFormat:@"<%@ frame=\"%@\"", view.class, NSStringFromCGRect(view.frame)];
    if (!CGPointEqualToPoint(view.bounds.origin, CGPointZero)) {
        [xml appendFormat:@" bounds=\"%@\"", NSStringFromCGRect(view.bounds)];
    }

    if ([view isKindOfClass:[UIScrollView class]]) {
        UIScrollView *scroll = (UIScrollView *)view;
        if (!UIEdgeInsetsEqualToEdgeInsets(UIEdgeInsetsZero, scroll.contentInset)) {
            [xml appendFormat:@" contentInset=\"%@\"", NSStringFromUIEdgeInsets(scroll.contentInset)];
        }
    }

    // 3.判断是否要结束
    if (view.subviews.count == 0) {
        [xml appendString:@" />"];
        return xml;
    } else {
        [xml appendString:@">"];
    }

    // 4.遍历所有的子控件
    for (UIView *child in view.subviews) {
        NSString *childXml = [self digView:child];
        [xml appendString:childXml];
    }

    // 5.标签结尾
    [xml appendFormat:@"</%@>", view.class];

    return xml;
}
3:UICollectionViewLayout自定义知识点
a:首先查看其开放的属性及方法,可以使用属性对应其方法,方法会比较灵活
@protocol UICollectionViewDelegateFlowLayout <UICollectionViewDelegate>

@optional


- (CGSize)collectionView:(UICollectionView *)collectionView layout:(UICollectionViewLayout*)collectionViewLayout sizeForItemAtIndexPath:(NSIndexPath *)indexPath;

- (UIEdgeInsets)collectionView:(UICollectionView *)collectionView layout:(UICollectionViewLayout*)collectionViewLayout insetForSectionAtIndex:(NSInteger)section;

- (CGFloat)collectionView:(UICollectionView *)collectionView layout:(UICollectionViewLayout*)collectionViewLayout minimumLineSpacingForSectionAtIndex:(NSInteger)section;

- (CGFloat)collectionView:(UICollectionView *)collectionView layout:(UICollectionViewLayout*)collectionViewLayout minimumInteritemSpacingForSectionAtIndex:(NSInteger)section;

- (CGSize)collectionView:(UICollectionView *)collectionView layout:(UICollectionViewLayout*)collectionViewLayout referenceSizeForHeaderInSection:(NSInteger)section;

- (CGSize)collectionView:(UICollectionView *)collectionView layout:(UICollectionViewLayout*)collectionViewLayout referenceSizeForFooterInSection:(NSInteger)section;


@end


NS_CLASS_AVAILABLE_IOS(6_0) @interface UICollectionViewFlowLayout : UICollectionViewLayout


@property (nonatomic) CGFloat minimumLineSpacing;

@property (nonatomic) CGFloat minimumInteritemSpacing;

@property (nonatomic) CGSize itemSize;

@property (nonatomic) CGSize estimatedItemSize NS_AVAILABLE_IOS(8_0); // defaults to CGSizeZero - setting a non-zero size enables cells that self-size via -preferredLayoutAttributesFittingAttributes:

@property (nonatomic) UICollectionViewScrollDirection scrollDirection; // default is UICollectionViewScrollDirectionVertical

@property (nonatomic) CGSize headerReferenceSize;

@property (nonatomic) CGSize footerReferenceSize;

@property (nonatomic) UIEdgeInsets sectionInset;


// Set these properties to YES to get headers that pin to the top of the screen and footers that pin to the bottom while scrolling (similar to UITableView).

@property (nonatomic) BOOL sectionHeadersPinToVisibleBounds NS_AVAILABLE_IOS(9_0);

@property (nonatomic) BOOL sectionFootersPinToVisibleBounds NS_AVAILABLE_IOS(9_0);

@end
b:Item size(每个item的大小),可以灵活定义到每个Item的大小
layout.itemSize = CGSizeMake(30,20);
或
- (CGSize)collectionView:(UICollectionView *)collectionView layout:(UICollectionViewLayout*)collectionViewLayout sizeForItemAtIndexPath:(NSIndexPath *)indexPath;
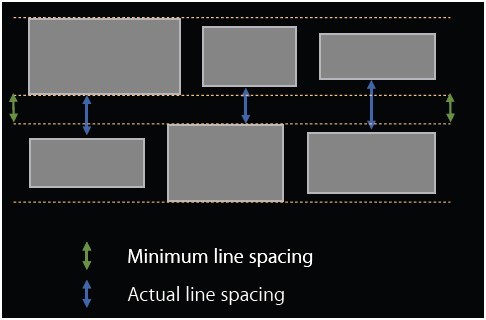
c:Line spacing(每行的间距)
@property (CGFloat) minimumLineSpacing
或
- (CGFloat)collectionView:(UICollectionView *)collectionView layout:(UICollectionViewLayout*)collectionViewLayout minimumLineSpacingForSectionAtIndex:(NSInteger)section;
注意:这边设置为其小的每行间距,实际如果大于这个间距就以自个为准;
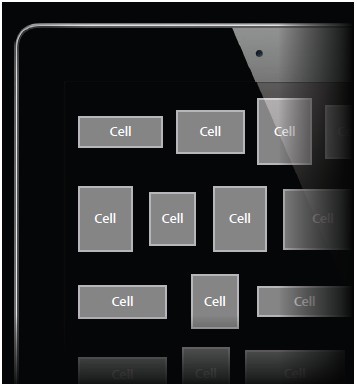
d:Inter cell spacing(每行内部cell item的间距)
@property (CGFloat) minimum InteritemSpacing
或
- (CGFloat)collectionView:(UICollectionView *)collectionView layout:(UICollectionViewLayout*)collectionViewLayout minimumInteritemSpacingForSectionAtIndex:(NSInteger)section;
注意:同样设置为最小的间距,实际如果比这个大则以自个为准

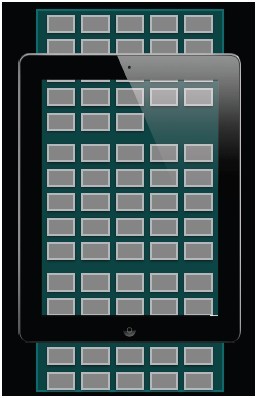
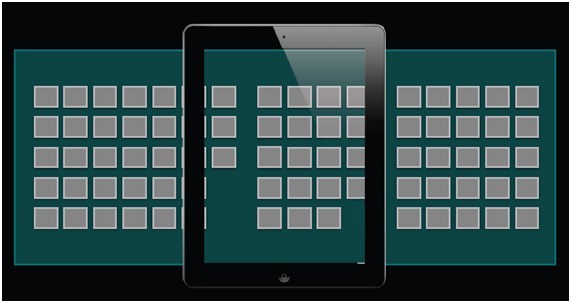
e:Scrolling direction(滚动方向)
设置scrollDirection属性即可。两个值如下
UICollectionViewScrollDirectionVertical
UICollectionViewScrollDirectionHorizontal
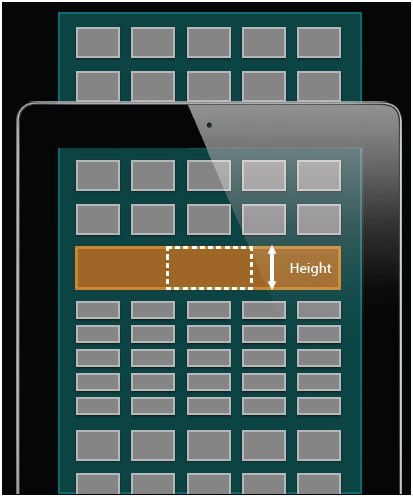
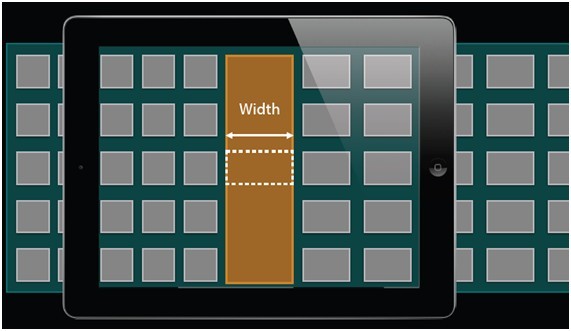
f:Header and footer size(页眉和页脚大小)
下面是页眉和页脚的一些解释。
n 也就是supplementary views
n 通过数据源的方法来提供内容,如下
- collectionView:viewForSupplementaryElementOfKind:atIndexPath:
n 两种常量(类型)
UICollectionElementKindSectionHeader
UICollectionElementKindSectionFooter
n 同样需要注册一个类并从队列中取出view
- registerClass:forSupplementaryViewOfKind:withReuseIdentifier:
- registerNib:forSupplementaryViewOfKind:withReuseIdentifier:
- dequeueReusableSupplementaryViewOfKind:withReuseIdentifier:forIndexPath:
页眉和页脚的size配置方式:
1)可以全局配置,如下属性
@property (CGSize) headerReferenceSize
@property (CGSize) footerReferenceSize
2)也可以通过delegate对每一个section进行配置,如下代码
- (CGSize)collectionView:(UICollectionView *)collectionView layout:(UICollectionViewLayout*)collectionViewLayout referenceSizeForHeaderInSection:(NSInteger)section;
- (CGSize)collectionView:(UICollectionView *)collectionView layout:(UICollectionViewLayout*)collectionViewLayout referenceSizeForFooterInSection:(NSInteger)section;
当垂直的时候,需要设置Height,当水平的时候,需要设置Width
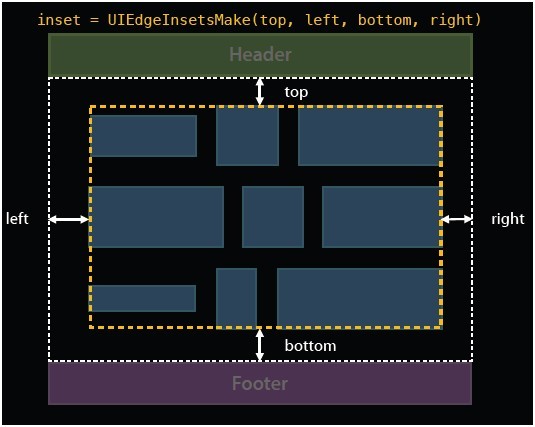
g:Section Inset(Section Inset就是某个section中cell的边界范围)
@property UIEdgeInsets sectionInset;
或
- (UIEdgeInsets)collectionView:(UICollectionView *)collectionView layout:(UICollectionViewLayout*)collectionViewLayout insetForSectionAtIndex:(NSInteger)section;
运用时:
            UICollectionViewFlowLayout *layout = [[UICollectionViewFlowLayout alloc] init];
            self.mediaView = [[UICustomCollectionView alloc] initWithFrame:CGRectMake(10, 10, Main_Screen_Width-2*15, 80) collectionViewLayout:layout];
4:模拟器改为Ipad userInterfaceIdiom没有效果的解决方法
将模拟器改为Ipad时,调用[[UIDevice currentDevice] userInterfaceIdiom]==UIUserInterfaceIdiomPad判断设备是否为Ipad,但程序并未做出正确的判断,后来做出如下设置:
PROJECT->Build Settings->Deployment->Targeted Device Family->iPhone/iPad
再次调试程序,成功识别出设备

 浙公网安备 33010602011771号