
C#进行Visio二次开发之动态仿真实现
Visio二次开发可以实现的项目情景很多,如电气线路分析、配电网络分析、流程图等,现因为项目需要,又认识多了一个应用场合,液压传动的仿真。项目效果图如下所示:
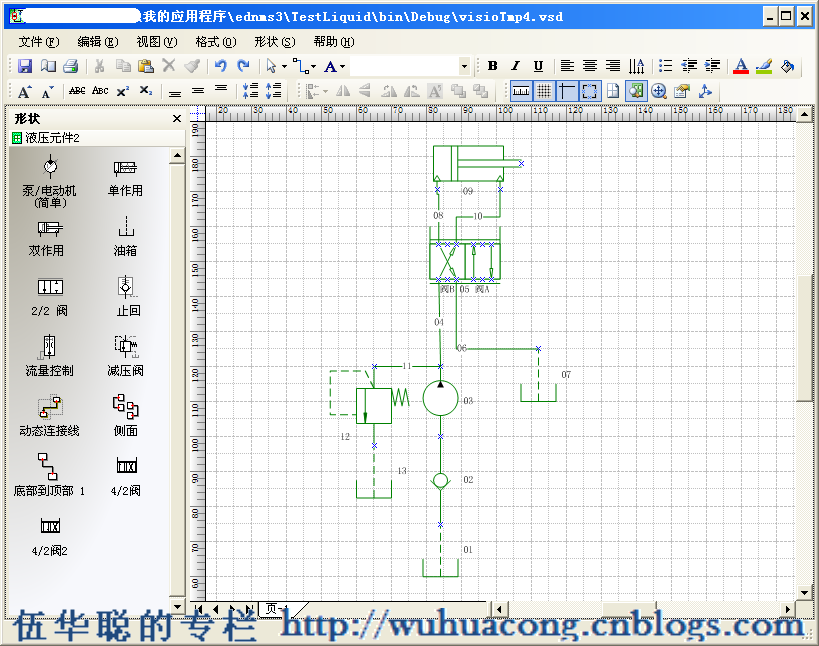
动态仿真,其实也就是模拟实际线路的走向,实现动画的展现。以前我的Visio的项目,基本上都是基于静态的图形展现,并没有设置太多的动态展现。原来配电网络的通电线路的分析,严格来说也是静态的,因为基本上是一次性把通电和不通电的线路给绘制出来。而动态仿真则要求慢慢的动画展现线路的走向和颜色变化。
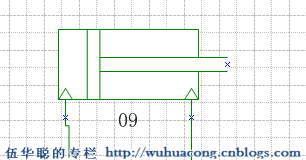
如活塞运动的仿真,要求不停止动画的情况下,可以一直循环的变化。 如下图所示的效果:
本文介绍如何实现线路走向、颜色变化,以及特定图形(如活塞)的动态仿真效果。
首先实现动态仿真效果,必须先分析出整个图纸的拓扑网络顺序及层次,这样我们才能知道正确的线路走向以及动画的变化顺序,如配电网络线路图中,必定是电源开始,通过导线或者设备传递电源,以实现电路的贯通。在液压线路中,由油箱开始,经过一系列设备,最后又回到油箱。
要在Visio图纸上实现如上图的动画效果,其中最重要的奥秘是使用下面代码:
Thread.Sleep(50);
很多情况下,我们可能对这个DoEvents函数的功能不是很熟悉,其实我们可以理解为主动触发事件,让消息流提前进入处理流程,这样我们就能够看到在Visio图纸上的图形更新效果了。
整个图形分析的过程,分为3个步骤:
1)进行简单的拓扑分析,把设备周边的关系保持到数据库进行分析。
2)根据数据库结构,对设备关系进行分析,获得拓扑网络的设备层次结构列表
3)根据不同的设备类型和图纸当前状态,对设备进行适当的绘制和动画仿真展示。
大致的代码如下所示:
{
#region 获取操作设备和判断是否图纸有设备
Visio.Shape shapeSelected = null;
try
{
Visio.Window wndVisio = app.ActiveWindow;
if (wndVisio.Selection.Count == 1)
{
shapeSelected = wndVisio.Selection.get_Item16(1);
}
}
catch { ; }
if (!VisioUtility.HasShapeInWindow(VisWindow))
{
MessageUtil.ShowWarning("图纸上没有设备, 不能执行该操作");
return;
}
#endregion
app.UndoEnabled = false;
List<string> list = new List<string>();
string message = "";
list = powerCutBLL.RunPowerCutAnalyzing(app, shapeSelected, ref message);
app.UndoEnabled = true;
if (message != "")
{
MessageUtil.ShowError(message);
return;
}
if (list.Count > 0)
{
AnalyzeShapeIdList.Clear();
foreach (string shapeStrID in list)
{
AnalyzeShapeIdList.Add(Convert.ToInt32(shapeStrID));
}
RunColorChanging(app);
}
else
{
MessageUtil.ShowWarning("请检查线路是否连接正确。");
}
}
线路颜色变化以及动画展示部分的代码如下所示 :
/// 根据分析后的设备ID,把设备变色动画展示
/// </summary>
/// <param name="visApp"></param>
private void RunColorChanging(Visio.Application visApp)
{
Visio.Cell cell = visApp.ActiveDocument.Pages[1].PageSheet.get_Cells("Scratch.A1");
int intValue = Convert.ToInt32(VisioUtility.FormulaStringToString(cell.Formula));
if (intValue == 1)
{
cell.Formula = "0";
}
else
{
cell.Formula = "1";
isMovie = !isMovie;
}
...................
int sequence = 1;
foreach (int shapeId in AnalyzeShapeIdList)
{
Visio.Shape shape = VisDocument.Pages[1].Shapes.get_ItemFromID(shapeId);
if (shape != null)
{
if (intValue == 0)
{
shape.Text = sequence++.ToString("D2");//string.Format("{0}({1})", sequence++, shape.ID);//
VisioUtility.SetShapeLineColor(shape, VisDefaultColors.visDarkGreen);//有电(绿色)
System.Windows.Forms.Application.DoEvents();
Thread.Sleep(500 * minFlowValue);
}
else
{
shape.Text = "";
VisioUtility.SetShapeLineColor(shape, VisDefaultColors.visBlack);//无电(黑色)
System.Windows.Forms.Application.DoEvents();
}
string equipType = VisioUtility.GetShapeCellValue(shape, "设备类型");
if (!string.IsNullOrEmpty(equipType))
{
#region 单作用、双作用
if (equipType == "单作用" || equipType == "双作用")
{
string minValue = "Width*0.25";
string maxValue = "Width*0.75";
string cellName = "Controls.Row_1.X";
try
{
if (shape.get_CellExistsU(cellName, (short)VisExistsFlags.visExistsAnywhere) != 0)
{
short i = shape.get_CellsRowIndex(cellName);
Visio.Cell typeCell = shape.get_CellsSRC((short)VisSectionIndices.visSectionControls, i, (short)VisCellIndices.visCtlX);
if (intValue == 0)
{
ThreadParameterInfo param = new ThreadParameterInfo();
param.Cell = typeCell;
param.ScratchCell = cell;
Thread thread = new Thread(new ParameterizedThreadStart(HuoSaiMoving));
thread.Start(param);
}
else
{
typeCell.Formula = VisioUtility.StringToFormulaForString(minValue);
System.Windows.Forms.Application.DoEvents();
//Thread.Sleep(500 * minFlowValue);
}
}
}
catch (Exception ex)
{
LogHelper.Error(ex);
}
}
#endregion
}
}
}
}
其中我们注意到了,活塞运动时一个独立的线程进行处理的,如下所示
thread.Start(param);
活塞运动是在线路联通后,继续循环进行动画的展示的,因为它是独立一个线程进行处理操作,通过判断标识来实现动画的停止控制的,具体处理活塞动画的效果实现代码如下所示:

 代码
代码{
ThreadParameterInfo objParam = obj as ThreadParameterInfo;
Visio.Cell scratchCell = objParam.ScratchCell;
Visio.Cell typeCell = objParam.Cell;
int intValue = Convert.ToInt32(VisioUtility.FormulaStringToString(scratchCell.Formula));
while (intValue == 1 && isMovie)
{
string minValue = "Width*0.25";
string maxValue = "Width*0.75";
//Visio.Cell typeCell = objCell as Visio.Cell;
if (typeCell != null)
{
string currentValue = "";
//增加
for (int k = 1; k <= 10; k++)
{
currentValue = string.Format("Width*0.25 + Width*{0}", 0.05 * k);
typeCell.Formula = VisioUtility.StringToFormulaForString(currentValue);
System.Windows.Forms.Application.DoEvents();
Thread.Sleep(50);
}
//减少
for (int k = 1; k <= 10; k++)
{
currentValue = string.Format("Width*0.75 - Width*{0}", 0.05 * k);
typeCell.Formula = VisioUtility.StringToFormulaForString(currentValue);
System.Windows.Forms.Application.DoEvents();
Thread.Sleep(50);
}
}
intValue = Convert.ToInt32(VisioUtility.FormulaStringToString(scratchCell.Formula));
}
}
Visio应用曲高和寡,代码贴图众口难调;不求一鸣惊人,但求潜移默化。
 专注于代码生成工具、.Net/.NetCore 框架架构及软件开发,以及各种Vue.js的前端技术应用。著有Winform开发框架/混合式开发框架、微信开发框架、Bootstrap开发框架、ABP开发框架、SqlSugar开发框架等框架产品。
转载请注明出处:撰写人:伍华聪 http://www.iqidi.com


