
Tomcat 对 HTTP 协议的实现(下)
在《Tomcat 对 HTTP 协议的实现(上)》一文中,对请求的解析进行了分析,接下来对 Tomcat 生成响应的设计和实现继续分析。本文首发于(微信公众号:顿悟源码)
一般 Servlet 生成响应的代码是这样的:
protected void service(HttpServletRequest req, HttpServletResponse resp)
      throws ServletException, IOException {
  resp.setContentType("text/html");
  resp.setCharacterEncoding("utf-8");
  PrintWriter writer = resp.getWriter();
  writer.println("<html><head><title>Demo</title></head>");
  writer.println("<body><div>Hello World!</div></body>");
  writer.println("</html>");
  writer.flush();
  writer.close();
}
像生成响应头和响应体并写入缓冲区,最后写入通道,这些都由 Tomcat 来做,来看下它是怎么设计的(可右键直接打开图片查看大图):
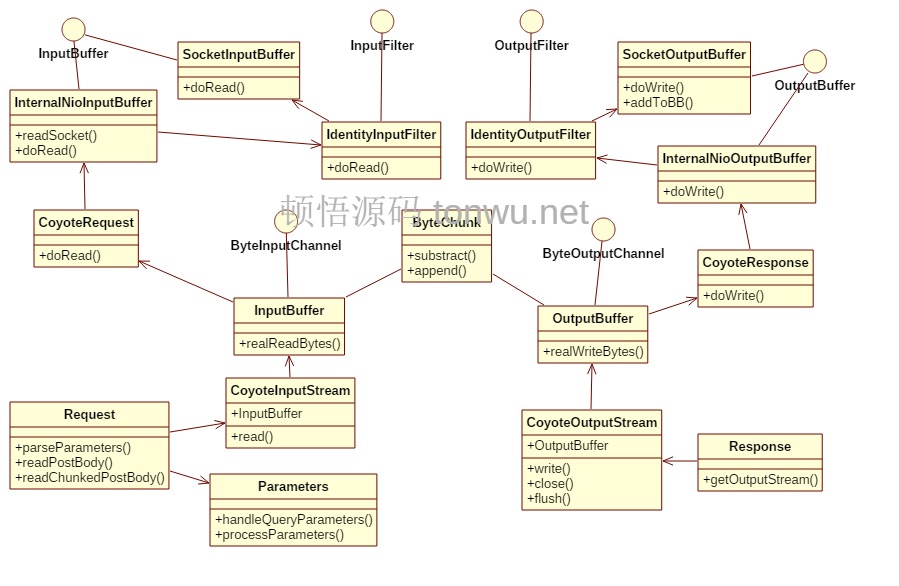
上图大部分类都是相对的,可与请求处理分析中的描述对比理解。重点还是理解 ByteChunk,它内部有一个 byte[] 数组引用,用于输入时,引用的 InternalNioInputBuffer 内的数组,表示一个字节序列的视图;用于输出时,会 new 一个可扩容的数组对象,存储响应体数据。
以上面的代码为例,分析一下,相关类的方法调用,上面的代码生成的是一种动态内容,会使用 chunked 传输编码:
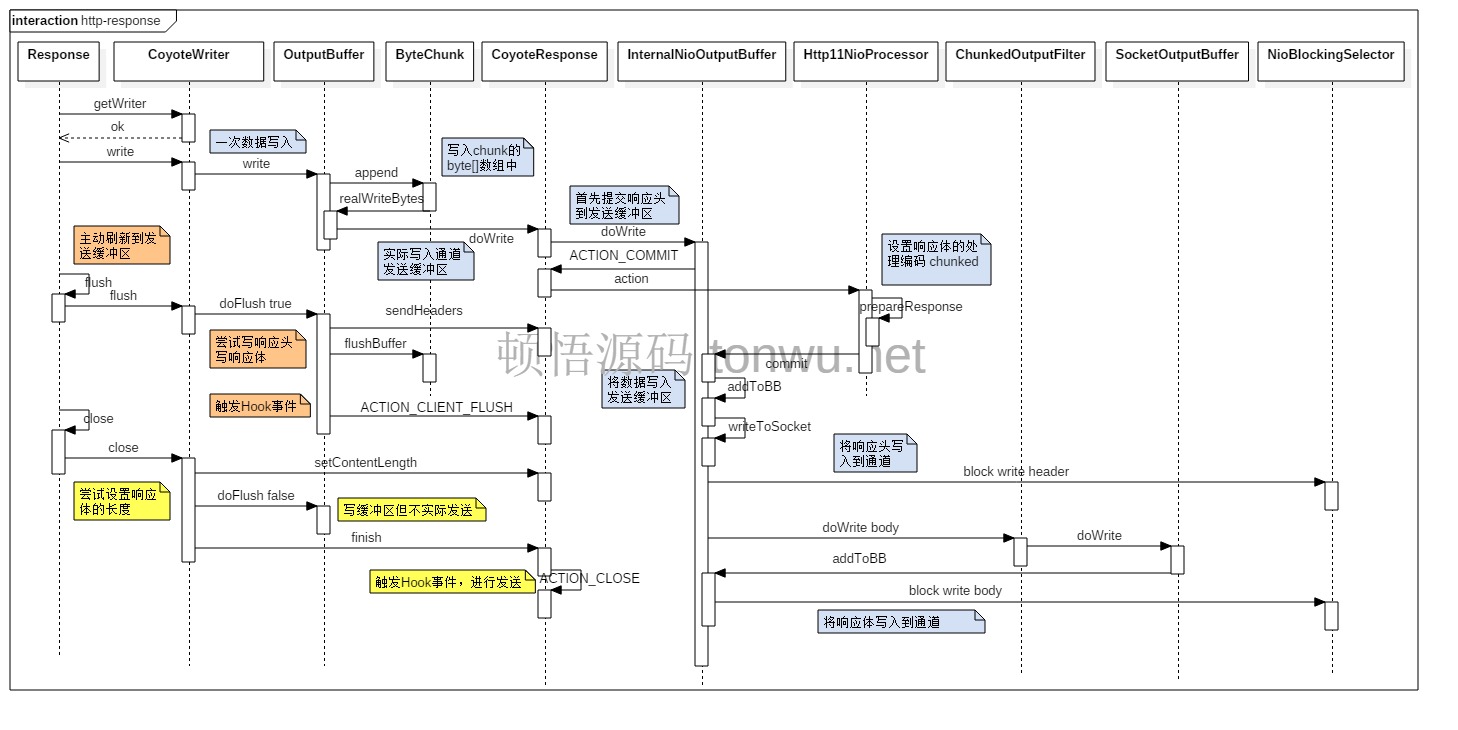
1. 存储响应体数据
调用图中,ByteChunk 调用 append 方法后,为了直观理解,就直接写入了发送缓冲区,真实情况不是这样,只有内部缓冲区满了,或者主动调用 flush、close 才会实际写入和发送,来看下 append 方法的代码:
public void append( byte src[], int off, int len )
        throws IOException {
  makeSpace( len ); // 扩容,高版本已去掉
  // 写入长度超过最大容量,直接往底层数组写
  // 如果底层数组也超了,会直接往通道写
  if ( optimizedWrite && len == limit && end == start
        && out != null ) {
      out.realWriteBytes( src, off, len );
      return;
  }
  // 如果 len 小于剩余空间,直接写入
  if( len <= limit - end ) {
    System.arraycopy( src, off, buff, end, len );
    end+=len;
    return;
  }
  // 否则就循环把长 len 的数据写入下层的缓冲区
  int avail=limit-end;
  System.arraycopy(src, off, buff, end, avail);
  end += avail;
  // 把现有数据写入下层缓冲区
  flushBuffer();
  // 循环写入 len 长的数据
  int remain = len - avail;
  while (remain > (limit - end)) {
    out.realWriteBytes( src, (off + len) - remain, limit - end );
    remain = remain - (limit - end);
  }
  System.arraycopy(src, (off + len) - remain, buff, end, remain);
  end += remain;
}
逻辑就是,首先写入自己的缓冲区,满了或不足使用 realWriteBytes 再写入下层的缓冲区中,下层的缓冲区实际就是 NioChannel 中的 WriteBuffer,写入之前首先会把响应头写入 InternalNioInputBuffer 内部的 HeaderBuffer,再提交到 WriteBuffer 中,接着就会调用响应的编码处理器写入响应体,编码处理通常有两种:identity 和 chunked。
2. identity 写入
当明确知道要响应资源的大小,比如一个css文件,并且调用了 resp.setContentLength(1) 方法时,就会使用 identity 写入指定长度的内容,核心代码就是 IdentityOutputFilter 的 doWrite 方法,这里不在贴出,唯一值得注意的是,它内部的 buffer 引用是 InternalNioInputBuffer 内部的 SocketOutputBuffer。
3. chunked 写入
当不确定长度时,会使用 chunked 传输编码,跟解析相反,就是要生成请求分析一文中介绍的 chunked 协议传输格式,写入逻辑如下:
public int doWrite(ByteChunk chunk, Response res)
  throws IOException {
  int result = chunk.getLength();
  if (result <= 0) {
      return 0;
  }
  // 生成 chunk-header
  // 从7开始,是因为chunkLength后面两位已经是\r\n了
  int pos = 7;
  // 比如 489 -> 1e9 -> ['1','e','9'] -> [0x31,0x65,0x39]
  // 生成 chunk-size 编码,将 int 转为16进制字符串的形式
  int current = result;
  while (current > 0) {
    int digit = current % 16;
    current = current / 16;
    chunkLength[pos--] = HexUtils.HEX[digit];
  }
  chunkHeader.setBytes(chunkLength, pos + 1, 9 - pos);
  // 写入 chunk-szie 包含 \r\n
  buffer.doWrite(chunkHeader, res);
  // 写入实际数据 chunk-data
  buffer.doWrite(chunk, res);
  chunkHeader.setBytes(chunkLength, 8, 2);
  // 写入 \r\n
  buffer.doWrite(chunkHeader, res);
  return result;
}
所有数据块写入完成后,最后再写入一个大小为0的 chunk,格式为 0\r\n\r\n。至此整个写入完毕。
4. 阻塞写入通道
上层所有数据的实际写入,最后都是由 InternalNioInputBuffer 的 writeToSocket 方法完成,代码如下:
private synchronized int writeToSocket(ByteBuffer bytebuffer,
             boolean block, boolean flip) throws IOException {
  // 切换为读模式
  if ( flip ) bytebuffer.flip();
  int written = 0;// 写入的字节数
  NioEndpoint.KeyAttachment att = (NioEndpoint.KeyAttachment)
                                  socket.getAttachment(false);
  if ( att == null ) throw new IOException("Key must be cancelled");
  long writeTimeout = att.getTimeout();
  Selector selector = null;
  try { // 获取模拟阻塞使用的 Selector
    // 通常是单例的 NioBlockingSelector
    selector = getSelectorPool().get();
  } catch ( IOException ignore ) { }
  try {
    // 阻塞写入
    written = getSelectorPool().write(bytebuffer, socket, selector,
                                  writeTimeout, block,lastWrite);
    do {
      if (socket.flush(true,selector,writeTimeout,lastWrite)) break;
    }while ( true );
  }finally {
    if ( selector != null ) getSelectorPool().put(selector);
  }
  if ( block ) bytebuffer.clear(); //only clear
  this.total = 0;
  return written;
}
模拟阻塞的具体实现,已在 Tomcat 对 NIO 模型实现一文中介绍,这里不再赘述。
5. 缓冲区设计
缓冲区直接关系到内存使用的大小,还影响着垃圾收集。在整个HTTP处理过程中,总共有以下几种缓冲区:
- NioChannel 中的读写 ByteBuffer
- NioInputBuffer 和 NioOutputBuffer 内部使用的消息头字节数组
- ByteChunk 用于写入响应体时内部使用的字节数组
- 解析请求参数时,如果长度过小会使用内部缓存的一个 byte[] 数组,否则新建
以上缓冲区均可重复利用。
6. 小结
为了更好的理解HTTP的解析,尽可能的使用简洁的代码仿写了这部分功能。
源码地址:https://github.com/tonwu/rxtomcat 位于 rxtomcat-http 模块
搜索微信公众号「小创编程」 - 获取更多源码分析和造的轮子.

