

iOS开发基础-九宫格坐标(2)之模型
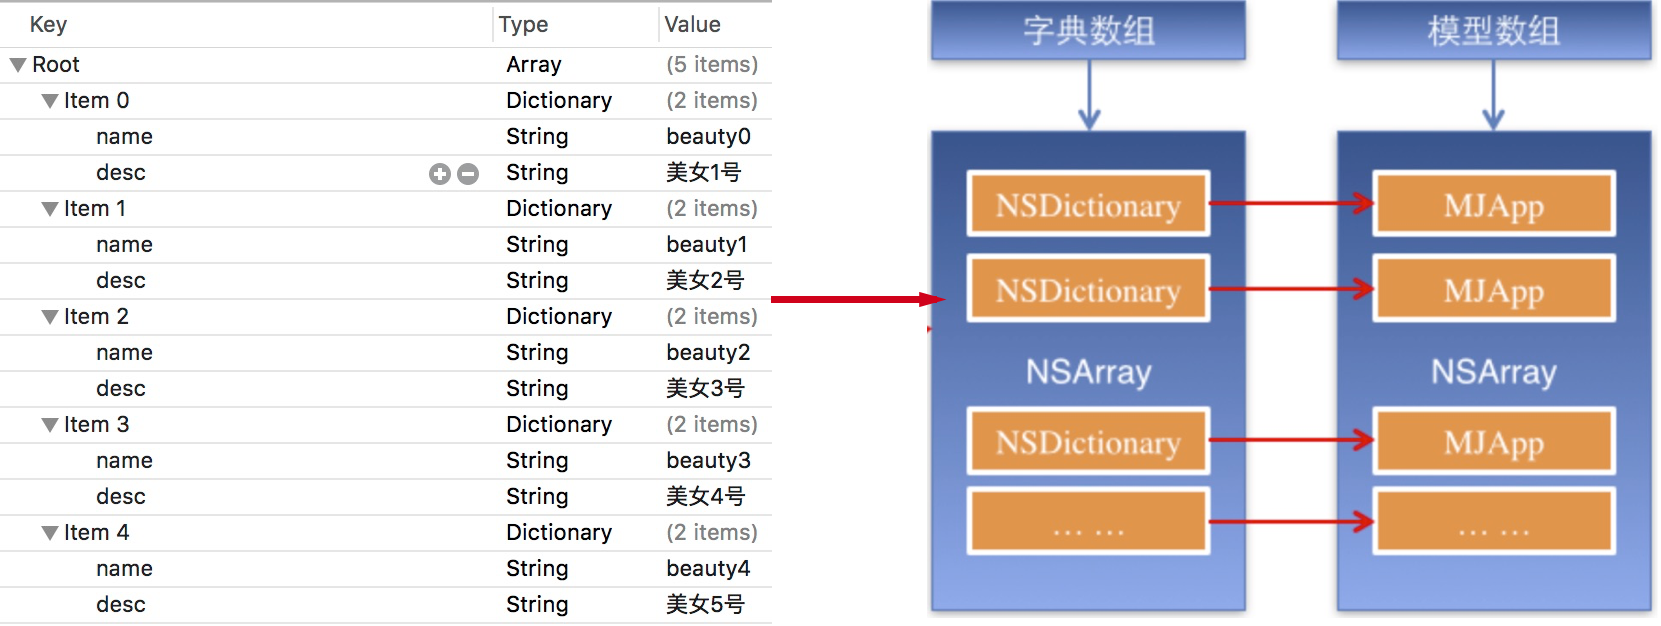
在iOS开发基础-九宫格(1)中,属性变量 apps 是从plist文件中加载数据的,在 viewDidLoad 方法中的第20行、26行中,直接通过字典的键名来获取相应的信息,使得 ViewController 直接与数据打交道,如果频繁这样使用,可能会不小心把键名写错,而程序却不会报错。因此,考虑把字典数据转换成一个模型,把数据封装到模型中去,让 ViewController 与模型交互,而不与数据直接打交道。
修改iOS开发基础-九宫格(1)中的代码:
一、字典转模型介绍
字典转模型的好处:
1)降低代码的耦合度;
2)将字典转模型部分代码集中在一处处理,降低代码出错概率;
3)程序中,直接对模型的属性进行操作,提供编码效率。
4)调用时,不必关心模型内部的任何细节。
二、代码实例
新建一个类命名为 WJQAppInfo 继承自 NSObject ,在 WJQAppInfo.h 头文件中声明公共的属性和方法:
 1 //WJQAppInfo.h,模型类
 2 #import <UIKit/UIKit.h>
 3
 4 @interface WJQAppInfo : NSObject
 5 @property (nonatomic, copy) NSString *name;     //图片名称
 6 @property (nonatomic, copy) NSString *desc;     //图片信息描述
 7 @property (nonatomic, strong, readonly) UIImage *image;
 8
 9 - (instancetype)initWithDict:(NSDictionary *)dict;
10 + (instancetype)appInfoWithDict:(NSDictionary *)dict;       //工厂方法
11 @end
定义属性时,会自动生成 setter 和 getter 方法,以及一个带下划线的成员变量。如果是 readonly 属性,则只生成 getter 方法,也没哟成员变量。
instancetype 会让编译器检查实例化对象的准确类型,其只能用于返回类型,不能当做参数使用。
WJQAppInfo 类的实现文件代码如下:
 1 //WJQAppInfo.m
 2 #import "WJQAppInfo.h"
 3
 4 @interface WJQAppInfo ()
 5 {
 6     UIImage *_imageABC;
 7 }
 8 @end
 9
10 @implementation WJQAppInfo
11
12 - (instancetype)initWithDict:(NSDictionary *)dict {
13     self = [super init];
14     if (self) {
15         self.name = dict[@"name"];
16         self.desc = dict[@"desc"];
17     }
18     return self;
19 }
20
21 + (instancetype)appInfoWithDict:(NSDictionary *)dict {
22     return [[self alloc] initWithDict:dict];
23 }
24
25 - (UIImage *)image {
26     if (!_imageABC) {
27         _imageABC = [UIImage imageNamed:self.name];
28     }
29     return _imageABC;
30 }
31
32 @end
在 ViewController.m 文件中导入 WJQAppInfo 头文件。
修改属性 apps 的 getter 方法,代码如下:
 1 //字典转换成WJQAppInfo模型
 2 - (NSArray *)apps {
 3     if (!_apps) {
 4         NSString *path = [[NSBundle mainBundle] pathForResource:@"Data" ofType:@"plist"];
 5         //_apps = [NSArray arrayWithContentsOfFile:path];
 6         NSArray *array = [NSArray arrayWithContentsOfFile:path];
 7         NSMutableArray *arrayM = [NSMutableArray array];
 8         for (NSDictionary *dict in array) {
 9             //遍历数组,将数据在的字典依次转化为WJQAppInfo对象,并添加到临时对象arrayM中去
10             //用字典来实例化对象的工厂方法
11             [arrayM addObject:[WJQAppInfo appInfoWithDict:dict]];
12         }
13         _apps = arrayM;
14     }
15     return _apps;
16 }
修改 viewDidLoad 代码如下:
 1 - (void)viewDidLoad {
 2     [super viewDidLoad];
 3
 4     int totalColumn = 3;        //3列
 5     CGFloat margin = (self.view.frame.size.width - totalColumn*appViewWidth) / (totalColumn + 1);
 6     int count = self.apps.count;
 7     NSLog(@"%d", count);
 8
 9     for (int i = 0; i < count; i++) {
10         int row = i/totalColumn;        //行号,从0开始
11         int column = i%totalColumn;     //列号,从0开始
12         CGFloat appViewX = margin + (margin + appViewWidth) * column;       //子视图的X坐标
13         CGFloat appViewY = margin + (margin + appViewHeight) * row;      //子视图的Y坐标
14
15         //创建UIView控件
16         UIView *appView = [[UIView alloc] initWithFrame:CGRectMake(appViewX, appViewY, appViewWidth, appViewHeight)];
17         [self.view addSubview:appView];
18         //创建上述UIView控件的子视图,创建图像信息
19         UIImageView *appImageView = [[UIImageView alloc] initWithFrame:CGRectMake(0, 0, 80, 50)];
20         WJQAppInfo *appInfo = self.apps[i];
21         UIImage *appImage = appInfo.image;
22         appImageView.image = appImage;      //设置图片
23         [appImageView setContentMode:UIViewContentModeScaleAspectFit];
24         [appView addSubview:appImageView];
25         //创建上述UIView控件的子视图,创建UILabel信息描述标签
26         UILabel *appLabel = [[UILabel alloc] initWithFrame:CGRectMake(0, 50, 80, 20)];
27         [appLabel setText:appInfo.desc];    //设置图片信息描述
28         [appLabel setTextAlignment:NSTextAlignmentCenter];
29         [appLabel setFont:[UIFont systemFontOfSize:12.0]];
30         [appLabel setTextColor:[UIColor blueColor]];
31         [appView addSubview:appLabel];
32         //创建下载按钮
33         UIButton *appButton = [UIButton buttonWithType:UIButtonTypeCustom];
34         appButton.frame = CGRectMake(0, 70, 80, 20);
35         [appButton setBackgroundImage:[UIImage imageNamed:@"download"] forState:UIControlStateNormal];
36         [appButton setBackgroundImage:[UIImage imageNamed:@"downloaded"] forState:UIControlStateHighlighted];
37         [appButton setTitle:@"下载" forState:UIControlStateNormal];
38         appButton.titleLabel.font = [UIFont systemFontOfSize:12.0];
39         [appButton setTitleColor:[UIColor blueColor] forState:UIControlStateNormal];
40         [appView addSubview:appButton];
41         [appButton addTarget:self action:@selector(buttonClicked:) forControlEvents:UIControlEventTouchUpInside];
42     }
43 }
使用 KVC 重新写模型类中的 initWithDict: 方法:
1 //WJQAppInfo.m
2 - (instancetype)initWithDict:(NSDictionary *)dict {
3     self = [super init];
4     if (self) {
5         [self setValue:dict[@"name"] forKey:@"name"];
6         [self setValue:dict[@"desc"] forKey:@"desc"];
7     }
8     return self;
9 }
或者使用 setValuesForKeysWithDictionary: 方法再对该方法进行修改:
1 //WJQAppInfo.m
2 - (instancetype)initWithDict:(NSDictionary *)dict {
3     self = [super init];
4     if (self) {
5         [self setValuesForKeysWithDictionary:dict];
6     }
7     return self;
8 }
setValuesForKeysWithDictionary: 方法会遍历形参 dict 中每个键值调用 setValue:forKey: 方法,但是当字典中有某个键值而调用的对象没有相应的属性时,系统会崩溃。
参考博客:iOS开发UI篇—字典转模型

 浙公网安备 33010602011771号