zabbix源码编译安装以及添加第一台host监控
基础准备
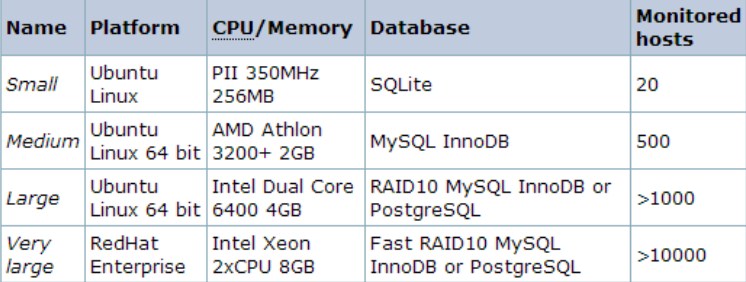
硬件需求
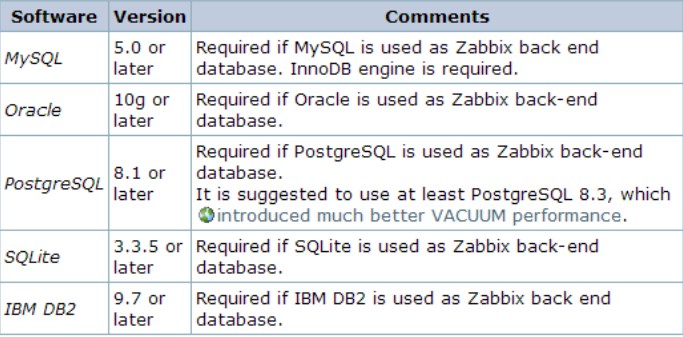
数据库需求
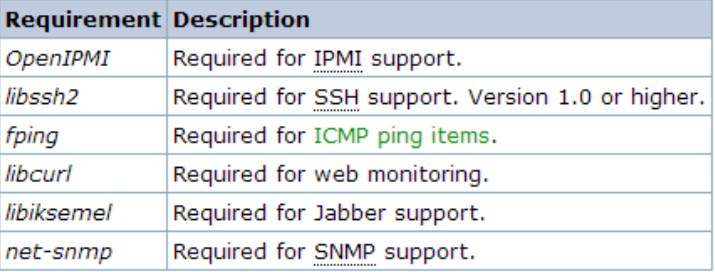
软件需求
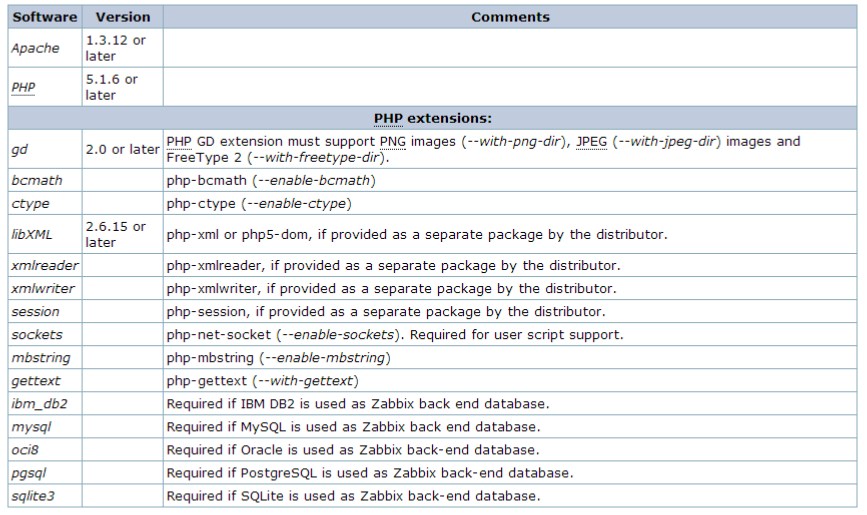
其他软件需求
安装
安装方式
- source code
- 编译好的二进制包
- rpm或者deb
源码编译安装部署zabbix以及附件
前提准备
- 最小化安装操作系统
- 分配好IP(内网外网ip设定)
- 关闭selinux
- 关闭firewalld
- 时间同步
[root@linux-node1 conf]# yum -y install ntp ntpdate
[root@linux-node1 conf]# systemctl restart ntpd
[root@linux-node1 conf]# ntpdate time.windows.com      #时间同步
3
1
[root@linux-node1 conf]# yum -y install ntp ntpdate2
[root@linux-node1 conf]# systemctl restart ntpd3
[root@linux-node1 conf]# ntpdate time.windows.com #时间同步zabbix-server安装
环境准备
- OS:CentOS Linux release 7.3.1611 (Core)
- zabbix:https://jaist.dl.sourceforge.net/project/zabbix/ZABBIX Latest Stable/3.2.7/zabbix-3.2.7.tar.gz
- Nginx:http://www.nginx.org/download/nginx-1.12.1.tar.gz
- mysql:https://cdn.mysql.com//Downloads/MySQL-5.7/mysql-5.7.19-linux-glibc2.12-x86_64.tar.gz
- php:http://cn2.php.net/distributions/php-5.6.31.tar.xz
- jdk1.8:http://download.oracle.com/otn-pub/java/jdk/8u144-b01/090f390dda5b47b9b721c7dfaa008135/jdk-8u144-linux-x64.rpm?AuthParam=1504418803_96caf675c8af37c08b7a8890c20e0ec8
- hostname:linux-node1
- IP:192.168.56.11
- baseurl:/opt
[root@linux-node1 ~]# hostname
linux-node1
[root@linux-node1 ~]# hostname -I
192.168.56.11 192.168.64.129
[root@linux-node1 ~]# mkdir /opt/tools
[root@linux-node1 ~]# cd /opt/tools
[root@linux-node1 tools]# wget https://jaist.dl.sourceforge.net/project/zabbix/ZABBIX Latest Stable/3.2.7/zabbix-3.2.7.tar.gz
[root@linux-node1 tools]# wget http://www.nginx.org/download/nginx-1.12.1.tar.gz
[root@linux-node1 tools]# wget https://cdn.mysql.com//Downloads/MySQL-5.7/mysql-5.7.19-linux-glibc2.12-x86_64.tar.gz
[root@linux-node1 tools]# wget http://cn2.php.net/distributions/php-5.6.31.tar.xz
[root@linux-node1 tools]# wget http://download.oracle.com/otn-pub/java/jdk/8u144-b01/090f390dda5b47b9b721c7dfaa008135/jdk-8u144-linux-x64.rpm?AuthParam=1504418803_96caf675c8af37c08b7a8890c20e0ec8
[root@linux-node1 tools]# rpm -ivh jdk-8u144-linux-x64.rpm
[root@linux-node1 ~]# yum -y install gcc-c++ zlib zlib-devel openssl openssl-devel pcre pcre-devel gd curl curl-devel libjpeg libjpeg-devel libpng libpng-devel freetype freetype-devel libxml2 libxml2-devel gcc gcc-c++ cmake ncurses-devel bison zlib-devel libaio gd curl curl-devel libjpeg libjpeg-devel libpng libpng-devel freetype freetype-devel libxml2 libxml2-devel bzip2 bzip2-develx
1
[root@linux-node1 ~]# hostname2
linux-node13
[root@linux-node1 ~]# hostname -I4
192.168.56.11 192.168.64.129 5
[root@linux-node1 ~]# mkdir /opt/tools6
[root@linux-node1 ~]# cd /opt/tools7
[root@linux-node1 tools]# wget https://jaist.dl.sourceforge.net/project/zabbix/ZABBIX Latest Stable/3.2.7/zabbix-3.2.7.tar.gz8
[root@linux-node1 tools]# wget http://www.nginx.org/download/nginx-1.12.1.tar.gz9
[root@linux-node1 tools]# wget https://cdn.mysql.com//Downloads/MySQL-5.7/mysql-5.7.19-linux-glibc2.12-x86_64.tar.gz10
[root@linux-node1 tools]# wget http://cn2.php.net/distributions/php-5.6.31.tar.xz11
[root@linux-node1 tools]# wget http://download.oracle.com/otn-pub/java/jdk/8u144-b01/090f390dda5b47b9b721c7dfaa008135/jdk-8u144-linux-x64.rpm?AuthParam=1504418803_96caf675c8af37c08b7a8890c20e0ec812
[root@linux-node1 tools]# rpm -ivh jdk-8u144-linux-x64.rpm 13
[root@linux-node1 ~]# yum -y install gcc-c++ zlib zlib-devel openssl openssl-devel pcre pcre-devel gd curl curl-devel libjpeg libjpeg-devel libpng libpng-devel freetype freetype-devel libxml2 libxml2-devel gcc gcc-c++ cmake ncurses-devel bison zlib-devel libaio gd curl curl-devel libjpeg libjpeg-devel libpng libpng-devel freetype freetype-devel libxml2 libxml2-devel bzip2 bzip2-develnginx安装
[root@linux-node1 ~]# cd /opt/tools/
[root@linux-node1 tools]# tar xf nginx-1.12.1.tar.gz
[root@linux-node1 tools]# cd nginx-1.12.1
[root@linux-node1 nginx-1.12.1]# vim src/core/nginx.h
#define nginx_version       998
#define NGINX_VERSION      "9.9.8"
#define NGINX_VER          "Apache/" NGINX_VERSION
#define NGINX_VAR          "Apache"
[root@linux-node1 nginx-1.12.1]# vim src/http/ngx_http_header_filter_module.c
static u_char ngx_http_server_string[] = "Server: Apache" CRLF;
[root@linux-node1 nginx-1.12.1]# vim src/http/ngx_http_special_response.c
static u_char ngx_http_error_full_tail[] =
"<hr><center>" NGINX_VER "</center>" CRLF
"</body>" CRLF
"</html>" CRLF
;
static u_char ngx_http_error_build_tail[] =
"<hr><center>" NGINX_VER_BUILD "</center>" CRLF
"</body>" CRLF
"</html>" CRLF
[root@linux-node1 nginx-1.12.1]# ./configure --prefix=/opt/application/nginx --with-http_stub_status_module --with-http_realip_module --with-http_addition_module  --with-pcre --with-http_gzip_static_module --with-http_random_index_module --with-http_sub_module --with-http_dav_module --with-http_ssl_module
[root@linux-node1 nginx-1.12.1]# make && make install
x
1
[root@linux-node1 ~]# cd /opt/tools/2
[root@linux-node1 tools]# tar xf nginx-1.12.1.tar.gz3
[root@linux-node1 tools]# cd nginx-1.12.14
[root@linux-node1 nginx-1.12.1]# vim src/core/nginx.h5
#define nginx_version 9986
#define NGINX_VERSION "9.9.8"7
#define NGINX_VER "Apache/" NGINX_VERSION8
#define NGINX_VAR "Apache"9
[root@linux-node1 nginx-1.12.1]# vim src/http/ngx_http_header_filter_module.c10
static u_char ngx_http_server_string[] = "Server: Apache" CRLF;11
[root@linux-node1 nginx-1.12.1]# vim src/http/ngx_http_special_response.c12
static u_char ngx_http_error_full_tail[] =13
"<hr><center>" NGINX_VER "</center>" CRLF14
"</body>" CRLF15
"</html>" CRLF16
;17
static u_char ngx_http_error_build_tail[] =18
"<hr><center>" NGINX_VER_BUILD "</center>" CRLF19
"</body>" CRLF20
"</html>" CRLF21
[root@linux-node1 nginx-1.12.1]# ./configure --prefix=/opt/application/nginx --with-http_stub_status_module --with-http_realip_module --with-http_addition_module --with-pcre --with-http_gzip_static_module --with-http_random_index_module --with-http_sub_module --with-http_dav_module --with-http_ssl_module22
[root@linux-node1 nginx-1.12.1]# make && make install mysql安装
[root@linux-node1 ~]# groupadd mysql
[root@linux-node1 ~]# useradd -g mysql -s /sbin/nologin -M mysql
[root@linux-node1 ~]# cd /opt/tools/
[root@linux-node1 tools]# tar xf mysql-5.7.19-linux-glibc2.12-x86_64.tar.gz
[root@linux-node1 tools]# mv mysql-5.7.19-linux-glibc2.12-x86_64 /opt/application/mysql
[root@linux-node1 tools]# cd /opt/application/mysql
[root@linux-node1 mysql]# useradd -s /sbin/nologin -M mysql
[root@linux-node1 mysql]# /opt/application/mysql/bin/mysqld --user=mysql --basedir=/opt/application/mysql --datadir=/opt/application/data --initialize
2017-09-02T14:59:34.959312Z 1 [Note] A temporary password is generated for root@localhost: VOFZIVorO4,W           #此处有密码则表示安装成功
[root@linux-node1 mysql]# ln -s /opt/application/mysql/bin/* /usr/bin/
[root@linux-node1 mysql]# vim /etc/my.cnf                                                           #修改配置文件
[client]
port		= 3306
socket		= /tmp/mysql.sock
[mysqld]
port		= 3306
socket		= /tmp/mysql.sock
skip-external-locking
key_buffer_size = 16M
max_allowed_packet = 1M
table_open_cache = 64
sort_buffer_size = 512K
net_buffer_length = 8K
read_buffer_size = 256K
read_rnd_buffer_size = 512K
myisam_sort_buffer_size = 8M
symbolic-links = 0
log-bin=mysql-bin
binlog_format=mixed
server-id	= 1
[mysqldump]
quick
max_allowed_packet = 16M
[mysql]
no-auto-rehash
[myisamchk]
key_buffer_size = 20M
sort_buffer_size = 20M
read_buffer = 2M
write_buffer = 2M
[mysqlhotcopy]
interactive-timeout
[root@linux-node1 mysql]# vim /opt/application/mysql/support-files/mysql.server
basedir=/opt/application/mysql/
datadir=/opt/application/data/
[root@linux-node1 mysql]# cp /opt/application/mysql/support-files/mysql.server /etc/init.d/mysql
[root@linux-node1 mysql]# /etc/init.d/mysql start
Starting MySQL.Logging to '/opt/application/data/linux-node1.err'.
 SUCCESS!                      #启动成功

[root@linux-node1 mysql]# mysql -pVOFZIVorO4,W    #进入程序
Enter password:
Welcome to the MySQL monitor.  Commands end with ; or \g.
Your MySQL connection id is 3
Server version: 5.7.19-log
Copyright (c) 2000, 2017, Oracle and/or its affiliates. All rights reserved.
Oracle is a registered trademark of Oracle Corporation and/or its
affiliates. Other names may be trademarks of their respective
owners.
Type 'help;' or '\h' for help. Type '\c' to clear the current input statement.
mysql> set password = password('woshiniba8');
mysql> alter user 'root'@'localhost' password expire never;
mysql> grant all privileges on *.* to root@'localhost' identified by 'woshiniba8';
mysql> flush privileges;
mysql> exit
1
[root@linux-node1 ~]# groupadd mysql2
[root@linux-node1 ~]# useradd -g mysql -s /sbin/nologin -M mysql3
[root@linux-node1 ~]# cd /opt/tools/4
[root@linux-node1 tools]# tar xf mysql-5.7.19-linux-glibc2.12-x86_64.tar.gz5
[root@linux-node1 tools]# mv mysql-5.7.19-linux-glibc2.12-x86_64 /opt/application/mysql6
[root@linux-node1 tools]# cd /opt/application/mysql7
[root@linux-node1 mysql]# useradd -s /sbin/nologin -M mysql8
[root@linux-node1 mysql]# /opt/application/mysql/bin/mysqld --user=mysql --basedir=/opt/application/mysql --datadir=/opt/application/data --initialize9
2017-09-02T14:59:34.959312Z 1 [Note] A temporary password is generated for root@localhost: VOFZIVorO4,W #此处有密码则表示安装成功10
[root@linux-node1 mysql]# ln -s /opt/application/mysql/bin/* /usr/bin/11
[root@linux-node1 mysql]# vim /etc/my.cnf #修改配置文件12
[client]13
port = 330614
socket = /tmp/mysql.sock15
[mysqld]16
port = 330617
socket = /tmp/mysql.sock18
skip-external-locking19
key_buffer_size = 16M20
max_allowed_packet = 1M21
table_open_cache = 6422
sort_buffer_size = 512K23
net_buffer_length = 8K24
read_buffer_size = 256K25
read_rnd_buffer_size = 512K26
myisam_sort_buffer_size = 8M27
symbolic-links = 028
log-bin=mysql-bin29
binlog_format=mixed30
server-id = 131
[mysqldump]32
quick33
max_allowed_packet = 16M34
[mysql]35
no-auto-rehash36
[myisamchk]37
key_buffer_size = 20M38
sort_buffer_size = 20M39
read_buffer = 2M40
write_buffer = 2M41
[mysqlhotcopy]42
interactive-timeout43
[root@linux-node1 mysql]# vim /opt/application/mysql/support-files/mysql.server44
basedir=/opt/application/mysql/45
datadir=/opt/application/data/46
[root@linux-node1 mysql]# cp /opt/application/mysql/support-files/mysql.server /etc/init.d/mysql47
[root@linux-node1 mysql]# /etc/init.d/mysql start48
Starting MySQL.Logging to '/opt/application/data/linux-node1.err'.49
SUCCESS! #启动成功50
51
[root@linux-node1 mysql]# mysql -pVOFZIVorO4,W #进入程序52
Enter password: 53
Welcome to the MySQL monitor. Commands end with ; or \g.54
Your MySQL connection id is 355
Server version: 5.7.19-log56
Copyright (c) 2000, 2017, Oracle and/or its affiliates. All rights reserved.57
Oracle is a registered trademark of Oracle Corporation and/or its58
affiliates. Other names may be trademarks of their respective59
owners.60
Type 'help;' or '\h' for help. Type '\c' to clear the current input statement.61
mysql> set password = password('woshiniba8');62
mysql> alter user 'root'@'localhost' password expire never;63
mysql> grant all privileges on *.* to root@'localhost' identified by 'woshiniba8';64
mysql> flush privileges;65
mysql> exitphp安装
- libiconv字符集转换库
[root@linux-node1 ~]# cd /opt/tools/
[root@linux-node1 tools]# wget http://ftp.gnu.org/pub/gnu/libiconv/libiconv-1.14.tar.gz
[root@linux-node1 tools]# tar xf libiconv-1.14.tar.gz
[root@linux-node1 tools]# cd libiconv-1.14
[root@linux-node1 libiconv-1.14]# ./configure --prefix=/usr/local/libiconv
[root@linux-node1 libiconv-1.14]# vim srclib/stdio.in.h 修改698行如下:
#if defined(__GLIBC__) && !defined(__UCLIBC__) && !__GLIBC_PREREQ(2, 16)
        _GL_WARN_ON_USE (gets, "gets is a security hole - use fgets instead");
#endif
[root@linux-node1 libiconv-1.14]# make && make install
x
1
[root@linux-node1 ~]# cd /opt/tools/2
[root@linux-node1 tools]# wget http://ftp.gnu.org/pub/gnu/libiconv/libiconv-1.14.tar.gz3
[root@linux-node1 tools]# tar xf libiconv-1.14.tar.gz4
[root@linux-node1 tools]# cd libiconv-1.145
[root@linux-node1 libiconv-1.14]# ./configure --prefix=/usr/local/libiconv6
[root@linux-node1 libiconv-1.14]# vim srclib/stdio.in.h 修改698行如下:7
#if defined(__GLIBC__) && !defined(__UCLIBC__) && !__GLIBC_PREREQ(2, 16) 8
_GL_WARN_ON_USE (gets, "gets is a security hole - use fgets instead");9
#endif10
[root@linux-node1 libiconv-1.14]# make && make install- libmcrypt加密算法拓展库
[root@linux-node1 ~]# cd /opt/tools/
[root@linux-node1 tools]#  wget ftp://mcrypt.hellug.gr/pub/crypto/mcrypt/libmcrypt/libmcrypt-2.5.7.tar.gz
[root@linux-node1 tools]# tar xf libmcrypt-2.5.7.tar.gz
[root@linux-node1 tools]# cd libmcrypt-2.5.7
[root@linux-node1 libmcrypt-2.5.7]# ./configure && make && make install
x
1
[root@linux-node1 ~]# cd /opt/tools/2
[root@linux-node1 tools]# wget ftp://mcrypt.hellug.gr/pub/crypto/mcrypt/libmcrypt/libmcrypt-2.5.7.tar.gz3
[root@linux-node1 tools]# tar xf libmcrypt-2.5.7.tar.gz 4
[root@linux-node1 tools]# cd libmcrypt-2.5.75
[root@linux-node1 libmcrypt-2.5.7]# ./configure && make && make install- php安装
[root@linux-node1 ~]# cd /opt/tools/
[root@linux-node1 tools]# tar xf php-5.6.31.tar.xz
[root@linux-node1 tools]# cd php-5.6.31
[root@linux-node1 php-5.6.31]# ./configure --prefix=/opt/application/php --with-config-file-path=/opt/application/php/etc --with-bz2 --with-curl --enable-ftp --enable-sockets --disable-ipv6 --with-gd --with-jpeg-dir=/usr/local --with-png-dir=/usr/local --with-freetype-dir=/usr/local --enable-gd-native-ttf --with-iconv-dir=/usr/local --enable-mbstring --enable-calendar --with-gettext --with-libxml-dir=/usr/local --with-zlib --with-pdo-mysql --with-mysqli --with-mysql --enable-dom --enable-xml --enable-fpm --with-libdir=lib64 --enable-bcmath
[root@linux-node1 php-5.6.31]# make && make install
x
1
[root@linux-node1 ~]# cd /opt/tools/2
[root@linux-node1 tools]# tar xf php-5.6.31.tar.xz 3
[root@linux-node1 tools]# cd php-5.6.314
[root@linux-node1 php-5.6.31]# ./configure --prefix=/opt/application/php --with-config-file-path=/opt/application/php/etc --with-bz2 --with-curl --enable-ftp --enable-sockets --disable-ipv6 --with-gd --with-jpeg-dir=/usr/local --with-png-dir=/usr/local --with-freetype-dir=/usr/local --enable-gd-native-ttf --with-iconv-dir=/usr/local --enable-mbstring --enable-calendar --with-gettext --with-libxml-dir=/usr/local --with-zlib --with-pdo-mysql --with-mysqli --with-mysql --enable-dom --enable-xml --enable-fpm --with-libdir=lib64 --enable-bcmath5
[root@linux-node1 php-5.6.31]# make && make install- zabbix安装(安装好server,agent,java-proxy,snmp,mysql等插件)
[root@linux-node1 ~]# groupadd zabbix
[root@linux-node1 ~]# useradd -g zabbix -s /sbin/nologin zabbix
[root@linux-node1 ~]# cd /opt/tools/
[root@linux-node1 tools]# tar xf zabbix-3.2.7.tar.gz
[root@linux-node1 tools]# cd zabbix-3.2.7
[root@linux-node1 zabbix-3.2.7]# yum -y install curl libcurl-devel net-snmp net-snmp-devel perl-DBI libdbi-dbd-mysql mysql-devel gcc gcc++ make libxml2 libxml2-devel java-devel
[root@linux-node1 zabbix-3.2.7]# ./configure --prefix=/opt/application/zabbix --enable-server --enable-java --enable-proxy --enable-agent --with-net-snmp --with-mysql=/opt/application/mysql/bin/mysql_config --with-libcurl --with-libxml2
[root@linux-node1 zabbix-3.2.7]# make && make install
[root@linux-node1 zabbix-3.2.7]# mkdir /opt/application/nginx/html/zabbix/
[root@linux-node1 zabbix-3.2.7]# cp -r frontends/php/* /opt/application/nginx/html/zabbix/
[root@linux-node1 zabbix-3.2.7]# l -s /opt/application/zabbix/sbin/* /usr/local/sbin/
[root@linux-node1 zabbix-3.2.7]# ln -s /opt/application/zabbix/bin/* /usr/local/bin/
[root@linux-node1 zabbix-3.2.7]# echo "/opt/application/mysql/lib" >> /etc/ld.so.conf
[root@linux-node1 zabbix-3.2.7]# ldconfig ll1
[root@linux-node1 ~]# groupadd zabbix2
[root@linux-node1 ~]# useradd -g zabbix -s /sbin/nologin zabbix3
[root@linux-node1 ~]# cd /opt/tools/4
[root@linux-node1 tools]# tar xf zabbix-3.2.7.tar.gz 5
[root@linux-node1 tools]# cd zabbix-3.2.76
[root@linux-node1 zabbix-3.2.7]# yum -y install curl libcurl-devel net-snmp net-snmp-devel perl-DBI libdbi-dbd-mysql mysql-devel gcc gcc++ make libxml2 libxml2-devel java-devel7
[root@linux-node1 zabbix-3.2.7]# ./configure --prefix=/opt/application/zabbix --enable-server --enable-java --enable-proxy --enable-agent --with-net-snmp --with-mysql=/opt/application/mysql/bin/mysql_config --with-libcurl --with-libxml28
[root@linux-node1 zabbix-3.2.7]# make && make install9
[root@linux-node1 zabbix-3.2.7]# mkdir /opt/application/nginx/html/zabbix/10
[root@linux-node1 zabbix-3.2.7]# cp -r frontends/php/* /opt/application/nginx/html/zabbix/11
[root@linux-node1 zabbix-3.2.7]# l -s /opt/application/zabbix/sbin/* /usr/local/sbin/12
[root@linux-node1 zabbix-3.2.7]# ln -s /opt/application/zabbix/bin/* /usr/local/bin/13
[root@linux-node1 zabbix-3.2.7]# echo "/opt/application/mysql/lib" >> /etc/ld.so.conf14
[root@linux-node1 zabbix-3.2.7]# ldconfig ll服务配置以及启动
nginx配置与启动
[root@linux-node1 ~]# vim /opt/application/nginx/conf/nginx.conf
server {
       listen       8888;
       root    html/zabbix/;
       location ~ \.php$ {
                fastcgi_pass   127.0.0.1:9000;
                fastcgi_index  index.php;
                fastcgi_param  SCRIPT_FILENAME $document_root$fastcgi_script_name;
                include        fastcgi_params;
      }
}
[root@linux-node1 ~]# /opt/application/nginx/sbin/nginx
[root@linux-node1 ~]# ps -ef | grep nginx
root      48031      1  0 12:50 ?        00:00:00 nginx: master process /opt/application/nginx/sbin/nginx
nobody    48032  48031  0 12:50 ?        00:00:00 nginx: worker process
root 48140 19734 0 13:20 pts/0 00:00:00 grep --color=auto nginxx
1
[root@linux-node1 ~]# vim /opt/application/nginx/conf/nginx.conf2
server {3
listen 8888;4
root html/zabbix/; 5
location ~ \.php$ {6
fastcgi_pass 127.0.0.1:9000;7
fastcgi_index index.php;8
fastcgi_param SCRIPT_FILENAME $document_root$fastcgi_script_name;9
include fastcgi_params;10
}11
}12
[root@linux-node1 ~]# /opt/application/nginx/sbin/nginx 13
[root@linux-node1 ~]# ps -ef | grep nginx14
root 48031 1 0 12:50 ? 00:00:00 nginx: master process /opt/application/nginx/sbin/nginx15
nobody 48032 48031 0 12:50 ? 00:00:00 nginx: worker process16
root 48140 19734 0 13:20 pts/0 00:00:00 grep --color=auto nginxmysql数据配置
[root@linux-node1 ~]# mysql -pwoshiniba8
mysql> create database zabbix character set utf8;      #创建库
mysql> grant all on zabbix.* to zabbix@'localhost' identified by 'woshiniba8';   #    权限分配
mysql> flush privileges;
mysql> exit
[root@linux-node1 ~]# cd /opt/tools/zabbix-3.2.7/database/mysql/
[root@linux-node1 mysql]# mysql -uzabbix -pwoshiniba8 zabbix < schema.sql
[root@linux-node1 mysql]# mysql -uzabbix -pwoshiniba8 zabbix < images.sql
[root@linux-node1 mysql]# mysql -uzabbix -pwoshiniba8 zabbix < data.sql
x
1
[root@linux-node1 ~]# mysql -pwoshiniba82
mysql> create database zabbix character set utf8; #创建库3
mysql> grant all on zabbix.* to zabbix@'localhost' identified by 'woshiniba8'; # 权限分配4
mysql> flush privileges;5
mysql> exit6
[root@linux-node1 ~]# cd /opt/tools/zabbix-3.2.7/database/mysql/7
[root@linux-node1 mysql]# mysql -uzabbix -pwoshiniba8 zabbix < schema.sql8
[root@linux-node1 mysql]# mysql -uzabbix -pwoshiniba8 zabbix < images.sql 9
[root@linux-node1 mysql]# mysql -uzabbix -pwoshiniba8 zabbix < data.sql php的配置与启动
[root@linux-node1 ~]# cp /opt/tools/php-5.6.31/php.ini-production /opt/application/php/etc/php.ini
[root@linux-node1 ~]# vim /opt/application/php/etc/php.ini
max_execution_time = 300 (Default is 30)
memory_limit = 128M (no change, default is 128M)
post_max_size = 16M  (default is 8M)
upload_max_filesize = 2M (no change, default is 2M)
max_input_time = 300   (default is 60)
date.timezone = Asia/Shanghai   (default is empty)
always_populate_raw_post_data = -1
[root@linux-node1 ~]#  echo "/opt/web/php/sbin/php-fpm" >> /etc/rc.local
[root@linux-node1 ~]# cp /opt/application/php/etc/php-fpm.conf.default /opt/application/php/etc/php-fpm.conf
[root@linux-node1 ~]# cp /opt/application/php/sbin/php-fpm /etc/init.d/php-fpm
[root@linux-node1 ~]# chmod +x /etc/init.d/php-fpm
[root@linux-node1 ~]# /etc/init.d/php-fpm
[root@linux-node1 ~]# ps -ef | grep php       #检测
root      48134      1  0 13:20 ?        00:00:00 php-fpm: master process (/opt/application/php/etc/php-fpm.conf)
nobody    48135  48134  0 13:20 ?        00:00:00 php-fpm: pool www
nobody    48136  48134  0 13:20 ?        00:00:00 php-fpm: pool www
root      48138  19734  0 13:20 pts/0    00:00:00 grep --color=auto php
x
1
[root@linux-node1 ~]# cp /opt/tools/php-5.6.31/php.ini-production /opt/application/php/etc/php.ini2
[root@linux-node1 ~]# vim /opt/application/php/etc/php.ini3
max_execution_time = 300 (Default is 30)4
memory_limit = 128M (no change, default is 128M)5
post_max_size = 16M (default is 8M)6
upload_max_filesize = 2M (no change, default is 2M)7
max_input_time = 300 (default is 60)8
date.timezone = Asia/Shanghai (default is empty)9
always_populate_raw_post_data = -110
[root@linux-node1 ~]# echo "/opt/web/php/sbin/php-fpm" >> /etc/rc.local11
[root@linux-node1 ~]# cp /opt/application/php/etc/php-fpm.conf.default /opt/application/php/etc/php-fpm.conf12
[root@linux-node1 ~]# cp /opt/application/php/sbin/php-fpm /etc/init.d/php-fpm13
[root@linux-node1 ~]# chmod +x /etc/init.d/php-fpm14
[root@linux-node1 ~]# /etc/init.d/php-fpm15
[root@linux-node1 ~]# ps -ef | grep php #检测16
root 48134 1 0 13:20 ? 00:00:00 php-fpm: master process (/opt/application/php/etc/php-fpm.conf)17
nobody 48135 48134 0 13:20 ? 00:00:00 php-fpm: pool www18
nobody 48136 48134 0 13:20 ? 00:00:00 php-fpm: pool www19
root 48138 19734 0 13:20 pts/0 00:00:00 grep --color=auto phpzabbix-sever配置与启动:
注意:当系统版本是centos7.0或者7.1的话,需要升级trousers,否则启动会报错
[root@linux-node1 ~]# cd /opt/application/zabbix/etc/
[root@linux-node1 etc]# vim zabbix_server.conf
LogFile=/opt/application/zabbix/logs/zabbix_server.log
PidFile=/tmp/zabbix_server.pid
DBHost=localhost
DBName=zabbix
DBUser=zabbix
DBPassword=woshiniba8
[root@linux-node1 ~]# mkdir /opt/application/zabbix/logs/
[root@linux-node1 sbin]# chmod 777 /opt/application/zabbix/logs/ -R
[root@linux-node1 ~]# /opt/application/zabbix/sbin/zabbix_server      #服务启动
11
1
[root@linux-node1 ~]# cd /opt/application/zabbix/etc/2
[root@linux-node1 etc]# vim zabbix_server.conf3
LogFile=/opt/application/zabbix/logs/zabbix_server.log4
PidFile=/tmp/zabbix_server.pid5
DBHost=localhost6
DBName=zabbix7
DBUser=zabbix8
DBPassword=woshiniba89
[root@linux-node1 ~]# mkdir /opt/application/zabbix/logs/10
[root@linux-node1 sbin]# chmod 777 /opt/application/zabbix/logs/ -R11
[root@linux-node1 ~]# /opt/application/zabbix/sbin/zabbix_server #服务启动zabbix-agent配置与启动
zabbix-server同样也需要监控自己
[root@linux-node1 ~]# cd /opt/application/zabbix/etc/
[root@linux-node1 etc]# vim zabbix_agentd.conf
LogFile=/opt/application/zabbix/logs/zabbix_agentd.log
Server=127.0.0.1
ServerActive=127.0.0.1
Hostname=Zabbix server
[root@linux-node1 etc]# /opt/application/zabbix/sbin/zabbix_agentd         #服务启动
7
1
[root@linux-node1 ~]# cd /opt/application/zabbix/etc/2
[root@linux-node1 etc]# vim zabbix_agentd.conf3
LogFile=/opt/application/zabbix/logs/zabbix_agentd.log4
Server=127.0.0.15
ServerActive=127.0.0.16
Hostname=Zabbix server7
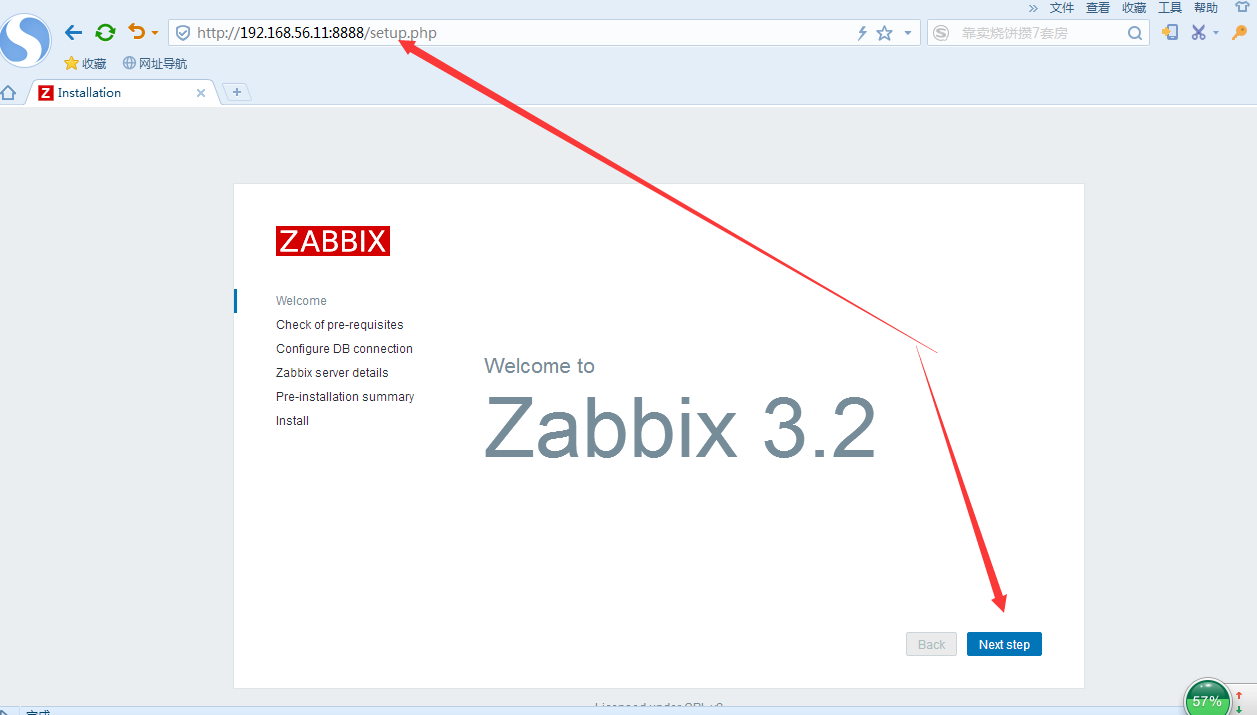
[root@linux-node1 etc]# /opt/application/zabbix/sbin/zabbix_agentd #服务启动web界面登录配置
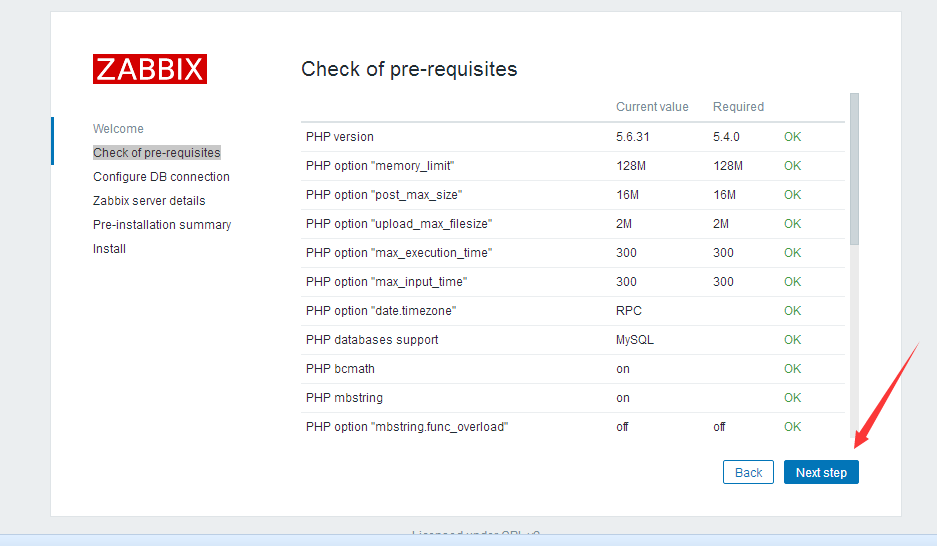
- 配置检查
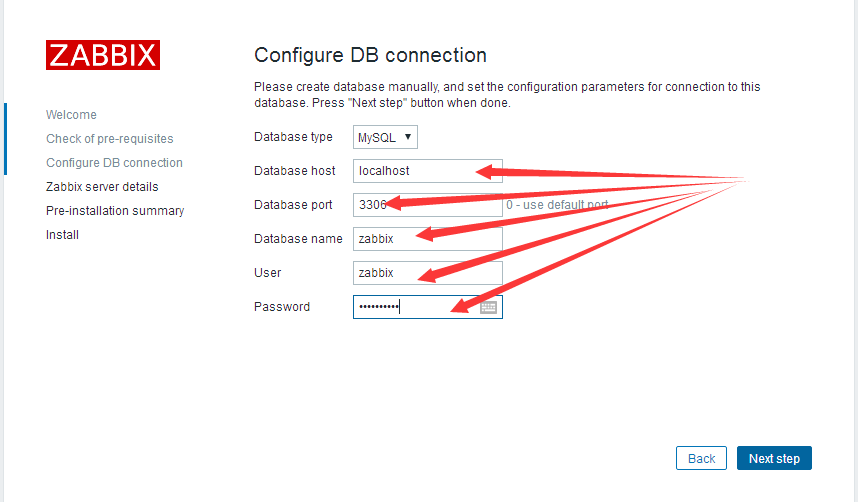
- 连接数据库
- server详细信息
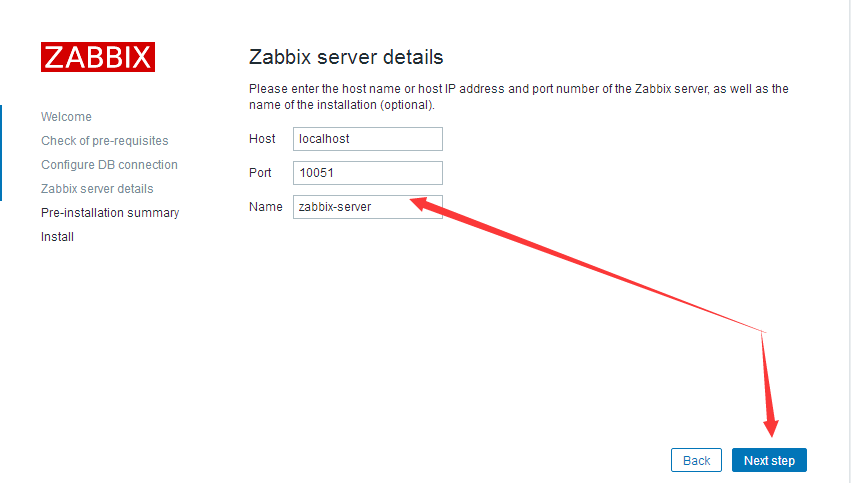
- 继续下一步

- 安装
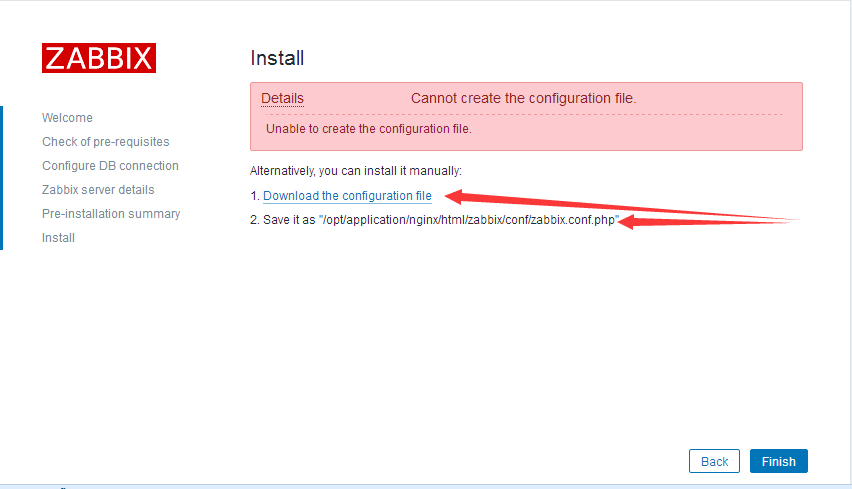
此时有报错:可以按照上面的步骤下载zabbix.conf.php传到/opt/application/nginx/html/zabbix/conf/
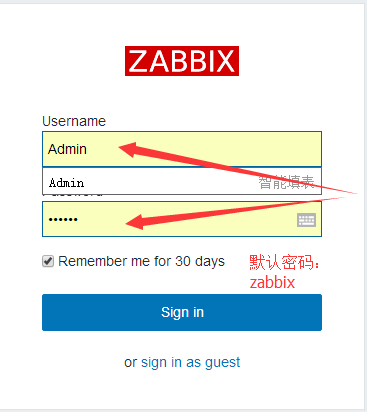
- 登录
- darshboard

zabbix客户端安装
客户端准备环境
- OS:CentOS Linux release 7.3.1611 (Core)
- hostname:linux-node2
- IP:192.168.56.12
- zabbix:https://jaist.dl.sourceforge.net/project/zabbix/ZABBIX Latest Stable/3.2.7/zabbix-3.2.7.tar.gz
[root@linux-node2 ~]# yum -y install gcc gcc-devel c++
[root@linux-node2 ~]# mkdir /opt/{application,tools}
[root@linux-node2 tools]# wget http://download.oracle.com/otn-pub/java/jdk/8u144-b01/090f390dda5b47b9b721c7dfaa008135/jdk-8u144-linux-x64.rpm?AuthParam=1504418803_96caf675c8af37c08b7a8890c20e0ec8
[root@linux-node2 tools]# rpm -ivh jdk-8u144-linux-x64.rpm
[root@linux-node2 tools]# wget https://jaist.dl.sourceforge.net/project/zabbix/ZABBIX Latest Stable/3.2.7/zabbix-3.2.7.tar.gz
[root@linux-node1 tools]# useradd -s /sbin/nologin zabbix
6
1
[root@linux-node2 ~]# yum -y install gcc gcc-devel c++2
[root@linux-node2 ~]# mkdir /opt/{application,tools}3
[root@linux-node2 tools]# wget http://download.oracle.com/otn-pub/java/jdk/8u144-b01/090f390dda5b47b9b721c7dfaa008135/jdk-8u144-linux-x64.rpm?AuthParam=1504418803_96caf675c8af37c08b7a8890c20e0ec84
[root@linux-node2 tools]# rpm -ivh jdk-8u144-linux-x64.rpm5
[root@linux-node2 tools]# wget https://jaist.dl.sourceforge.net/project/zabbix/ZABBIX Latest Stable/3.2.7/zabbix-3.2.7.tar.gz6
[root@linux-node1 tools]# useradd -s /sbin/nologin zabbix客户端安装
[root@linux-node2 ~]# cd /opt/tools/
[root@linux-node2 tools]# tar xf zabbix-3.2.7.tar.gz
[root@linux-node2 zabbix-3.2.7]# ./configure --prefix=/opt/application/zabbix-agent --enable-agent --enable-java
[root@linux-node2 zabbix-3.2.7]# make && make installx
1
[root@linux-node2 ~]# cd /opt/tools/2
[root@linux-node2 tools]# tar xf zabbix-3.2.7.tar.gz3
[root@linux-node2 zabbix-3.2.7]# ./configure --prefix=/opt/application/zabbix-agent --enable-agent --enable-java4
[root@linux-node2 zabbix-3.2.7]# make && make install客户端配置
[root@linux-node2 ~]# cd /opt/application/zabbix-agent/etc/
[root@linux-node2 etc]# vim zabbix_agentd.conf
LogFile=/opt/application/zabbix-agent/logs/zabbix_agentd.log
Server=192.168.56.11
Hostname=Zabbix server
[root@linux-node2 etc]# mkdir /opt/application/zabbix-agent/logs
[root@linux-node2 etc]# chmod 777 -R /opt/application/zabbix-agent/logs
[root@linux-node2 etc]# groupadd zabbix
[root@linux-node2 etc]# useradd -g zabbix -s /sbin/nologin -M zabbix
[root@linux-node2 etc]# /opt/application/zabbix-agent/sbin/zabbix_agentd
1
[root@linux-node2 ~]# cd /opt/application/zabbix-agent/etc/2
[root@linux-node2 etc]# vim zabbix_agentd.conf3
LogFile=/opt/application/zabbix-agent/logs/zabbix_agentd.log4
Server=192.168.56.115
Hostname=Zabbix server6
[root@linux-node2 etc]# mkdir /opt/application/zabbix-agent/logs7
[root@linux-node2 etc]# chmod 777 -R /opt/application/zabbix-agent/logs8
[root@linux-node2 etc]# groupadd zabbix9
[root@linux-node2 etc]# useradd -g zabbix -s /sbin/nologin -M zabbix10
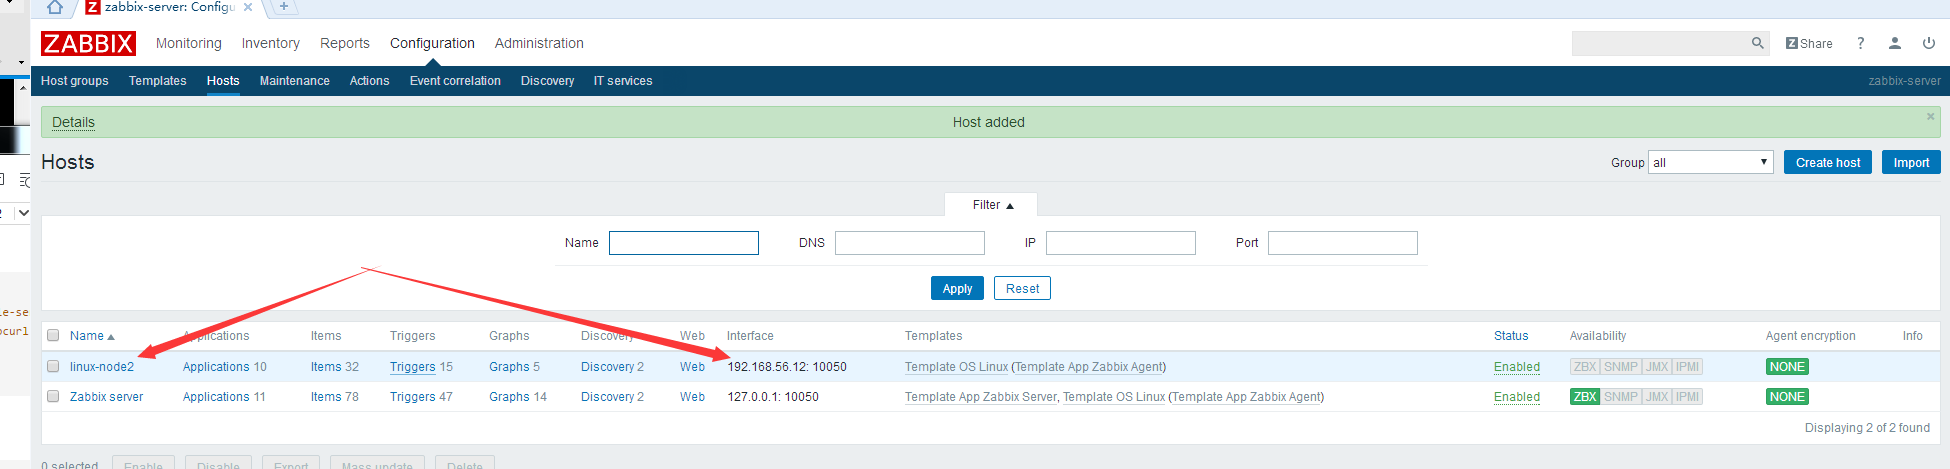
[root@linux-node2 etc]# /opt/application/zabbix-agent/sbin/zabbix_agentd 添加第一台监控主机
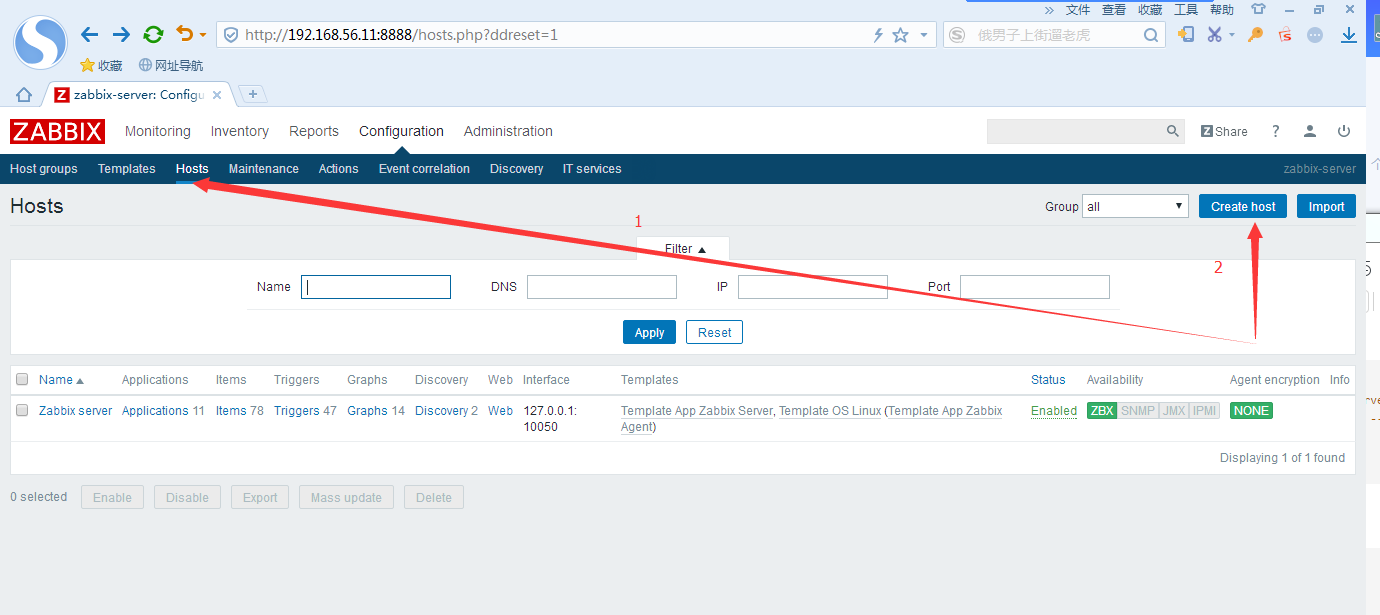
- 登录zabbix-darshboard
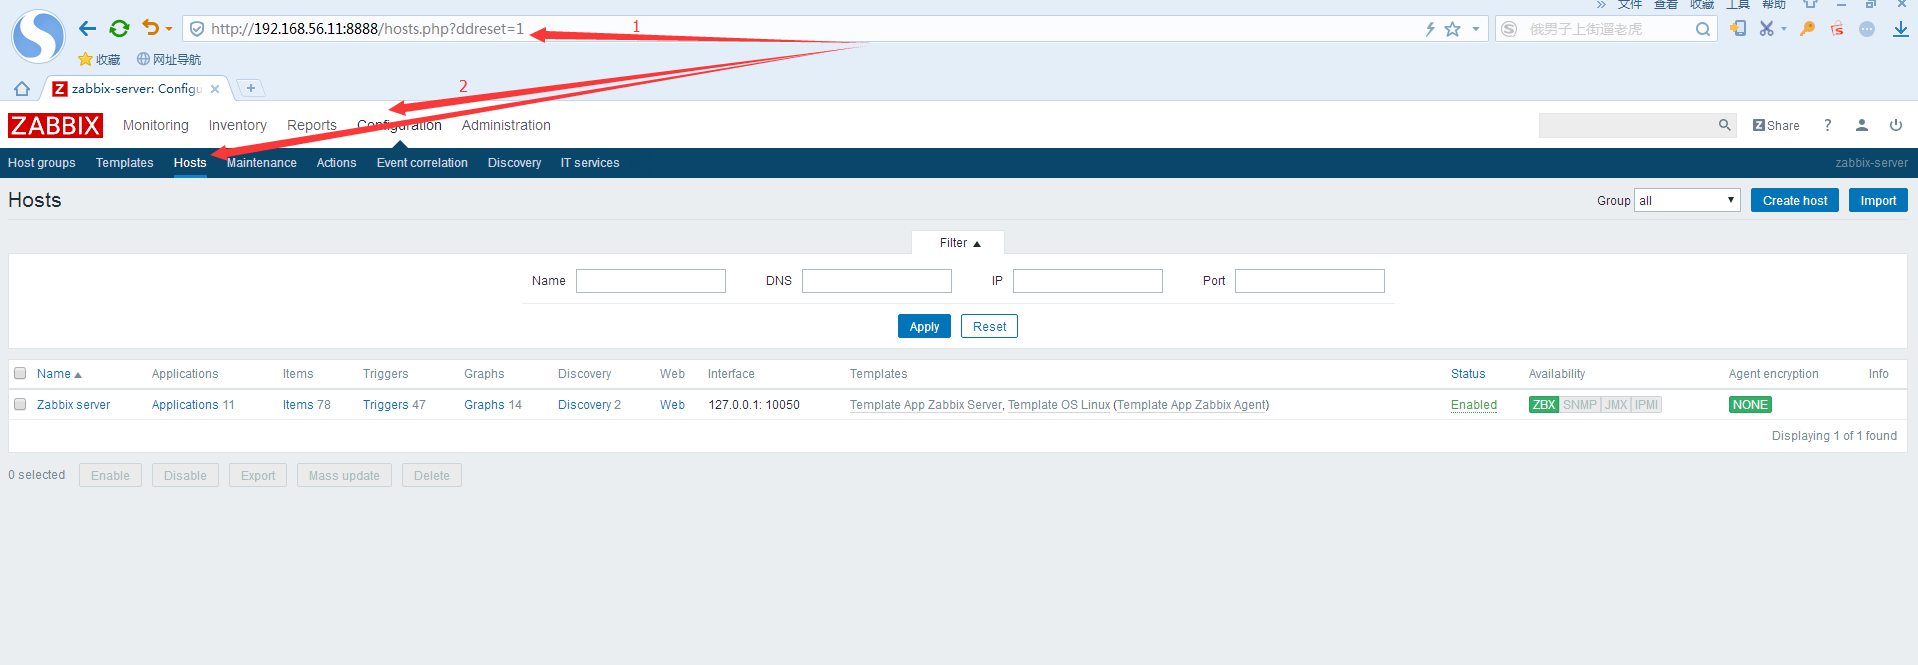
- 添加主机
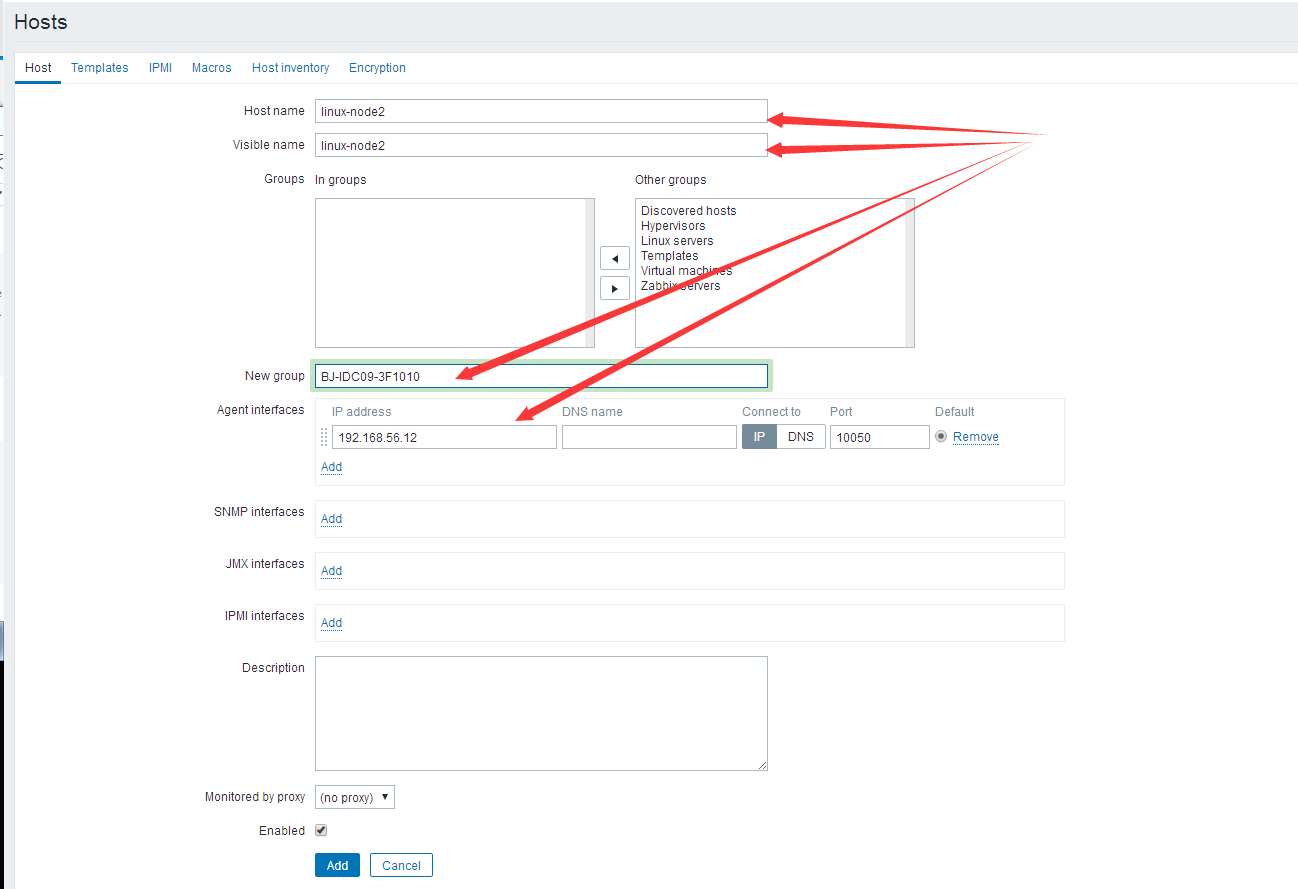
- 主机信息填写
- 配置模板
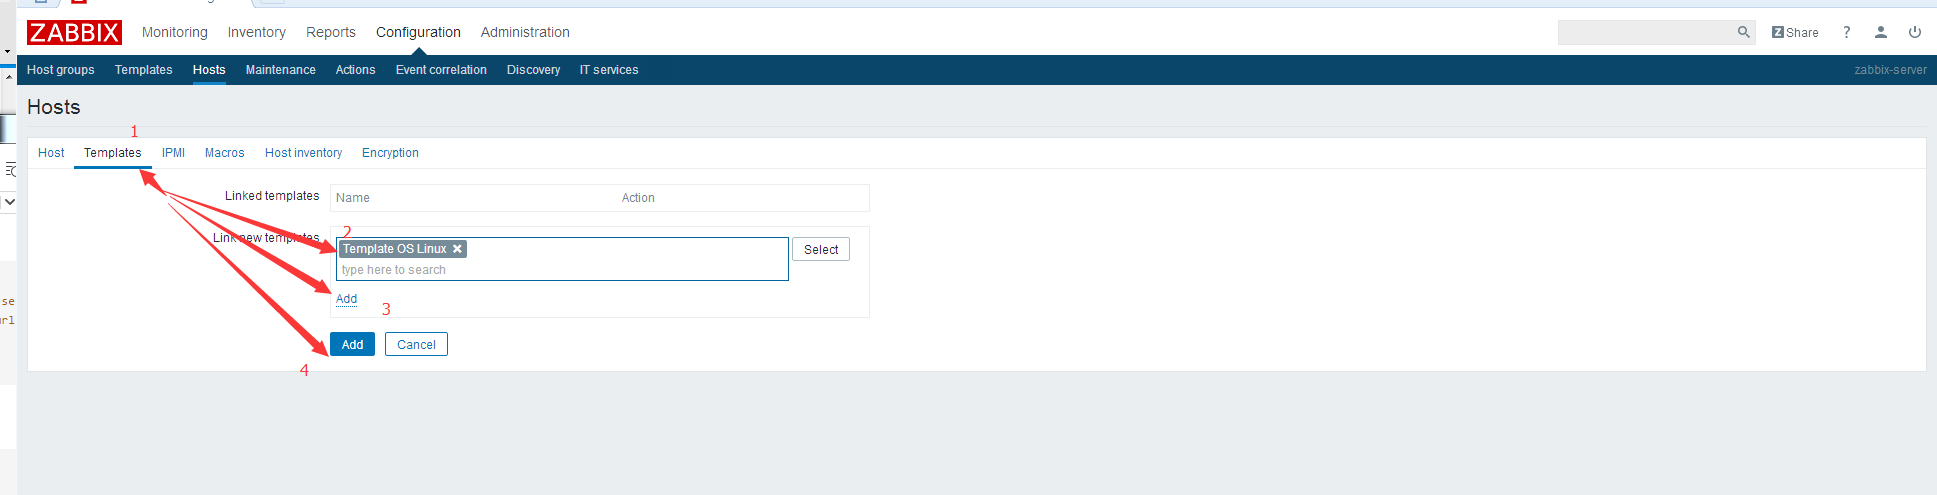
至此,第一台机器监控就告一段落