CorePlex开发手记:一、Winform窗体皮肤及简单换肤机制
2011-07-10 19:25 uonun 阅读(3760) 评论(22) 收藏 举报前言: CorePlex代码库 作为一个Visual Studio插件, 允许用户通过VS直接访问在线代码库。开发过程中我翻阅了很多网上的资料,也总结了一些技术要点,现写成系列文章,以飨读者。同时,里面某些技术也是我第一次使用,如有不对的地方,还请行家狠拍,欢迎大家指正~
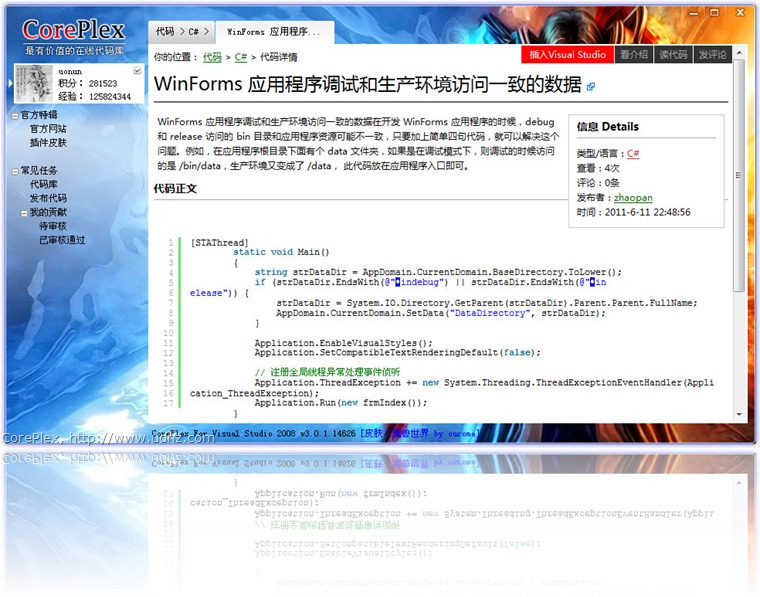
闲话休絮,进入正题。从本篇文章开始,介绍 CorePlex 的窗体皮肤机制,以及简单的换肤功能。我们先来看看效果:
换一个皮肤看看:
需要实现的是圆角窗体+四周的阴影,要实现这个,大致的思路是这样的:先使用 Graphics 绘制一个 Bitmap,将需要的皮肤绘制成一个内存图,然后使用 Win32的API:UpdateLayeredWindow 将这个构造好的 Bitmap 绘制/更新到窗体上。我们来看看具体的实现吧。
第一部分,构造皮肤背景。
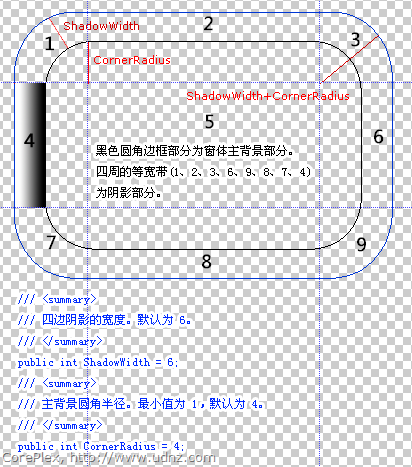
为了实现圆角以及四周的阴影,我将窗体背景划分成了九宫格的形式:

主要思路是:除 5 之外的其他部分,都作为窗体的边框和圆角来处理。而5这个部分,则作为圆角窗体的主体背景部分。1、3、7、9四个部分,作为圆角,我使用 PathGradientBrush 来绘制扇形渐变,而2、4、6、8四个部分,作为边框,我使用 LinearGradientBrush 来绘制线性渐变。
不多说,见代码:
/// <summary>
/// 绘制四角的阴影
/// </summary>
/// <param name="g"></param>
/// <param name="corSize">圆角区域正方形的大小</param>
/// <returns></returns>
private void DrawCorners(Graphics g, Size corSize)
{
    /*
     * 四个角,每个角都是一个扇面
     * 画图时扇面由外弧、内弧以及两段的连接线构成图形
     * 然后在内弧中间附近向外做渐变
     *
     * 阴影分为9宫格,5为内部背景图部分
     *  1   2   3
     *  4   5   6
     *  7   8   9
     */
    Action<int> DrawCorenerN = (n) =>
    {
        using (GraphicsPath gp = new GraphicsPath())
        {
            // 扇面外沿、内沿曲线的尺寸
            Size sizeOutSide = new Size(corSize.Width * 2, corSize.Height * 2);
          Size sizeInSide = new Size(this.SkinOptions.CornerRadius * 2, this.SkinOptions.CornerRadius * 2);

            // 扇面外沿、内沿曲线的位置
            Point locationOutSide, locationInSide;
            // 当圆角半径小于MinCornerRadius时,内沿不绘制曲线,而以线段绘制近似值。该线段绘制方向是从p1指向p2。
            Point p1, p2;

            // 渐变起点位置
            PointF brushCenter;

            // 扇面起始角度
            float startAngle;

            // 根据四个方位不同,确定扇面的位置、角度及渐变起点位置
            switch (n)
            {
                case 1:
                    locationOutSide = new Point(0, 0);
                    startAngle = 180;
                    brushCenter = new PointF((float)sizeOutSide.Width - sizeInSide.Width * 0.5f,
                        (float)sizeOutSide.Height - sizeInSide.Height * 0.5f);
                    p1 = new Point(corSize.Width, this.SkinOptions.ShadowWidth);
                    p2 = new Point(this.SkinOptions.ShadowWidth, corSize.Height);
                    break;

                case 3:
                    locationOutSide = new Point(this.Width - sizeOutSide.Width, 0);
                    startAngle = 270;
                    brushCenter = new PointF((float)locationOutSide.X + sizeInSide.Width * 0.5f,
                        (float)sizeOutSide.Height - sizeInSide.Height * 0.5f);
                    p1 = new Point(this.Width - this.SkinOptions.ShadowWidth, corSize.Height);
                    p2 = new Point(this.Width - corSize.Width, this.SkinOptions.ShadowWidth);
                    break;

                case 7:
                    locationOutSide = new Point(0, this.Height - sizeOutSide.Height);
                    startAngle = 90;
                    brushCenter = new PointF((float)sizeOutSide.Width - sizeInSide.Width * 0.5f,
                        (float)locationOutSide.Y + sizeInSide.Height * 0.5f);
                    p1 = new Point(this.SkinOptions.ShadowWidth, this.Height - corSize.Height);
                    p2 = new Point(corSize.Width, this.Height - this.SkinOptions.ShadowWidth);
                    break;

                default:
                    locationOutSide = new Point(this.Width - sizeOutSide.Width, this.Height - sizeOutSide.Height);
                    startAngle = 0;
                    brushCenter = new PointF((float)locationOutSide.X + sizeInSide.Width * 0.5f,
                        (float)locationOutSide.Y + sizeInSide.Height * 0.5f);
                    p1 = new Point(this.Width - corSize.Width, this.Height - this.SkinOptions.ShadowWidth);
                    p2 = new Point(this.Width - this.SkinOptions.ShadowWidth, this.Height - corSize.Height);
                    break;
            }

            // 扇面外沿曲线
            Rectangle recOutSide = new Rectangle(locationOutSide, sizeOutSide);

            // 扇面内沿曲线的位置
            locationInSide = new Point(locationOutSide.X + (sizeOutSide.Width - sizeInSide.Width) / 2,
                locationOutSide.Y + (sizeOutSide.Height - sizeInSide.Height) / 2);

            // 扇面内沿曲线
            Rectangle recInSide = new Rectangle(locationInSide, sizeInSide);

            // 将扇面添加到形状,以备绘制
            gp.AddArc(recOutSide, startAngle, 91);

            if (this.SkinOptions.CornerRadius > MinCornerRadius)
                gp.AddArc(recInSide, startAngle + 90, -91);
            else
                gp.AddLine(p1, p2);

            // 使用渐变笔刷
            using (PathGradientBrush shadowBrush = new PathGradientBrush(gp))
            {
                Color[] colors = new Color[2];
                float[] positions = new float[2];
                ColorBlend sBlend = new ColorBlend();
                // 扇面外沿色
                colors[0] = this.SkinOptions.CornerColor[1];
                // 扇面内沿色
                colors[1] = this.SkinOptions.CornerColor[0];
                positions[0] = 0.0f;
                positions[1] = 1.0f;
                sBlend.Colors = colors;
                sBlend.Positions = positions;

                shadowBrush.InterpolationColors = sBlend;
                // 上色中心点
                shadowBrush.CenterPoint = brushCenter;

                g.FillPath(shadowBrush, gp);
            }
        }
    };

    DrawCorenerN(1);
    DrawCorenerN(3);
    DrawCorenerN(7);
    DrawCorenerN(9);
}

/// <summary>
/// 绘制上下左右四边的阴影
/// </summary>
/// <param name="g"></param>
/// <param name="corSize"></param>
/// <param name="gradientSize_LR"></param>
/// <param name="gradientSize_TB"></param>
private void DrawLines(Graphics g, Size corSize, Size gradientSize_LR, Size gradientSize_TB)
{
    Rectangle rect2 = new Rectangle(new Point(corSize.Width, 0), gradientSize_TB);
    Rectangle rect4 = new Rectangle(new Point(0, corSize.Width), gradientSize_LR);
    Rectangle rect6 = new Rectangle(new Point(this.Size.Width - this.SkinOptions.ShadowWidth, corSize.Width), gradientSize_LR);
    Rectangle rect8 = new Rectangle(new Point(corSize.Width, this.Size.Height - this.SkinOptions.ShadowWidth), gradientSize_TB);

    using (
        LinearGradientBrush brush2 = new LinearGradientBrush(rect2, this.SkinOptions.ShadowColor[1],
                      this.SkinOptions.ShadowColor[0], LinearGradientMode.Vertical),
         brush4 = new LinearGradientBrush(rect4, this.SkinOptions.ShadowColor[1],
                      this.SkinOptions.ShadowColor[0], LinearGradientMode.Horizontal),
         brush6 = new LinearGradientBrush(rect6, this.SkinOptions.ShadowColor[0],
                      this.SkinOptions.ShadowColor[1], LinearGradientMode.Horizontal),
         brush8 = new LinearGradientBrush(rect8, this.SkinOptions.ShadowColor[0],
                      this.SkinOptions.ShadowColor[1], LinearGradientMode.Vertical)
    )
    {
        g.FillRectangle(brush2, rect2);
        g.FillRectangle(brush4, rect4);
        g.FillRectangle(brush6, rect6);
        g.FillRectangle(brush8, rect8);
    }
}
好,到此为止,四周的圆角和渐变边框算是模拟出来了,然后就是将 5号为止的主背景绘制上去,以及添加一些高光、暗部等线条,突出质感:
/// <summary>
/// 绘制主背景图
/// </summary>
/// <param name="g"></param>
private void DrawMain(Graphics g)
{
    // 要显示的区域图像的大小
    Rectangle destRect = new Rectangle(0, 0,
                             this.Width - this.SkinOptions.ShadowWidth * 2 + 1,
                             this.Height - this.SkinOptions.ShadowWidth * 2 + 1);

    // 建立一个临时的 bitmap,用于存放被圆角化的图像
    using (Bitmap corBg = new Bitmap(destRect.Width, destRect.Height))
    {
        using (Graphics corG = Graphics.FromImage(corBg))
        {
            corG.SmoothingMode = SmoothingMode.HighQuality;

            // 创建圆角区域
            using (GraphicsPath gp = CreateRoundRect(destRect, this.SkinOptions.CornerRadius))
            {
                Region re = new System.Drawing.Region(gp);

                // 设置画布区域为圆角区域
                corG.IntersectClip(re);

                Pen p = new Pen(this.SkinOptions.BorderColor);
                p.Width = this.SkinOptions.BorderWidth;
                p.Alignment = PenAlignment.Inset;

                switch (this.SkinOptions.BackgroundLayout)
                {
                    case ImageLayout.Center:
                        {
                            // 创建源图上的截取区域
                            Rectangle srcRect = new Rectangle(new Point(0, 0), this.SkinOptions.BackgroundImage.Size);
                            // 绘制背景图
                            corG.DrawImage(this.SkinOptions.BackgroundImage,
                                       (this.Width - this.SkinOptions.BackgroundImage.Width) / 2,
                                       (this.Height - this.SkinOptions.BackgroundImage.Height) / 2,
                                       srcRect, GraphicsUnit.Pixel);
                        }
                        break;

                    case ImageLayout.Stretch:
                        {
                            // 创建源图上的截取区域
                            Rectangle srcRect = new Rectangle(new Point(0, 0), this.SkinOptions.BackgroundImage.Size);
                            // 绘制背景图
                            corG.DrawImage(this.SkinOptions.BackgroundImage, p.Width, p.Width, srcRect, GraphicsUnit.Pixel);
                        }
                        break;

                    case ImageLayout.Tile:
                        {
                            // 创建源图上的截取区域
                            TextureBrush tb = new TextureBrush(this.SkinOptions.BackgroundImage);
                            corG.FillRectangle(tb, destRect);
                        }
                        break;

                    case ImageLayout.Zoom:
                        {
                            // 创′建¨源′图?上?的?截?取?区?域ò
                            Rectangle srcRect = new Rectangle(new Point(0, 0), this.SkinOptions.BackgroundImage.Size);
                            // 绘制背景图
                            corG.DrawImage(this.SkinOptions.BackgroundImage,
                                       (this.Width - this.SkinOptions.BackgroundImage.Width) / 2,
                                       (this.Height - this.SkinOptions.BackgroundImage.Height) / 2,
                                       srcRect, GraphicsUnit.Pixel);
                        }
                        break;
                    case ImageLayout.None:
                    default:
                        corG.DrawImage(this.SkinOptions.BackgroundImage, p.Width, p.Width);
                        break;
                }

                // 构造外边框
                Rectangle borderOut = new Rectangle(0, 0, destRect.Width - 1, destRect.Height - 1);
                // 绘制外边框
                corG.DrawPath(p, CreateRoundRect(borderOut, this.SkinOptions.CornerRadius));

                // 构造内边框
                Rectangle borderIn = new Rectangle(1, 1, borderOut.Width - 2, borderOut.Height - 2);

                using (LinearGradientBrush b = new LinearGradientBrush(borderIn,
                                       this.SkinOptions.BorderHighlightColor[0],
                                       this.SkinOptions.BorderHighlightColor[1],
                                       this.SkinOptions.BorderHighlightAngle))
                {
                    // 绘制内边框高光
                    using (Pen lightPen = new Pen(b))
                    {
                        // 绘制内边框
                        corG.DrawPath(lightPen, CreateRoundRect(borderIn, this.SkinOptions.CornerRadius));
                    }
                }

                // 将圆角图绘制到主画布
                g.DrawImage(corBg, this.SkinOptions.ShadowWidth, this.SkinOptions.ShadowWidth);

                #region 绘制Logo
                using (Bitmap logo = Resources.Default.formlogo)
                {
                    Rectangle paintTo = new Rectangle(25, 20, logo.Width, logo.Height);
                    Rectangle sourceRec = new Rectangle(0, 0, logo.Width, logo.Height);
                    g.DrawImage(logo, paintTo, sourceRec, GraphicsUnit.Pixel);
                }
                #endregion

                #region 绘制控制按钮
                using (Bitmap cb = Resources.Default.controlboxes)
                {
                    Rectangle paintTo = new Rectangle(this.Width - this.SkinOptions.ShadowWidth - cb.Width + 3,
                                            this.SkinOptions.ShadowWidth - 1, cb.Width, ControlBoxHeight);
                    Rectangle sourceRec = new Rectangle(0, this._currentControlBoxImgY, cb.Width, ControlBoxHeight);
                    g.DrawImage(cb, paintTo, sourceRec, GraphicsUnit.Pixel);
                }
                #endregion
            }
        }
    }
}
/// <summary>
/// 构造圆角路径
/// </summary>
/// <param name="rect"></param>
/// <param name="radius"></param>
/// <returns></returns>
private GraphicsPath CreateRoundRect(Rectangle rect, int radius)
{
    GraphicsPath gp = new GraphicsPath();

    int x = rect.X;
    int y = rect.Y;
    int width = rect.Width;
    int height = rect.Height;

    if (width > 0 && height > 0)
    {
        // 半径大才做圆角
        if (radius > MinCornerRadius)
        {
            radius = Math.Min(radius, height / 2 - 1);
            radius = Math.Min(radius, width / 2 - 1);
            gp.AddArc(x + width - (radius * 2), y, radius * 2, radius * 2, 270, 90);
            gp.AddLine(x + width, y + radius, x + width, y + height - (radius * 2));
            gp.AddArc(x + width - (radius * 2), y + height - (radius * 2), radius * 2, radius * 2, 0, 90);
            gp.AddLine(x + width - (radius * 2), y + height, x + radius, y + height);
            gp.AddArc(x, y + height - (radius * 2), radius * 2, radius * 2, 90, 90);
            gp.AddLine(x, y + height - (radius * 2), x, y + radius);
            gp.AddArc(x, y, radius * 2, radius * 2, 180, 90);
        }
        else
        {
            gp.AddLine(x + width - radius, y, x + width, y + radius);
            gp.AddLine(x + width, y + radius, x + width, y + height - radius);
            gp.AddLine(x + width, y + height - radius, x + width - radius, y + height);
            gp.AddLine(x + width - radius, y + height, x + radius, y + height);
            gp.AddLine(x + radius, y + height, x, y + height - radius);
            gp.AddLine(x, y + height - radius, x, y + radius);
            gp.AddLine(x, y + radius, x + radius, y);
        }
        gp.CloseFigure();
    }
    return gp;
}
好了,带圆角、渐变阴影的窗体背景算是构造好了,但它现在仅仅是一张内存里的 bitmap 图片,我们要如何才能将它显示到窗体上呢?
第二部分:使用 Win32的API将 bitmap 更新到窗体
这个操作使用 UpdateLayeredWindow 来进行,MSDN上是这样描述的:Updates the position, size, shape, content, and translucency of a layered window.
MSDN:ms-help://MS.MSDNQTR.v90.chs/dv_vclib/html/9035dce1-8560-4ea4-94a8-f6e0ba2b2021.htm
现在我们只是用它来将我们绘制好的内存图Update到一个窗体上。你应该已经注意到MSDN的说明以及这个方法的名字了,单词Window前有一个限定词,Layered。那么我们怎么构造一个Layered的Window呢?或者说,怎么才能使我们的窗体成为Layered的呢?很简单,你可以这样:
protected override CreateParams CreateParams
{
    get
    {
        CreateParams cp = base.CreateParams;
        // 绘制背景必须针对具有 WS_EX_LAYERED 扩展风格的窗体进行
        if (!this.DesignMode)
        {
            cp.ExStyle |= Win32.WS_EX_LAYERED; // WS_EX_LAYERED
        }
        return cp;
    }
}
好了,我们有一个合适的Window了,下面我们使用 UpdateLayeredWindow 来讲绘制的内存图更新到窗体上:(老实说,这段代码是从网上Copy的,嘿嘿~)
/// <summary>
/// 绘制已构造好的位图
/// </summary>
/// <param name="bitmap"></param>
/// <param name="opacity"></param>
private void SetBitmap(Bitmap bitmap, byte opacity = 255)
{
    if (bitmap.PixelFormat != PixelFormat.Format32bppArgb)
        throw new Exception("窗体背景图必须是 8 位/通道 RGB 颜色的图。");

    // The ideia of this is very simple,
    // 1. Create a compatible DC with screen;
    // 2. Select the bitmap with 32bpp with alpha-channel in the compatible DC;
    // 3. Call the UpdateLayeredWindow.

    IntPtr screenDc = Win32.GetDC(IntPtr.Zero);
    IntPtr memDc = Win32.CreateCompatibleDC(screenDc);
    IntPtr hBitmap = IntPtr.Zero;
    IntPtr oldBitmap = IntPtr.Zero;

    try
    {
        hBitmap = bitmap.GetHbitmap(Color.FromArgb(0));  // grab a GDI handle from this GDI+ bitmap
        oldBitmap = Win32.SelectObject(memDc, hBitmap);

        Win32.Size size = new Win32.Size(bitmap.Width, bitmap.Height);
        Win32.Point pointSource = new Win32.Point(0, 0);
        Win32.Point topPos = new Win32.Point(Left, Top);
        Win32.BLENDFUNCTION blend = new Win32.BLENDFUNCTION();
        blend.BlendOp = Win32.AC_SRC_OVER;
        blend.BlendFlags = 0;
        blend.SourceConstantAlpha = opacity;
        blend.AlphaFormat = Win32.AC_SRC_ALPHA;

        Win32.UpdateLayeredWindow(Handle, screenDc, ref topPos, ref size,
                      memDc, ref pointSource, 0, ref blend, Win32.ULW_ALPHA);
    }
    finally
    {
        Win32.ReleaseDC(IntPtr.Zero, screenDc);
        if (hBitmap != IntPtr.Zero)
        {
            Win32.SelectObject(memDc, oldBitmap);
            Win32.DeleteObject(hBitmap);
        }
        Win32.DeleteDC(memDc);
    }
}
OK,到此为止,我们需要的圆角、渐变的阴影,都有了!
第三部分:简单的换肤机制
大家可能已经注意到,上面的代码有一个名为 SkinOptions 的东西。为了实现皮肤参数的统一传递和包装,我实现了 SkinOptions 这个类,用于保存当前皮肤的所有参数信息。
/// <summary>
/// 皮肤风格参数
/// </summary>
public class SkinOptions : ICloneable
{
    /// <summary>
    /// 四边阴影的宽度。默认为 6。
    /// </summary>
    public int ShadowWidth = 6;
    /// <summary>
    /// 主背景圆角半径。最小值为 1,默认为 4。
    /// </summary>
    public int CornerRadius = 4;
    /// <summary>
    /// 界面整体透明度。值范围 0~255。
    /// </summary>
    public byte Opacity = 255;
    /// <summary>
    /// 边框宽度。默认为 1。
    /// </summary>
    public int BorderWidth = 1;
    /// <summary>
    /// 边框颜色
    /// </summary>
    public Color BorderColor = Color.FromArgb(255, 128, 128, 128);
    /// <summary>
    /// 四边阴影的颜色。[0]为阴影内沿颜色,[1]为阴影外沿颜色
    /// </summary>
    public Color[] ShadowColor = { Color.FromArgb(60, 0, 0, 0), Color.FromArgb(0, 0, 0, 0) };
    /// <summary>
    /// 圆角阴影的颜色。[0]为阴影内沿颜色,[1]为阴影外沿颜色。
    /// 注:一般来讲,圆角阴影内沿的颜色应当比四边阴影内沿的颜色更深,才会有更好的显示效果。此值应当根据您的实际情况而定。
    /// </summary>
    /// <remarks>由于给扇面上渐变时,起点并不是准确的扇面内弧,因此扇面的内沿颜色可能应比四边的内沿颜色深</remarks>
    public Color[] CornerColor = { Color.FromArgb(180, 0, 0, 0), Color.FromArgb(0, 0, 0, 0) };
    /// <summary>
    /// 高光颜色。[0]为高光边框左上角点的颜色,[1]为高光边框右下角的颜色
    /// </summary>
    public Color[] BorderHighlightColor = { Color.FromArgb(200, 255, 255, 255), Color.FromArgb(200, 255, 255, 255) };
    /// <summary>
    /// 高光过渡照射的角度。默认为“左下角到右上角对角线”的法线方向。
    /// </summary>
    public float BorderHighlightAngle = 45f;
    /// <summary>
    /// 背景高光。[0]为上下两端的颜色,[1]为中间高光的颜色
    /// </summary>
    public Color[] BackgroundHighlightColor = { Color.FromArgb(0, 255, 255, 255), Color.FromArgb(200, 255, 255, 255) };
    /// <summary>
    /// 窗体背景图
    /// </summary>
    public Image BackgroundImage
    {
        get
        {
            if (bgImg == null)
            {
                Bitmap defaultBmp = new Bitmap(200, 100);
                using (Graphics g = Graphics.FromImage(defaultBmp))
                {
                    g.FillRectangle(SystemBrushes.Control, 0, 0, 200, 100);
                    g.DrawString("未设置背景图", new Font(new FontFamily("宋体"), 9), SystemBrushes.GrayText, 50, 45);
                    bgImg = defaultBmp;
                }

                this.BackgroundLayout = ImageLayout.Tile;
            }
            return bgImg;
        }
        set
        {
            //if (null == value) throw new Exception("窗体背景图不能为 null 值。");
            bgImg = value;
        }
    }
    private Image bgImg;
    /// <summary>
    /// 窗体背景图的显示方式
    /// </summary>
    public ImageLayout BackgroundLayout = ImageLayout.None;

    public static SkinOptions NewOne
    {
        get
        {
            return new SkinOptions();
        }
    }

    #region ICloneable 成员

    public object Clone()
    {
        SkinOptions result = SkinOptions.NewOne;
        result.BackgroundImage = (Image)this.BackgroundImage.Clone();
        result.BackgroundLayout = this.BackgroundLayout;
        result.BorderColor = this.BorderColor;
        result.BorderWidth = this.BorderWidth;
        result.CornerColor = (Color[])this.CornerColor.Clone();
        result.CornerRadius = this.CornerRadius;
        result.BorderHighlightAngle = this.BorderHighlightAngle;
        result.BorderHighlightColor = (Color[])this.BorderHighlightColor.Clone();
        result.BackgroundHighlightColor = (Color[])this.BackgroundHighlightColor.Clone();
        result.Opacity = this.Opacity;
        result.ShadowColor = (Color[])this.ShadowColor.Clone();
        result.ShadowWidth = this.ShadowWidth;
        return result;
    }

    #endregion
}

有了这个类,我就可以很简单地通过切换这个类的实例,从而达到换肤的目的:
/// <summary>
/// 应用新的皮肤风格(淡入淡出)
/// </summary>
/// <param name="newSkin">新皮肤风格。为 null 则取消皮肤</param>
public void ApplySkin(SkinOptions newSkin)
{
    if (_isSkinChanging) return;
    this._isSkinChanging = true;
    Cursor oldCursor = this.Cursor;
    this.Cursor = Cursors.WaitCursor;

    SkinEventArgs e = new SkinEventArgs() {
        Old = this.SkinOptions == null ? null : (SkinOptions)this.SkinOptions.Clone(),
        New = newSkin == null ? null : (SkinOptions)newSkin.Clone()
    };

    // 触发皮肤切换之前的事件
    if (OnSkinPreChange != null) { OnSkinPreChange(this, e); }

    if (newSkin == null) { newSkin = SkinOptions.NewOne; }
    this.SkinOptions = newSkin;

    SynchronizationContext context = SynchronizationContext.Current;
    SendOrPostCallback check = (a) =>
    {
        _isSkinChanging = false;
        this.Cursor = oldCursor;

        // 触发皮肤切换之后的事件
        if (OnSkinChanged != null) { OnSkinChanged(this, e); }
    };

    // 淡入操作
    SendOrPostCallback show = (a) =>
    {
        byte tmp = 0;
        byte currentOpacity = newSkin.Opacity;
        bufferdBackgroundImage = CreateBackground();
        while (tmp < currentOpacity)
        {
            SetBitmap(bufferdBackgroundImage, tmp);
            tmp += 5;
            Thread.Sleep(5);
        }

        new Thread((sc) => { ((SynchronizationContext)sc).Post(check, null); }) { Name = "检查切换操作是否完毕" }.Start(context);
    };

    // 淡出操作
    SendOrPostCallback hide = (a) =>
    {
        // 渐变因子
        byte step = 10;
        SkinOptions oldSkin = (SkinOptions)this.SkinOptions.Clone();
        Bitmap oldbg = (Bitmap)bufferdBackgroundImage.Clone();
        int currentOpacity = oldSkin.Opacity;
        if (oldbg != null)
        {
            while (currentOpacity > step)
            {
                if (currentOpacity - (int)step <= 0) currentOpacity = step;
                SetBitmap(oldbg, (byte)currentOpacity);
                currentOpacity -= step;
                Thread.Sleep(5);
            }
        }

        new Thread((sc) => { ((SynchronizationContext)sc).Post(show, null); }) { Name = "淡入新皮肤" }.Start(context);
    };

    new Thread((sc) => { ((SynchronizationContext)sc).Post(hide, null); }) { Name = "淡出旧皮肤" }.Start(context);
}
private bool _isSkinChanging = false;
OK,到此为止,简单的换肤机制也完成了。


 浙公网安备 33010602011771号