
学习笔记——初学NHibernate
了解ORM
首先来解释下ORM对象关系映射(Object Relational Mapping),是一种为了解决面向对象与关系数据库存在的互不匹配的现象的技术。
一般以第三方插件的形式,在程序中调用。
ORM是通过使用描述对象和数据库之间映射的元数据,将程序中的对象自动持久化到关系数据库中。本质上就是将数据从一种形式转换到另一种形式。
这里解释下
数据持久化:就是将内存中的数据模型转换为存储模型,以及将存储模型转换为内存中的数据模型的统称。在应用程序中能永久地保存各个处理状态信息的机制。如果没有持久化这个机制,状态只能保存在内存中,机器关机后就会丢失。
NHibernate就是用于做数据持久化相关的编程工作,能够使开发人员从原来枯燥的SQL语句的编写中解放出来,解放出来的精力可以让开发人员投入到业务逻辑的实现。
NHibernate的使用
一、NHibernate简介
一个Java开源项目Hibernate发展来的NHibernate。与数据库打交道主要是用NHibernate,NHibernate的开发者尝试为其提供与Hibernate类似的API。
二、NHibernate下载
使用前我们需要下载Nhibernate,下载地址:http://sourceforge.net/projects/nhibernate/files/NHibernate/。
NHibernate-3.3.3.GA-src.zip 是源文件,里面有源代码。
NHibernate-3.3.3.GA-bin.zip 是使用文件,解压后能直接使用的dll。
在接下的实例中,使用的NHibernate-3.3.3GA版本
三、NHibernate相关的电子书
NHibernate 3.0 CookBook介绍:http://www.cnblogs.com/lyj/archive/2010/10/11/nhibernate-3-0-cookbook.html
NHibernate 3.0 CookBook电子书下载地址:https://files.cnblogs.com/lyj/Packtpub.NHibernate.3.0.Cookbook.Oct.2010.zip
原书示例代码下载地址:http://downloads.packtpub.com/sites/default/files/3043_code.zip
四、NHibernate的使用步骤
1.在数据库中创建把.NET类持久化的对应表
2.创建需求被持久化的.net类
3.创建映射文件,告诉NHibernate怎么样持久化这些类
4.创建NHibernate的配置文件,以告诉NHibernate怎么样连接数据库
5.使用NHibernate提供的API
从别的的博客中看到NHibernate3.3的使用过程,自己重新试做了一次,按上述用步骤操作如下:
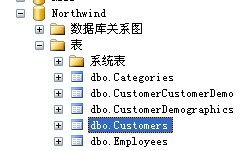
第一步、在数据库中创建把.net类持久化的对应表
这里选用的是数据库示例的Northwind数据库,需要持久化的表是Customers
Customers表中有以下的列
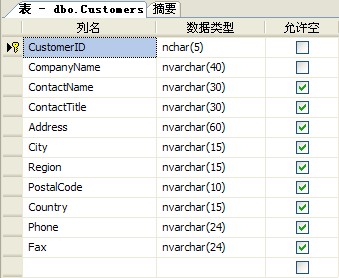
现在需要持久化的Customers表有了,接下来去创建要被持久化的类。
第二步、创建需求被持久化的.net类
首先用Visual Studio2010 新建一个asp.net空web应用程序。在UI界面中添加一个GridView控件,用于最后数据呈现。附上WebForm1.aspx中代码:
 1 <%@ Page Language="C#" AutoEventWireup="true" CodeBehind="WebForm1.aspx.cs" Inherits="NHibernateUI.WebForm1" %>
 2
 3 <!DOCTYPE html PUBLIC "-//W3C//DTD XHTML 1.0 Transitional//EN" "http://www.w3.org/TR/xhtml1/DTD/xhtml1-transitional.dtd">
 4
 5 <html xmlns="http://www.w3.org/1999/xhtml">
 6 <head runat="server">
 7     <title></title>
 8 </head>
 9 <body>
10     <form id="form1" runat="server">
11     <div>
12         <asp:GridView ID="GridView1" runat="server">
13         </asp:GridView>
14     </div>
15     </form>
16 </body>
17 </html>
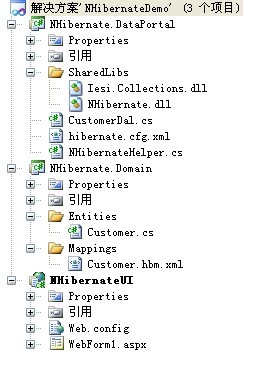
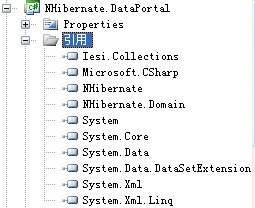
然后创建两个类库文件,一个命名为NHibernate.Domain,另一个命名为NHibernate.DataPortal。
最后所有添加的文件如下图所示:
在NHibernate.Domain中添加一个Customer.cs类文件,这个类,就是我们需要持久化的类。Customer.cs中代码如下:
 1 using System;
 2 using System.Collections.Generic;
 3 using System.Linq;
 4 using System.Web;
 5
 6 namespace NHibernate.Domain.Entities
 7 {
 8     [Serializable]
 9     public class Customer
10     {
11         #region Customer
12         public virtual string CustomerID { get; set; }
13         public virtual string CompanyName { get; set; }
14         public virtual string ContactName { get; set; }
15         public virtual string ContactTitle { get; set; }
16         public virtual string Address { get; set; }
17         public virtual string City { get; set; }
18         public virtual string Region { get; set; }
19         public virtual string PostalCode { get; set; }
20         public virtual string Country { get; set; }
21         public virtual string Phone { get; set; }
22         public virtual string Fax { get; set; }
23         #endregion
24     }
25 }
第三步、创建映射文件,告诉NHibernate怎么样持久化这些类
然后在NHibernate.Domain中添加一个Xml文件,Customer.hbm.xml,命名规则是“需要持久化类名.hbm.xml”,配置此实体类对应的映射文件。
 1 <?xml version="1.0" encoding="utf-8" ?>
 2 <hibernate-mapping xmlns="urn:nhibernate-mapping-2.2" assembly="NHibernate.Domain" namespace="NHibernate.Domain.Entities">
 3   <class name="NHibernate.Domain.Entities.Customer,NHibernate.Domain" table="Customers">
 4     <id name="CustomerID" column="CustomerID" type="string" unsaved-value="0">
 5       <generator class="increment"/>
 6     </id>
 7     <property name="CompanyName" column="CompanyName" type="string"  />
 8     <property name="ContactName" column="ContactName" type="string"  />
 9     <property name="ContactTitle" column="ContactTitle" type="string"  />
10     <property name="Address" column="Address" type="string"  />
11     <property name="City" column="City" type="string"  />
12     <property name="Region" column="Region" type="string"  />
13     <property name="PostalCode" column="PostalCode" type="string"  />
14     <property name="Country" column="Country" type="string"  />
15     <property name="Phone" column="Phone" type="string"  />
16     <property name="Fax" column="Fax" type="string"  />
17
18   </class>
19 </hibernate-mapping>
注意:
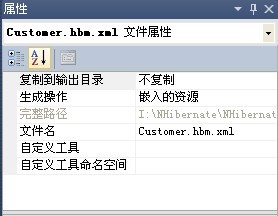
在这个Customer.hbm.xml映射文件中,一定要把“生成操作”设置成:嵌入的资源
XML文件的默认生成操作为“内容”,这里需要修改为“嵌入的资源”生成,否则出现“ failed: NHibernate.MappingException : No persister for: NHibernateSample.Domain.Entities.Customer”异常。
在NHibernate.DataPortal的引用中,添加上Nhibernate文件中的Iesi.Collections.dll和NHibernate.dll。以及NHibernate.Domain生成的NHibernate.Domain.dll文件。
编写操作类
然后在NHibernate.DataPortal的CustomerDal.cs:
using System;
using System.Collections.Generic;
using System.Linq;
using System.Web;
using NHibernate.Domain.Entities;


namespace NHibernate.DataPortal
{

    public class CustomerDal
    {
        private NHibernateHelper nhibernateHelper = new NHibernateHelper();

        protected ISession Session { get;set;}

        public CustomerDal()
        {
            this.Session = nhibernateHelper.GetSesion();
        }

        public CustomerDal(ISession session)
        {
            this.Session = session;
        }

        public void CreateCustomer(Customer customer)
        {
            Session.Save(customer);
            Session.Flush();
        }

        public Customer GetCustomerById(int customerId)
        {
            return Session.Get<Customer>(customerId);
        }

        public IList<Customer> GetCustomers()
        {
            IList<Customer> list = null;
            list = Session.QueryOver<Customer>().List();
            return list;
        }
    }
}
编写数据库访问层
NHibernateHelper.cs文件:
using System;
using System.Collections.Generic;
using System.Linq;
using System.Web;
using NHibernate.Cfg;

namespace NHibernate.DataPortal
{
    public class NHibernateHelper
    {
        private ISessionFactory _sessionFactory;

        public NHibernateHelper() {
            _sessionFactory = GetSessionFactory();
        }

        private ISessionFactory GetSessionFactory() {
            return (new Configuration()).Configure().BuildSessionFactory();
        }

        public ISession GetSesion() {
            return _sessionFactory.OpenSession();
        }
    }
}
第四步、创建NHibernate的配置文件,以告诉NHibernate怎么样连接数据库
hibernate.cfg.xml文件:
<?xml version="1.0" encoding="utf-8" ?>
<hibernate-configuration xmlns="urn:nhibernate-configuration-2.2">
  <session-factory>
    <property name="dialect">NHibernate.Dialect.MsSql2005Dialect</property>
    <property name="connection.provider">NHibernate.Connection.DriverConnectionProvider</property>
    <property name="connection.driver_class">NHibernate.Driver.SqlClientDriver</property>
    <property name="connection.connection_string">Server=.;initial catalog=northwind;Integrated Security=True</property>
    <property name="proxyfactory.factory_class">NHibernate.Bytecode.DefaultProxyFactoryFactory,NHibernate</property>
    <property name="show_sql">true</property>
    <property name="command_timeout">10</property>
    <property name="adonet.batch_size">10</property>
    <property name="query.substitutions">true 1, false 0, yes 'Y', no 'N'</property>

    <mapping assembly="NHibernate.Domain" />
  </session-factory>
</hibernate-configuration>
这个hibernate.cfg.xml文件中,需要将“复制到输出目录”设置成“始终复制”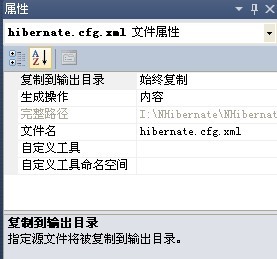
注意:
XML文件的默认“复制到输出目录”为“不复制”,这里需要修改为“始终复制”。否则出现“failed: NHibernate.Cfg.HibernateConfigException : An exception occurred during configuration of persistence layer. ----> System.IO.FileNotFoundException : 未能找到文件“NHibernateSample\NHibernateSample.Data.Test\bin\Debug\hibernate.cfg.xml””异常。
第五步、使用NHibernate提供的API
在编写前面的操作类中已经使用了Nhibernate提供的SessionFactory。
最后在WebForm1.aspx中调用操作类的方法
using System;
using System.Collections.Generic;
using System.Linq;
using System.Web;
using System.Web.UI;
using System.Web.UI.WebControls;

namespace NHibernateUI
{
    public partial class WebForm1 : System.Web.UI.Page
    {
        protected void Page_Load(object sender, EventArgs e)
        {
            if(!IsPostBack)
            {

                    NHibernate.DataPortal.CustomerDal customerDal = new NHibernate.DataPortal.CustomerDal();
                    GridView1.DataSource = customerDal.GetCustomers();
                    GridView1.DataBind();


            }
        }
    }
}
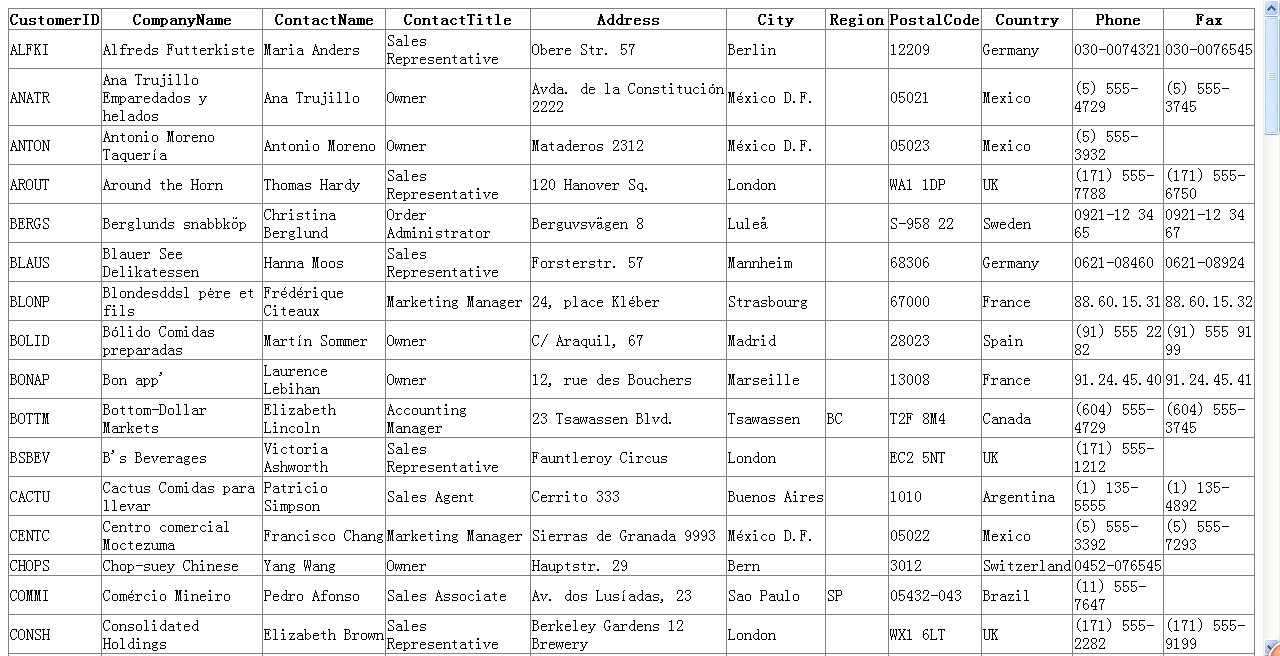
显示结果如下:
这次主要是对Nhibernate的一个初步的使用,具体实现细节,在后续的学习中去了解。
以上内容参考了一些Nhibernate不错的博文。
http://www.cnblogs.com/lyj/archive/2008/10/14/1310913.html
http://www.cnblogs.com/stone_w/archive/2011/09/15/2177830.html
http://www.cnblogs.com/cpine/archive/2013/05/04/NHibernate%E9%85%8D%E7%BD%AE.html
