
OpenResty 扩展库之(一)——lua-resty-shell 库
介绍
当您需要执行子进程(或shell命令)时,这是一个打算与OpenResty应用程序一起使用的小型库。 它类似于os.execute和io.popen,除了它是完全非阻塞的,因此即使对于需要很长时间完成的命令也是安全的。
该库依赖于您需要在Web服务器(sockproc)上运行的守护程序组件。 基本思想是,shell库连接到sockproc守护程序的unix域套接字,发送命令以及子程序所期望的任何输入数据,然后读取退出代码,输出流数据和错误流数据 子进程。 因为我们使用由lua-nginx-module提供的co-socket API,所以nginx工作者从不被阻止。
一、安装 sockproc
下载地址:https://github.com/juce/sockproc
具体安装步骤:
git clone https://github.com/juce/sockproc.git

cd sockproc/

-- 通过gcc 编译生成一个可执行的文件 sockproc
gcc -o sockproc ./sockproc.c

tinywan@tinywan:~/sockproc$ ls
LICENSE  Makefile  README.md  sockproc  sockproc.c  tests.sh

./sockproc /tmp/shell.sock

chmod 0666 /tmp/shell.sock
test.sh 文件测试是否成功安装
tinywan@tinywan:~/sockproc$ ./tests.sh
=========================
status:0
114
Linux tinywan 4.8.0-46-generic #49~16.04.1-Ubuntu SMP Fri Mar 31 14:51:03 UTC 2017 x86_64 x86_64 x86_64 GNU/Linux
0
status:0
129
uid=1000(tinywan) gid=1000(tinywan) 组=1000(tinywan),4(adm),24(cdrom),27(sudo),30(dip),46(plugdev),113(lpadmin),128(sambashare)
0
status:0
2
2
0
status:0
14
line1
line2
0
status:32512
0
38
/bin/sh: 1: thisshouldfail: not found
status:0
13
hello output
12
hello error
status:0
2041
123456789012345678901234567890123456789012345678901234567890123456789012345678901234567890123456789012345678901234567890123456789012345678901234567890123456789012345678901234567890123456789012345678901234567890123456789012345678901234567890123456789012345678901234567890123456789012345678901234567890123456789012345678901234567890123456789012345678901234567890123456789012345678901234567890123456789012345678901234567890123456789012345678901234567890123456789012345678901234567890123456789012345678901234567890123456789012345678901234567890123456789012345678901234567890123456789012345678901234567890123456789012345678901234567890123456789012345678901234567890123456789012345678901234567890123456789012345678901234567890123456789012345678901234567890123456789012345678901234567890123456789012345678901234567890123456789012345678901234567890123456789012345678901234567890123456789012345678901234567890123456789012345678901234567890123456789012345678901234567890123456789012345678901234567890123456789012345678901234567890123456789012345678901234567890123456789012345678901234567890123456789012345678901234567890123456789012345678901234567890123456789012345678901234567890123456789012345678901234567890123456789012345678901234567890123456789012345678901234567890123456789012345678901234567890123456789012345678901234567890123456789012345678901234567890123456789012345678901234567890123456789012345678901234567890123456789012345678901234567890123456789012345678901234567890123456789012345678901234567890123456789012345678901234567890123456789012345678901234567890123456789012345678901234567890123456789012345678901234567890123456789012345678901234567890123456789012345678901234567890123456789012345678901234567890123456789012345678901234567890123456789012345678901234567890123456789012345678901234567890123456789012345678901234567890123456789012345678901234567890123456789012345678901234567890123456789012345678901234567890123456789012345678901234567890123456789012345678901234567890123456789012345678901234567890123456789012345678901234567890
0
=========================
二、安装lua-resty-shell
git clone https://github.com/juce/lua-resty-shell
复制 shell.lua 文件到自己的项目库中去
/home/tinywan/Openresty_Protect/First_Protect/lualib/resty

sudo cp /home/tinywan/lua-resty-shell/lib/resty/shell.lua ./
三、测试Lua执行shell 命令
nginx.conf 配置
# shell
location /shell_test {
    content_by_lua_block {
        local shell = require("resty.shell")

        local args = {
            socket = "unix:/tmp/shell.sock",
        }

        local status, out, err = shell.execute("uname -a", args)

        ngx.header.content_type = "text/plain"
        ngx.say("Hello from:\n" .. out)
    }
}
重启nginx
sudo /opt/openresty/nginx/sbin/nginx -s reload
curl 测试结果
tinywan@tinywan:~/Openresty_Protect/First_Protect$ curl http://127.0.0.1/shell_test
Hello from:
Linux tinywan 4.8.0-46-generic #49~16.04.1-Ubuntu SMP Fri Mar 31 14:51:03 UTC 2017 x86_64 x86_64 x86_64 GNU/Linux
可能遇到的错误
2017/05/04 20:50:04 [crit] 94338#0: *372128 connect() to unix:/tmp/shell.sock failed (13: Permission denied), client: 127.0.0.1, server: localhost, request: "GET /shell_test HTTP/1.1", host: "127.0.0.1"
解决办法:chmod 0666 /tmp/shell.sock
小知识积累(C语言的第一个C程序案例):
收集时间:2017-05-04 21:38:23
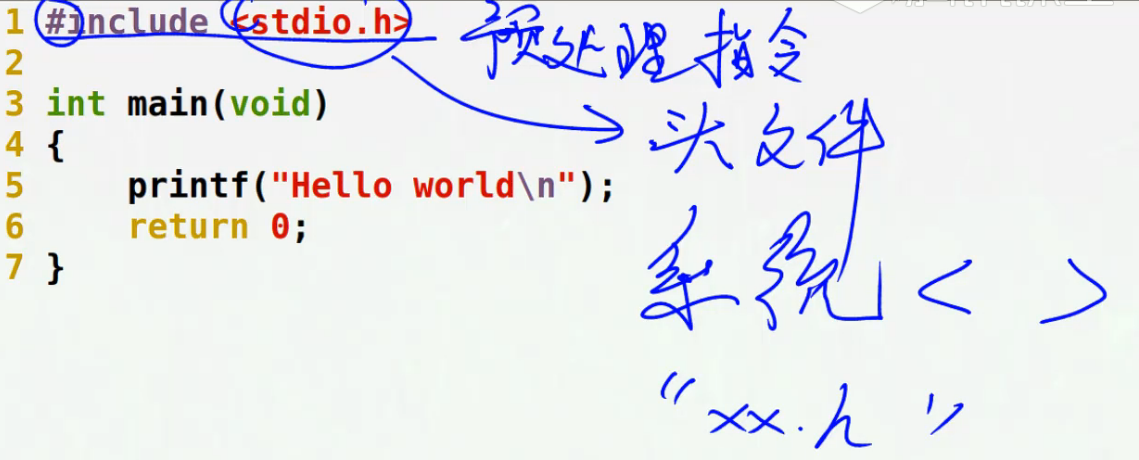
1、系统头文件使用 一堆 <> 括起来
2、自己定义的头文件使用 一对 “” 双引号括起来
3、stdio.h 标准的输入(scanf)输出(屏幕终端)头文件
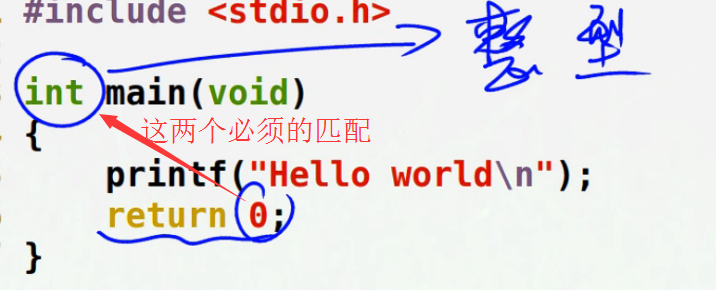
4、入口文件 main ,也就是主函数
5、void 表示不接受任何参数
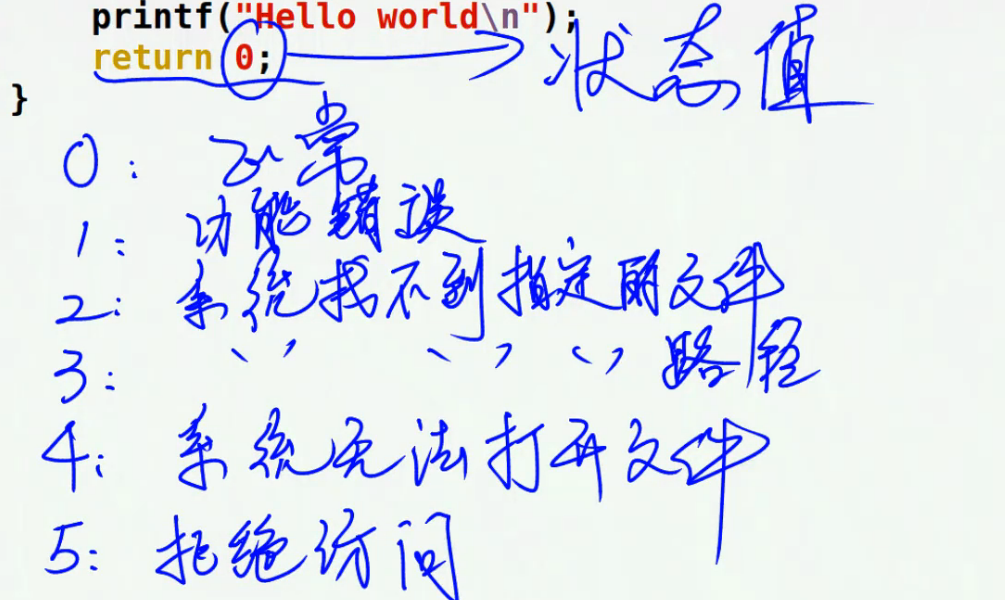
6、return 0 返回一个整形int
7、\n 表示换行符
8、return 0 ,0 之外的数值
9、保存、编译
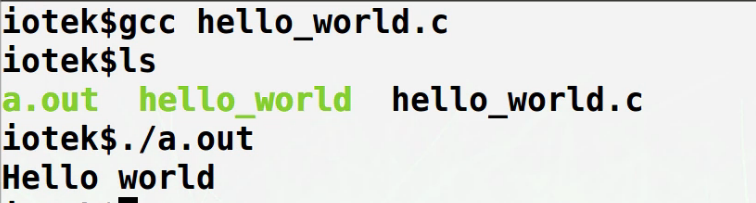
tinywan@tinywan:~/C$ vim hello_world.c
tinywan@tinywan:~/C$ ls
hello_world.c
tinywan@tinywan:~/C$ gcc -o hello_world hello_world.c
tinywan@tinywan:~/C$ ls
hello_world  hello_world.c
tinywan@tinywan:~/C$ ./hello_world  -- 通过prinf 函数输出的文件
Hello World
10、-o 指定一个输出文件,这里为hello_world hello_world.c 为源文件
11、不加输出文件编译
telnet命令执行:telnet 127.0.0.1 5000

