

Spring.profile实现开发、测试和生产环境的配置和切换
软件开发过程一般涉及“开发 -> 测试 -> 部署上线”多个阶段,每个阶段的环境的配置参数会有不同,如数据源,文件路径等。为避免每次切换环境时都要进行参数配置等繁琐的操作,可以通过spring的profile功能来进行配置参数的切换。
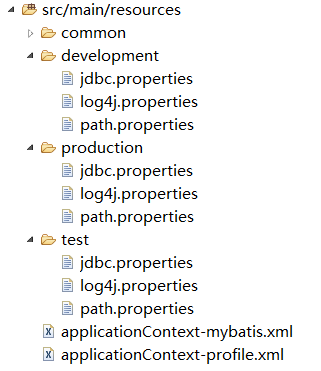
以我用到的项目的实际情况为例,首先可以在resources文件夹下分别为每个环境建立单独的文件夹(也可以额外建立一个common文件夹,用于存放公共的参数配置文件),每个文件夹下面存放对应的环境所需的配置文件,就像这样子:
在resources文件夹下建立applicationContext-profile.xml文件,用来定义不同的profile:
<?xml version="1.0" encoding="UTF-8"?>
<beans xmlns="http://www.springframework.org/schema/beans"
    xmlns:c="http://www.springframework.org/schema/c" xmlns:xsi="http://www.w3.org/2001/XMLSchema-instance"
    xmlns:p="http://www.springframework.org/schema/p" xmlns:jdbc="http://www.springframework.org/schema/jdbc"
    xmlns:jee="http://www.springframework.org/schema/jee" xmlns:context="http://www.springframework.org/schema/context"
    xsi:schemaLocation="http://www.springframework.org/schema/beans
    http://www.springframework.org/schema/beans/spring-beans.xsd
    http://www.springframework.org/schema/context
    http://www.springframework.org/schema/context/spring-context.xsd
    http://www.springframework.org/schema/jdbc
    http://www.springframework.org/schema/jdbc/spring-jdbc.xsd
    http://www.springframework.org/schema/jee
    http://www.springframework.org/schema/jee/spring-jee.xsd">

    <description>spring profile配置</description>

    <!-- 开发环境配置文件 -->
    <beans profile="development">
        <context:property-placeholder
            location="classpath*:common/*.properties, classpath*:development/*.properties" />
    </beans>

    <!-- 测试环境配置文件 -->
    <beans profile="test">
        <context:property-placeholder
            location="classpath*:common/*.properties, classpath*:test/*.properties" />
    </beans>

    <!-- 生产环境配置文件 -->
    <beans profile="production">
        <context:property-placeholder
            location="classpath*:common/*.properties, classpath*:production/*.properties" />
    </beans>

</beans>
这样就实现了通过profile标记不同的环境,接下来就可以通过设置spring.profiles.default和spring.profiles.active这两个属性来激活和使用对应的配置文件。default为默认,如果没有通过active来指定,那么就默认使用default定义的环境。
这两个属性可以通过多种方法来设置:
- 在web.xml中作为web应用的上下文参数context-param;
- 在web.xml中作为DispatcherServlet的初始化参数;
- 作为JNDI条目;
- 作为环境变量;
- 作为JVM的系统属性;
- 在集成测试类上,使用@ActiveProfiles注解配置。
前两者都可以在web.xml文件中设置:
<?xml version="1.0" encoding="UTF-8"?>
<web-app version="3.0" xmlns="http://java.sun.com/xml/ns/javaee"
    xmlns:xsi="http://www.w3.org/2001/XMLSchema-instance"
    xsi:schemaLocation="http://java.sun.com/xml/ns/javaee
    http://java.sun.com/xml/ns/javaee/web-app_3_0.xsd">

    <display-name>Archetype Created Web Application</display-name>

    <context-param>
        <param-name>contextConfigLocation</param-name>
        <param-value>
            classpath*:/applicationContext*.xml
        </param-value>
    </context-param>

    <!-- 在上下文context-param中设置profile.default的默认值 -->
    <context-param>
        <param-name>spring.profiles.default</param-name>
        <param-value>development</param-value>
    </context-param>

    <!-- 在上下文context-param中设置profile.active的默认值 -->
    <!-- 设置active后default失效,web启动时会加载对应的环境信息 -->
    <context-param>
        <param-name>spring.profiles.active</param-name>
        <param-value>development</param-value>
    </context-param>

    <servlet>
        <servlet-name>appServlet</servlet-name>
        <servlet-class>org.springframework.web.servlet.DispatcherServlet</servlet-class>
        <!-- 在DispatcherServlet参数中设置profile的默认值,active同理 -->
        <init-param>
            <param-name>spring.profiles.default</param-name>
            <param-value>development</param-value>
        </init-param>
        <load-on-startup>1</load-on-startup>
    </servlet>
    <servlet-mapping>
        <servlet-name>appServlet</servlet-name>
        <url-pattern>/</url-pattern>
    </servlet-mapping>

</web-app>
激活指定的环境,也可以通过JVM参数来设置,可以在tomcat的启动脚本中加入以下JVM参数来激活:
-Dspring.profiles.active="production"
在程序中,也可以通过 @Profile("...") 对某些资源进行注解,这样只有当选择对应的环境时,才会产生对应的bean,如:
@Bean
@Profile("production")
    public DataSource jndiDataSource(){
        JndiObjectFactoryBean jofb=new JndiObjectFactoryBean();
        jofb.setJndiName("jndi/iDS");
        jofb.setResourceRef(true);
        jofb.setProxyInterface(xxx.class);
        return (DataSource) jofb.getObject();
    }
}
参考:

