


Sahi (3) —— 压力测试Load Test以CAS SSO登陆场景为例(103 Tutorial)
Sahi (3) —— 压力测试Load Test以CAS SSO登陆场景为例(103 Tutorial)
jvm版本: 1.8.0_65
sahi版本: Sahi Pro 6.1.0
参考来源:
[Sahi Quick Tutorial](http://sahipro.com/docs/using-sahi/quick-tutorial.html#Download Sahi Pro)
Sahi社区论坛:SAHI for performance testing
Sahi (1) —— 快速入门(101 Tutorial)
Sahi (2) —— https/SSL配置(102 Tutorial))
Sahi的压力测试脚本包含了2个子脚本,一个是用来生成压力的,这个脚本被称为“noise”,跑在一个无头(headless)的浏览器上,在“noise”文件中的脚本会一直无限循环执行下去。另一个脚本被称为“subject”,这个脚本是被用来定时执行,然后查看不同压力下的性能指标的。
准备
配置
PhantomJS
由于“noise”是通过PhantomJS在后台运行的,所以我们需要先安装PhantomJS。如果有brew的童鞋可以简单运行下面命令行安装:
brew install phantomjs
写这篇文章的时候PhantomJS的最新稳定版本是2.0.0,但是我们需要较低的1.9.8版本
$ phantomjs --version
2.0.0
原因是Sahi6.1(也是当前最新稳定版)这个版本对于PhantomJS只支持到1.x,如果使用2.0会出现执行时卡死的情况。

-
以下是Mac(Linux)环境下的安装步骤:
-
下载PhantomJS到 /usr/local/share
解压后执行以下命令(1.9以下版本需要)
 sudo ln -s /usr/local/share/phantomjs-1.9.8-macosx/bin/phantomjs /usr/local/share/phantomjs
 sudo ln -s /usr/local/share/phantomjs-1.9.8-macosx/bin/phantomjs /usr/local/bin/phantomjs
 sudo ln -s /usr/local/share/phantomjs-1.9.8-macosx/bin/phantomjs /usr/bin/phantomjs
完成后可以通过命令行查看当前PhantomJS的版本号
$ phantomjs --version -
在Dashboard上点击Configure加入以下配置
<browserType>
  <name>phantomjs</name>
  <displayName>PhantomJS</displayName>
  <icon>phantomjs.png</icon>
  <path>$sahiDir/ext/phantomjs/sahi_phantomjs.sh</path>
  <options>--proxy=localhost:9999 $sahiDir/ext/phantomjs/phantomsahi.js</options>
  <processName>phantomjs</processName>
  <capacity>100</capacity>
  <useSystemProxy>false</useSystemProxy>
</browserType>
对于SSL错误,还需要修改配置为(--ignore-ssl-errors=yes):
<browserType> <name>phantomjs</name> <displayName>PhantomJS</displayName> <icon>phantomjs.png</icon> <path>$sahiDir/ext/phantomjs/sahi_phantomjs.sh</path> <options>--ignore-ssl-errors=yes --debug=yes --proxy=localhost:9999 $sahiDir/ext/phantomjs/phantomsahi.js</options> <processName>phantomjs</processName> <capacity>100</capacity> <useSystemProxy>false</useSystemProxy> </browserType> -
保存并重启Sahi
-
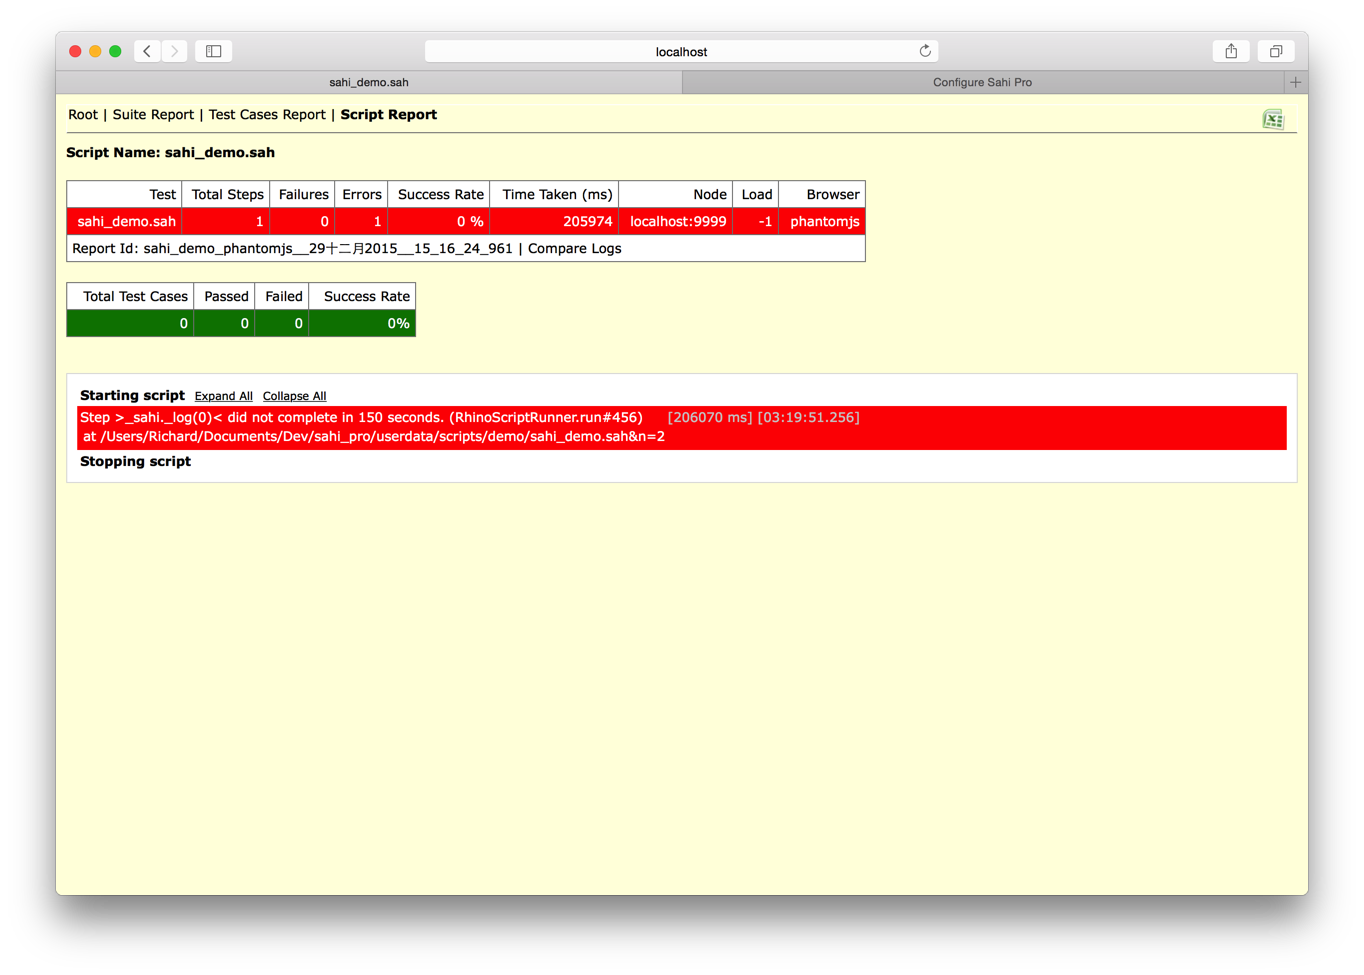
命令行运行并测试
$ ./testrunner.sh demo/sahi_demo.sah http://sahitest.com/demo/ phantomjs如果成功查看log:
![]()
-

压力测试Demo
Sahi6.1官方在安装包下提供了压力测试的示例,我们尝试运行该测试。
首先启动Sahi Dashboard:
$ ./start_dashboard.sh
再运行:
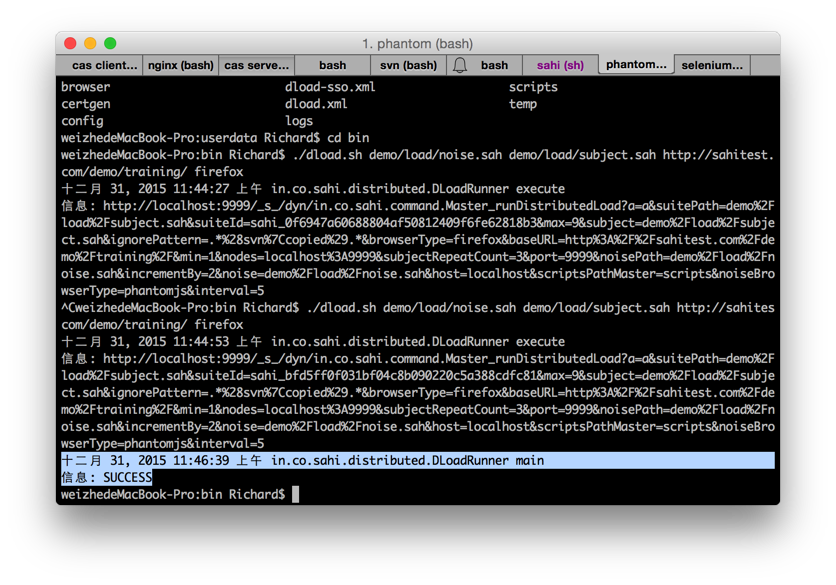
$ ./dload.sh demo/load/noise.sah demo/load/subject.sah http://sahitest.com/demo/training/ firefox
如果完成没有出错Sahi的DLoadRunner会提示成功
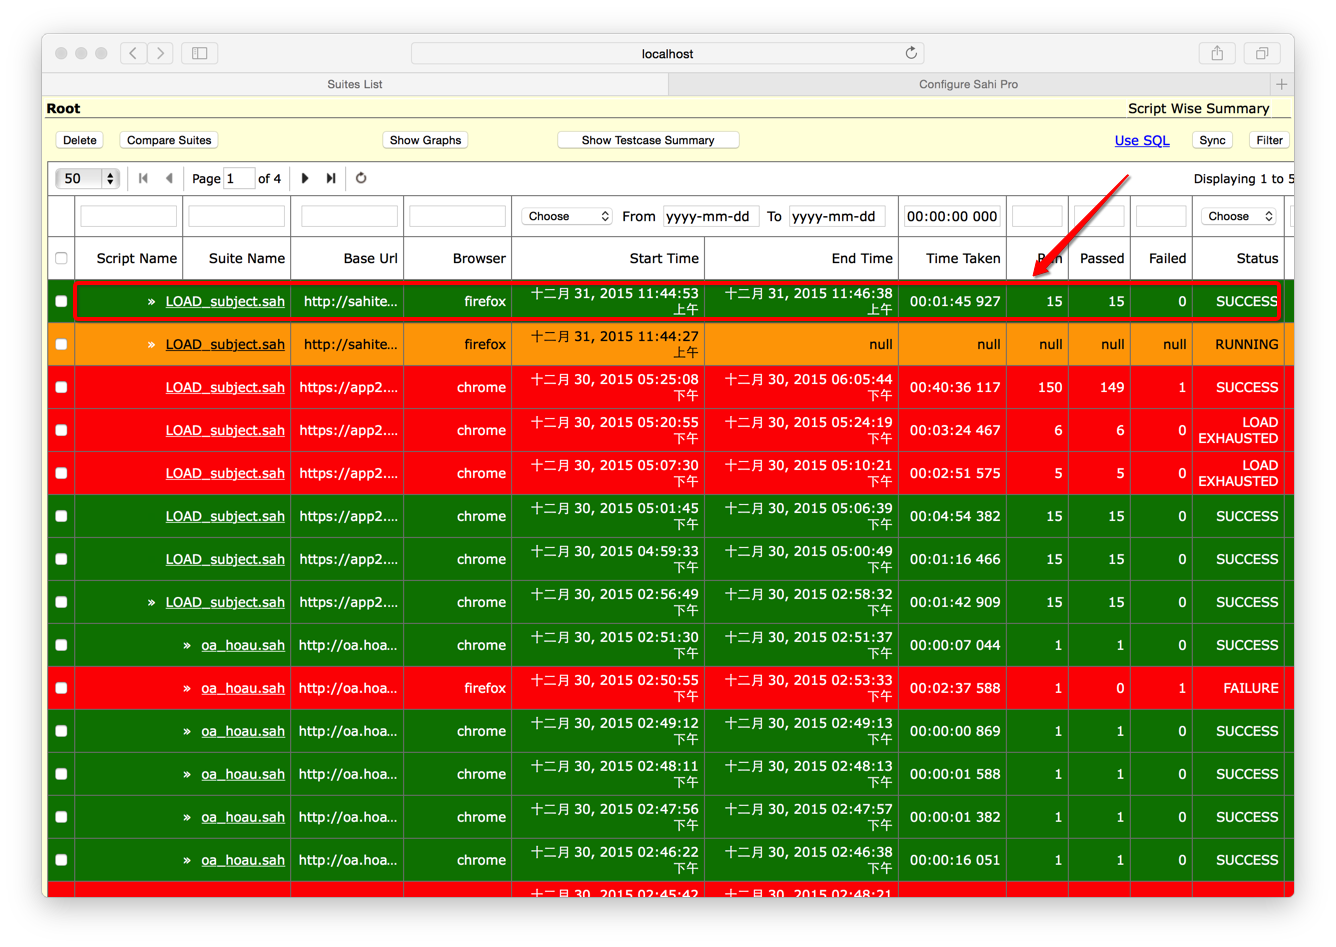
查看log与报告


设置ANT
在Sahi的安装目录下<SAHI_INSTALLATION_FOLDER>,新建ant配置文件dload.xml
	<?xml version="1.0" encoding="ISO-8859-1"?>
	<!--
	/**
	 * Copyright Tyto Software Pvt. Ltd.
	 */
	-->
	<project name="demo" default="dloadrun">
	    <taskdef name="sahiload" classname="in.co.sahi.ant.DAntLoadRunner" classpath="lib/ant-sahi.jar"/>

	    <target name="dloadrun">
	    	<sahiload scriptsPathMaster="scripts"
				subject="demo/load/subject.sah"
				baseurl="http://sahitest.com/demo/training/"
				sahihost="localhost"
				sahiport="9999"
				failureproperty="sahi.failed"
				haltonfailure="false"
				browsertype="chrome"
				noise="demo/load/noise.sah"
				noiseBrowserType="phantomjs"
				min="1"
				max="9"
				incrementBy="2"
				interval="5"
				subjectRepeatCount="3"
				ignorePattern=".*(svn|copied).*">
				<node host="localhost" port="9999"/>
				<!--
				<node host="machine2" port="9999"/>
				<node host="machine3" port="9999"/>
				-->
	    	</sahiload>
	        <antcall target="failsahi"/>
	    </target>

		<target name="failsahi" if="sahi.failed">
	        <fail message="Sahi tests failed!"/>
	    </target>
	</project>
然后我们通过命令行运行
ant -f dload.xml
没有安装好ant的也可以通过brew安装
$ brew install ant
录制与修改脚本
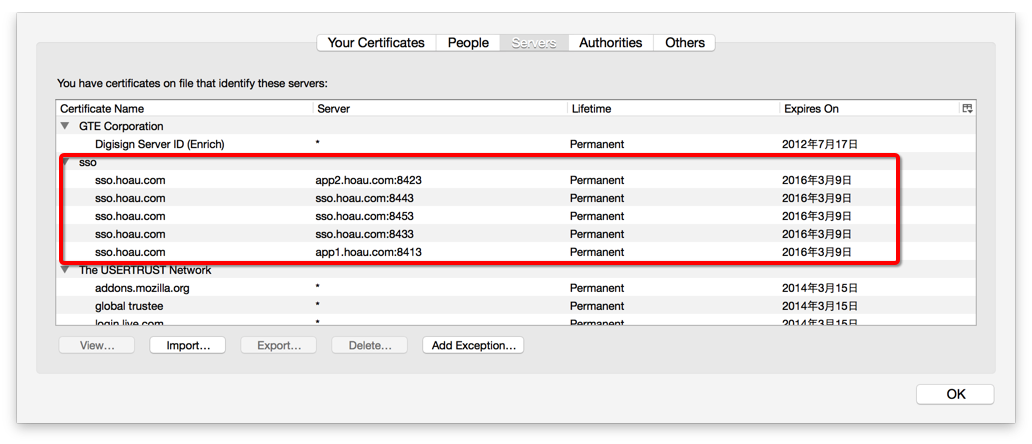
在录制脚本的时候,不知何原因,无法在通过https访问本地搭建的sso环境https://sso.hoau.com:8433/cas 同时应用程序客户端https://app1.hoau.com:8413/cas1 也无法正常访问。比较Sahi里面的浏览器和正常的浏览器证书的设置发现(Firefox-> Preferences -> Advanced -> Certificates -> View Certificates)Sahi里的代理浏览器缺少证书,手工导入无果(没有研究如何操作)
于是尝试先用http录制,然后在PhantomJS后台通过--ignore-ssl-errors=yes模式尝试https
首先录制http://sso.hoau.com:8083/cas
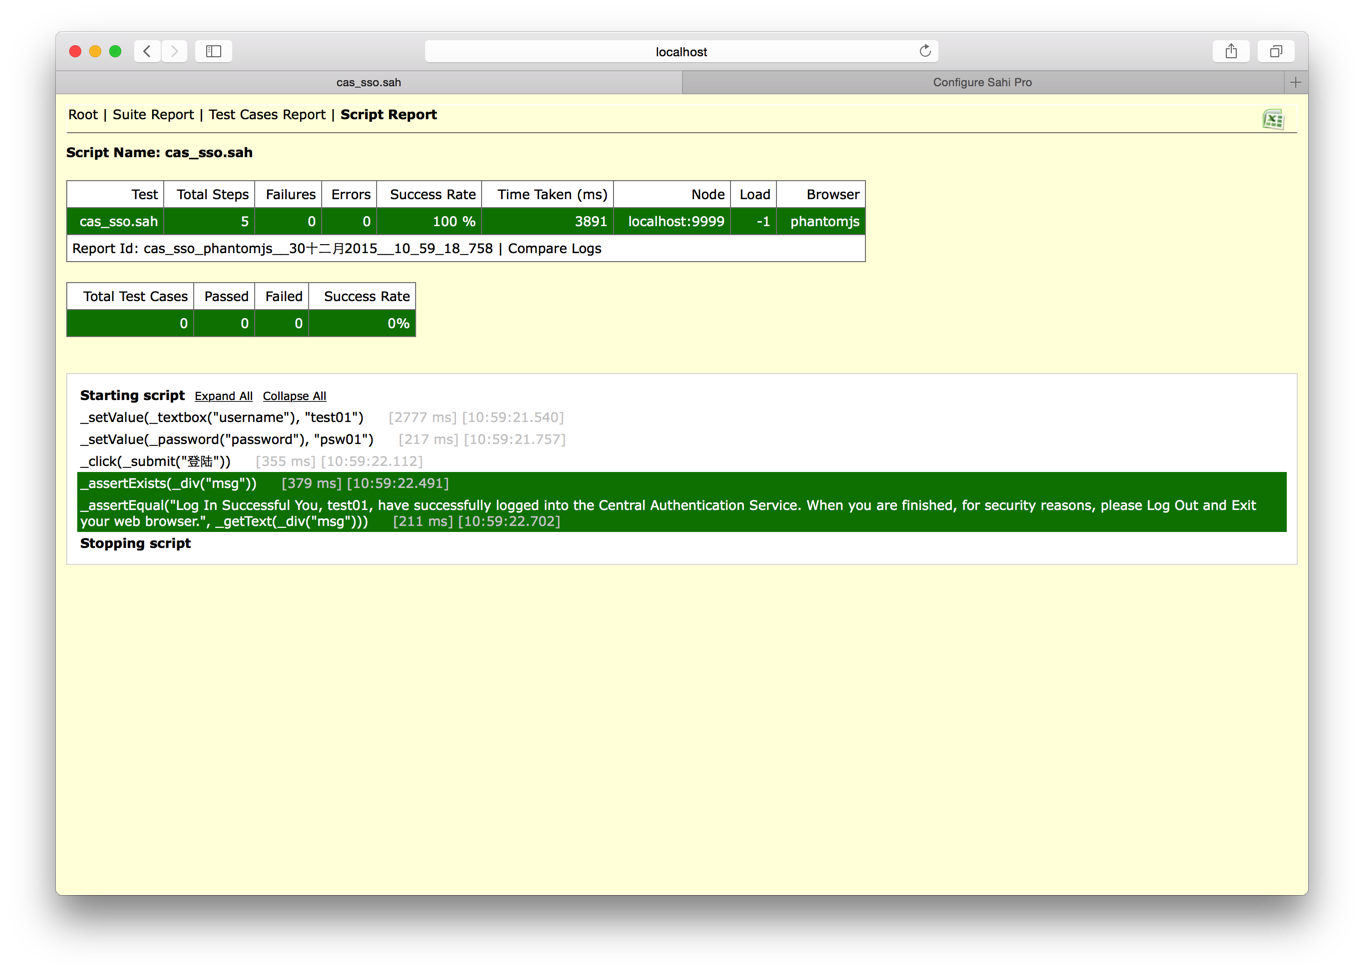
_setValue(_textbox("username"), "test01");
_setValue(_password("password"), "psw01");
_click(_submit("登陆"));
_assertExists(_div("msg"));
_assertEqual("Log In Successful You, test01, have successfully logged into the Central Authentication Service. When you are finished, for security reasons, please Log Out and Exit your web browser.", _getText(_div("msg")));
然后更改目标的地址的startURL,并且命令行下运行:
$ ./testrunner.sh my/cas_sso.sah https://sso.hoau.com:8433/cas/ phantomjs
测试成功。
同样方式我们尝试http://app1.hoau.com:8081
得到类似脚本:
_setValue(_textbox("username"), "test01");
_setValue(_password("password"), "psw01");
_click(_submit("登陆"));
_assertExists(_link("test01"));
自动化测试
但如果重复playback会出错,因为浏览器会保持JSESSION的session cookie,记录下曾经登陆的状态,无法重复playback。因此,我们需要清除浏览器的cookie。
Sahi官网上介绍了如何清除浏览器cookie,但我尝试过发现此方法无效:
// Shows all cookies for www.yahoo.com domain.
_navigateTo("http://www.yahoo.com/_s_/dyn/Cookies_showAll");
// Click the checkbox to choose all cookies.
_check(_checkbox("_sahi_chooseAll"));
// Delete the cookies.
_click(_button("Delete"));
// Shows all cookies again so that you can verify that all cookies have been deleted.
_navigateTo("http://www.yahoo.com/_s_/dyn/Cookies_showAll");
*怀疑
-
可能是浏览器版本
我本地的Chrome版本为:42.0.2311.152 (64-bit)
Firefox版本为:43.0.2 -
可能是路径原因Sahi清除cookie页面里的javascript脚本执行的目标路径有问题
"_sendToServer(...)"
这个问题还没有研究出根本原因在哪,不过有方法可以绕过去。
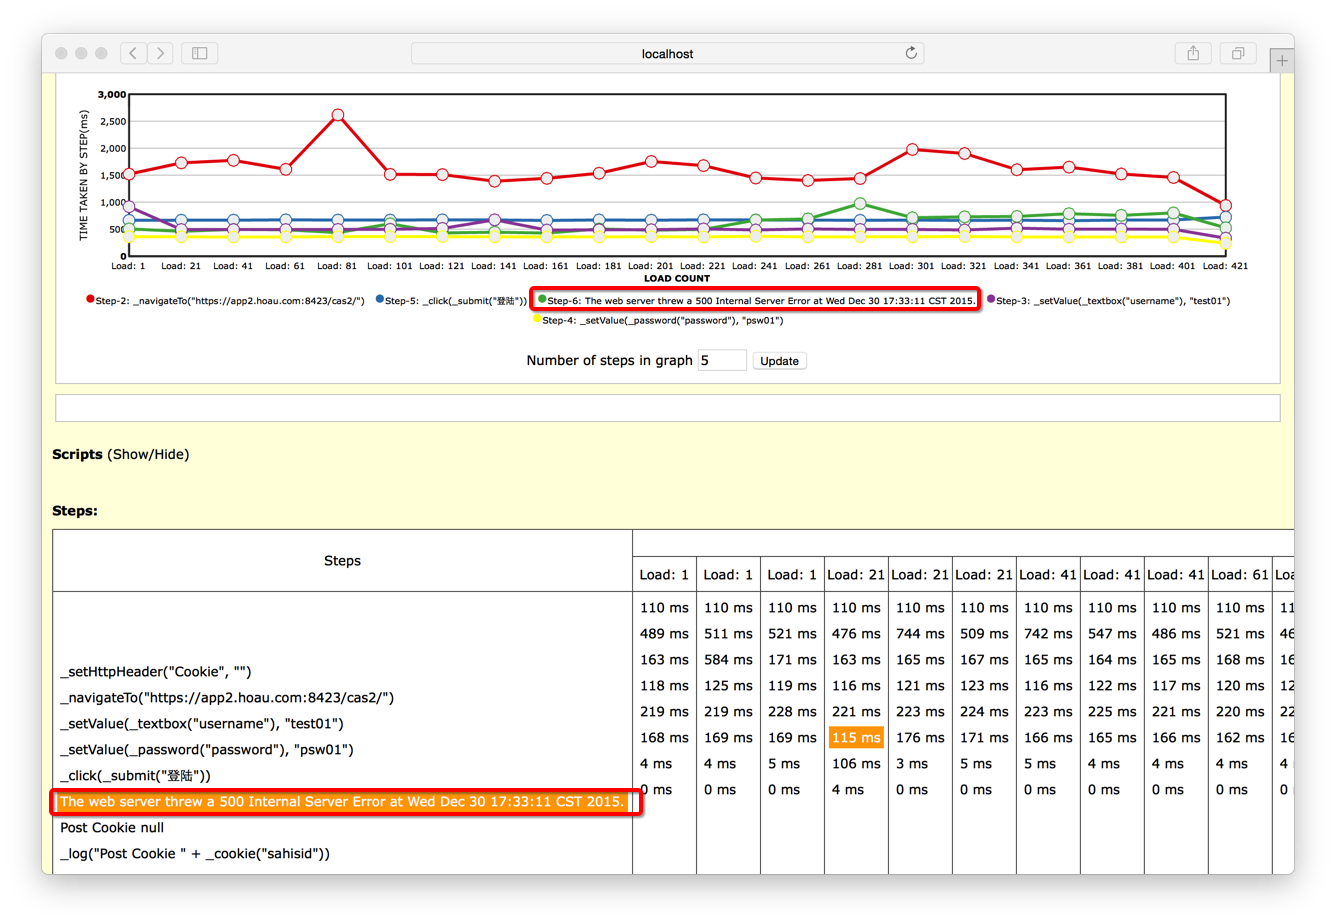
我有另外一片文章介绍过CAS SSO的时序图,并且分析过http的request和Response消息头消息体里面的内容,我们可以通过将head Cookie置空达到清除cookie的目的,修改好以后的脚本如下:
_setHttpHeader("Cookie", "");
_navigateTo("https://app2.hoau.com:8423/cas2/");


_setValue(_textbox("username"), "test01");
_setValue(_password("password"), "psw01");
_click(_submit("登陆"));
这样我们就能重复playback,而且经测试发现数据库中也会生成大量ticket
压力测试
以上工作完成后,我们现在正式开始对CAS SSO的登陆做压力测试。
我以官网的样例为模板稍作修改:
<!--
/**
 * Copyright Tyto Software Pvt. Ltd.
 */
-->
<project name="demo" default="dloadrun">
    <taskdef name="sahiload" classname="in.co.sahi.ant.DAntLoadRunner" classpath="../lib/ant-sahi.jar"/>

    <target name="dloadrun">
    	<sahiload scriptsPathMaster="scripts"
			subject="my/load/subject.sah"
			baseurl="https://app2.hoau.com:8423/cas2/"
			sahihost="localhost"
			sahiport="9999"
			failureproperty="sahi.failed"
			haltonfailure="false"
			browsertype="chrome"
			noise="my/load/subject.sah"
			noiseBrowserType="phantomjs"
			min="1"
			max="999"
			incrementBy="20"
			interval="5"
			subjectRepeatCount="3"
			ignorePattern=".*(svn|copied).*">
			<node host="localhost" port="9999"/>
			<!--
			<node host="machine2" port="9999"/>
			<node host="machine3" port="9999"/>
			-->
    	</sahiload>
        <antcall target="failsahi"/>
    </target>

	<target name="failsahi" if="sahi.failed">
        <fail message="Sahi tests failed!"/>
    </target>
</project>
我们将baseurl指定为测试的目标地址,“subject”浏览器为Chrome,“noise”浏览器为PhantomJS,同时我们将增加线程数的为20,线程从1增长至999最大,为了专注与登陆的压力,我同时将subject和noise都指向了登陆的脚本。有兴趣的童鞋可以尝试以下其他的方式,以及修改参数试试。
可以通过ant运行
$ ant -f dload-sso.xml
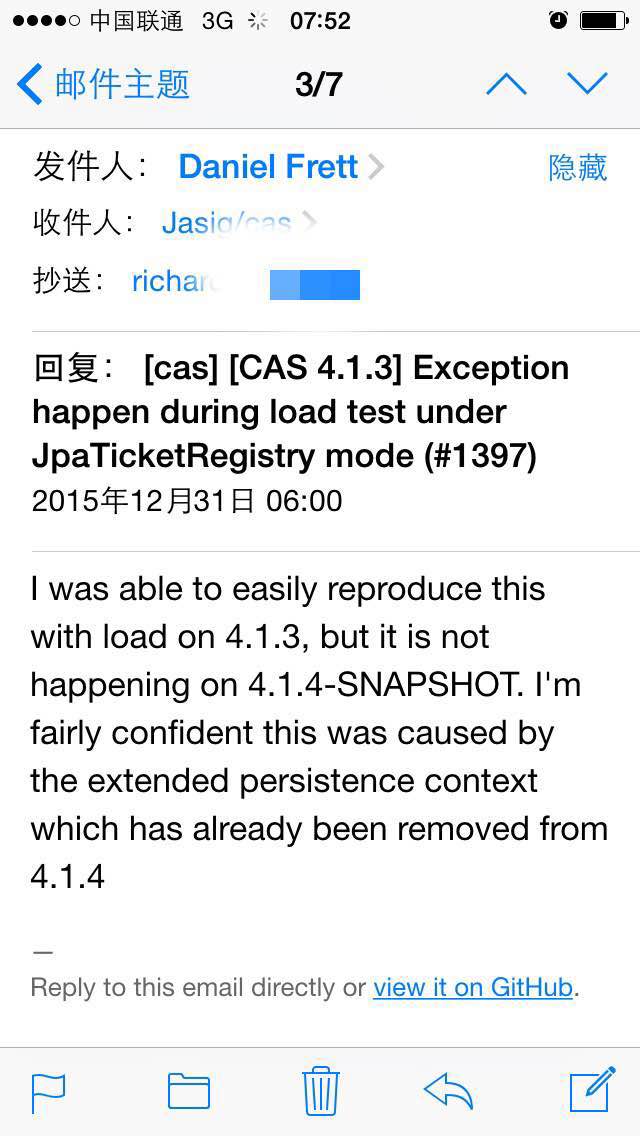
然后竟然被我遇到了一个core dev认可,4.1.3版本的major
测试结果:
Github上的答复:
问题
-
Sahi的压力测试能否支持部署多个分布式Sahi测试节点?
-
Sahi的压力测试除了Subject和Noise这种模式,是否还有需要其他支持,或者提供其他支持?
结束
还未对Sahi做全面评估,网上评论说Sahi比较适合Smoke Web UI,不过单纯从个人角度就易上手程度来主管评价,Sahi相对于Selenium和JMeter较容易上手。

 浙公网安备 33010602011771号