智能家居——阿里云物联网套件体验
背景
本文主要记录使用阿里云物联网套件的方法。
以STM32驱动DHT11读取温度、湿度为例,将数据以MQTT方式推送到阿里云物联网平台上。
STM32驱动DHT11从串口获取数据请参考文章《STM32获取DHT11温度传感器数据》

云平台配置
1. 登陆管理控制台
<1> 登陆阿里云官网
<2> 产品 -> 物联网套件 -> 开通服务 or 管理控制台
2. 新建产品、设备
如图,创建了名为home_automation的产品,以及产品下面两个设备temperature_sensor和subscribe_test

以MQTT方式发布数据
官方文档:https://help.aliyun.com/document_detail/30539.html?spm=5176.doc30530.6.574.43QEvm
本示例采用方式二:使用HTTPS认证再连接模式;
按照官网文档说明,实现HTTPS认证并获取授权,再通过MQTT通信。
HTTPS认证
HTTPS认证方式参考代码如下:
#!/usr/bin/python
# -*- coding: utf-8 -*-

import json
import time
import hmac
import hashlib
import requests
import traceback


class AliyunIot():
    CONF_FILE = 'config.json'

    def __init__(self, config_file = None):
        if not config_file:
            config_file = self.CONF_FILE
        self.__s = requests.Session()
        self.__config = self.__load_config(config_file)

    def __load_config(self, filename):
        with open(filename) as f:
            return json.load(f, encoding='utf-8')

    def __del__(self):
        self.__s.close()

    def GetSign(self, secret, param):
        black_key_list = ['version', 'sign', 'resources', 'signmethod']
        p = filter(lambda x:x[0] not in black_key_list, param.items())
        c = ''.join([''.join(str(j) for j in i) for i in sorted(p, key=lambda x:x[0])])
        return hmac.new(str(secret), c, hashlib.md5).hexdigest()

    def DeviceAuthentication(self, client_id, resources = 'mqtt'):
        timestamp = int(time.time())

        param = {'productKey': self.__config['productKey'],
                 'deviceName': self.__config['deviceName'],
                 'sign': None,
                 'signmethod': 'hmacmd5',
                 'clientId': client_id,
                 'timestamp': timestamp,
                 'resources': resources}

        param['sign'] = self.GetSign(self.__config['deviceSecret'], param)

        pre = requests.Request('POST', url=self.__config['url'], data=param).prepare()
        res = self.__s.send(pre, cert=self.__config['cert'], timeout=3)
        if res.text:
            try:
                resp = json.loads(res.text)
                if resp['code'] == 200:
                    return resp['data']
            except:
                print res.text
                print 'Http request failed.'
                print traceback.print_exc()
        return None,None

if __name__ == '__main__':
    a = AliyunIot()
    print a.DeviceAuthentication('01')
新建config.json配置如下:
{
    "productKey": "xx",
    "deviceName": "xx",
    "deviceSecret": "xx",
    "url": "https://iot-auth.cn-shanghai.aliyuncs.com/auth/devicename",
    "cert": "aliyun_iot.crt"
}
参数说明:
- productKey:官网产品管理获取
- deviceName:设备页面获取
- deviceSecret:设备页面 -> 设备证书
- cert:请下载官网文档中给的,也可选择不使用证书,但要将python的
Requests的verify置为false,方法可网上查阅资料。

执行脚本即可得到响应:
pi@raspberrypi:~/IoT/raspberrypi $ ./aliyun_iot.py
{u'iotId': u'xxxxx', u'resources': {u'mqtt': {u'host': u'public.iot-as-mqtt.cn-shanghai.aliyuncs.com', u'port': 1883}}, u'iotToken': u'xxxxxxx'}
MQTT发布消息
从串口读取数据解析出json
编辑文件iot_serial.py
#!/usr/bin/python
# -*- coding: utf-8 -*-

import serial
import json
import time

class Serial:
    def __init__(self, port, baudrate = 9600):
        self.__ser = serial.Serial(port, baudrate, timeout=0.5)

    def __del__(self):
        self.__ser.close()

    def GetData(self):
        self.FlushInput()

        while True:
            time.sleep(0.1)

            text = self.__ser.read(1)

            if text:
                recv = text + self.__ser.readline()
                return recv.strip().strip('\n').strip('_')

    def FlushInput(self):
        self.__ser.flushInput()


if __name__ == '__main__':
    s = Serial('/dev/ttyUSB0')
    while True:

        try:
            j = json.loads(s.GetData())
            print '%s\t%s' %(time.time(), j)
        except:
            continue
运行,测试串口数据读取正常
pi@raspberrypi:~/IoT/raspberrypi $ ./iot_serial.py
1506334420.2    {u'temperature': 17.4, u'humidness': 35.6}
1506334444.57   {u'temperature': 20.4, u'humidness': 46.4}
1506334468.19   {u'temperature': 20.4, u'humidness': 43.6}
将串口读取数据利用MQTT协议发送
python安装mqtt模块:
sudo pip install paho-mqtt
编辑文件mqtt.py
#!/usr/bin/python
# -*- coding: utf-8 -*-

import time
import json
import traceback
import paho.mqtt.client as mqtt


from util import GetMacAddr
from iot_serial import Serial
from aliyun_iot import AliyunIot

#此处TOPIC应该替换为自己的
TOPIC = '/xxxxx/temperature_sensor/m2m'

def ConnectCallback(client, userdata, flags, rc):
    print 'Connected:' + str(rc)

dev_id = GetMacAddr()
print dev_id

a = AliyunIot()
conf = a.DeviceAuthentication(dev_id)
print conf

client = mqtt.Client(dev_id)
client.on_connect = ConnectCallback

client.tls_set('aliyun_iot.crt')
client.username_pw_set(conf['iotId'], conf['iotToken'])

m = conf['resources']['mqtt']
client.connect(m['host'], m['port'], 80)
client.loop_start()

s = Serial('/dev/ttyUSB0')
while True:
    try:
        msg = json.dumps(json.loads(s.GetData()))
        rc, mid = client.publish(TOPIC, payload=msg)
        if rc == 0:
            print '[%s]publis success, %s' %(time.strftime("%Y-%m-%d %H:%M:%S", time.localtime()), msg)
    except:
        traceback.print_exc()
    time.sleep(1)
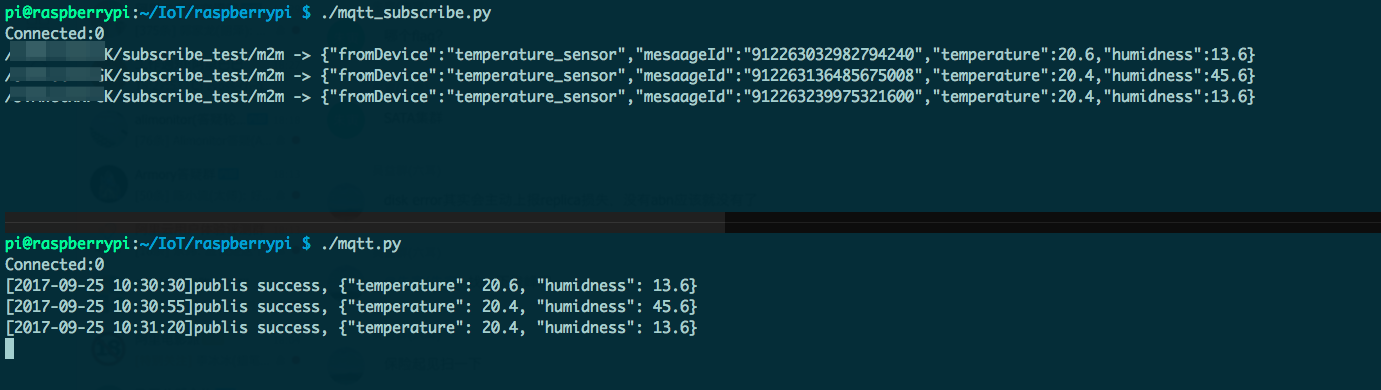
运行查看结果:
pi@raspberrypi:~/IoT/raspberrypi $ ./mqtt.py
Connected:0
[2017-09-25 10:18:36]publis success, {"temperature": 17.2, "humidness": 45.6}
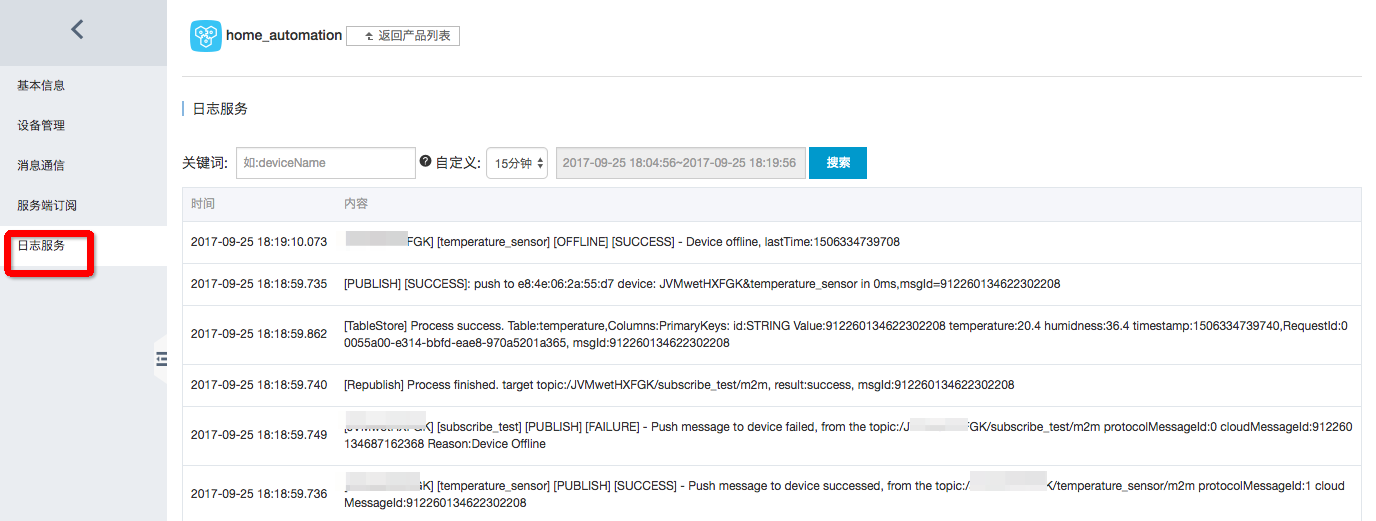
也可以在云平台管理页面查看日志:
设备间通信M2M
官方文档:https://help.aliyun.com/document_detail/59147.html?spm=5176.doc30539.6.668.bSNXB3
配置规则引擎

订阅Topic
#!/usr/bin/python
# -*- coding: utf-8 -*-

from util import GetMacAddr
from iot_serial import Serial
from aliyun_iot import AliyunIot
import paho.mqtt.client as mqtt

TOPIC = '/JVMwetHXFGK/temperature_sensor/m2m'

def ConnectCallback(client, userdata, flags, rc):
    print 'Connected:' + str(rc)
    client.subscribe(TOPIC)

def MessageCallback(client, userdata, msg):
    print '%s -> %s' %(msg.topic, str(msg.payload))

dev_id = GetMacAddr()
dev_id='test001'

a = AliyunIot('config_subscribe.json')
conf = a.DeviceAuthentication(dev_id)

client = mqtt.Client(dev_id)
client.on_connect = ConnectCallback
client.on_message = MessageCallback

client.tls_set('aliyun_iot.crt')
client.username_pw_set(conf['iotId'], conf['iotToken'])

m = conf['resources']['mqtt']
client.connect(m['host'], m['port'], 80)
client.loop_forever()
其中config_subscribe.json为配置文件拷贝一份,将里面的设备名和秘钥改为另一个设备的。
运行发布消息和订阅消息程序
数据存入表格存储
创建规则

添加方法
没有内容的可以按照提示连接创建

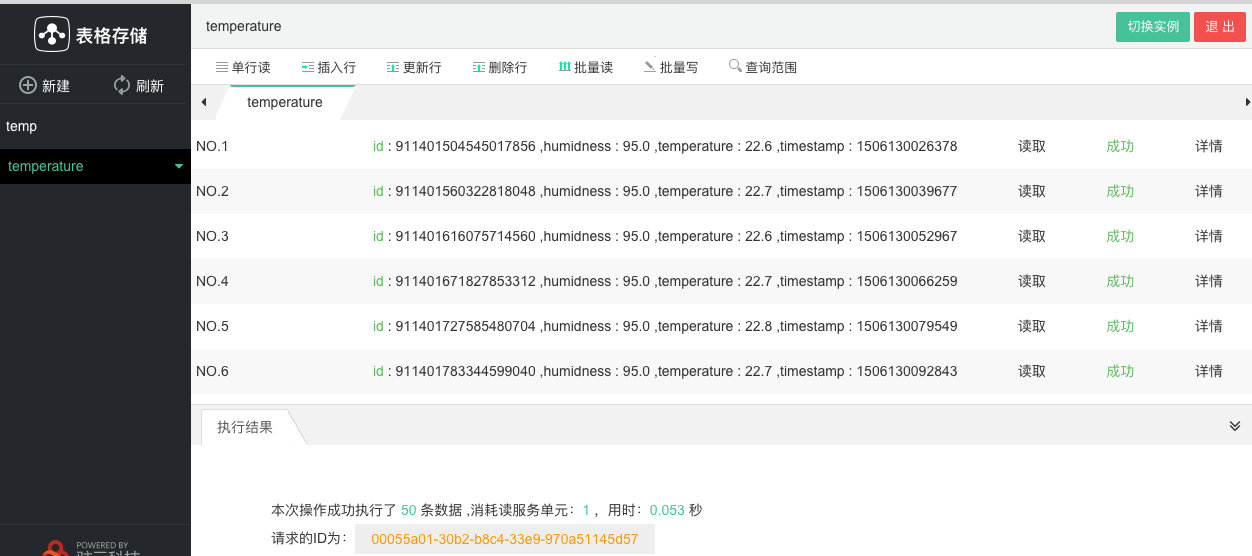
在OTS中查看数据
安装表格存储客户端并登陆
总结
阿里云Iot套件提供了方便的接入,便捷的数据导入其他云服务,很适合大型、或海量应用高效接入。
对于智能家居方便,目前有比较好的开源平台Home Assistant可以自己搭建私有平台,且可以方便介入HomeKit等,效果非常赞。
下篇博客将简单介绍Home Assistant相关内容。

作者:rainmote
博客:http://www.cnblogs.com/rainmote
本作品采用知识共享署名-非商业性使用-相同方式共享 4.0 国际许可协议进行许可。
欢迎转载,但未经作者同意必须保留此段声明,且在文章页面明显位置给出原文连接。

 浙公网安备 33010602011771号