【ASP.NET Identity系列教程(二)】运用ASP.NET Identity
注:本文是【ASP.NET Identity系列教程】的第二篇。本系列教程详细、完整、深入地介绍了微软的ASP.NET Identity技术,描述了如何运用ASP.NET Identity实现应用程序的用户管理,以及实现应用程序的认证与授权等相关技术,译者希望本系列教程能成为掌握ASP.NET Identity技术的一份完整而有价值的资料。读者若是能够按照文章的描述,一边阅读、一边实践、一边理解,定能有意想不到的巨大收获!希望本系列博文能够得到广大园友的高度推荐。
14 Applying ASP.NET Identity
14 运用ASP.NET Identity
In this chapter, I show you how to apply ASP.NET Identity to authenticate and authorize the user accounts created in the previous chapter. I explain how the ASP.NET platform provides a foundation for authenticating requests and how ASP.NET Identity fits into that foundation to authenticate users and enforce authorization through roles. Table 14-1 summarizes this chapter.
本章将演示如何将ASP.NET Identity用于对上一章中创建的用户账号进行认证与授权。我将解释ASP.NET平台对请求进行认证的基础,并解释ASP.NET Identity如何融入这种基础对用户进行认证,以及通过角色增强授权功能。表14-1描述了本章概要。
| Problem 问题 |
Solution 解决方案 |
Listing 清单号 |
|---|---|---|
| Prepare an application for user authentication. 准备用户认证的应用程序 |
Apply the Authorize attribute to restrict access to action methods and define a controller to which users will be redirected to provide credentials. 运用Authorize注解属性来限制对动作方法的访问,并定义一个对用户重定向的控制器,以便让用户提供凭据 |
1–4 |
| Authenticate a user. 认证用户 |
Check the name and password using the FindAsync method defined by the user manager class and create an implementation of the IIdentity interface using the CreateIdentityMethod. Set an authentication cookie for subsequent requests by calling the SignIn method defined by the authentication manager class. 使用由用户管理器类定义的FindAsync方法检查用户名和口令,并使用CreateIdentityMethod创建一个IIdentity接口的实现。通过调用由认证管理器类定义的SignIn方法,设置后继请求的认证Cookie。 |
5 |
| Prepare an application for role-based authorization. 准备基于角色授权的应用程序 |
Create a role manager class and register it for instantiation in the OWIN startup class. 创建一个角色管理器类,将其注册为OWIN启动类中的实例化 |
6–8 |
| Create and delete roles. 创建和删除角色 |
Use the CreateAsync and DeleteAsync methods defined by the role manager class. 使用由角色管理器类定义的CreateAsync和DeleteAsync方法。 |
9–12 |
| Manage role membership. 管理角色成员 |
Use the AddToRoleAsync and RemoveFromRoleAsync methods defined by the user manager class. 使用由用户管理器类定义的AddToRoleAsync和RemoveFromRoleAsync方法 |
13–15 |
| Use roles for authorization. 使用角色进行授权 |
Set the Roles property of the Authorize attribute. 设置Authorize注解属性的Roles属性 |
16–19 |
| Seed the database with initial content. 将初始化内容种植数据库 |
Use the database context initialization class. 使用数据库上下文的初始化类 |
20, 21 |
14.1 Preparing the Example Project
14.1 准备示例项目
In this chapter, I am going to continue working on the Users project I created in Chapter 13. No changes to the application components are required.
在本章中,我打算继续沿用第13章所创建的Users项目,不需要修改该应用程序的组件。
14.2 Authenticating Users
14.2 认证用户
The most fundamental activity for ASP.NET Identity is to authenticate users, and in this section, I explain and demonstrate how this is done. Table 14-2 puts authentication into context.
ASP.NET Identity最基本的活动就是认证用户,在本小节中,我将解释并演示其做法。表14-2描述了认证的情形。
| Question 问题 |
Answer 回答 |
|---|---|
| What is it? 什么是认证? |
Authentication validates credentials provided by users. Once the user is authenticated, requests that originate from the browser contain a cookie that represents the user identity. 认证是验证用户提供的凭据。一旦用户已被认证,源自该浏览器的请求便会含有表示该用户标识的Cookie。 |
| Why should I care? 为何要关心它? |
Authentication is how you check the identity of your users and is the first step toward restricting access to sensitive parts of the application. 认证是你检查用户标识的办法,也是限制对应用程序敏感部分进行访问的第一步。 |
| How is it used by the MVC framework? 如何在MVC框架中使用它? |
Authentication features are accessed through the Authorize attribute, which is applied to controllers and action methods in order to restrict access to authenticated users. 认证特性是通过Authorize注解属性进行访问的,将该注解属性运用于控制器和动作方法,目的是将访问限制到已认证用户。 |
Tip I use names and passwords stored in the ASP.NET Identity database in this chapter. In Chapter 15, I demonstrate how ASP.NET Identity can be used to authenticate users with a service from Google (Identity also supports authentication for Microsoft, Facebook, and Twitter accounts).
提示:本章会使用存储在ASP.NET Identity数据库中的用户名和口令。在第15章中将演示如何将ASP.NET Identity用于认证享有Google服务的用户(Identity还支持对Microsoft、Facebook以及Twitter账号的认证)。
14.2.1 Understanding the Authentication/Authorization Process
14.2.1 理解认证/授权过程
The ASP.NET Identity system integrates into the ASP.NET platform, which means you use the standard MVC framework techniques to control access to action methods, such as the Authorize attribute. In this section, I am going to apply basic restrictions to the Index action method in the Home controller and then implement the features that allow users to identify themselves so they can gain access to it. Listing 14-1 shows how I have applied the Authorize attribute to the Home controller.
ASP.NET Identity系统集成到了ASP.NET平台,这意味着你可以使用标准的MVC框架技术来控制对动作方法的访问,例如使用Authorize注解属性。在本小节中,我打算在Home控制中的Index动作方法上运用基本的限制,然后实现让用户对自己进行标识,以使他们能够访问。清单14-1演示了如何将Authorize注解属性运用于Home控制器。
Listing 14-1. Securing the Home Controller
清单14-1. 实施Home控制器的安全
using System.Web.Mvc;
using System.Collections.Generic;

namespace Users.Controllers {

    public class HomeController : Controller {

        [Authorize]
        public ActionResult Index() {
            Dictionary<string, object> data
                = new Dictionary<string, object>();
            data.Add("Placeholder", "Placeholder");
            return View(data);
        }
    }
}
Using the Authorize attribute in this way is the most general form of authorization and restricts access to the Index action methods to requests that are made by users who have been authenticated by the application.
这种方式使用Authorize注解属性是授权的最一般形式,它限制了对Index动作方法的访问,由用户发送给该动作方法的请求必须是应用程序已认证的用户。
If you start the application and request a URL that targets the Index action on the Home controller (/Home/Index, /Home, or just /), you will see the error shown by Figure 14-1.
如果启动应用程序,并请求以Home控制器中Index动作为目标的URL(/Home/Index、/Home或/),将会看到如图14-1所示的错误。
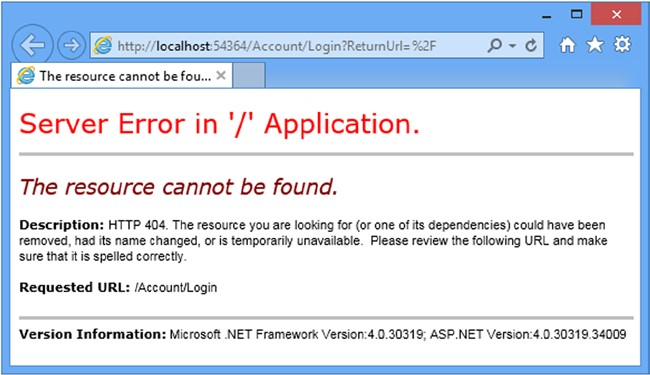
Figure 14-1. Requesting a protected URL
图14-1. 请求一个受保护的URL
The ASP.NET platform provides some useful information about the user through the HttpContext object, which is used by the Authorize attribute to check the status of the current request and see whether the user has been authenticated. The HttpContext.User property returns an implementation of the IPrincipal interface, which is defined in the System.Security.Principal namespace. The IPrincipal interface defines the property and method shown in Table 14-3.
ASP.NET平台通过HttpContext对象提供一些关于用户的有用信息,该对象由Authorize注解属性使用的,以检查当前请求的状态,考察用户是否已被认证。HttpContext.User属性返回的是IPrincipal接口的实现,该接口是在System.Security.Principal命名空间中定义的。IPrincipal接口定义了如表14-3所示的属性和方法。
| Name 名称 |
Description 描述 |
|---|---|
| Identity | Returns an implementation of the IIdentity interface that describes the user associated with the request. 返回IIdentity接口的实现,它描述了与请求相关联的用户 |
| IsInRole(role) | Returns true if the user is a member of the specified role. See the “Authorizing Users with Roles” section for details of managing authorizations with roles. 如果用户是指定角色的成员,则返回true。参见“以角色授权用户”小节,其中描述了以角色进行授权管理的细节 |
The implementation of IIdentity interface returned by the IPrincipal.Identity property provides some basic, but useful, information about the current user through the properties I have described in Table 14-4.
由IPrincipal.Identity属性返回的IIdentity接口实现通过一些属性提供了有关当前用户的一些基本却有用的信息,表14-4描述了这些属性。
| Name 名称 |
Description 描述 |
|---|---|
| AuthenticationType | Returns a string that describes the mechanism used to authenticate the user 返回一个字符串,描述了用于认证用户的机制 |
| IsAuthenticated | Returns true if the user has been authenticated 如果用户已被认证,返回true。 |
| Name | Returns the name of the current user 返回当前用户的用户名 |
Tip In Chapter 15 I describe the implementation class that ASP.NET Identity uses for the IIdentity interface, which is called ClaimsIdentity.
提示:第15章会描述ASP.NET Identity用于IIdentity接口的实现类,其名称为ClaimsIdentity。
ASP.NET Identity contains a module that handles the AuthenticateRequest life-cycle event, which I described in Chapter 3, and uses the cookies sent by the browser to establish whether the user has been authenticated. I’ll show you how these cookies are created shortly. If the user is authenticated, the ASP.NET framework module sets the value of the IIdentity.IsAuthenticated property to true and otherwise sets it to false. (I have yet to implement the feature that will allow users to authenticate, which means that the value of the IsAuthenticated property is always false in the example application.)
ASP.NET Identity含有一个处理AuthenticateRequest生命周期事件(第3章曾做过描述)的模块,并使用浏览器发送过来的Cookie确认用户是否已被认证。我很快会演示如何创建这些Cookie。如果用户已被认证,此ASP.NET框架模块便会将IIdentity.IsAuthenticated属性的值设置为true,否则设置为false。(此刻尚未实现让用户进行认证的特性,这意味着在本示例应用程序中,IsAuthenticated属性的值总是false。)
The Authorize module checks the value of the IsAuthenticated property and, finding that the user isn’t authenticated, sets the result status code to 401 and terminates the request. At this point, the ASP.NET Identity module intercepts the request and redirects the user to the /Account/Login URL. This is the URL that I defined in the IdentityConfig class, which I specified in Chapter 13 as the OWIN startup class, like this:
Authorize模块检查IsAuthenticated属性的值,会发现该用户是未认证的,于是将结果状态码设置为401(未授权),并终止该请求。但在这一点处(这里是ASP.NET Identity在请求生命周期中的切入点——译者注),ASP.NET Identity模块会拦截该请求,并将用户重定向到/Account/Login URL。我在IdentityConfig类中已定义了此URL,IdentityConfig是第13章所指定的OWIN启动类,如下所示:
using Microsoft.AspNet.Identity;
using Microsoft.Owin;
using Microsoft.Owin.Security.Cookies;
using Owin;
using Users.Infrastructure;

namespace Users {
    public class IdentityConfig {
        public void Configuration(IAppBuilder app) {

            app.CreatePerOwinContext<AppUserManager>(AppUserManager.Create);
            app.UseCookieAuthentication(new CookieAuthenticationOptions {
                AuthenticationType = DefaultAuthenticationTypes.ApplicationCookie,
                LoginPath = new PathString("/Account/Login"),
            });
        }
    }
}
The browser requests the /Account/Login URL, but since it doesn’t correspond to any controller or action in the example project, the server returns a 404 – Not Found response, leading to the error message shown in Figure 14-1.
浏览器请求/Account/Login时,但因为示例项目中没有相应的控制器或动作,于服务器返回了“404 – 未找到”响应,从而导致了如图14-1所示的错误消息。
14.2.2 Preparing to Implement Authentication
14.2.2 实现认证的准备
Even though the request ends in an error message, the request in the previous section illustrates how the ASP.NET Identity system fits into the standard ASP.NET request life cycle. The next step is to implement a controller that will receive requests for the /Account/Login URL and authenticate the user. I started by adding a new model class to the UserViewModels.cs file, as shown in Listing 14-2.
虽然请求终止于一条错误消息,但上一小节的请求已勾画出ASP.NET Identity系统是如何切入标准的ASP.NET请求生命周期的。下一个步骤是实现一个控制器,用它来接收对/Account/Login URL的请求,并认证用户。我首先在UserViewModels.cs文件中添加了一个模型类,如清单14-2所示。
Listing 14-2. Adding a New Model Class to the UserViewModels.cs File
清单14-2. 在UserViewModels.cs文件中添加一个新的模型类
using System.ComponentModel.DataAnnotations;

namespace Users.Models {

    public class CreateModel {
        [Required]
        public string Name { get; set; }
        [Required]
        public string Email { get; set; }
        [Required]
        public string Password { get; set; }
    }

     public class LoginModel {
        [Required]
        public string Name { get; set; }
        [Required]
        public string Password { get; set; }
    }
}
The new model has Name and Password properties, both of which are decorated with the Required attribute so that I can use model validation to check that the user has provided values.
新模型具有Name和Password属性,两者都用Required注解属性进行了注释,以使我能够使用模型验证来检查用户是否提供了这些属性的值。
Tip In a real project, I would use client-side validation to check that the user has provided name and password values before submitting the form to the server, but I am going to keep things focused on identity and the server-side functionality in this chapter. See Pro ASP.NET MVC 5 for details of client-side form validation.
提示:在一个实际的项目中,我会在用户将表单递交到服务器之前,使用客户端验证来检查用户已经提供了用户名和口令的值,但在本章中,我打算把注意力集中在标识和服务器端的功能方面。客户端表单验证的详情可参阅Pro ASP.NET MVC 5一书。
I added an Account controller to the project, as shown in Listing 14-3, with Login action methods to collect and process the user’s credentials. I have not implemented the authentication logic in the listing because I am going to define the view and then walk through the process of validating user credentials and signing users into the application.
我在项目中添加了一个Account控制器,如清单14-3所示,其中带有Login动作方法,用以收集和处理用户的凭据。该清单尚未实现认证逻辑,因为我打算先定义视图,然后再实现验证用户凭据的过程,并让用户签入应用程序。
Listing 14-3. The Contents of the AccountController.cs File
清单14-3. AccountController.cs文件的内容
using System.Threading.Tasks;
using System.Web.Mvc;
using Users.Models;

namespace Users.Controllers {

    [Authorize]
    public class AccountController : Controller {

        [AllowAnonymous]
        public ActionResult Login(string returnUrl) {
            if (ModelState.IsValid) {
            }
            ViewBag.returnUrl = returnUrl;
            return View();
        }

        [HttpPost]
        [AllowAnonymous]
        [ValidateAntiForgeryToken]
        public async Task<ActionResult> Login(LoginModel details, string returnUrl) {
            return View(details);
        }
    }
}
Even though it doesn’t authenticate users yet, the Account controller contains some useful infrastructure that I want to explain separately from the ASP.NET Identity code that I’ll add to the Login action method shortly.
尽管它此刻尚未认证用户,但Account控制器已包含了一些有用的基础结构,我想通过ASP.NET Identity代码对这些结构分别加以解释,很快就会在Login动作方法中添加这些代码。
First, notice that both versions of the Login action method take an argument called returnUrl. When a user requests a restricted URL, they are redirected to the /Account/Login URL with a query string that specifies the URL that the user should be sent back to once they have been authenticated. You can see this if you start the application and request the /Home/Index URL. Your browser will be redirected, like this:
首先要注意Login动作方法有两个版本,它们都有一个名称为returnUrl的参数。当用户请求一个受限的URL时,他们被重定向到/Account/Login URL上,并带有查询字符串,该字符串指定了一旦用户得到认证后将用户返回的URL,如下所示:
/Account/Login?ReturnUrl=%2FHome%2FIndex
The value of the ReturnUrl query string parameter allows me to redirect the user so that navigating between open and secured parts of the application is a smooth and seamless process.
ReturnUrl查询字符串参数的值可让我能够对用户进行重定向,使应用程序公开和保密部分之间的导航成为一个平滑无缝的过程。
Next, notice the attributes that I have applied to the Account controller. Controllers that manage user accounts contain functionality that should be available only to authenticated users, such as password reset, for example. To that end, I have applied the Authorize attribute to the controller class and then used the AllowAnonymous attribute on the individual action methods. This restricts action methods to authenticated users by default but allows unauthenticated users to log in to the application.
下一个要注意的是运用于Account控制器的注解属性。管理用户账号的控制器含有只能由已认证用户才能使用的功能,例如口令重置。为此,我在控制器类上运用了Authorize注解属性,然后又在个别动作方法上运用了AllowAnonymous注解属性。这会将这些动作方法默认限制到已认证用户,但又能允许未认证用户登录到应用程序。
Finally, I have applied the ValidateAntiForgeryToken attribute, which works in conjunction with the Html.AntiForgeryToken helper method in the view and guards against cross-site request forgery. Cross-site forgery exploits the trust that your user has for your application and it is especially important to use the helper and attribute for authentication requests.
最后要注意的是,我运用了ValidateAntiForgeryToken注解属性,该属性与视图中的Html.AntiForgeryToken辅助器方法联合工作,防止Cross-Site Request Forgery(CSRF,跨网站请求伪造)的攻击。CSRF会利用应用程序对用户的信任,因此使用这个辅助器和注解属性对于认证请求是特别重要的。
Tip you can learn more about cross-site request forgery at http://en.wikipedia.org/wiki/Cross-site_request_forgery.
提示:更多关于CSRF的信息,请参阅http://en.wikipedia.org/wiki/Cross-site_request_forgery。
My last preparatory step is to create the view that will be rendered to gather credentials from the user. Listing 14-4 shows the contents of the Views/Account/Login.cshtml file, which I created by right-clicking the Index action method and selecting Add View from the pop-up menu.
最后一项准备步骤是创建一个视图,用以收集来自于用户的凭据。清单14-4显示了Views/Account/Login.cshtml文件的内容,这是通过右击Index动作方法,然后从弹出菜单选择“Add View(添加视图)”而创建的。
Listing 14-4. The Contents of the Login.cshtml File
清单14-4. Login.cshtml文件的内容
@model Users.Models.LoginModel
@{ ViewBag.Title = "Login";}
<h2>Log In</h2>

@Html.ValidationSummary()

@using (Html.BeginForm()) {
    @Html.AntiForgeryToken();
    <input type="hidden" name="returnUrl" value="@ViewBag.returnUrl" />
    <div class="form-group">
        <label>Name</label>
        @Html.TextBoxFor(x => x.Name, new { @class = "form-control" })
    </div>
    <div class="form-group">
        <label>Password</label>
        @Html.PasswordFor(x => x.Password, new { @class = "form-control" })
    </div>
    <button class="btn btn-primary" type="submit">Log In</button>
}
The only notable aspects of this view are using the Html.AntiForgeryToken helper and creating a hidden input element to preserve the returnUrl argument. In all other respects, this is a standard Razor view, but it completes the preparations for authentication and demonstrates the way that unauthenticated requests are intercepted and redirected. To test the new controller, start the application and request the /Home/Index URL. You will be redirected to the /Account/Login URL, as shown in Figure 14-2.
该视图唯一要注意的方面是使用了Html.AntiForgeryToken辅助器,并创建了一个隐藏的input元素,以保护returnUrl参数。在其他方面,这是一个标准的Razor视图,但它实现了认证的准备工作,并能演示被拦截且被重定向的未认证请求的情况。为了测试这个新的控制器,启动应用程序,并请求/Home/Index。你将被重定向到/Account/Login,如图14-2所示。
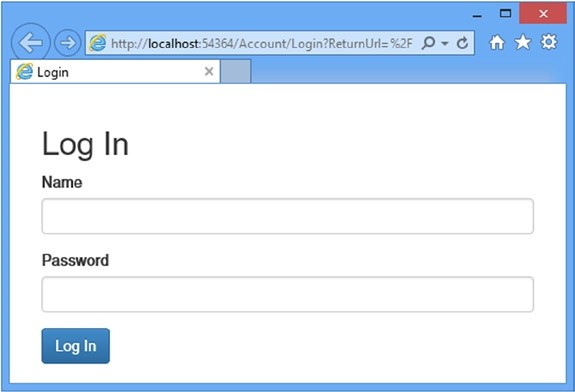
Figure 14-2. Prompting the user for authentication credentials
图14-2. 提示用户输入认证凭据
14.2.3 Adding User Authentication
14.2.3 添加用户认证
Requests for protected URLs are being correctly redirected to the Account controller, but the credentials provided by the user are not yet used for authentication. In Listing 14-5, you can see how I have completed the implementation of the Login action.
发送给受保护URL的请求会被正确地重定向到Account控制器,但由用户提供的凭据尚未被用于认证。从清单14-5可以看出如何完成Login动作的实现。
Listing 14-5. Adding Authentication to the AccountController.cs File
清单14-5. 在AccountController.cs文件中添加认证
using System.Threading.Tasks;
using System.Web.Mvc;
using Users.Models;
using Microsoft.Owin.Security;
using System.Security.Claims;
using Microsoft.AspNet.Identity;
using Microsoft.AspNet.Identity.Owin;
using Users.Infrastructure;
using System.Web;

namespace Users.Controllers {

    [Authorize]
    public class AccountController : Controller {

        [AllowAnonymous]
        public ActionResult Login(string returnUrl) {
            ViewBag.returnUrl = returnUrl;
            return View();
        }

        [HttpPost]
        [AllowAnonymous]
        [ValidateAntiForgeryToken]
        public async Task<ActionResult> Login(LoginModel details, string returnUrl) {
            if (ModelState.IsValid) {
                AppUser user = await UserManager.FindAsync(details.Name,
                            details.Password);
                if (user == null) {
                    ModelState.AddModelError("", "Invalid name or password.");
                } else {
                    ClaimsIdentity ident = await UserManager.CreateIdentityAsync(user,
                                DefaultAuthenticationTypes.ApplicationCookie);
                    AuthManager.SignOut();
                    AuthManager.SignIn(new AuthenticationProperties {
                        IsPersistent = false}, ident);
                     return Redirect(returnUrl);
                }
            }
            ViewBag.returnUrl = returnUrl;
            return View(details);
        }

        private IAuthenticationManager AuthManager {
            get {
                return HttpContext.GetOwinContext().Authentication;
            }
        }
        private AppUserManager UserManager {
            get {
                return HttpContext.GetOwinContext().GetUserManager<AppUserManager>();
            }
        }
    }
}
The simplest part is checking the credentials, which I do through the FindAsync method of the AppUserManager class, which you will remember as the user manager class from Chapter 13:
最简单的部分是检查凭据,这是通过AppUserManager类的FindAsync方法来做的,你可能还记得,AppUserManager是第13章的用户管理器类。
...
AppUser user = await UserManager.FindAsync(details.Name, details.Password);
...
I will be using the AppUserManager class repeatedly in the Account controller, so I defined a property called UserManager that returns the instance of the class using the GetOwinContext extension method for the HttpContext class, just as I did for the Admin controller in Chapter 13.
我会在Account控制器中反复使用AppUserManager类,因此定义了一个名称为的UserManager属性,它使用HttpContext类的GetOwinContext扩展方法来返回AppUserManager类的实例。
The FindAsync method takes the account name and password supplied by the user and returns an instance of the user class (AppUser in the example application) if the user account exists and if the password is correct. If there is no such account or the password doesn’t match the one stored in the database, then the FindAsync method returns null, in which case I add an error to the model state that tells the user that something went wrong.
FindAsync方法以用户提供的账号名和口令为参数,并在该用户账号存在且口令正确时,返回一个用户类(此例中的AppUser)的实例。如果无此账号,或者与数据库存储的不匹配,那么FindAsync方法返回空(null),出现这种情况时,我给模型状态添加了一条错误消息,告诉用户可能出错了。
If the FindAsync method does return an AppUser object, then I need to create the cookie that the browser will send in subsequent requests to show they are authenticated. Here are the relevant statements:
如果FindAsync方法确实返回了AppUser对象,那么则需要创建Cookie,浏览器会在后继的请求中发送这个Cookie,表明他们是已认证的。以下是有关语句:
...
ClaimsIdentity ident = await UserManager.CreateIdentityAsync(user,
        DefaultAuthenticationTypes.ApplicationCookie);
AuthManager.SignOut();
AuthManager.SignIn(new AuthenticationProperties {IsPersistent = false}, ident);
return Redirect(returnUrl);
...
The first step is to create a ClaimsIdentity object that identifies the user. The ClaimsIdentity class is the ASP.NET Identity implementation of the IIdentity interface that I described in Table 14-4 and that you can see used in the “Using Roles for Authorization” section later in this chapter.
第一步是创建一个标识该用户的ClaimsIdentity对象。ClaimsIdentity类是表14-4所描述的IIdentity接口的ASP.NET Identity实现,可以在本章稍后的“使用角色授权”小节中看到它的使用。
Tip Don’t worry about why the class is called ClaimsIdentity at the moment. I explain what claims are and how they can be used in Chapter 15.
提示:此刻不必关心这个类为什么要调用ClaimsIdentity,第15章会解释什么是声明(Claims),并介绍如何使用它们。
Instances of ClaimsIdentity are created by calling the user manager CreateIdentityAsync method, passing in a user object and a value from the DefaultAuthenticationTypes enumeration. The ApplicationCookie value is used when working with individual user accounts.
ClaimsIdentity的实例是调用用户管理器的CreateIdentityAsync方法而创建的,在其中传递了一个用户对象和DefaultAuthenticationTypes枚举中的一个值。在使用个别用户账号进行工作时,会用到ApplicationCookie值。
The next step is to invalidate any existing authentication cookies and create the new one. I defined the AuthManager property in the controller because I’ll need access to the object it provides repeatedly as I build the functionality in this chapter. The property returns an implementation of the IAuthenticationManager interface that is responsible for performing common authentication options. I have described the most useful methods provided by the IAuthenticationManager interface in Table 14-5.
下一个步骤是让已认证的Cookie失效,并创建一个新的Cookie。我在该控制器中定义了AuthManager属性,因为在建立本章功能过程中,需要反复访问它所提供的对象。该属性返回的是IAuthenticationManager接口的实现,它负责执行常规的认证选项。表14-5中描述了IAuthenticationManager接口所提供的最有用的方法。
| Name 名称 |
Description 描述 |
|---|---|
| SignIn(options, identity) | Signs the user in, which generally means creating the cookie that identifies authenticated requests 签入用户,这通常意味着要创建用来标识已认证请求的Cookie |
| SignOut() | Signs the user out, which generally means invalidating the cookie that identifies authenticated requests 签出用户,这通常意味着使标识已认证用户的Cookie失效 |
The arguments to the SignIn method are an AuthenticationProperties object that configures the authentication process and the ClaimsIdentity object. I set the IsPersistent property defined by the AuthenticationProperties object to true to make the authentication cookie persistent at the browser, meaning that the user doesn’t have to authenticate again when starting a new session. (There are other properties defined by the AuthenticationProperties class, but the IsPersistent property is the only one that is widely used at the moment.)
SignIn方法的参数是一个AuthenticationProperties对象,用以配置认证过程以及ClaimsIdentity对象。我将AuthenticationProperties对象定义的IsPersistent属性设置为true,以使认证Cookie在浏览器中是持久化的,意即用户在开始新会话时,不必再次进行认证。(AuthenticationProperties类还定义了一些其他属性,但IsPersistent属性是此刻唯一要广泛使用的一个属性。)
The final step is to redirect the user to the URL they requested before the authentication process started, which I do by calling the Redirect method.
最后一步是将用户重定向到他们在认证过程开始之前所请求的URL,这是通过调用Redirect方法实现的。
CONSIDERING TWO-FACTOR AUTHENTICATION
考虑双因子认证
I have performed single-factor authentication in this chapter, which is where the user is able to authenticate using a single piece of information known to them in advance: the password.
在本章中,我实行的是单因子认证,在这种场合中,用户只需使用一个他们预知的单一信息片段:口令,便能够进行认证。
ASP.NET Identity also supports two-factor authentication, where the user needs something extra, usually something that is given to the user at the moment they want to authenticate. The most common examples are a value from a SecureID token or an authentication code that is sent as an e-mail or text message (strictly speaking, the two factors can be anything, including fingerprints, iris scans, and voice recognition, although these are options that are rarely required for most web applications).
ASP.NET Identity还支持双因子认证,在这种情况下,用户需要一些附加信息,通常是在他们需要认证时才发给他们的某种信息。最常用的例子是SecureID令牌的值,或者是通过E-mail发送的认证码或文本消息(严格地讲,第二因子可以是任何东西,包括指纹、眼瞳扫描、声音识别等,尽管这些是在大多数Web应用程序中很少需要用到的选项。)
Security is increased because an attacker needs to know the user’s password and have access to whatever provides the second factor, such an e-mail account or cell phone.
这样增加了安全性,因为攻击者需要知道用户的口令,并且能够对提供第二因子的客户端进行访问,如E-mail账号或移动电话等。
I don’t show two-factor authentication in the book for two reasons. The first is that it requires a lot of preparatory work, such as setting up the infrastructure that distributes the second-factor e-mails and texts and implementing the validation logic, all of which is beyond the scope of this book.
本章不演示双因子认证有两个原因。第一是它需要许多准备工作,例如要建立分发第二因子的邮件和文本的基础架构,并实现验证逻辑,这些都超出了本书的范围。
The second reason is that two-factor authentication forces the user to remember to jump through an additional hoop to authenticate, such as remembering their phone or keeping a security token nearby, something that isn’t always appropriate for web applications. I carried a SecureID token of one sort or another for more than a decade in various jobs, and I lost count of the number of times that I couldn’t log in to an employer’s system because I left the token at home.
第二个原因是双因子认证强制用户要记住一个额外的认证令牌,例如,要记住他们的电话,或者将安全令牌带在身边,这对Web应用程序而言,并非总是合适的。我十几年在各种工作中都带着这种或那种SecureID令牌,而且我有数不清的次数无法登录雇员系统,因为我将令牌丢在了家里。
If you are interested in two-factor security, then I recommend relying on a third-party provider such as Google for authentication, which allows the user to choose whether they want the additional security (and inconvenience) that two-factor authentication provides. I demonstrate third-party authentication in Chapter 15.
如果对双因子安全性有兴趣,那么我建议你依靠第三方提供器,例如Google认证,它允许用户选择是否希望使用双因子提供的附加安全性(而且是不方便的)。第15章将演示第三方认证。
14.2.4 Testing Authentication
14.2.4 测试认证
To test user authentication, start the application and request the /Home/Index URL. When redirected to the /Account/Login URL, enter the details of one of the users I listed at the start of the chapter (for instance, the name joe and the password MySecret). Click the Log In button, and your browser will be redirected back to the /Home/Index URL, but this time it will submit the authentication cookie that grants it access to the action method, as shown in Figure 14-3.
为了测试用户认证,启动应用程序,并请求/Home/Index URL。当被重定向到/Account/Login URL时,输入本章开始时列出的一个用户的细节(例如,姓名为joe,口令为MySecret)。点击“Log In(登录)”按钮,你的浏览器将被重定向,回到/Home/Index URL,但这次它将递交认证Cookie,被准予访问该动作方法,如图14-3所示。
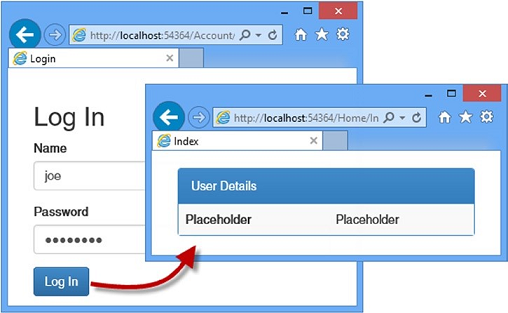
Figure 14-3. Authenticating a user
图14-3. 认证用户
Tip You can use the browser F12 tools to see the cookies that are used to identify authenticated requests.
提示:可以用浏览器的F12工具,看到用来标识已认证请求的Cookie。
14.3 Authorizing Users with Roles
14.3 以角色授权用户
In the previous section, I applied the Authorize attribute in its most basic form, which allows any authenticated user to execute the action method. In this section, I will show you how to refine authorization to give finer-grained control over which users can perform which actions. Table 14-6 puts authorization in context.
上一小节以最基本的形式运用了Authorize注解属性,这允许任何已认证用户执行动作方法。在本小节中,将展示如何精炼授权,以便在用户能够执行的动作上有更细粒度的控制。表14-6描述了授权的情形。
| Question 问题 |
Answer 答案 |
|---|---|
| What is it? 什么是授权? |
Authorization is the process of granting access to controllers and action methods to certain users, generally based on role membership. 授权是将控制器和动作的准许访问限制到特定用户,通常是基于角色的成员 |
| Why should I care? 为何要关心它? |
Without roles, you can differentiate only between users who are authenticated and those who are not. Most applications will have different types of users, such as customers and administrators. 没有角色,你只能在已认证用户和未认证用户之间加以区分。大多数应用程序均有不同类型的用户,例如客户和管理员等 |
| How is it used by the MVC framework? 如何在MVC框架中使用它? |
Roles are used to enforce authorization through the Authorize attribute, which is applied to controllers and action methods. 角色通过Authorize注解属性可用于强制授权,Authorize可用于控制器和动作方法 |
Tip In Chapter 15, I show you a different approach to authorization using claims, which are an advanced ASP.NET Identity feature.
提示:第15章将使用Claims(声明)来演示不同的授权办法,Claims是一种高级的ASP.NET Identity特性。
14.3.1 Adding Support for Roles
14.3.1 添加角色支持
ASP.NET Identity provides a strongly typed base class for accessing and managing roles called RoleManager<T> , where T is the implementation of the IRole interface supported by the storage mechanism used to represent roles. The Entity Framework uses a class called IdentityRole to implement the IRole interface, which defines the properties shown in Table 14-7.
ASP.NET Identity为访问和管理角色提供了一个强类型的基类,叫做RoleManager<T> ,其中T是IRole接口的实现,该实现得到了用来表示角色的存储机制的支持。Entity Framework实现了IRole接口,使用的是一个名称为IdentityRole的类,它定义了如表14-7所示的属性。
| Name 名称 |
Description 描述 |
|---|---|
| Id | Defines the unique identifier for the role 定义角色的唯一标识符 |
| Name | Defines the name of the role 定义角色名称 |
| Users | Returns a collection of IdentityUserRole objects that represents the members of the role 返回一个代表角色成员的IdentityUserRole对象集合 |
I don’t want to leak references to the IdentityRole class throughout my application because it ties me to the Entity Framework for storing role data, so I start by creating an application-specific role class that is derived from IdentityRole. I added a class file called AppRole.cs to the Models folder and used it to define the class shown in Listing 14-6.
我不希望在整个应用程序中都暴露对IdentityRole类的引用,因为它为了存储角色数据,将我绑定到了Entity Framework。为此,我首先创建了一个应用程序专用的角色类,它派生于IdentityRole。我在Models文件夹中添加了一个类文件,名称为AppRole.cs,并用它定义了这个类,如清单14-6所示。
Listing 14-6. The Contents of the AppRole.cs File
清单14-6. AppRole文件的内容
using Microsoft.AspNet.Identity.EntityFramework;

namespace Users.Models {
    public class AppRole : IdentityRole {

        public AppRole() : base() {}

        public AppRole(string name) : base(name) { }
    }
}
The RoleManager<T> class operates on instances of the IRole implementation class through the methods and properties shown in Table 14-8.
RoleManager<T> 类通过表14-8所示的方法和属性对IRole实现类的实例进行操作。
| Name 名称 |
Description 描述 |
|---|---|
| CreateAsync(role) | Creates a new role 创建一个新角色 |
| DeleteAsync(role) | Deletes the specified role 删除指定角色 |
| FindByIdAsync(id) | Finds a role by its ID 找到指定ID的角色 |
| FindByNameAsync(name) | Finds a role by its name 找到指定名称的角色 |
| RoleExistsAsync(name) | Returns true if a role with the specified name exists 如果存在指定名称的角色,返回true |
| UpdateAsync(role) | Stores changes to the specified role 将修改存储到指定角色 |
| Roles | Returns an enumeration of the roles that have been defined 返回已被定义的角色枚举 |
These methods follow the same basic pattern of theUserManager<T> class that I described in Chapter 13. Following the pattern I used for managing users, I added a class file called AppRoleManager.cs to the Infrastructure folder and used it to define the class shown in Listing 14-7.
这些方法与第13章描述的UserManager<T> 类有同样的基本模式。按照对管理用户所采用的模式,我在Infrastructure文件夹中添加了一个类文件,名称为AppRoleManager.cs,用它定义了如清单14-7所示的类。
Listing 14-7. The Contents of the AppRoleManager.cs File
清单14-7. AppRoleManager.cs文件的内容
using System;
using Microsoft.AspNet.Identity;
using Microsoft.AspNet.Identity.EntityFramework;
using Microsoft.AspNet.Identity.Owin;
using Microsoft.Owin; using Users.Models;

namespace Users.Infrastructure {

    public class AppRoleManager : RoleManager<AppRole>, IDisposable {

        public AppRoleManager(RoleStore<AppRole> store) : base(store) { }

        public static AppRoleManager Create(
                IdentityFactoryOptions<AppRoleManager> options,
                IOwinContext context) {
            return new AppRoleManager(new
                    RoleStore<AppRole>(context.Get<AppIdentityDbContext>()));
        }
    }
}
This class defines a Create method that will allow the OWIN start class to create instances for each request where Identity data is accessed, which means I don’t have to disseminate details of how role data is stored throughout the application. I can just obtain and operate on instances of the AppRoleManager class. You can see how I have registered the role manager class with the OWIN start class, IdentityConfig, in Listing 14-8. This ensures that instances of the AppRoleManager class are created using the same Entity Framework database context that is used for the AppUserManager class.
这个类定义了一个Create方法,它让OWIN启动类能够为每一个访问Identity数据的请求创建实例,这意味着在整个应用程序中,我不必散布如何存储角色数据的细节,却能获取AppRoleManager类的实例,并对其进行操作。在清单14-8中可以看到如何用OWIN启动类(IdentityConfig)来注册角色管理器类。这样能够确保,可以使用与AppUserManager类所用的同一个Entity Framework数据库上下文,来创建AppRoleManager类的实例。
Listing 14-8. Creating Instances of the AppRoleManager Class in the IdentityConfig.cs File
清单14-8. 在IdentityConfig.cs文件中创建AppRoleManager类的实例
using Microsoft.AspNet.Identity;
using Microsoft.Owin;
using Microsoft.Owin.Security.Cookies;
using Owin;
using Users.Infrastructure;

namespace Users {
    public class IdentityConfig {
        public void Configuration(IAppBuilder app) {

            app.CreatePerOwinContext<AppIdentityDbContext>(AppIdentityDbContext.Create);
            app.CreatePerOwinContext<AppUserManager>(AppUserManager.Create);
            app.CreatePerOwinContext<AppRoleManager>(AppRoleManager.Create);

            app.UseCookieAuthentication(new CookieAuthenticationOptions {
                AuthenticationType = DefaultAuthenticationTypes.ApplicationCookie,
                LoginPath = new PathString("/Account/Login"),
            });
        }
    }
}
14.3.2 Creating and Deleting Roles
14.3.2 创建和删除角色
Having prepared the application for working with roles, I am going to create an administration tool for managing them. I will start the basics and define action methods and views that allow roles to be created and deleted. I added a controller called RoleAdmin to the project, which you can see in Listing 14-9.
现在已经做好了应用程序使用角色的准备,我打算创建一个管理工具来管理角色。首先从基本的开始,定义能够创建和删除角色的动作方法和视图。我在项目中添加了一个控制器,名称为RoleAdmin,如清单14-9所示。
Listing 14-9. The Contents of the RoleAdminController.cs File
清单14-9. RoleAdminController.cs文件的内容
using System.ComponentModel.DataAnnotations;
using System.Linq; using System.Threading.Tasks;
using System.Web; using System.Web.Mvc; using Microsoft.AspNet.Identity; using Microsoft.AspNet.Identity.Owin;
using Users.Infrastructure; using Users.Models;

namespace Users.Controllers {
    public class RoleAdminController : Controller {

        public ActionResult Index() {
             return View(RoleManager.Roles);
        }

        public ActionResult Create() {
            return View();
        }

        [HttpPost]
        public async Task<ActionResult> Create([Required]string name) {
            if (ModelState.IsValid) {
                 IdentityResult result
                    = await RoleManager.CreateAsync(new AppRole(name));
                if (result.Succeeded) {
                    return RedirectToAction("Index");
                } else {
                    AddErrorsFromResult(result);
                }
            }
            return View(name);
        }

        [HttpPost]
        public async Task<ActionResult> Delete(string id) {
            AppRole role = await RoleManager.FindByIdAsync(id);
            if (role != null) {
                IdentityResult result = await RoleManager.DeleteAsync(role);
                if (result.Succeeded) {
                    return RedirectToAction("Index");
                } else {
                    return View("Error", result.Errors);
                }
            } else {
                return View("Error", new string[] { "Role Not Found" });
            }
        }

        private void AddErrorsFromResult(IdentityResult result) {
            foreach (string error in result.Errors) {
                 ModelState.AddModelError("", error);
            }
        }

        private AppUserManager UserManager {
            get {
                return HttpContext.GetOwinContext().GetUserManager<AppUserManager>();
            }
        }

        private AppRoleManager RoleManager {
            get {
                return HttpContext.GetOwinContext().GetUserManager<AppRoleManager>();
            }
        }
    }
}
I have applied many of the same techniques that I used in the Admin controller in Chapter 13, including a UserManager property that obtains an instance of the AppUserManager class and an AddErrorsFromResult method that processes the errors reported in an IdentityResult object and adds them to the model state.
这里运用了许多第13章中Admin控制器所采用的同样技术,包括一个UserManager属性,用于获取AppUserManager类的实例;和一个AddErrorsFromResult方法,用来处理IdentityResult对象所报告的消息,并将消息添加到模型状态。
I have also defined a RoleManager property that obtains an instance of the AppRoleManager class, which I used in the action methods to obtain and manipulate the roles in the application. I am not going to describe the action methods in detail because they follow the same pattern I used in Chapter 13, using the AppRoleManager class in place of AppUserManager and calling the methods I described in Table 14-8.
我还定义了RoleManager属性,用来获取AppRoleManager类的实例,在动作方法中用该实例获取并维护应用程序的角色。我不打算详细描述这些动作方法,因为它们遵循着与第13章同样的模式,在使用AppUserManager的地方使用了AppRoleManager类,调用的是表14-8中的方法。
14.3.3 Creating the Views
14.3.3 创建视图
The views for the RoleAdmin controller are standard HTML and Razor markup, but I have included them in this chapter so that you can re-create the example. I want to display the names of the users who are members of each role. The Entity Framework IdentityRole class defines a Users property that returns a collection of IdentityUserRole user objects representing the members of the role. Each IdentityUserRole object has a UserId property that returns the unique ID of a user, and I want to get the username for each ID. I added a class file called IdentityHelpers.cs to the Infrastructure folder and used it to define the class shown in Listing 14-10.
RoleAdmin控制器的视图是标准的HTML和Razor标记,但我还是将它们包含在本章之中,以便你能够重建本章的示例。我希望显示每个角色中成员的用户名。Entity Framework的IdentityRole类中定义了一个Users属性,它能够返回表示角色成员的IdentityUserRole用户对象集合。每一个IdentityUserRole对象都有一个UserId属性,它返回一个用户的唯一ID,不过,我希望得到的是每个ID所对应的用户名。我在Infrastructure文件夹中添加了一个类文件,名称为IdentityHelpers.cs,用它定义了如清单14-10所示的类。
Listing 14-10. The Contents of the IdentityHelpers.cs File
清单14-10. IdentityHelpers.cs文件的内容
using System.Web;
using System.Web.Mvc;
using Microsoft.AspNet.Identity.Owin;

namespace Users.Infrastructure {
     public static class IdentityHelpers {

        public static MvcHtmlString GetUserName(this HtmlHelper html, string id) {
            AppUserManager mgr
                =  HttpContext.Current.GetOwinContext().GetUserManager<AppUserManager>();
            return new MvcHtmlString(mgr.FindByIdAsync(id).Result.UserName);
        }
    }
}
Custom HTML helper methods are defined as extensions on the HtmlHelper class. My helper, which is called GetUsername, takes a string argument containing a user ID, obtains an instance of the AppUserManager through the GetOwinContext.GetUserManager method (where GetOwinContext is an extension method on the HttpContext class), and uses the FindByIdAsync method to locate the AppUser instance associated with the ID and to return the value of the UserName property.
这个自定义的HTML辅助器方法,是作为HtmlHelper类的扩展进行定义的。该辅助器的名称为GetUsername,以一个含有用户ID的字符串为参数,通过GetOwinContext.GetUserManager方法获取AppUserManager的一个实例(其中GetOwinContext是HttpContext类的扩展方法),并使用FindByIdAsync方法定位与ID相关联的AppUser实例,然后返回UserName属性的值。
Listing 14-11 shows the contents of the Index.cshtml file from the Views/RoleAdmin folder, which I created by right-clicking the Index action method in the code editor and selecting Add View from the pop-up menu.
清单14-11显示了Views/RoleAdmin文件夹中Index.cshtml文件的内容,这是通过在代码编辑器中右击Index动作,并从弹出菜单中选择“Add View(添加视图)”来创建的。
Listing 14-11. The Contents of the Index.cshtml File in the Views/RoleAdmin Folder
清单14-11. Views/RoleAdmin文件夹中Index.cshtml文件的内容
@using Users.Models
@using Users.Infrastructure
@model IEnumerable<AppRole>
@{ ViewBag.Title = "Roles"; }

<div class="panel panel-primary">
    <div class="panel-heading">Roles</div>
    <table class="table table-striped">

        <tr><th>ID</th><th>Name</th><th>Users</th><th></th></tr>
        @if (Model.Count() == 0) {
            <tr><td colspan="4" class="text-center">No Roles</td></tr>
        } else {
            foreach (AppRole role in Model) {
                <tr>
                    <td>@role.Id</td>
                    <td>@role.Name</td>
                    <td>
                        @if (role.Users == null || role.Users.Count == 0) {
                            @: No Users in Role
                        } else {
                            <p>@string.Join(", ", role.Users.Select(x =>
                                Html.GetUserName(x.UserId)))</p>
                        }
                    </td>
                    <td>
                        @using (Html.BeginForm("Delete", "RoleAdmin",
                            new { id = role.Id })) {
                            @Html.ActionLink("Edit", "Edit", new { id = role.Id },
                                     new { @class = "btn btn-primary btn-xs" })
                            <button class="btn btn-danger btn-xs"
                                    type="submit">
                                Delete
                            </button>
                        }
                    </td>
                </tr>
            }
        }
    </table>
</div>
@Html.ActionLink("Create", "Create", null, new { @class = "btn btn-primary" })
This view displays a list of the roles defined by the application, along with the users who are members, and I use the GetUserName helper method to get the name for each user.
该视图显示了一个由应用程序定义的角色列表,且带有成员用户,我用GetUserName辅助器方法获取了每个用户的用户名。
Listing 14-12 shows the Views/RoleAdmin/Create.cshtml file, which I created to allow new roles to be created.
清单14-12显示了Views/RoleAdmin/Create.cshtml文件,这是用来创建新角色的视图。
Listing 14-12. The Contents of the Create.cshtml File in the Views/RoleAdmin Folder
清单14-12. Views/RoleAdmin文件夹中Create.cshtml文件的内容
@model string
@{ ViewBag.Title = "Create Role";}
<h2>Create Role</h2>
@Html.ValidationSummary(false)
@using (Html.BeginForm()) {
    <div class="form-group">
        <label>Name</label>
        <input name="name" value="@Model" class="form-control" />
    </div>
    <button type="submit" class="btn btn-primary">Create</button>
    @Html.ActionLink("Cancel", "Index", null, new { @class = "btn btn-default" })
}
The only information required to create a new view is a name, which I gather using a standard input element and submit the value to the Create action method.
创建该视图需要的唯一信息是角色名,我用标准的input元素进行采集,并将该值递交给Create动作方法。
14.3.4 Testing Creating and Deleting Roles
14.3.4 测试角色的创建和删除
To test the new controller, start the application and navigate to the /RoleAdmin/Index URL. To create a new role, click the Create button, enter a name in the input element, and click the second Create button. The new view will be saved to the database and displayed when the browser is redirected to the Index action, as shown in Figure 14-4. You can remove the role from the application by clicking the Delete button.
为了测试新的控制器,启动应用程序并导航到/RoleAdmin/Index URL。为了创建一个新的角色,点击“Create”按钮,在input元素中输入一个角色名,然后点击第二个“Create”按钮。新角色将被保存到数据库,并在浏览器被重定向到Index动作时显示出来,如图14-4所示。可以点击“Delete”按钮将该角色从应用程序中删除。

Figure 14-4. Creating a new role
图14-4. 创建新角色
14.3.5 Managing Role Memberships
14.3.5 管理角色成员
To authorize users, it isn’t enough to just create and delete roles; I also have to be able to manage role memberships, assigning and removing users from the roles that the application defines. This isn’t a complicated process, but it invokes taking the role data from the AppRoleManager class and then calling the methods defined by the AppUserMangager class that associate users with roles.
为了授权用户,仅仅创建和删除角色还不够。还必须能够管理角色成员,从应用程序定义的角色中指定和除去用户。这不是一个复杂的过程,但它要从AppRoleManager类获取角色数据,然后调用将用户与角色关联在一起的AppUserMangager类所定义的方法。
I started by defining view models that will let me represent the membership of a role and receive a new set of membership instructions from the user. Listing 14-13 shows the additions I made to the UserViewModels.cs file.
我首先定义了视图模型,这让我能够表示一个角色中的成员,并能够从用户那里接收一组新成员的指令。清单14-13显示了在UserViewModels.cs文件中所做的添加。
Listing 14-13. Adding View Models to the UserViewModels.cs File
清单14-13. 添加到UserViewModels.cs文件的视图模型
using System.ComponentModel.DataAnnotations;
using System.Collections.Generic;

namespace Users.Models {

    public class CreateModel {
        [Required]
        public string Name { get; set; }
        [Required]
        public string Email { get; set; }
        [Required]
        public string Password { get; set; }
    }

    public class LoginModel {
        [Required]
        public string Name { get; set; }
        [Required]
        public string Password { get; set; }
    }

    public class RoleEditModel {
        public AppRole Role { get; set; }
        public IEnumerable<AppUser> Members { get; set; }
        public IEnumerable<AppUser> NonMembers { get; set; }
    }

     public class RoleModificationModel {
        [Required]
        public string RoleName { get; set; }
        public string[] IdsToAdd { get; set; }
        public string[] IdsToDelete { get; set; }
    }
}
The RoleEditModel class will let me pass details of a role and details of the users in the system, categorized by membership. I use AppUser objects in the view model so that I can extract the name and ID for each user in the view that will allow memberships to be edited. The RoleModificationModel class is the one that I will receive from the model binding system when the user submits their changes. It contains arrays of user IDs rather than AppUser objects, which is what I need to change role memberships.
RoleEditModel类使我能够在系统中传递角色细节和用户细节,按成员进行归类。我在视图模型中使用了AppUser对象,以使我在编辑成员的视图中能够为每个用户提取用户名和ID。RoleModificationModel类是在用户递交他们的修改时,从模型绑定系统接收到的一个类。它含有用户ID的数组,而不是AppUser对象,这是对角色成员进行修改所需要的。
Having defined the view models, I can add the action methods to the controller that will allow role memberships to be defined. Listing 14-14 shows the changes I made to the RoleAdmin controller.
定义了视图模型之后,便可以在控制器中添加动作方法,以便定义角色成员。清单14-14显示了我对RoleAdmin控制器所做的修改。
Listing 14-14. Adding Action Methods in the RoleAdminController.cs File
清单14-14. 在RoleAdminController.cs文件中添加动作方法
using System.ComponentModel.DataAnnotations;
using System.Linq;
using System.Threading.Tasks;
using System.Web;
using System.Web.Mvc;
using Microsoft.AspNet.Identity;
using Microsoft.AspNet.Identity.Owin;
using Users.Infrastructure;
using Users.Models;
using System.Collections.Generic;

namespace Users.Controllers {
    public class RoleAdminController : Controller {

          // ...other action methods omitted for brevity...
          // ...出于简化,这里忽略了其他动作方法 ...

        public async Task<ActionResult> Edit(string id) {
            AppRole role = await RoleManager.FindByIdAsync(id);
            string[] memberIDs = role.Users.Select(x => x.UserId).ToArray();
            IEnumerable<AppUser> members
                    = UserManager.Users.Where(x => memberIDs.Any(y => y == x.Id));
            IEnumerable<AppUser> nonMembers = UserManager.Users.Except(members);
            return View(new RoleEditModel {
                Role = role,
                Members = members,
                NonMembers = nonMembers
            });
        }

        [HttpPost]
        public async Task<ActionResult> Edit(RoleModificationModel model) {
            IdentityResult result;
            if (ModelState.IsValid) {
                foreach (string userId in model.IdsToAdd ?? new string[] { }) {
                    result = await UserManager.AddToRoleAsync(userId, model.RoleName);
                    if (!result.Succeeded) {
                        return View("Error", result.Errors);
                    }
                }
                foreach (string userId in model.IdsToDelete ?? new string[] { }) {
                     result = await UserManager.RemoveFromRoleAsync(userId,
                        model.RoleName);
                     if (!result.Succeeded) {
                        return View("Error", result.Errors);
                    }
                }
                return RedirectToAction("Index");
            }
            return View("Error", new string[] { "Role Not Found" });
        }

        private void AddErrorsFromResult(IdentityResult result) {
            foreach (string error in result.Errors) {
                 ModelState.AddModelError("", error);
            }
        }

        private AppUserManager UserManager {
            get {
                return HttpContext.GetOwinContext().GetUserManager<AppUserManager>();
            }
        }

        private AppRoleManager RoleManager {
            get {
                return HttpContext.GetOwinContext().GetUserManager<AppRoleManager>();
            }
        }
    }
}
The majority of the code in the GET version of the Edit action method is responsible for generating the sets of members and nonmembers of the selected role, which is done using LINQ. Once I have grouped the users, I call the View method, passing a new instance of the RoleEditModel class I defined in Listing 14-13.
GET版Edit动作方法的主要代码是负责生成一组所选角色的成员和非成员,这是用LINQ完成的。一旦对用户进行了分组,便调用View方法,为其传递了清单14-13所定义的RoleEditModel类的新实例。
The POST version of the Edit method is responsible for adding and removing users to and from roles. The AppUserManager class inherits a number of role-related methods from its base class, which I have described in Table 14-9.
POST版的Edit方法是负责从角色中添加和删除用户。AppUserManager类从它的基类继承了几个与角色有关的方法,描述于表14-9。
| Name 名称 |
Description 描述 |
|---|---|
| AddToRoleAsync(id, name) | Adds the user with the specified ID to the role with the specified name 将指定ID的用户添加到指定name的角色 |
| GetRolesAsync(id) | Returns a list of the names of the roles of which the user with the specified ID is a member 返回指定ID的用户所在的角色名列表 |
| IsInRoleAsync(id, name) | Returns true if the user with the specified ID is a member of the role with the specified name 如果指定ID的用户是指定name角色的成员,返回true |
| RemoveFromRoleAsync(id, name) | Removes the user with the specified ID as a member from the role with the specified name 在指定name角色的成员中除去指定ID的用户 |
An oddity of these methods is that the role-related methods operate on user IDs and role names, even though roles also have unique identifiers. It is for this reason that my RoleModificationModel view model class has a RoleName property.
这些方法的奇怪之处在于,与角色有关的方法都根据“用户ID”和“角色name(角色名)”进行操作,尽管角色也具有唯一标识符(ID)。这也是在RoleModificationModel视图模型类中使用RoleName属性的原因。
Listing 14-15 shows the view for the Edit.cshtml file, which I added to the Views/RoleAdmin folder and used to define the markup that allows the user to edit role memberships.
清单14-15显示了Edit.cshtml文件的视图,该视图放在Views/RoleAdmin文件中,用它定义了让用户编辑角色成员的标记。
Listing 14-15. The Contents of the Edit.cshtml File in the Views/RoleAdmin Folder
清单14-15. Views/RoleAdmin文件夹中Edit.cshtml文件的内容
@using Users.Models
@model RoleEditModel
@{ ViewBag.Title = "Edit Role";}
@Html.ValidationSummary()
@using (Html.BeginForm()) {
    <input type="hidden" name="roleName" value="@Model.Role.Name" />
    <div class="panel panel-primary">
        <div class="panel-heading">Add To @Model.Role.Name</div>
        <table class="table table-striped">
            @if (Model.NonMembers.Count() == 0) {
                <tr><td colspan="2">All Users Are Members</td></tr>
            } else {
                <tr><td>User ID</td><td>Add To Role</td></tr>
                foreach (AppUser user in Model.NonMembers) {
                    <tr>
                        <td>@user.UserName</td>
                        <td>
                            <input type="checkbox" name="IdsToAdd" value="@user.Id">
                        </td>
                    </tr>
                }
            }
        </table>
    </div>
    <div class="panel panel-primary">
        <div class="panel-heading">Remove from @Model.Role.Name</div>
        <table class="table table-striped">
            @if (Model.Members.Count() == 0) {
                <tr><td colspan="2">No Users Are Members</td></tr>
            } else {
                <tr><td>User ID</td><td>Remove From Role</td></tr>
                foreach (AppUser user in Model.Members) {
                    <tr>
                        <td>@user.UserName</td>
                        <td>
                            <input type="checkbox" name="IdsToDelete" value="@user.Id">
                        </td>
                    </tr>
                }
            }
        </table>
    </div>
    <button type="submit" class="btn btn-primary">Save</button>
    @Html.ActionLink("Cancel", "Index", null, new { @class = "btn btn-default" })
}
The view contains two tables: one for users who are not members of the selected role and one for those who are members. Each user’s name is displayed along with a check box that allows the membership to be changed.
该视图含有两个表格:一个用于不是所选角色成员的用户,一个是所选角色成员的用户。每个被显示出来的用户名称旁边都有一个复选框,可以修改其成员情况。
14.3.6 Testing Editing Role Membership
14.3.6 测试角色成员的编辑
Adding the AppRoleManager class to the application causes the Entity Framework to delete the contents of the database and rebuild the schema, which means that any users you created in the previous chapter have been removed. So that there are users to assign to roles, start the application and navigate to the /Admin/Index URL and create users with the details in Table 14-10.
在应用程序中添加AppRoleManager类会导致Entity Framework删除数据库的内容,并重建数据库架构,这意味着在上一章创建的用户都会被删除。因此,为了有用户可以赋予角色,需启动应用程序并导航到/Admin/Index URL,先创建一些如表14-10所示的用户。
| Name 用户名 |
Email |
Password 口令 |
|---|---|---|
| Alice | alice@example.com | MySecret |
| Bob | bob@example.com | MySecret |
| Joe | joe@example.com | MySecret |
Tip deleting the user database is fine for an example application but tends to be a problem in real applications. I show you how to gracefully manage changes to the database schema in Chapter 15.
提示:删除用户对示例应用程序而言没什么问题,但对实际应用程序来说就是一个问题了。第15章将演示如何优雅地修改数据库架构。
To test managing role memberships, navigate to the /RoleAdmin/Index URL and create a role called Users, following the instructions from the “Testing, Creating, and Deleting Roles” section. Click the Edit button and check the boxes so that Alice and Joe are members of the role but Bob is not, as shown in Figure 14-5.
为了测试角色成员的管理,导航到/RoleAdmin/Index URL,并按照“测试角色的创建和删除”小节的说明,创建一个名称为Users的角色。点击“Edit”按钮,并选中复选框,使Alice和Joe成为该角色的成员,而Bob别选,如图14-5所示。
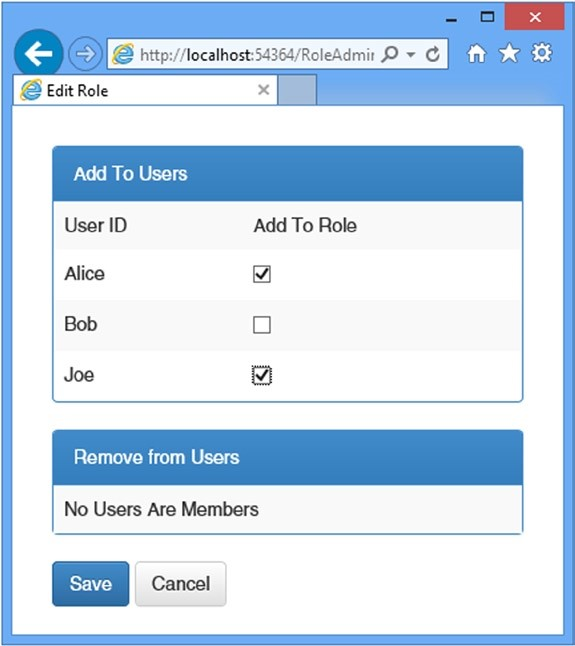
Figure 14-5. Editing role membership
图14-5. 编辑角色成员
Tip If you get an error that tells you there is already an open a data reader, then you didn’t set the MultipleActiveResultSets setting to true in the connection string in Chapter 13.
提示:如果出现错误,告诉你说,已经有一个打开的数据读取程序,那是因为你并未将第13章连接字符串中的MultipleActiveResultSets设置为true。
Click the Save button, and the controller will update the role memberships and redirect the browser to the Index action. The summary of the Users role will show that Alice and Joe are now members, as illustrated by Figure 14-6.
点击“Save”按钮,于是控制器将更新角色成员,并将浏览器重定向到Index动作。Users角色的摘要将显示Alice和Joe现在已经是成员,如图14-6所示。
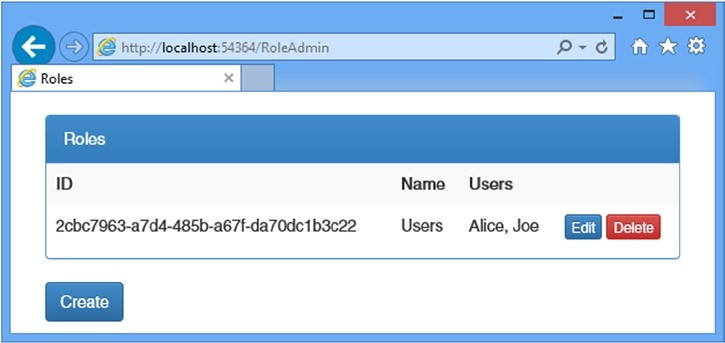
Figure 14-6. The effect of adding users to a role
图14-6. 将用户添加到角色的效果
14.3.7 Using Roles for Authorization
14.3.7 使用角色进行授权
Now that I have the ability to manage roles, I can use them as the basis for authorization through the Authorize attribute. To make it easier to test role-based authorization, I have added a Logout method to the Account controller, as shown in Listing 14-16, which will make it easier to log out and log in again as a different user to see the effect of role membership.
现在已经能够管理角色了,通过Authorize注解属性,还可以将角色作为授权的基础。为了更易于测试基于角色的授权,我在Account控制器中添加了一个Logout方法,如清单14-16所示,这样便很容易注销,也容易作为不同用户登录,以看看角色成员的效果。
Listing 14-16. Adding a Logout Method to the AccountController.cs File
清单14-16. 在AccountController.cs文件中添加Logout方法
using System.Threading.Tasks;
using System.Web.Mvc;
using Users.Models;
using Microsoft.Owin.Security;
using System.Security.Claims;
using Microsoft.AspNet.Identity;
using Microsoft.AspNet.Identity.Owin;
using Users.Infrastructure;
using System.Web;

namespace Users.Controllers {

    [Authorize]
    public class AccountController : Controller {

        [AllowAnonymous]
        public ActionResult Login(string returnUrl) {
            ViewBag.returnUrl = returnUrl;
            return View();
        }

        [HttpPost]
        [AllowAnonymous]
        [ValidateAntiForgeryToken]
        public async Task<ActionResult> Login(LoginModel details, string returnUrl) {
            // ...statements omitted for brevity...
            // ...出于简化,忽略了一些语句...
        }

        [Authorize]
        public ActionResult Logout() {
            AuthManager.SignOut();
            return RedirectToAction("Index", "Home");
        }

        private IAuthenticationManager AuthManager {
            get {
                return HttpContext.GetOwinContext().Authentication;
            }
        }

        private AppUserManager UserManager {
            get {
                return HttpContext.GetOwinContext().GetUserManager<AppUserManager>();
            }
        }
    }
}
I have updated the Home controller to add a new action method and pass some information about the authenticated user to the view, as shown in Listing 14-17.
我也更新了Home控制器,添加了一个新的动作方法,并将已认证用户的一些信息传递给视图,如清单14-17所示。
Listing 14-17. Adding an Action Method and Account Information to the HomeController.cs File
清单14-17. 在HomeController.cs文件中添加动作方法和账号信息
using System.Web.Mvc;
using System.Collections.Generic;
using System.Web;
using System.Security.Principal;

namespace Users.Controllers {

    public class HomeController : Controller {

        [Authorize]
        public ActionResult Index() {
             return View(GetData("Index"));
        }

        [Authorize(Roles="Users")]
        public ActionResult OtherAction() {
            return View("Index", GetData("OtherAction"));
        }

        private Dictionary<string, object> GetData(string actionName) {
            Dictionary<string, object> dict
                = new Dictionary<string, object>();
            dict.Add("Action", actionName);
            dict.Add("User", HttpContext.User.Identity.Name);
            dict.Add("Authenticated", HttpContext.User.Identity.IsAuthenticated);
            dict.Add("Auth Type", HttpContext.User.Identity.AuthenticationType);
            dict.Add("In Users Role", HttpContext.User.IsInRole("Users"));
            return dict;
        }
    }
}
I have left the Authorize attribute unchanged for the Index action method, but I have set the Roles property when applying the attribute to the OtherAction method, specifying that only members of the Users role should be able to access it. I also defined a GetData method, which adds some basic information about the user identity, using the properties available through the HttpContext object. The final change I made was to the Index.cshtml file in the Views/Home folder, which is used by both actions in the Home controller, to add a link that targets the Logout method in the Account controller, as shown in Listing 14-18.
我没有改变Index动作方法上的Authorize注解属性,但将该属性运用于OtherAction方法时,已经设置了Roles属性,指明只有Users角色的成员才能够访问它。我还定义了一个GetData方法,它添加了一些有关用户标识的基本信息,这是通过HttpContext对象可用的属性获得的。最后所做的修改是Views/Home文件夹中的Index.cshtml文件,它是由Home控制器中的两个动作使用的,我在其中添加了一些以Account控制器中的Logout方法为目标的链接,如清单14-18所示。
Listing 14-18. Adding a Sign-Out Link to the Index.cshtml File in the Views/Home Folder
清单14-18. 在Views/Home文件夹中的Index.cshtml文件中添加Sign-Out(签出)链接
@{ ViewBag.Title = "Index"; }

<div class="panel panel-primary">
    <div class="panel-heading">User Details</div>
    <table class="table table-striped">
        @foreach (string key in Model.Keys) {
            <tr>
                <th>@key</th>
                <td>@Model[key]</td>
            </tr>
        }
    </table>
</div>

@Html.ActionLink("Sign Out", "Logout", "Account", null, new {@class = "btn btn-primary"})
Tip the Authorize attribute can also be used to authorize access based on a list of individual usernames. This is an appealing feature for small projects, but it means you have to change the code in your controllers each time the set of users you are authorizing changes, and that usually means having to go through the test-and-deploy cycle again. Using roles for authorization isolates the application from changes in individual user accounts and allows you to control access to the application through the memberships stored by ASP.NET Identity.
提示:Authorize注解属性也能够用来根据个别用户名进行授权访问。这是一个对小型项目很吸引人的特性,但这意味着,你每次授权的用户集合发生变化时,必须修改控制器中的代码,这也意味着,要重走一遍从测试到部署的开发周期。使用角色授权将应用程序与修改个别用户账号隔离开来,使你能够通过ASP.NET Identity存储的成员来控制对应用程序的访问。
To test the authentication, start the application and navigate to the /Home/Index URL. Your browser will be redirected so that you can enter user credentials. It doesn’t matter which of the user details from Table 14-10 you choose to authenticate with because the Authorize attribute applied to the Index action allows access to any authenticated user.
为了测试认证,启动应用程序,并导航到/Home/Index URL。浏览器将被重定向,让你输入用户凭据。选用表14-10中的哪一个用户细节进行认证没有多大关系,因为运用于Index动作的Authorize注解属性允许任何已认证用户进行访问
However, if you now request the /Home/OtherAction URL, the user details you chose from Table 14-10 will make a difference because only Alice and Joe are members of the Users role, which is required to access the OtherAction method.
然而,如果你现在请求/Home/OtherAction URL,从表14-10所选的用户细节就有区别了,因为只有Alice和Joe是Users角色的成员,这是访问OtherAction方法所必须的。
If you log in as Bob, then your browser will be redirected so that you can be prompted for credentials once again.
如果以Bob登录,那么浏览器将被重定向,可能会提示再次输入凭据。
Redirecting an already authenticated user for more credentials is rarely a useful thing to do, so I have modified the Login action method in the Account controller to check to see whether the user is authenticated and, if so, redirect them to the shared Error view. Listing 14-19 shows the changes.
重定向已认证用户要求更多凭据几乎是一件毫无作用的事,因此,我修改了Account控制器中的Login动作方法,检查用户是否已认证,如果是,则将他们重定向到共享的Error视图,清单14-19显示了所做的修改。
Listing 14-19. Detecting Already Authenticated Users in the AccountController.cs File
清单14-19. 在AccountController.cs文件中检测已认证用户
using System.Threading.Tasks;
using System.Web.Mvc;
using Users.Models;
using Microsoft.Owin.Security;
using System.Security.Claims;
using Microsoft.AspNet.Identity;
using Microsoft.AspNet.Identity.Owin;
using Users.Infrastructure;
using System.Web;

namespace Users.Controllers {

    [Authorize]
    public class AccountController : Controller {

        [AllowAnonymous]
        public ActionResult Login(string returnUrl) {
             if (HttpContext.User.Identity.IsAuthenticated) {
                return View("Error", new string[] { "Access Denied" });
            }
            ViewBag.returnUrl = returnUrl;
            return View();
        }

        [HttpPost]
        [AllowAnonymous]
        [ValidateAntiForgeryToken]
        public async Task<ActionResult> Login(LoginModel details, string returnUrl) {
            // ...code omitted for brevity...
            // ...出于简化,忽略了这里的代码...
        }

        [Authorize]
        public ActionResult Logout() {
            AuthManager.SignOut();
            return RedirectToAction("Index", "Home");
        }

        private IAuthenticationManager AuthManager {
            get {
                return HttpContext.GetOwinContext().Authentication;
            }
        }

        private AppUserManager UserManager {
            get {
                return HttpContext.GetOwinContext().GetUserManager<AppUserManager>();
            }
        }
    }
}
Figure 14-7 shows the responses generated for the user Bob when requesting the /Home/Index and /Home/OtherAction URLs.
图14-7显示了用户Bob在请求/Home/Index和/Home/OtherAction URL时生成的响应。
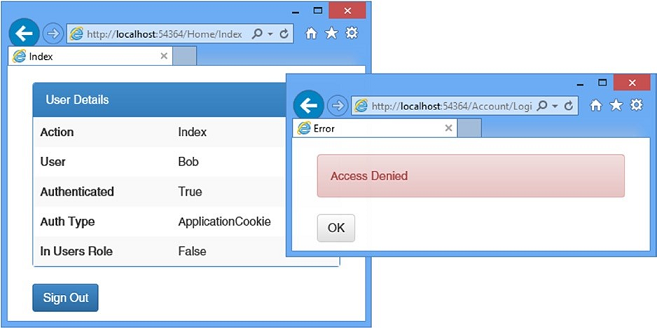
Figure 14-7. Using roles to control access to action methods
图14-7. 使用角色控制对动作方法的访问
Tip Roles are loaded when the user logs in, which means if you change the roles for the user you are currently authenticated as, the changes won’t take effect until you log out and authenticate.
提示:角色在用户登录时就会加载,这意味着,如果修改了当前已认证用户的角色,这些修改是不会生效的,直到他们退出并重新认证。
14.4 Seeding the Database
14.4 种植数据库
One lingering problem in my example project is that access to my Admin and RoleAdmin controllers is not restricted.
上述示例项目中一直未消除的一个问题是,对Admin和RoleAdmin控制器的访问是不受限制的。
This is a classic chicken-and-egg problem because in order to restrict access, I need to create users and roles, but the Admin and RoleAdmin controllers are the user management tools, and if I protect them with the Authorize attribute, there won’t be any credentials that will grant me access to them, especially when I first deploy the application.
这是一个经典的鸡与蛋的问题,因为,若要限制访问,则需要预先创建一些用户和角色,但Admin和RoleAdmin控制器又是用户管理工具,如果用Authorize注解属性来保护它们,那么就不存在能够对它们访问的凭据,特别是在第一次部署应用程序时。
The solution to this problem is to seed the database with some initial data when the Entity Framework Code First feature creates the schema. This allows me to automatically create users and assign them to roles so that there is a base level of content available in the database.
这一问题的解决方案是,在Entity Framework的Code First特性创建数据库架构时,以一些初始的数据植入数据库。这样能够自动地创建一些用户,并赋予一定的角色,以使数据库中有一个基础级的内容可用。
The database is seeded by adding statements to the PerformInitialSetup method of the IdentityDbInit class, which is the application-specific Entity Framework database setup class. Listing 14-20 shows the changes I made to create an administration user.
种植数据库的办法是在IdentityDbInit类的PerformInitialSetup方法中添加一些语句,IdentityDbInit是应用程序专用的Entity Framework数据库设置类。清单14-20是为了创建管理用户所做的修改
Listing 14-20. Seeding the Database in the AppIdentityDbContext.cs File
清单14-20. 在AppIdentityDbContext.cs文件中种植数据库
using System.Data.Entity;
using Microsoft.AspNet.Identity.EntityFramework;
using Users.Models;
using Microsoft.AspNet.Identity;

namespace Users.Infrastructure {
    public class AppIdentityDbContext : IdentityDbContext<AppUser> {

        public AppIdentityDbContext() : base("IdentityDb") { }

        static AppIdentityDbContext() {
            Database.SetInitializer<AppIdentityDbContext>(new IdentityDbInit());
        }

        public static AppIdentityDbContext Create() {
             return new AppIdentityDbContext();
        }
    }

    public class IdentityDbInit
            : DropCreateDatabaseIfModelChanges<AppIdentityDbContext> {
         protected override void Seed(AppIdentityDbContext context) {
            PerformInitialSetup(context);
            base.Seed(context);
        }

        public void PerformInitialSetup(AppIdentityDbContext context) {
            AppUserManager userMgr = new AppUserManager(new UserStore<AppUser>(context));
             AppRoleManager roleMgr = new AppRoleManager(new RoleStore<AppRole>(context));

            string roleName = "Administrators";
             string userName = "Admin";
             string password = "MySecret";
             string email = "admin@example.com";

            if (!roleMgr.RoleExists(roleName)) {
                 roleMgr.Create(new AppRole(roleName));
            }

            AppUser user = userMgr.FindByName(userName);
            if (user == null) {
                userMgr.Create(new AppUser { UserName = userName, Email = email },
                    password);
                user = userMgr.FindByName(userName);
            }

            if (!userMgr.IsInRole(user.Id, roleName)) {
                 userMgr.AddToRole(user.Id, roleName);
            }
        }
    }
}
Tip For this example, I used the synchronous extension methods to locate and manage the role and user. As I explained in Chapter 13, I prefer the asynchronous methods by default, but the synchronous methods can be useful when you need to perform a sequence of related operations.
提示:在上述示例中,我使用了同步的扩展方法来定位和管理角色和用户。正如第13章所解释的那样,一般情况下我更喜欢异步方法,但是,当需要执行一系列相关操作时,同步方法可能是有用的。
I have to create instances of AppUserManager and AppRoleManager directly because the PerformInitialSetup method is called before the OWIN configuration is complete. I use the RoleManager and AppManager objects to create a role called Administrators and a user called Admin and add the user to the role.
我必须直接创建AppUserManager和AppRoleManager的实例,因为PerformInitialSetup方法是在OWIN配置完成之前就被调用的。我使用RoleManager和AppManager对象创建一个名称为Administrators的角色,和一个名称为的Admin的用户,并将此用户添加到该角色。
Tip Read Chapter 15 before you add database seeding to your project. I describe database migrations, which allow you to take control of schema changes in the database and which put the seeding logic in a different place.
提示:在项目中添加数据库种植之前,请先阅读第15章。我在其中描述了数据库迁移,这让你能够对数据库中的架构变化进行控制,并可以将种植逻辑放在不同的地方。
With this change, I can use the Authorize attribute to protect the Admin and RoleAdmin controllers. Listing 14-21 shows the change I made to the Admin controller.
经过这种修改,我可以使用Authorize注解属性来保护Admin和RoleAdmin控制器。清单14-21显示了对Admin控制器所做的修改。
Listing 14-21. Restricting Access in the AdminController.cs File
清单14-21. 在AdminController.cs文件中的限制访问
using System.Web;
using System.Web.Mvc;
using Microsoft.AspNet.Identity.Owin;
using Users.Infrastructure;
using Users.Models;
using Microsoft.AspNet.Identity;
using System.Threading.Tasks;

namespace Users.Controllers {

    [Authorize(Roles = "Administrators")]
    public class AdminController : Controller {
        // ...statements omitted for brevity...
        // ...出于简化,忽略了这里的语句...
    }
}
Listing 14-22 shows the corresponding change I made to the RoleAdmin controller.
清单14-22是对RoleAdmin控制器所做的相应修改。
Listing 14-22. Restricting Access in the RoleAdminController.cs File
清单14-22. 在RoleAdminController.cs文件中的限制访问
using System.ComponentModel.DataAnnotations;
using System.Linq;
using System.Threading.Tasks;
using System.Web;
using System.Web.Mvc;
using Microsoft.AspNet.Identity;
using Microsoft.AspNet.Identity.Owin;
using Users.Infrastructure;
using Users.Models;
using System.Collections.Generic;

namespace Users.Controllers {

    [Authorize(Roles = "Administrators")]
    public class RoleAdminController : Controller {
        // ...statements omitted for brevity...
        // ...出于简化,忽略了这里的语句...
    }
}
The database is seeded only when the schema is created, which means I need to reset the database to complete the process. This isn’t something you would do in a real application, of course, but I wanted to wait until I demonstrated how authentication and authorization worked before creating the administrator account.
只有在创建架构时才会种植数据库,这意味着需要重置数据库才能完成这一过程。当然,这不是在实际项目中可能要做的事情,但我希望等一等,在创建管理员账号之前,完成认证与授权的演示。
To delete the database, open the Visual Studio SQL Server Object Explorer window and locate and right-click the IdentityDb item. Select Delete from the pop-up menu and check both of the options in the Delete Database dialog window. Click the OK button to delete the database.
为了删除数据库,请打开Visual Studio中的“SQL Server对象资源管理器”窗口,找到并右击“IdentityDb”条目。从弹出菜单选择“Delete(删除)”,并在“Delete Database(删除数据库)”窗口选中那两个选项。点击“OK”按钮,删除该数据库。
Now create an empty database to which the schema will be added by right-clicking the Databases item, selecting Add New Database, and entering IdentityDb in the Database Name field. Click OK to create the empty database.
现在,右击“Databases(数据库)”条目,选择“Add New Database(添加新数据库)”,并在“Database Name(数据库名称)”字段中输入IdentityDb。点击OK,创建一个空数据库。
Tip There are step-by-step instructions with screenshots in Chapter 13 for creating the database.
提示:第13章有创建数据库的逐步说明和屏幕截图。
Now start the application and request the /Admin/Index or /RoleAdmin/Index URL. There will be a delay while the schema is created and the database is seeded, and then you will be prompted to enter your credentials. Use Admin as the name and MySecret as the password, and you will be granted access to the controllers.
现在,启动应用程序,请求/Admin/Index或/RoleAdmin/Index URL。在创建数据库架构以及植入数据库期间会有一点延时,然后将提示你输入凭据。使用Admin作为用户名,MySecret作为口令,将会获得对该控制器的访问。
Caution Deleting the database removes the user accounts you created using the details in table 14-10, which is why you would not perform this task on a live database containing user details.
警告:删除数据库也删去了你用表14-10所创建的用户账号,正是这一原因,一般不会在一个含有用户细节的活动数据库中执行此项任务。
14.5 Summary
14.5 小结
In this chapter, I showed you how to use ASP.NET Identity to authenticate and authorize users. I explained how the ASP.NET life-cycle events provide a foundation for authenticating requests, how to collect and validate credentials users, and how to restrict access to action methods based on the roles that a user is a member of. In the next chapter, I demonstrate some of the advanced features that ASP.NET Identity provides.
在本章中,我演示了如何使用ASP.NET Identity进行用户认证与授权。解释了ASP.NET生命周期事件如何提供认证基础,如何收集和检验用户凭据,以及如何根据用户的成员角色限制对动作方法的访问。下一章将演示ASP.NET Identity所提供的一些高级特性。
看完此文如果觉得有所收获,请给个推荐。
你的推荐是我继续下去的动力,也会让更多人关注并获益,这也是你的贡献。

 浙公网安备 33010602011771号