基于全志H3芯片的ARM开发环境搭建
基于全志H3芯片的ARM开发环境搭建
最近买了个友善之臂的NanoPi M1板子,又在网上申请了个NanoPi NEO板子,这两个都是基于全志H3芯片的Crotex-A7四核ARM开发板,两个板子可以共用一套开发环境,本文就以NanoPi NEO为例,简单讲述基于全志H3芯片的ARM开发环境搭建。
1. 安装交叉编译工具
1.1 获取交叉编译工具
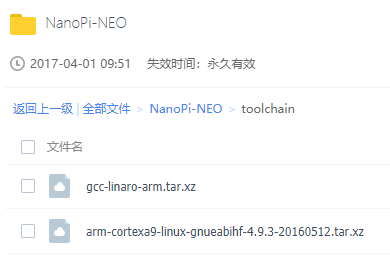
在百度网盘中,给出了Nanopi NEO的交叉编译工具:

注意:
第一个 gcc-linaro-arm.tar.xz 是用友善之臂给出的脚本编译生成固件的;
如果需要交叉编译工具编译应用程序或者内核,需要使用第二个 arm-cortexa9-linux-gnueabihf-4.9.3-20160512.tar.xz 工具。
1.2 安装交叉编译工具
解压:arm-cortexa9-linux-gnueabihf-4.9.3-20160512.tar.xz,得到 4.9.3 目录,与其他平台搭建交叉编译环境方法一样,将该目录复制到 /usr/local/arm/ 目录下
设置环境变量,在 ~/.bashrc 最后添加:
# vim ~/.bashrc
PATH=$PATH:/usr/local/arm/4.9.3/bin/
export PATH
重启或者注销用户再登录即可使用该交叉编译工具。
1.3 验证安装是否成功
验证交叉编译工具是否安装成功:
$ arm-cortexa9-linux-gnueabihf-gcc -v
Using built-in specs.
COLLECT_GCC=arm-cortexa9-linux-gnueabihf-gcc
COLLECT_LTO_WRAPPER=/usr/local/arm/4.9.3/bin/../libexec/gcc/arm-cortexa9-linux-gnueabihf/4.9.3/lto-wrapper
Target: arm-cortexa9-linux-gnueabihf
Configured with: /work/toolchain/build/src/gcc-4.9.3/configure --build=x86_64-build_pc-linux-gnu --host=x86_64-build_pc-linux-gnu --target=arm-cortexa9-linux-gnueabihf --prefix=/opt/FriendlyARM/toolchain/4.9.3 --with-sysroot=/opt/FriendlyARM/toolchain/4.9.3/arm-cortexa9-linux-gnueabihf/sys-root --enable-languages=c,c++ --with-arch=armv7-a --with-tune=cortex-a9 --with-fpu=vfpv3 --with-float=hard --with-pkgversion=ctng-1.21.0-229g-FA --with-bugurl=http://www.friendlyarm.com/ --enable-__cxa_atexit --disable-libmudflap --disable-libgomp --disable-libssp --disable-libquadmath --disable-libquadmath-support --disable-libsanitizer --with-gmp=/work/toolchain/build/arm-cortexa9-linux-gnueabihf/buildtools --with-mpfr=/work/toolchain/build/arm-cortexa9-linux-gnueabihf/buildtools --with-mpc=/work/toolchain/build/arm-cortexa9-linux-gnueabihf/buildtools --with-isl=/work/toolchain/build/arm-cortexa9-linux-gnueabihf/buildtools --with-cloog=/work/toolchain/build/arm-cortexa9-linux-gnueabihf/buildtools --with-libelf=/work/toolchain/build/arm-cortexa9-linux-gnueabihf/buildtools --enable-lto --with-host-libstdcxx='-static-libgcc -Wl,-Bstatic,-lstdc++,-Bdynamic -lm' --enable-threads=posix --enable-linker-build-id --with-linker-hash-style=gnu --enable-plugin --enable-gold --disable-multilib --with-local-prefix=/opt/FriendlyARM/toolchain/4.9.3/arm-cortexa9-linux-gnueabihf/sys-root --enable-long-long
Thread model: posix
gcc version 4.9.3 (ctng-1.21.0-229g-FA)
1.4 验证交叉编译工具是否能正常编译
验证安装的交叉编译工具编译的程序在Nanopi NEO板子上能够运行:
1)先写一个简单的验证程序,也就是程序员”家喻户晓“的 Hello world!
$ cat hello.c
#include <stdio.h>

int main(void)
{
    printf("Hello world!\n");

    return 0;
}
2)将程序交叉编译为板子能运行的程序:
$ arm-cortexa9-linux-gnueabihf-gcc hello.c -o hello
3)编译完成后生成的hello程序,查看文件属性:
$ file hello
hello: ELF 32-bit LSB executable, ARM, EABI5 version 1 (SYSV), dynamically linked, interpreter /lib/ld-linux-armhf.so.3, for GNU/Linux 3.0.8, BuildID[sha1]=e471478037c7cf740dadac9ec82136aad38f0c4e, not stripped
2. 将程序通过NFS文件系统复制到开发板
2.1 先让板子连上网
1)确保板子已经能够正常联网:
# ifconfig
eth0      Link encap:Ethernet  HWaddr **:**:**:**:**:**
          inet addr:***.***.*.***  Bcast:***.***.*.255  Mask:255.255.255.0
          inet6 addr: ****::****:****:****:****/64 Scope:Link
          UP BROADCAST RUNNING MULTICAST  MTU:1500  Metric:1
          RX packets:820 errors:0 dropped:0 overruns:0 frame:0
          TX packets:637 errors:0 dropped:0 overruns:0 carrier:0
          collisions:0 txqueuelen:1000
          RX bytes:513171 (501.1 KiB)  TX bytes:49921 (48.7 KiB)
          Interrupt:114

lo        Link encap:Local Loopback
          inet addr:127.0.0.1  Mask:255.0.0.0
          inet6 addr: ::1/128 Scope:Host
          UP LOOPBACK RUNNING  MTU:16436  Metric:1
          RX packets:33 errors:0 dropped:0 overruns:0 frame:0
          TX packets:33 errors:0 dropped:0 overruns:0 carrier:0
          collisions:0 txqueuelen:0
          RX bytes:3304 (3.2 KiB)  TX bytes:3304 (3.2 KiB)
2)ping外网,检测是否能和外网通讯:
# ping www.baidu.com
PING www.baidu.com (163.177.151.110) 56(84) bytes of data.
64 bytes from www.baidu.com (163.177.151.110): icmp_seq=1 ttl=53 time=11.1 ms
64 bytes from www.baidu.com (163.177.151.110): icmp_seq=2 ttl=53 time=10.3 ms
64 bytes from www.baidu.com (163.177.151.110): icmp_seq=3 ttl=53 time=10.6 ms
^C
--- www.baidu.com ping statistics ---
3 packets transmitted, 3 received, 0% packet loss, time 2003ms
rtt min/avg/max/mdev = 10.356/10.740/11.183/0.350 ms
2.2 安装NFS服务器并配置NFS目录
1)安装NFS服务器
# sudo apt-get install nfs-kernel-server
2)创建NFS目录:
# vim /etc/exports
添加:
/mnt             *(rw,sync,no_root_squash,no_subtree_check)
3)重启NFS服务器:
# systemctl restart nfs-kernel-server
4)检查nfs是否启动:
# ps -aux | grep nfs
root        39  0.0  0.0      0     0 ?        S<   14:53   0:00 [nfsiod]
root     29118  0.0  0.0      0     0 ?        S    15:55   0:00 [nfsd]
root     29119  0.0  0.0      0     0 ?        S    15:55   0:00 [nfsd]
root     29120  0.0  0.0      0     0 ?        S    15:55   0:00 [nfsd]
root     29121  0.0  0.0      0     0 ?        S    15:55   0:00 [nfsd]
root     29122  0.0  0.0      0     0 ?        S    15:55   0:00 [nfsd]
root     29123  0.0  0.0      0     0 ?        S    15:55   0:00 [nfsd]
root     29124  0.0  0.0      0     0 ?        S    15:55   0:00 [nfsd]
root     29125  0.0  0.0      0     0 ?        S    15:55   0:00 [nfsd]
root     29142  0.0  0.1   4136   748 ttyS0    S+   15:56   0:00 grep nfs
2.3 通过NFS网络服务器传输文件
通过NFS网络服务器挂载,将文件拷贝到板子上:
1)在PC的虚拟机上安装NFS客户端:
$ sudo apt-get install nfs-common
2)将板子的 /mnt/nfs 目录挂载到PC虚拟机的 /mnt 目录:
$ sudo mount -t nfs -o intr,nolock 192.168.4.113:/mnt/nfs /mnt
3)将PC虚拟机上编译好的程序拷贝到板子上:
$ sudo cp hello /mnt
在板子上的/mnt/nfs目录下就可以看到拷贝过来的程序了:
# ls /mnt
hello
在开发板上运行程序,验证程序是否可以在板子上运行:
# ./hello
Hello world!
验证成功,由交叉编译工具编译的程序在板子上可以正常运行。
至此,基于全志H3芯片的开发环境搭建完成,可以进行开发工作了。


 浙公网安备 33010602011771号