
伪分布模式:
Hadoop可以在单节点上以伪分布模式运行,用不同的Java进程模拟分布式运行中的各类节点。
1、安装Hadoop
确保系统已安装好JDK和ssh。
1)在官网下载Hadoop: http://hadoop.apache.org/ 我这里下载的是 hadoop-1.1.1-bin.tar.gz
2)下载后放到/softs目录下
3)将hadoop-1.1.1-bin.tar.gz解压到/usr目录
[root@localhost usr]# tar -zxvf /softs/hadoop-1.1.1-bin.tar.gz
[root@localhost usr]# ls
bin  etc  games  hadoop-1.1.1  include  java  lib  libexec  local  lost+found  sbin  share  src  tmp
[root@localhost usr]#
2、配置Hadoop
1)配置/usr/hadoop-1.1.1/conf/hadoop-env.sh文件,找到 export JAVA_HOME,修改为JDK的安装路径
export JAVA_HOME=/usr/java/jdk1.6.0_38
2)配置/usr/hadoop-1.1.1/conf/core-site.xml,内容如下:
<?xml version="1.0"?>
<?xml-stylesheet type="text/xsl" href="configuration.xsl"?>

<!-- Put site-specific property overrides in this file. -->

<configuration>
        <property>
                <name>fs.default.name</name>
                <value>hdfs://localhost:9000</value>
        </property>
</configuration>
3)配置/usr/hadoop-1.1.1/conf/hdfs-site.xml,内容如下:
<?xml version="1.0"?>
<?xml-stylesheet type="text/xsl" href="configuration.xsl"?>

<!-- Put site-specific property overrides in this file. -->

<configuration>
        <property>
                <name>dfs.replication</name>
                <value>1</value>
        </property>
</configuration>
4)配置/usr/hadoop-1.1.1/conf/mapred-site.xml,内容如下:
<?xml version="1.0"?>
<?xml-stylesheet type="text/xsl" href="configuration.xsl"?>

<!-- Put site-specific property overrides in this file. -->

<configuration>
        <property>
                <name>mapred.job.tracker</name>
                <value>localhost:9001</value>
        </property>
</configuration>
3、免密码SSH设置
Hadoop运行过程中需要使用ssh管理远端Hadoop守护进程,需要不用输入密码就可以访问,所以这里设置用密钥验证。
1)生成密钥,执行如下命令:
[root@localhost ~]# ssh-keygen -t rsa
提示输入Enter passphrase (empty for no passphrase): 和 Enter same passphrase again:时,无需输入任何东西,直接按回车键即可。
[root@localhost ~]# ssh-keygen -t rsa
Generating public/private rsa key pair.
Enter file in which to save the key (/root/.ssh/id_rsa):
Created directory '/root/.ssh'.
Enter passphrase (empty for no passphrase):
Enter same passphrase again:
Your identification has been saved in /root/.ssh/id_rsa.
Your public key has been saved in /root/.ssh/id_rsa.pub.
The key fingerprint is:
16:54:ed:23:0c:04:fa:74:1b:b0:b5:eb:c3:87:43:52 root@localhost.localdomain
The key's randomart image is:
+--[ RSA 2048]----+
|      oo+...     |
|     . =..  .    |
|    . o Eo .     |
|     o o =o o    |
|      o S  . .   |
|       * .       |
|        * .      |
|         +       |
|                 |
+-----------------+
[root@localhost ~]# ls
从上面执行的结果可以看到,生成的密钥已经保存到/root/.ssh/id_rsa中。
2)进入到/root/.ssh目录,执行如下命令
[root@localhost .ssh]# cp id_rsa.pub authorized_keys
3)接着执行:
[root@localhost .ssh]# ssh localhost
可以实现无需输入密码就可以用ssh连接
[root@localhost .ssh]# ssh localhost
The authenticity of host 'localhost (::1)' can't be established.
RSA key fingerprint is e5:44:06:97:b4:66:ba:89:40:95:ba:23:0a:06:2a:74.
Are you sure you want to continue connecting (yes/no)? yes
Warning: Permanently added 'localhost' (RSA) to the list of known hosts.
Last login: Tue Jan 15 22:08:06 2013 from 192.168.0.101
Hello,man
[root@localhost ~]#
4、运行Hadoop
1)格式化分布式文件系统:
[root@localhost hadoop-1.1.1]# bin/hadoop namenode -format
[root@localhost hadoop-1.1.1]# bin/hadoop namenode -format
13/01/15 23:56:53 INFO namenode.NameNode: STARTUP_MSG:
/************************************************************
STARTUP_MSG: Starting NameNode
STARTUP_MSG:   host = localhost.localdomain/127.0.0.1
STARTUP_MSG:   args = [-format]
STARTUP_MSG:   version = 1.1.1
STARTUP_MSG:   build = https://svn.apache.org/repos/asf/hadoop/common/branches/branch-1.1 -r 1411108; compiled by 'hortonfo' on Mon Nov 19 10:48:11 UTC 2012
************************************************************/
13/01/15 23:56:54 INFO util.GSet: VM type       = 32-bit
13/01/15 23:56:54 INFO util.GSet: 2% max memory = 19.33375 MB
13/01/15 23:56:54 INFO util.GSet: capacity      = 2^22 = 4194304 entries
13/01/15 23:56:54 INFO util.GSet: recommended=4194304, actual=4194304
13/01/15 23:56:55 INFO namenode.FSNamesystem: fsOwner=root
13/01/15 23:56:55 INFO namenode.FSNamesystem: supergroup=supergroup
13/01/15 23:56:55 INFO namenode.FSNamesystem: isPermissionEnabled=true
13/01/15 23:56:55 INFO namenode.FSNamesystem: dfs.block.invalidate.limit=100
13/01/15 23:56:55 INFO namenode.FSNamesystem: isAccessTokenEnabled=false accessKeyUpdateInterval=0 min(s), accessTokenLifetime=0 min(s)
13/01/15 23:56:55 INFO namenode.NameNode: Caching file names occuring more than 10 times
13/01/15 23:56:55 INFO common.Storage: Image file of size 110 saved in 0 seconds.
13/01/15 23:56:55 INFO namenode.FSEditLog: closing edit log: position=4, editlog=/tmp/hadoop-root/dfs/name/current/edits
13/01/15 23:56:55 INFO namenode.FSEditLog: close success: truncate to 4, editlog=/tmp/hadoop-root/dfs/name/current/edits
13/01/15 23:56:55 INFO common.Storage: Storage directory /tmp/hadoop-root/dfs/name has been successfully formatted.
13/01/15 23:56:55 INFO namenode.NameNode: SHUTDOWN_MSG:
/************************************************************
SHUTDOWN_MSG: Shutting down NameNode at localhost.localdomain/127.0.0.1
************************************************************/
[root@localhost hadoop-1.1.1]#
2)启动Hadoop守护进程
[root@localhost hadoop-1.1.1]# bin/start-all.sh
[root@localhost hadoop-1.1.1]# bin/start-all.sh
starting namenode, logging to /usr/hadoop-1.1.1/libexec/../logs/hadoop-root-namenode-localhost.localdomain.out
localhost: starting datanode, logging to /usr/hadoop-1.1.1/libexec/../logs/hadoop-root-datanode-localhost.localdomain.out
localhost: starting secondarynamenode, logging to /usr/hadoop-1.1.1/libexec/../logs/hadoop-root-secondarynamenode-localhost.localdomain.out
starting jobtracker, logging to /usr/hadoop-1.1.1/libexec/../logs/hadoop-root-jobtracker-localhost.localdomain.out
localhost: starting tasktracker, logging to /usr/hadoop-1.1.1/libexec/../logs/hadoop-root-tasktracker-localhost.localdomain.out
[root@localhost hadoop-1.1.1]#
启动后,可以通过 http://localhost:50070/访问到NameNode:
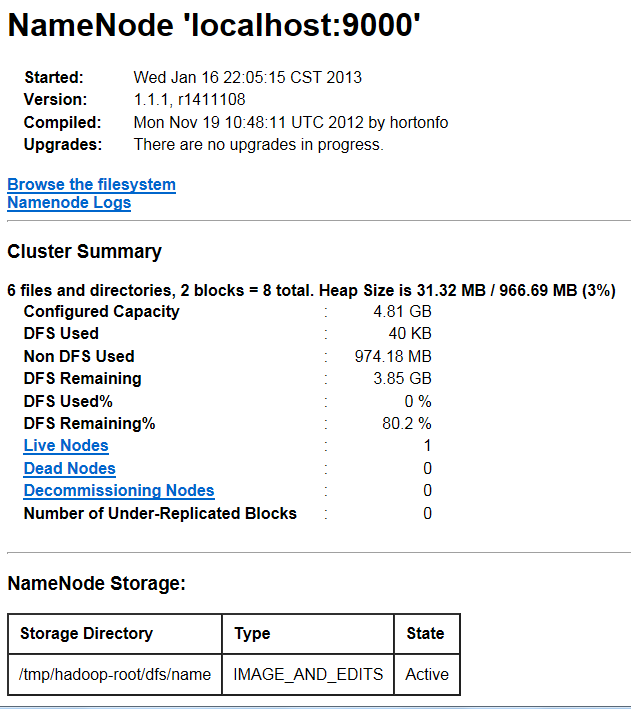
NameNode是HDFS的守护程序,负责记录文件是如何分割成数据块的,以及这些数据块分别被存储到哪些数据节点上。它的主要功能是对内存以及I/O进行集中管理。
通过 http://localhost:50030/ 访问JobTracker
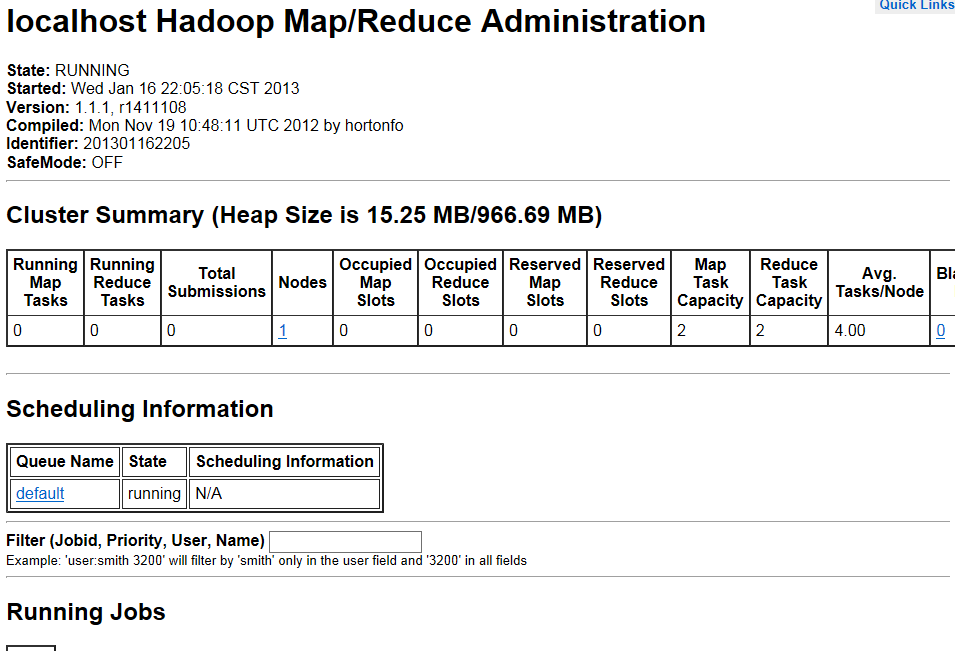
JobTracker后台程序用来连接应用程序与Hadoop。用户代码提交到集群以后,由JobTracker决定哪个文件将被处理,并且为不同的task分配节点。
3)停止Hadoop守护进程
[root@localhost hadoop-1.1.1]# bin/stop-all.sh

