

WPF,Silverlight与XAML读书笔记第十三 - WPF中对话框与外观
说明:本系列基本上是《WPF揭秘》的读书笔记。在结构安排与文章内容上参照《WPF揭秘》的编排,对内容进行了总结并加入一些个人理解。
对话框是Windows系统中很常见的一个元素,对话框是一类模态窗口,也就是说在对话框关闭之前无法返回窗口。WPF也提供了一系列通用的对话框实现如打开/保存文件,浏览文件夹,选择字体,打印等常见任务。同时WPF也提供创建拥有相同模式行为的自定义对话框的功能。
内建对话框
WPF内建的一些类提供了常规对话框的功能,这些类通过一些属性与方法使用户可以与对话框交互。WPF提供的对话框也是对Win32 API的封装,与对话框的通信也是通过调用Win32 API完成。这种设计可以使对话框版本与操作系统版本同步。
提示:
WinForm与WPF都封装了Windows常规的一些对话框。但WPF中有ColorDialog,FontDialog及 FolderBrowser这三个WinForm中封装过的对话框没有自己的封装版本。但是可以直接引用 System.Windows.Forms.dll来使用WinForm中这些包装对话框的托管类。
使用内建对话框的方式是一致的:声明并初始化对话框对象,调用其ShowDialog方法,最后处理对话框返回的结果。例如,打印对话框的使用:
PrintDialog pd = new PrintDialog();
if (pd.ShowDialog() == true)
    pd.PrintVisual(image, Path.GetFileName(filename));
自定义对话框
WPF也支持自定义对话框来帮你实现通用对话框不支持的功能。前文提到对话框是一种模态窗口,所以可以使用创建模态窗口的方式来产生一个自定义的对话框。WPF中模态与非模态对话框的概念与WinForm中是相同的,所以WPF中也是通过ShowDialog创建一个模态窗口(对话框),通过Show创建一个非模态窗口(普通Window)。ShowDialog是阻塞似的,并返回一个bool?类型的值。
自定以对话框的使用方式与内建对话框完全一致。而在对话框的设计上为了控制ShowDialog()方法的返回值,只需要设置Window的DialogResult属性(bool?类型)即可。(一般点击对话框中确定按钮时将此值设置为true,点击取消按钮或关闭对话框则将此值设置为false)。
注意:给DialogRusult设置值会隐式的关闭Window。
使应用程序具有Vista/Win7样式的感官
下文将分别介绍如何在WPF中使用Task Dialog及实现Aero Glass效果。
提示:
由于这部分介绍的功能只适用于Vista以上版本的Windows系统,所以使用这部分功能时,应该首先对系统版本进行判断,并做好对旧系统的兼容工作。如下代码:
if(System.Enviroment.OSVersion.Version.Major >= 6);
// 如:使用Vista支持的TaskDialog
else
// 需要使用MessageBox替代
TaskDialog是Vista以上版本系统Win32 API之一,在C#中使用此Win32 API需要通过PInvoke。代码如下:
class TaskDialogHelper
{
//导入Win32 API
[DllImport("comctl32.dll", PreserveSig = false, CharSet = CharSet.Unicode)]
public static extern TaskDialogResult TaskDialog(IntPtr hwndParent, IntPtr hInstance,
    string title, string mainInstruction, string content,
TaskDialogButtons buttons, TaskDialogIcon icon);
}
//同时需要定义导入方法的参数的类型
enum TaskDialogResult
{
    Ok = 1,
    Cancel = 2,
    Retry = 4,
    Yes = 6,
    No = 7,
    Close = 8
}

[Flags]
enum TaskDialogButtons
{
    Ok = 0x0001,
    Yes = 0x0002,
    No = 0x0004,
    Cancel = 0x0008,
    Retry = 0x0010,
    Close = 0x0020
}

enum TaskDialogIcon
{
    Warning = 65535,
    Error = 65534,
    Information = 65533,
    Shield = 65532
}
在使用及效果上,与传统MessageBox主要有两个不同,首先TaskDialog中提示信息分为两个部分,一主一副,这个主的被称为主指令,是TaskDialog所新增。另外TaskDialog中也允许混合任意类型的按钮。以上两个特性可见下面示例代码中的粗体部分。
// 传统MessageBox
MessageBoxResult result = MessageBox.Show(
    "Are you sure you want to delete '" + filename + "'?",
    "Delete Picture",
    MessageBoxButton.YesNo,
    MessageBoxImage.Warning);

if (result == MessageBoxResult.Yes)
proceed = true;

// TaskDialog的使用
TaskDialogResult result = TaskDialogHelper.TaskDialog(
    new System.Windows.Interop.WindowInteropHelper(this).Handle,
    IntPtr.Zero,
    "Delete Picture",
    "Are you sure you want to delete '" + filename + "'?",
    "This will delete the picture permanently, rather than sending it to the Recycle Bin.",
    TaskDialogButtons.Yes | TaskDialogButtons.No,
    TaskDialogIcon.Warning);

if (result == TaskDialogResult.Yes)
    proceed = true;
注意:
TaskDialog需要使用Windows Common Control Dll(ComCtl32.dll)第6版,而由于兼容性考虑默认情况下应用程序不会自动使用该版本的ComCtl32.dll。需要提供一个名为AppName.exe.mainfest的清单文件来显示告诉应用程序所需的程序集。清单文件内容如:<?xml version="1.0" encoding="UTF-8" standalone="yes"?> <assembly xmlns="urn:schemas-microsoft-com:asm.v1" manifestVersion="1.0"> <assemblyIdentity version="1.0.0.0" processorArchitecture="X86" name="PhotoGallery" type="win32" /> <description>Photo Gallery</description> <dependency> <dependentAssembly> <assemblyIdentity type="win32" name="Microsoft.Windows.Common-Controls" version="6.0.0.0" processorArchitecture="X86" publicKeyToken="6595b64144ccf1df" language="*" /> </dependentAssembly> </dependency> </assembly>
提示:
通过使用更复杂的TaskDialogIndirect API可以进一步定制TaskDialog。具体参见Windows SDK。
Aero Glass
Aero效果可以扩展到客户区域的任意部分。在WPF中可以通过DwmExtentFrameIntoClientArea来实现Aero效果(Dwm即Desktop Window Manager)。可以将任意内容放在实现了Aero效果的窗体上。类似调用TaskDialog,C#调用实现Aero效果的API也需PInvoke。封装对Win32 API调用的代码如下:
public class GlassHelper
{
    [DllImport("dwmapi.dll", PreserveSig = false)]
    static extern void DwmExtendFrameIntoClientArea(
        IntPtr hWnd, ref MARGINS pMarInset);
    [DllImport("dwmapi.dll", PreserveSig = false)]
    static extern bool DwmIsCompositionEnabled();

    public static bool ExtendGlassFrame(Window window, Thickness margin)
    {
        if (!DwmIsCompositionEnabled())
            return false;

        IntPtr hwnd = new WindowInteropHelper(window).Handle;
        if (hwnd == IntPtr.Zero)
            throw new InvalidOperationException(
            "The Window must be shown before extending glass.");

        // Set the background to transparent from both the WPF and Win32 perspectives
        window.Background = Brushes.Transparent;
        HwndSource.FromHwnd(hwnd).CompositionTarget.BackgroundColor = Colors.Transparent;

        MARGINS margins = new MARGINS(margin);
        DwmExtendFrameIntoClientArea(hwnd, ref margins);
        return true;
    }
}

[StructLayout(LayoutKind.Sequential)]
public struct MARGINS
{
    public MARGINS(Thickness t)
    {
        Left = (int)t.Left;
        Right = (int)t.Right;
        Top = (int)t.Top;
        Bottom = (int)t.Bottom;
    }
    public int Left;
    public int Right;
    public int Top;
    public int Bottom;
}
上面代码中,GlassHelper这个类封装了对PInvoke封装的Win32 API的调用。很明显代码中粗体部分为对Win32 API的封装。这个帮助类封装的方法ExtendGlassFrame接受两个参数:一个Window对象及一个Thickness参数指定需要Glass化的Window区域的大小(值为-1会实现玻璃表格效果)。方法中首先调用的Win32 API函数用来检查系统是否启用Aero Glass主题(桌面合成是否启用,当使用远程桌面或用户显示关闭桌面合成等情况桌面合成是不被启用的,而通过截获Win32消息 – WM_DWMCOMPOSITIONCHANGED,可以得知桌面合成特性的改变),只有在此条件满足时才会继续。接下来,构建一个正确的HWND,通过Thickness构建一个MARGINS类型对象,并将window窗体的Background设置为Transparent。最后调用封装的Win32 API传入HWND,MARGINS对象,就可以显示出玻璃效果。
在WPF Window中使用上文GlassHelper的方法:
protected override void OnSourceInitialized(EventArgs e)
{
    base.OnSourceInitialized(e);

    if (System.Environment.OSVersion.Version.Major >= 6)
    {
        // 需要在base.OnSourceInitialized(e)后调用
        GlassHelper.ExtendGlassFrame(this, new Thickness(0, 0, 0, 55));

        // 附加一个window,以便可以在桌面合成变化时得到通知
        IntPtr hwnd = new WindowInteropHelper(this).Handle;
        HwndSource.FromHwnd(hwnd).AddHook(new HwndSourceHook(WndProc));
    }
}

private IntPtr WndProc(IntPtr hwnd, int msg, IntPtr wParam, IntPtr lParam, ref bool handled)
{
    if (msg == WM_DWMCOMPOSITIONCHANGED)
    {
        // Reenable glass:
        GlassHelper.ExtendGlassFrame(this, new Thickness(-1));
        handled = true;
    }
    return IntPtr.Zero;
}
private const int WM_DWMCOMPOSITIONCHANGED = 0x031E;
由代码可以看出需要在初始化时,并在其它对象完成初始化后,调用生成Aero Class效果的函数。
Gadget风格应用程序
WPF提供创建非标准形状的窗体,即让应用程序拥有不同规则的非客户区域。这样可以构建出gadget风格,浮在桌面上的应用程序。实现这个效果的步骤如下:
-
将Window的AllowsTransparency设置为true。(一般应使用XAML设置这个值,如果使用编程方式设置需要在Window显示前进行,否则会引起InvalidOperationException异常)
-
把Window的WindowsStyle设置为None,来移除所有的非客户区域。(只有None这个设置可以与AllowsTransparency="true"的设置共用,否则也会引起InvalidOperationException异常)
-
将Window的Background设置为Transparent,到这步矩形的Window就透明了,你看到的窗体的形状将是一个自定的不透明的区域的形状。
-
为了使用户有更好的使用体验,需要给用户提供拖动这个外观上形状不规则窗体的功能。这需要通过在适当的位置(如窗体可见区域)调用Window的DragMove方法来实现。
-
另一个增加体验的方面,添加一个自定义的关闭按钮,否则用户只能右击任务栏来关闭这个程序(尤其是当ShowInTaskbar="false"时)。
说过了步骤,给出一个完整例子:
首先是最终效果图:
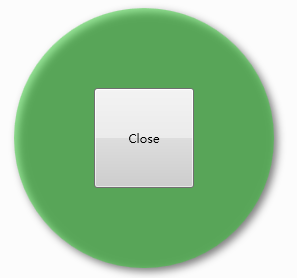
下面是Xaml代码,其中粗体部分对应前文的几个步骤中的要点:
<Window x:Class="GadgetWindow"
  xmlns="http://schemas.microsoft.com/winfx/2006/xaml/presentation"
  xmlns:x="http://schemas.microsoft.com/winfx/2006/xaml"
  Height="300" Width="300"
  AllowsTransparency="True" WindowStyle="None" Background="Transparent"
  MouseLeftButtonDown="Window_MouseLeftButtonDown">
    <Grid>
        <Ellipse Fill="LimeGreen" Opacity="0.5" Margin="20">
            <Ellipse.BitmapEffect>
                <DropShadowBitmapEffect/>
            </Ellipse.BitmapEffect>
        </Ellipse>
        <Button Margin="100" Click="Button_Click">Close</Button>
    </Grid>
</Window>
代码中使用了BitmapEffect增加了阴影效果。下面是C#代码:
public partial class GadgetWindow : Window
{
    public GadgetWindow()
    {
        InitializeComponent();
    }
    void Window_MouseLeftButtonDown(object sender, MouseButtonEventArgs e)
    {
        this.DragMove();
    }
    void Button_Click(object sender, RoutedEventArgs e)
    {
        this.Close();
    }
}
结合XAML中的对MouseLeftButtonDown事件处理的定义,实现了鼠标左键按下时调用Window的拖动逻辑。通过代码也可看出在WPF中实现拖动非常容易,只需调用Window对象的DragMove方法即可。
本文完
参考:
《WPF揭秘》

