

介绍:
在Metro中从Silverlight中保留下来了一些布局控件及一些新增的布局控件。
本节主要讲解从Silverlight中延续下来的布局控件Grid、Canvas及StackPanel,如果你有Silvelright或WPF基础可以跳过本节。
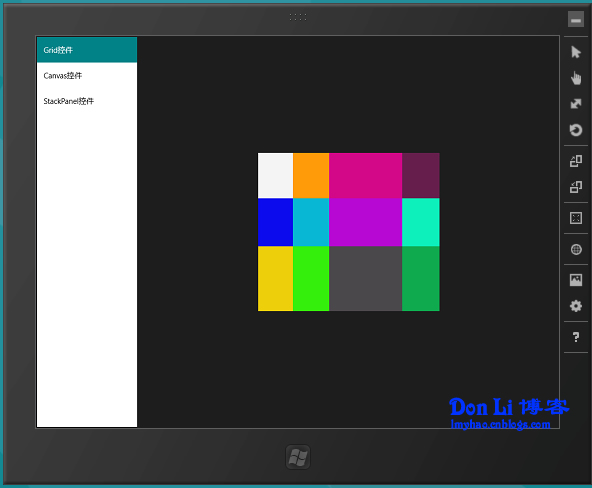
Grid网格布局控件
定义由行和列组成的网格区域。
Grid.xaml
1 <UserControl
2 x:Class="BlankApplication.Grid"
3 xmlns="http://schemas.microsoft.com/winfx/2006/xaml/presentation"
4 xmlns:x="http://schemas.microsoft.com/winfx/2006/xaml"
5 xmlns:local="using:BlankApplication"
6 xmlns:d="http://schemas.microsoft.com/expression/blend/2008"
7 xmlns:mc="http://schemas.openxmlformats.org/markup-compatibility/2006"
8 mc:Ignorable="d"
9 d:DesignHeight="300"
10 d:DesignWidth="400">
11
12 <!--Grid表格布局
13 Grid.RowDefinitions:定义Grid中的行
14 Grid.ColumnDefinitions :定义Grid的列
15
16 -->
17 <Grid HorizontalAlignment="Center" Height="210" VerticalAlignment="Center" Width="305">
18 <Grid.RowDefinitions>
19 <!--定义三行及每行高度-->
20 <RowDefinition Height="30*"/>
21 <RowDefinition Height="32*"/>
22 <RowDefinition Height="43*"/>
23 </Grid.RowDefinitions>
24 <Grid.ColumnDefinitions>
25 <!--定义四列及每列宽度-->
26 <ColumnDefinition Width="58*" />
27 <ColumnDefinition Width="61*"/>
28 <ColumnDefinition Width="123*"/>
29 <ColumnDefinition Width="63*"/>
30 </Grid.ColumnDefinitions>
31 <!--Grid第一列-->
32 <Rectangle Fill="#FFF4F4F5"/>
33 <Rectangle Fill="#FF0B0BEE" Grid.Row="1" />
34 <Rectangle Fill="#FFEECF0B" Grid.Row="2" />
35 <!--Grid第二列-->
36 <Rectangle Fill="#FF34EE0B" Grid.Row="2" Grid.Column="1" />
37 <Rectangle Fill="#FFFF9A09" Grid.Row="0" Grid.Column="1" />
38 <Rectangle Fill="#FF08B7D3" Grid.Row="1" Grid.Column="1" />
39 <!--Grid第三列-->
40 <Rectangle Fill="#FFD30889" Grid.Row="0" Grid.Column="2" />
41 <Rectangle Fill="#FFB708D3" Grid.Row="1" Grid.Column="2" />
42 <Rectangle Fill="#FF4B484B" Grid.Row="2" Grid.Column="2" />
43 <!--Grid第四列-->
44 <Rectangle Fill="#FF661F4D" Grid.Row="0" Grid.Column="3" />
45 <Rectangle Fill="#FF0DF0BC" Grid.Row="1" Grid.Column="3" />
46 <Rectangle Fill="#FF0FAA4E" Grid.Row="2" Grid.Column="3" />
47 </Grid>
48
49 </UserControl>
Canvas画布布局控件
定义一个区域,在该区域中可以使用相对于该区域的坐标显式定位子元素。
canvas.xaml
1 <UserControl
2 x:Class="BlankApplication.Canvas"
3 xmlns="http://schemas.microsoft.com/winfx/2006/xaml/presentation"
4 xmlns:x="http://schemas.microsoft.com/winfx/2006/xaml"
5 xmlns:local="using:BlankApplication"
6 xmlns:d="http://schemas.microsoft.com/expression/blend/2008"
7 xmlns:mc="http://schemas.openxmlformats.org/markup-compatibility/2006"
8 mc:Ignorable="d"
9 d:DesignHeight="300"
10 d:DesignWidth="400">
11
12 <Grid>
13 <Canvas HorizontalAlignment="Center" Height="144" Margin="0" VerticalAlignment="Center" Width="276" Background="#FFAA6C6C">
14 <!--Canvas里子元素通过调整Canvas区域的绝对位置来定位
15 Canvas.Left - 以左上角为原点,Canvas X轴的距离
16 Canvas.Top - 以左上角为原点,Canvas Y轴的距离
17 -->
18 <Ellipse Fill="#FF0B0BC5" Height="51" Canvas.Left="30" Stroke="Black" Canvas.Top="52" Width="53"/>
19 <Rectangle Fill="#FF32FD12" Height="56" Canvas.Left="119" Stroke="Black" Canvas.Top="38" Width="84"/>
20 </Canvas>
21
22 </Grid>23 </UserControl>
StackPanel排列布局控件
将子元素排列成一行(可沿水平或垂直方向)
stackpanel.xaml
1 <UserControl
2 x:Class="BlankApplication.StackPanel"
3 xmlns="http://schemas.microsoft.com/winfx/2006/xaml/presentation"
4 xmlns:x="http://schemas.microsoft.com/winfx/2006/xaml"
5 xmlns:local="using:BlankApplication"
6 xmlns:d="http://schemas.microsoft.com/expression/blend/2008"
7 xmlns:mc="http://schemas.openxmlformats.org/markup-compatibility/2006"
8 mc:Ignorable="d"
9 d:DesignHeight="300"
10 d:DesignWidth="400">
11 <StackPanel>
12 <StackPanel Orientation="Horizontal" x:Name="stackpanel">
13 <Button>ok</Button>
14 <Button>ok</Button>
15 <Button>ok</Button>
16 <Button>ok</Button>
17 <Button>ok</Button>
18 <Button>ok</Button>
19 <Button>ok</Button>
20 <Button>ok</Button>
21 <Button>ok</Button>
22 <Button>ok</Button>
23 <Button>ok</Button>
24 <Button>ok</Button>
25 <Button>ok</Button>
26 <Button>ok</Button>
27 </StackPanel>
28 <Button Width="100" Height="80" Margin="10" Click="Button_Click_1">变换方向</Button>
29 </StackPanel>
30 </UserControl>
stackpanel.xaml.cs
1 using System;
2 using System.Collections.Generic;
3 using System.IO;
4 using System.Linq;
5 using Windows.Foundation;
6 using Windows.Foundation.Collections;
7 using Windows.UI.Xaml;
8 using Windows.UI.Xaml.Controls;
9 using Windows.UI.Xaml.Controls.Primitives;
10 using Windows.UI.Xaml.Data;
11 using Windows.UI.Xaml.Input;
12 using Windows.UI.Xaml.Media;
13 using Windows.UI.Xaml.Navigation;
14
15
16
17 namespace BlankApplication
18 {
19 public sealed partial class StackPanel : UserControl
20 {
21 public StackPanel()
22 {
23 this.InitializeComponent();
24 }
25
26 private void Button_Click_1(object sender, Windows.UI.Xaml.RoutedEventArgs e)
27 {
28 ///更改Stackpanel控件的内部排列方式
29 if(stackpanel.Orientation==Orientation.Horizontal)
30 stackpanel.Orientation = Orientation.Vertical;
31 else
32 stackpanel.Orientation = Orientation.Horizontal;
33 }
34 }
35 }
ok.Demo源码下载

 浙公网安备 33010602011771号