

mybatis学习笔记(六) -- maven+spring+mybatis从零开始搭建整合详细过程(下)
继续 mybatis学习笔记(五) -- maven+spring+mybatis从零开始搭建整合详细过程(上)
五、使用监听器启动Spring容器
1、修改pom.xml文件,添加Spring-web
2、修改web.xml,配置启动Spring容器
3、新建BookServer
4、新建BookServlet
5、修改ApplicationContext.xml
6、测试
继续!!!
五、使用监听器启动Spring容器
1、修改pom.xml,添加Spring-web包(注:上一篇中的pom.xml已经添加)
<!--添加spring-web包 -->
<dependency>
    <groupId>org.springframework</groupId>
    <artifactId>spring-web</artifactId>
    <version>4.1.4.RELEASE</version>
</dependency>
2、修改web.xml文件(src/main/webapp/WEB-INF/web.xml),如果该目录下没有这个文件,则新建一个
<?xml version="1.0" encoding="UTF-8"?>
<web-app xmlns:xsi="http://www.w3.org/2001/XMLSchema-instance" xmlns="http://java.sun.com/xml/ns/javaee" xsi:schemaLocation="http://java.sun.com/xml/ns/javaee http://java.sun.com/xml/ns/javaee/web-app_3_0.xsd" id="WebApp_ID" version="3.0">
  <welcome-file-list>
    <welcome-file>index.jsp</welcome-file>
  </welcome-file-list>
  <listener>
    <description>Spring容器启动监听器</description>
    <listener-class>org.springframework.web.context.ContextLoaderListener</listener-class>
  </listener>
  <context-param>
    <param-name>contextConfigLocation</param-name>
    <param-value>classpath*:ApplicationContext.xml</param-value>
  </context-param>
</web-app>
3、新建一个BookService

package com.lmei.service;

import java.util.List;
import javax.annotation.Resource;
import org.springframework.stereotype.Service;

import com.lmei.dao.BookDaoI;
import com.lmei.entity.Book;

@Service
public class BookService {
    @Resource
    BookDaoI bookDao;
    public List<Book> getAllBook() {
        return bookDao.getAllBook();
    }
}
@Service切记勿漏写,如果没写,运行时会报错“org.springframework.beans.factory.NoSuchBeanDefinitionException: No qualifying bean of type [com.lmei.service.BookService] is defined”
4、新建BookServlet

package com.lmei.action;

import java.io.IOException;
import java.io.PrintWriter;

import javax.servlet.ServletException;
import javax.servlet.annotation.WebServlet;
import javax.servlet.http.HttpServlet;
import javax.servlet.http.HttpServletRequest;
import javax.servlet.http.HttpServletResponse;

import org.springframework.web.context.WebApplicationContext;
import org.springframework.web.context.support.WebApplicationContextUtils;

import com.lmei.service.BookService;

@WebServlet("/BookServlet.do")
public class BookServlet extends HttpServlet {
    private static final long serialVersionUID = 1L;

    BookService bookService;

    @Override
    public void init() throws ServletException {
      //在当前上下文中获得Spring容器
      WebApplicationContext ctx = WebApplicationContextUtils.getWebApplicationContext(getServletContext());
      //从容器中获得bean
      bookService = ctx.getBean(BookService.class);
    }

    protected void doGet(HttpServletRequest request, HttpServletResponse response) throws ServletException, IOException {
        PrintWriter writer = response.getWriter();
        writer.print(bookService.getAllBook().size());
    }

    protected void doPost(HttpServletRequest request, HttpServletResponse response) throws ServletException, IOException {
        doGet(request, response);
    }
}
serialVersionUID作用:序列化时为了保持版本的兼容性,即在版本升级时反序列化仍保持对象的唯一性。
两种生成方式:
一个是默认的1L,比如:private static final long serialVersionUID = 1L;
一个是根据类名、接口名、成员方法及属性等来生成一个64位的哈希字段,比如:private static final long serialVersionUID = xxxxL;
5、修改ApplicationContext.xml,新增配置
    <!--自动扫描映射接口-->
    <bean class="org.mybatis.spring.mapper.MapperScannerConfigurer">
        <!-- 指定sql会话工厂,在上面配置过的 -->
        <property name="sqlSessionFactoryBeanName" value="sqlSessionFactory"></property>
        <!-- 指定基础包,即自动扫描com.lmei.dao这个包下的所有接口类 -->
        <property name="basePackage" value="com.lmei.dao"></property>
    </bean>


    <!--自动扫描组件 -->
    <context:component-scan base-package="com.lmei">
        <context:exclude-filter type="aspectj" expression="com.lmei.dao.*"/>
    </context:component-scan>
    <aop:aspectj-autoproxy proxy-target-class="true"></aop:aspectj-autoproxy>
完整的ApplicationContext.xml
<?xml version="1.0" encoding="UTF-8"?>

<beans xmlns="http://www.springframework.org/schema/beans"
    xmlns:xsi="http://www.w3.org/2001/XMLSchema-instance" xmlns:p="http://www.springframework.org/schema/p"
    xmlns:aop="http://www.springframework.org/schema/aop" xmlns:context="http://www.springframework.org/schema/context"
    xsi:schemaLocation="http://www.springframework.org/schema/beans
        http://www.springframework.org/schema/beans/spring-beans.xsd
        http://www.springframework.org/schema/context
        http://www.springframework.org/schema/context/spring-context-4.3.xsd
        http://www.springframework.org/schema/aop
        http://www.springframework.org/schema/aop/spring-aop-4.3.xsd">

    <!-- 引入db.properties属性文件 -->
    <context:property-placeholder location="classpath:db.properties" />

    <!--定义一个jdbc数据源,创建一个驱动管理数据源的bean -->
    <bean id="jdbcDataSource"
        class="org.springframework.jdbc.datasource.DriverManagerDataSource">
        <property name="driverClassName" value="${jdbc.driver}" />
        <property name="url" value="${jdbc.url}" />
        <property name="username" value="${jdbc.username}" />
        <property name="password" value="${jdbc.password}" />
    </bean>

    <!--创建一个sql会话工厂bean,指定数据源 -->
    <bean id="sqlSessionFactory" class="org.mybatis.spring.SqlSessionFactoryBean">
        <!-- 指定数据源 -->
        <property name="dataSource" ref="jdbcDataSource" />
        <!--类型别名包,默认引入com.lmei.entity下的所有类 -->
        <property name="typeAliasesPackage" value="com.lmei.entity"></property>
        <!--指定sql映射xml文件的路径 -->
        <property name="mapperLocations"
            value="classpath:com/lmei/mapper/*Mapper.xml"></property>
    </bean>

    <!--自动扫描映射接口-->
    <bean class="org.mybatis.spring.mapper.MapperScannerConfigurer">
        <!-- 指定sql会话工厂,在上面配置过的 -->
        <property name="sqlSessionFactoryBeanName" value="sqlSessionFactory"></property>
        <!-- 指定基础包,即自动扫描com.lmei.dao这个包下的所有接口类 -->
        <property name="basePackage" value="com.lmei.dao"></property>
    </bean>

    <!--自动扫描组件 -->
    <context:component-scan base-package="com.lmei">
        <context:exclude-filter type="aspectj" expression="com.lmei.dao.*"/>
    </context:component-scan>
    <aop:aspectj-autoproxy proxy-target-class="true"></aop:aspectj-autoproxy>
</beans>
6、测试
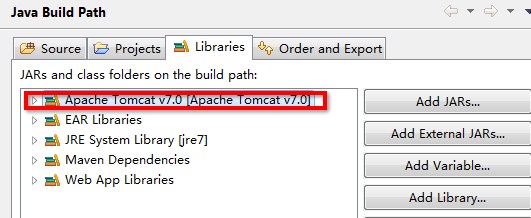
项目右键->Run AS->Run On Server->Tomcat Server at localhost(运行前确认是否已配置Apache Tomcat)
运行成功后,在浏览器输入:http://localhost:8888/spring_mybatis_1/BookServlet.do
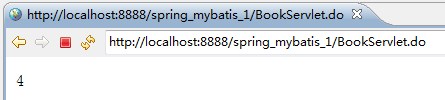
返回 4,表示有4条符合条件的结果。
本篇到此结束!!!
如有兴趣了解Springmvc+spring+mybatis可前往:
springmvc学习总结(二) -- maven+springmvc+spring+mybatis+mysql详细搭建整合过程讲解

 浙公网安备 33010602011771号