OpenCV中的神器Image Watch
Image Watch是在VS2012上使用的一款OpenCV工具,能够实时显示图像和矩阵Mat的内容,跟Matlab很像,方便程序调试,相当好用。跟VS2012配合使用,简直就是一款神器!让我一下就爱上它了!
第一次看到Image Watch是今年3、4月份的时候,当时是在微博上看到新闻,点击链接的下载页面一直出问题,后面就忘了这事,昨天碰巧在OpenCV主页看到OpenCV2.4.5的Change Logs里面有链接,点进能下载果断试用下啊!

闲话少说,先看看部分相关链接。
1、Image Watch 的下载链接。
2、OpenCV关于Image Watch的介绍页面链接。
3、OpenCV2.4.5在线文档关于Image Watch的介绍文档。
4、更详细的信息参见Image Watch的官方网站。
直接上图,有个直观印象。
下面利用一个实际的例子,来说明下Image Watch。
利用二维SURF特征和单映射寻找已知物体。输入两幅图像,一幅是需要寻找的物体图像,另一幅是场景中包含此物体的图像。
SURF特征的特征描述方法封装在SurfFeatureDetector类中,利用成员函数detect函数检测出SURF特征的关键点,保存在vector容器中,再利用SurfDesciptorExtractor类进行特征向量的计算,将之前的vector变量变成矩阵形式保存在Mat中。
利用FLANN特征匹配算法进行匹配,此算法封装在FlannBaseMatcher类中,匹配后保留好的特征匹配点。利用findHomography获取匹配特征点之间的变换,最后利用perspectiveTransform定位到场景图中物体的4个点。
代码如下:
#include <stdio.h>
#include <iostream>
#include <opencv2\core\core.hpp>
#include <opencv2\imgproc\imgproc.hpp>
#include <opencv2\nonfree\features2d.hpp>
#include <opencv2\highgui\highgui.hpp>
#include <opencv2\calib3d\calib3d.hpp>

using namespace cv;

void usage()
{
    std::cout << "Usage: ./FindObjectByFeature <img1> <img2> " << std::endl;
}

int main(int argc, char *argv[])
{
    if(argc != 3)
    {
        usage();
        return -1;
    }

    Mat img_object = imread(argv[1], CV_LOAD_IMAGE_COLOR);
    Mat img_scene = imread(argv[2], CV_LOAD_IMAGE_COLOR);

    if(!img_object.data || !img_scene.data)
    {
        std::cout << "Error reading images!" << std::endl;
        return -1;
    }

    //step1:检测SURF特征点/////////////////////////////////////////////////////////////////
    int minHeassian = 400;
    SurfFeatureDetector detector(minHeassian);

    std::vector<KeyPoint> keypoints_object, keypoints_scene;

    detector.detect(img_object, keypoints_object);
    detector.detect(img_scene, keypoints_scene);

    //step2:计算特征向量///////////////////////////////////////////////////////////////////
    SurfDescriptorExtractor extractor;

    Mat descriptors_object, descriptors_scene;

    extractor.compute(img_object, keypoints_object, descriptors_object);
    extractor.compute(img_scene, keypoints_scene, descriptors_scene);

    //step3:利用FLANN匹配算法匹配特征描述向量//////////////////////////////////////////////
    FlannBasedMatcher matcher;
    std::vector<DMatch> matches;
    matcher.match( descriptors_object, descriptors_scene, matches);

    double max_dist = 0; double min_dist = 100;

    //快速计算特征点之间的最大和最小距离///////////////////////////////////////////////////
    for(int i = 0; i < descriptors_object.rows; i++)
    {
        double dist = matches[i].distance;
        if(dist < min_dist) min_dist = dist;
        if(dist > max_dist) max_dist = dist;
    }

    printf("---Max dist: %f \n", max_dist);
    printf("---Min dist: %f \n", min_dist);

    //只画出好的匹配点(匹配特征点之间距离小于3*min_dist)//////////////////////////////////
    std::vector<DMatch> good_matches;

    for(int i = 0; i < descriptors_object.rows; i++)
    {
        if(matches[i].distance < 3*min_dist)
            good_matches.push_back(matches[i]);
    }

    Mat img_matches;
    drawMatches(img_object, keypoints_object, img_scene, keypoints_scene,
        good_matches, img_matches, Scalar::all(-1), Scalar::all(-1),
        vector<char>(), DrawMatchesFlags::NOT_DRAW_SINGLE_POINTS);

    //定位物体////////////////////////////////////////////////////////////////////////////
    std::vector<Point2f> obj;
    std::vector<Point2f> scene;

    for(int i = 0; i < good_matches.size(); i++)
    {
        //从好的匹配中获取特征点/////////////////////////////////////
        obj.push_back(keypoints_object[good_matches[i].queryIdx].pt);
        scene.push_back(keypoints_scene[good_matches[i].trainIdx].pt);
    }

    //找出匹配特征点之间的变换///////////////////
    Mat H = findHomography(obj, scene, CV_RANSAC);

    //得到image_1的角点(需要寻找的物体)//////////
    std::vector<Point2f> obj_corners(4);
    obj_corners[0] = cvPoint(0,0);
    obj_corners[1] = cvPoint(img_object.cols, 0);
    obj_corners[2] = cvPoint(img_object.cols, img_object.rows);
    obj_corners[3] = cvPoint(0, img_object.rows);
    std::vector<Point2f> scene_corners(4);

    //匹配四个角点/////////////////////////////////////
    perspectiveTransform(obj_corners, scene_corners, H);

    //画出匹配的物体///////////////////////////////////////////////////////////////////////
    line(img_matches, scene_corners[0] + Point2f(img_object.cols, 0), scene_corners[1] + Point2f(img_object.cols, 0), Scalar(0,255,0), 4);
    line(img_matches, scene_corners[1] + Point2f(img_object.cols, 0), scene_corners[2] + Point2f(img_object.cols, 0), Scalar(0,255,0), 4);
    line(img_matches, scene_corners[2] + Point2f(img_object.cols, 0), scene_corners[3] + Point2f(img_object.cols, 0), Scalar(0,255,0), 4);
    line(img_matches, scene_corners[3] + Point2f(img_object.cols, 0), scene_corners[0] + Point2f(img_object.cols, 0), Scalar(0,255,0), 4);

    imshow("Good Matches & Object detection", img_matches);

    waitKey(0);
    return 0;
}
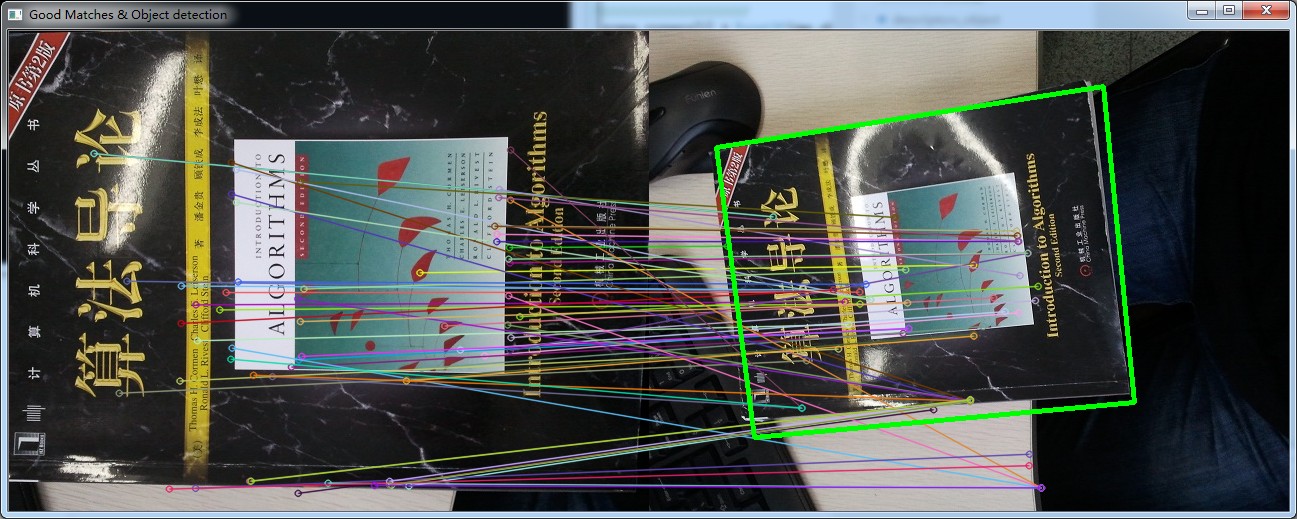
匹配结果图如下(下图中左边子图为待寻找的物体图像,右边子图场景中寻找到的物体图像):
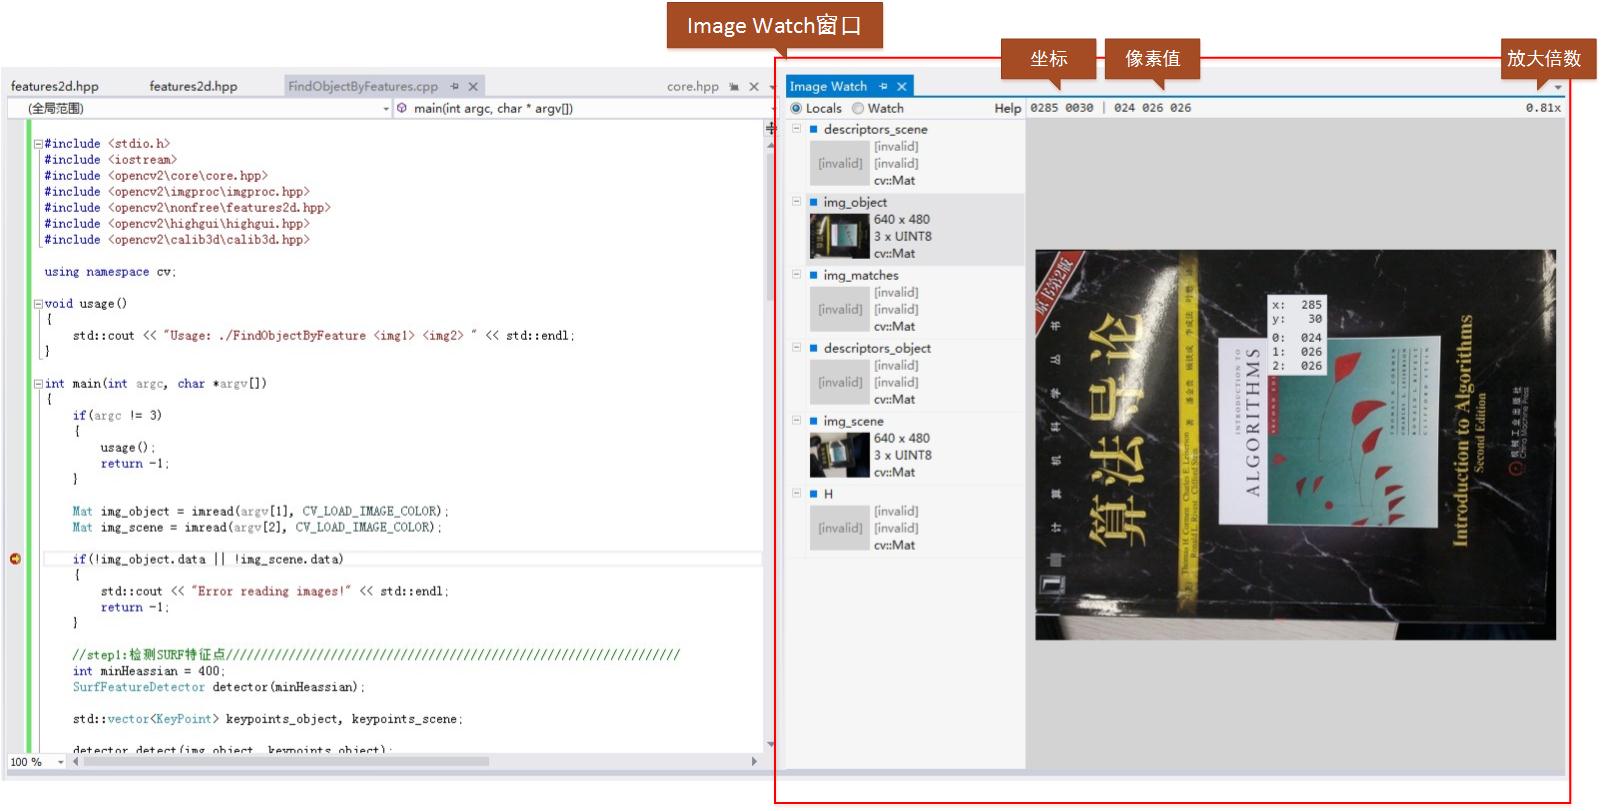
在Debug模式下,如果我们在程序某处设置调试断点,当程序运行到断点处时,可以在Image Watch窗口(View->Other Windows->Image Watch)查看已经分配内存的Mat图像。
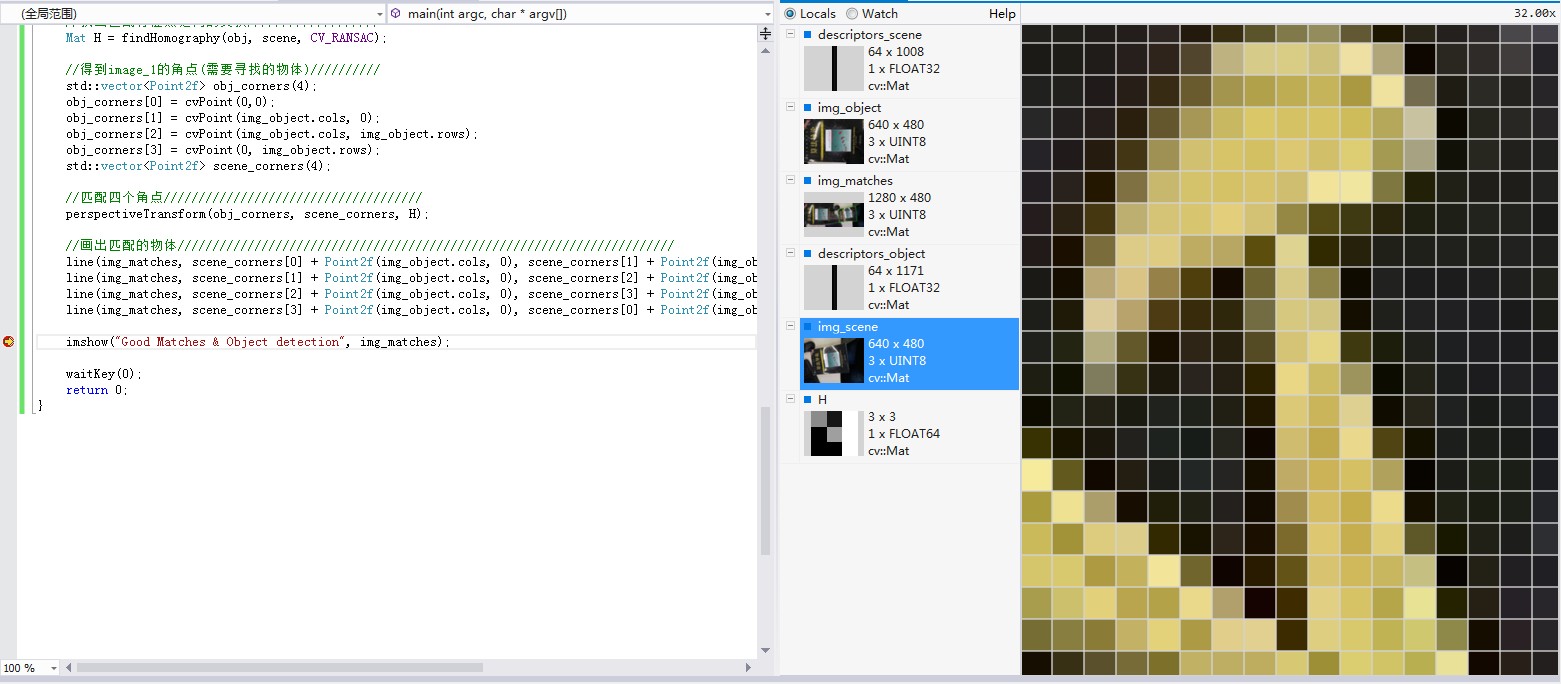
还在将鼠标放置在所选图像上进行放大,最大能放大到像素级别。如下图所示:
在这个例子中,再稍微多说一点编译工程时我遇到的问题。
1、如果用的是OpenCV2.4以后版本,在程序include中包含:#include <opencv2/features2d/features2d.hpp>,可能会出现SurfFeatureDetector无法解析的情况。
这是因为OpenCV2.4后,SurfFeatureDetector类移到了opencv2/nonfree/features2d.hpp,而不是opencv2/features2d/features2d.hpp。因此需要把#include<opencv2/features2d/features2d.hpp>改为
#include <opencv2/nonfree/features2d.hpp>,另外还需要把opencv_nonfree245d.lib库文件链接进去。
2、另外,对于工程中有两个以上OpenCV版本的情况,加入#include <opencv2/nonfree/features2d.hpp>后编译又可能出现重定义的情况。开始我一直没搞清楚原因,后来在stackoverflow查了下。原因如下:
Your compiler and editor are confused by the two OpenCV versions installed on your system.

First, make sure that all the settings ( include paths in Visual Studio, lib path in Visual studio linker settings and bin path -probably an environment variable) point to the same version.

Next, make sure to include all the needed headers. In OpenCV 2.4 and above, SURF and SIFT have been moved to nonfree module, so you also have to install it. Do not forget that some functions may be moved to legacy.

And if you uninstall one version of OpenCV, the editor (which doesn't have all the parsing capabilities of the compiler) will not be confused anymore.
也就是说如果VS中安装了两个以上的OpenCV版本,VS可能会搞混,把include的地址解析到了两个不同OpenCV目录下的头文件,因此引起重定义。
于是在VS中把include目录下的OpenCV2.3.1的头文件地址删除,问题解决。
看来程序员真的应该多上下stackoverflow,能学到很多知识。

 浙公网安备 33010602011771号