Yii 框架学习:如何复制一个Ruby on Rails。
早上在ruby-china发了个帖子,询问“现今PHP的框架中最接近RAILS的是什么?”大部分答曰"Yii”。所以晚上回来就来学下这个框架看看。
Yii 是一个基于组件、纯OOP的、用于开发大型 Web 应用的高性能 PHP 框架。
下载回来的软件包解压后结构如下:
- CHANGELOG, LICENSE, README, and UPGRADE text documents
- demos folder
- framework folder
- requirements folder
第一部分为更新文档、许可(BSD许可,可以自由商用),升级文档以及README。
demos中有四个示例:a blog, the game Hangman, a basic “Hello, World!”, and a phone book。
framework 中是使用Yii必须的框架,核心部分。
requirements 主要是检查运行环境用的工具,另外还有一些小东西。
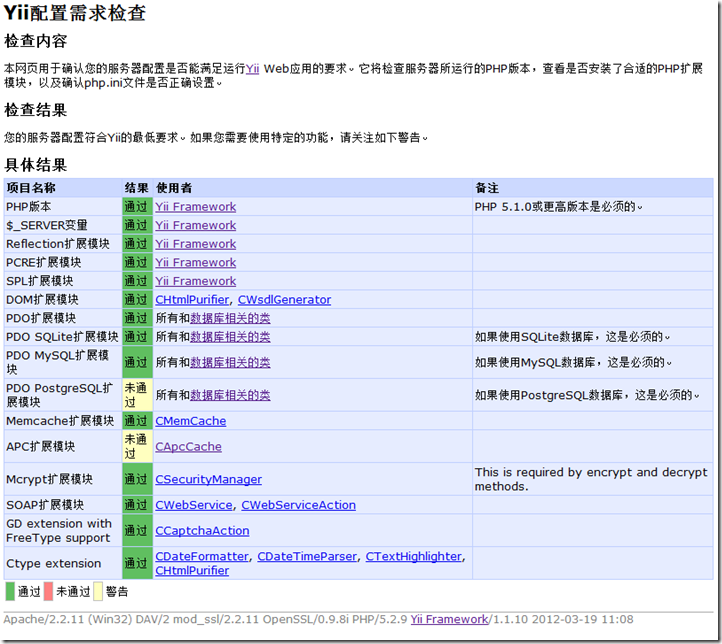
在WEB根目录下,建立yii的文件夹,放入framework 和requirements ,然后打开浏览器访问 http://localhost/yii/requirements,可以看到:
这是一个运行环境检查的程序,检查通过后就可以删掉requirements 了。
接着往下看:
YII带了一个类似于rails的命令行生成器:yiic 。通过这个生成器可以帮助我们快速生成网站架构和MVC相关的文件!
好吧,这一条命令就是rails new 以及 rails g等等的衍生品。
1: E:\xampp\htdocs\yii\framework>yiic
2: Yii command runner (based on Yii v1.1.10)
3: Usage: E:\xampp\htdocs\yii\framework\yiic <command-name> [parameters...]
4:
5: The following commands are available:
6: - message
7: - migrate
8: - shell
9: - webapp
10:
11: To see individual command help, use the following:
12: E:\xampp\htdocs\yii\framework\yiic help <command-name>
创建我的第一个APP--运行:
D:\xampp\htdocs>d:\xampp\php\php.exe d:\xampp\htdocs\framework\yiic webapp myblog
生成初始化的目录结构:
1: css/ 包含 CSS 文件
2: images/ 包含图片文件
3: themes/ 包含应用主题
4: protected/ 包含受保护的应用文件
5: yiic yiic 命令行脚本
6: yiic.bat Windows 下的 yiic 命令行脚本
7: yiic.php yiic 命令行 PHP 脚本
8: commands/ 包含自定义的 'yiic' 命令
9: shell/ 包含自定义的 'yiic shell' 命令
10: components/ 包含可重用的用户组件
11: Controller.php 所有控制器类的基础类
12: Identity.php 用来认证的 'Identity' 类
13: config/ 包含配置文件
14: console.php 控制台应用配置
15: main.php Web 应用配置
16: test.php 功能测试使用的配置
17: controllers/ 包含控制器的类文件
18: SiteController.php 默认控制器的类文件
19: data/ 包含示例数据库
20: schema.mysql.sql 示例 MySQL 数据库
21: schema.sqlite.sql 示例 SQLite 数据库
22: testdrive.db 示例 SQLite 数据库文件
23: extensions/ 包含第三方扩展
24: messages/ 包含翻译过的消息
25: models/ 包含模型的类文件
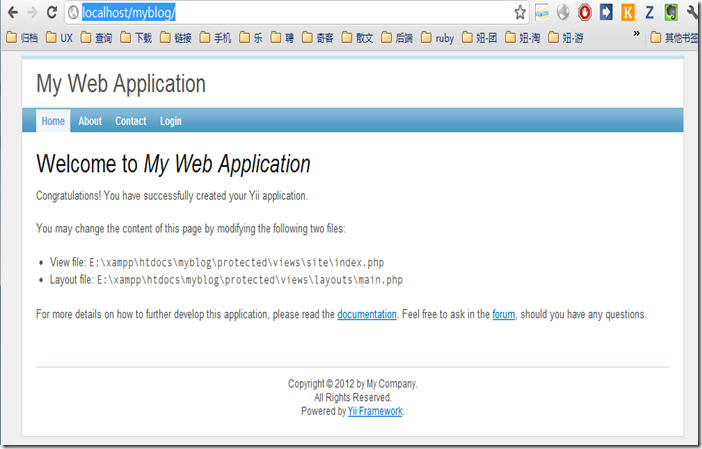
接下来就可以浏览了:
应用设置文件在这里:protected/config/main.php
1: <?php
2:
3: // uncomment the following to define a path alias
4: // Yii::setPathOfAlias('local','path/to/local-folder');
5:
6: // This is the main Web application configuration. Any writable
7: // CWebApplication properties can be configured here.
8: return array(
9: 'basePath'=>dirname(__FILE__).DIRECTORY_SEPARATOR.'..',
10: 'name'=>'My Web Application',
11:
12: // preloading 'log' component
13: 'preload'=>array('log'),
14:
15: // autoloading model and component classes
16: 'import'=>array(
17: 'application.models.*',
18: 'application.components.*',
19: ),
20:
21: 'modules'=>array(
22: // uncomment the following to enable the Gii tool
23: /*
24: 'gii'=>array(
25: 'class'=>'system.gii.GiiModule',
26: 'password'=>'Enter Your Password Here',
27: // If removed, Gii defaults to localhost only. Edit carefully to taste.
28: 'ipFilters'=>array('127.0.0.1','::1'),
29: ),
30: */
31: ),
32:
33: // application components
34: 'components'=>array(
35: 'user'=>array(
36: // enable cookie-based authentication
37: 'allowAutoLogin'=>true,
38: ),
39: // uncomment the following to enable URLs in path-format
40: /*
41: 'urlManager'=>array(
42: 'urlFormat'=>'path',
43: 'rules'=>array(
44: '<controller:\w+>/<id:\d+>'=>'<controller>/view',
45: '<controller:\w+>/<action:\w+>/<id:\d+>'=>'<controller>/<action>',
46: '<controller:\w+>/<action:\w+>'=>'<controller>/<action>',
47: ),
48: ),
49: */
50: 'db'=>array(
51: 'connectionString' => 'sqlite:'.dirname(__FILE__).'/../data/testdrive.db',
52: ),
53: // uncomment the following to use a MySQL database
54: /*
55: 'db'=>array(
56: 'connectionString' => 'mysql:host=localhost;dbname=testdrive',
57: 'emulatePrepare' => true,
58: 'username' => 'root',
59: 'password' => '',
60: 'charset' => 'utf8',
61: ),
62: */
63: 'errorHandler'=>array(
64: // use 'site/error' action to display errors
65: 'errorAction'=>'site/error',
66: ),
67: 'log'=>array(
68: 'class'=>'CLogRouter',
69: 'routes'=>array(
70: array(
71: 'class'=>'CFileLogRoute',
72: 'levels'=>'error, warning',
73: ),
74: // uncomment the following to show log messages on web pages
75: /*
76: array(
77: 'class'=>'CWebLogRoute',
78: ),
79: */
80: ),
81: ),
82: ),
83:
84: // application-level parameters that can be accessed
85: // using Yii::app()->params['paramName']
86: 'params'=>array(
87: // this is used in contact page
88: 'adminEmail'=>'webmaster@example.com',
89: ),
90: );
这里可以修改数据库
'db'=>array(
'connectionString' => 'sqlite:'.dirname(__FILE__).'/../data/testdrive.db',
),
默认使用了sqlite,改成mysql 如下:
'db'=>array(
'connectionString'=>'mysql:host=localhost;dbname=webapp,
'username'=>'root',
'password'=>'toor',
),
不得不说PHP的语法真丑,
工作流程描述如下:
1. 用户请求此 URL http://www.example.com/blog/index.php?r=site/contact;
2. 入口脚本 被网站服务器执行以处理此请求;
3. 一个 应用 的实例被创建,其配置参数为/wwwroot/blog/protected/config/main.php 应用配置文件中
指定的初始值;
4. 应用分派此请求到一个 控制器(Controller) 和一个 控制器动作(Controller action)。对于联系
页(Contact)的请求,它分派到了 site 控制器和 contact 动作 ( 即 /wwwroot/blog/protected/
controllers/SiteController.php 中的 actionContact 方法);
5. 应用按 SiteController 实例创建了 site 控制器并执行;
6. SiteController 实例通过调用它的 actionContact() 方法执行 contact 动作;
7. actionContact 方法为用户䘦染一个名为 contact 的 视图(View) 。在程序内部,这是通过包含一
个视图文件 /wwwroot/blog/protected/views/site/contact.php 并将结果插入 布局 文件 /wwwroot/
blog/protected/views/layouts/column1.php 实现的。
配置Gii (Gii 自版本 1.1.2 可用)
为了使用 Gii,首先需要编辑文件 WebRoot/testdrive/protected/main.php,取消关于gii的注释部分:
1: 'gii'=>array(
2: 'class'=>'system.gii.GiiModule',
3: 'password'=>'test123',
4: // If removed, Gii defaults to localhost only. Edit carefully to taste.
5: 'ipFilters'=>array('127.0.0.1','::1'),
6: ),
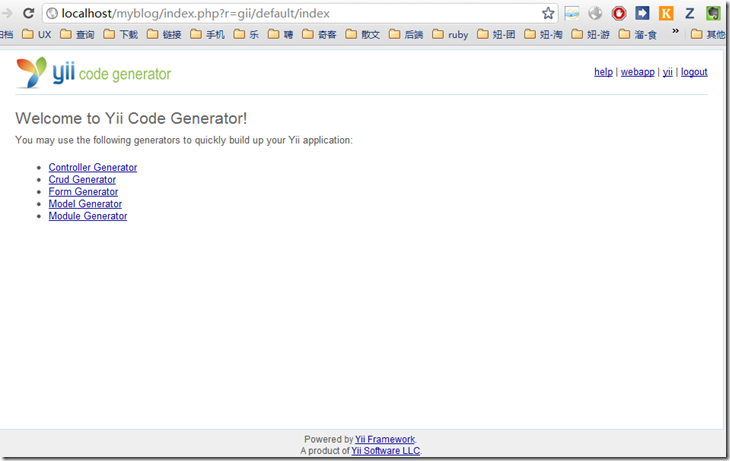
然后,访问 URL http://localhost/myblog/index.php?r=gii 密码为上面这里配置的密码 test123。验证通过后可以看到:
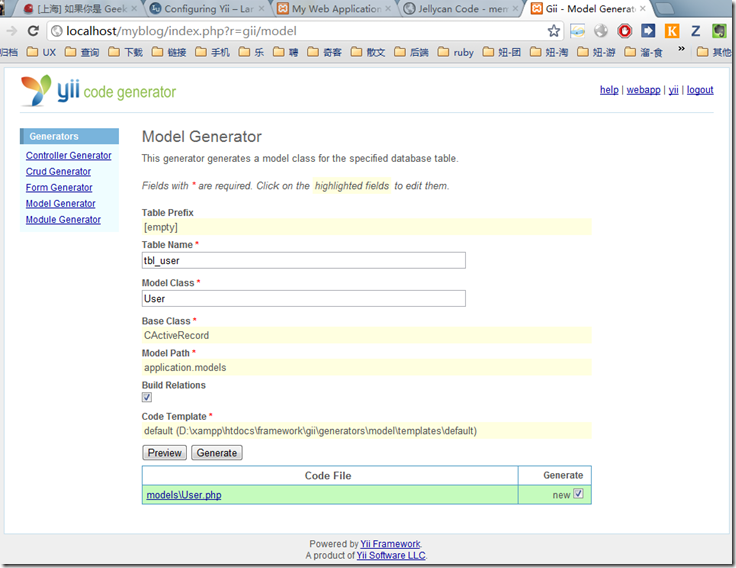
创建一个model:
这里的tbl_user表是应用默认初始建立的用户表。
Generating code using template "D:\xampp\htdocs\framework\gii\generators\model\templates\default"...
 generated models\User.php
done!
相关代码(D:\xampp\htdocs\myblog\protected\models\User.php)如下:
1: <?php
2:
3: /**
4: * This is the model class for table "tbl_user".
5: *
6: * The followings are the available columns in table 'tbl_user':
7: * @property integer $id
8: * @property string $username
9: * @property string $password
10: * @property string $email
11: */
12: class User extends CActiveRecord
13: {
14: /**
15: * Returns the static model of the specified AR class.
16: * @param string $className active record class name.
17: * @return User the static model class
18: */
19: public static function model($className=__CLASS__)
20: {
21: return parent::model($className);
22: }
23:
24: /**
25: * @return string the associated database table name
26: */
27: public function tableName()
28: {
29: return 'tbl_user';
30: }
31:
32: /**
33: * @return array validation rules for model attributes.
34: */
35: public function rules()
36: {
37: // NOTE: you should only define rules for those attributes that
38: // will receive user inputs.
39: return array(
40: array('username, password, email', 'required'),
41: array('username, password, email', 'length', 'max'=>128),
42: // The following rule is used by search().
43: // Please remove those attributes that should not be searched.
44: array('id, username, password, email', 'safe', 'on'=>'search'),
45: );
46: }
47:
48: /**
49: * @return array relational rules.
50: */
51: public function relations()
52: {
53: // NOTE: you may need to adjust the relation name and the related
54: // class name for the relations automatically generated below.
55: return array(
56: );
57: }
58:
59: /**
60: * @return array customized attribute labels (name=>label)
61: */
62: public function attributeLabels()
63: {
64: return array(
65: 'id' => 'ID',
66: 'username' => 'Username',
67: 'password' => 'Password',
68: 'email' => 'Email',
69: );
70: }
71:
72: /**
73: * Retrieves a list of models based on the current search/filter conditions.
74: * @return CActiveDataProvider the data provider that can return the models based on the search/filter conditions.
75: */
76: public function search()
77: {
78: // Warning: Please modify the following code to remove attributes that
79: // should not be searched.
80:
81: $criteria=new CDbCriteria;
82:
83: $criteria->compare('id',$this->id);
84: $criteria->compare('username',$this->username,true);
85: $criteria->compare('password',$this->password,true);
86: $criteria->compare('email',$this->email,true);
87:
88: return new CActiveDataProvider($this, array(
89: 'criteria'=>$criteria,
90: ));
91: }
92: }
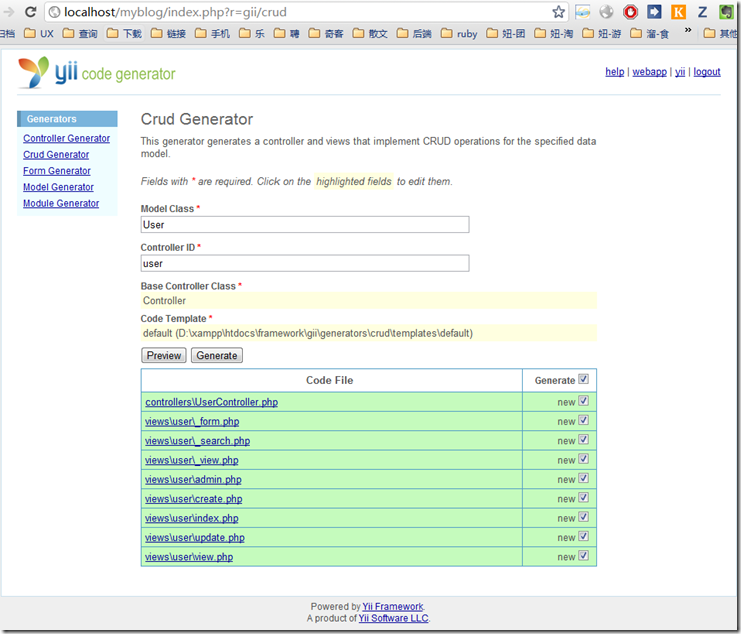
生成 CRUD 代码
Generating code using template "D:\xampp\htdocs\framework\gii\generators\crud\templates\default"...
 generated controllers\UserController.php
 generated views\user\_form.php
 generated views\user\_search.php
 generated views\user\_view.php
 generated views\user\admin.php
 generated views\user\create.php
 generated views\user\index.php
 generated views\user\update.php
 generated views\user\view.php
done!
这里生成了一个control 和 8个view。
control 代码:
1: <?php
2:
3: class UserController extends Controller
4: {
5: /**
6: * @var string the default layout for the views. Defaults to '//layouts/column2', meaning
7: * using two-column layout. See 'protected/views/layouts/column2.php'.
8: */
9: public $layout='//layouts/column2';
10:
11: /**
12: * @return array action filters
13: */
14: public function filters()
15: {
16: return array(
17: 'accessControl', // perform access control for CRUD operations
18: );
19: }
20:
21: /**
22: * Specifies the access control rules.
23: * This method is used by the 'accessControl' filter.
24: * @return array access control rules
25: */
26: public function accessRules()
27: {
28: return array(
29: array('allow', // allow all users to perform 'index' and 'view' actions
30: 'actions'=>array('index','view'),
31: 'users'=>array('*'),
32: ),
33: array('allow', // allow authenticated user to perform 'create' and 'update' actions
34: 'actions'=>array('create','update'),
35: 'users'=>array('@'),
36: ),
37: array('allow', // allow admin user to perform 'admin' and 'delete' actions
38: 'actions'=>array('admin','delete'),
39: 'users'=>array('admin'),
40: ),
41: array('deny', // deny all users
42: 'users'=>array('*'),
43: ),
44: );
45: }
46:
47: /**
48: * Displays a particular model.
49: * @param integer $id the ID of the model to be displayed
50: */
51: public function actionView($id)
52: {
53: $this->render('view',array(
54: 'model'=>$this->loadModel($id),
55: ));
56: }
57:
58: /**
59: * Creates a new model.
60: * If creation is successful, the browser will be redirected to the 'view' page.
61: */
62: public function actionCreate()
63: {
64: $model=new User;
65:
66: // Uncomment the following line if AJAX validation is needed
67: // $this->performAjaxValidation($model);
68:
69: if(isset($_POST['User']))
70: {
71: $model->attributes=$_POST['User'];
72: if($model->save())
73: $this->redirect(array('view','id'=>$model->id));
74: }
75:
76: $this->render('create',array(
77: 'model'=>$model,
78: ));
79: }
80:
81: /**
82: * Updates a particular model.
83: * If update is successful, the browser will be redirected to the 'view' page.
84: * @param integer $id the ID of the model to be updated
85: */
86: public function actionUpdate($id)
87: {
88: $model=$this->loadModel($id);
89:
90: // Uncomment the following line if AJAX validation is needed
91: // $this->performAjaxValidation($model);
92:
93: if(isset($_POST['User']))
94: {
95: $model->attributes=$_POST['User'];
96: if($model->save())
97: $this->redirect(array('view','id'=>$model->id));
98: }
99:
100: $this->render('update',array(
101: 'model'=>$model,
102: ));
103: }
104:
105: /**
106: * Deletes a particular model.
107: * If deletion is successful, the browser will be redirected to the 'admin' page.
108: * @param integer $id the ID of the model to be deleted
109: */
110: public function actionDelete($id)
111: {
112: if(Yii::app()->request->isPostRequest)
113: {
114: // we only allow deletion via POST request
115: $this->loadModel($id)->delete();
116:
117: // if AJAX request (triggered by deletion via admin grid view), we should not redirect the browser
118: if(!isset($_GET['ajax']))
119: $this->redirect(isset($_POST['returnUrl']) ? $_POST['returnUrl'] : array('admin'));
120: }
121: else
122: throw new CHttpException(400,'Invalid request. Please do not repeat this request again.');
123: }
124:
125: /**
126: * Lists all models.
127: */
128: public function actionIndex()
129: {
130: $dataProvider=new CActiveDataProvider('User');
131: $this->render('index',array(
132: 'dataProvider'=>$dataProvider,
133: ));
134: }
135:
136: /**
137: * Manages all models.
138: */
139: public function actionAdmin()
140: {
141: $model=new User('search');
142: $model->unsetAttributes(); // clear any default values
143: if(isset($_GET['User']))
144: $model->attributes=$_GET['User'];
145:
146: $this->render('admin',array(
147: 'model'=>$model,
148: ));
149: }
150:
151: /**
152: * Returns the data model based on the primary key given in the GET variable.
153: * If the data model is not found, an HTTP exception will be raised.
154: * @param integer the ID of the model to be loaded
155: */
156: public function loadModel($id)
157: {
158: $model=User::model()->findByPk($id);
159: if($model===null)
160: throw new CHttpException(404,'The requested page does not exist.');
161: return $model;
162: }
163:
164: /**
165: * Performs the AJAX validation.
166: * @param CModel the model to be validated
167: */
168: protected function performAjaxValidation($model)
169: {
170: if(isset($_POST['ajax']) && $_POST['ajax']==='user-form')
171: {
172: echo CActiveForm::validate($model);
173: Yii::app()->end();
174: }
175: }
176: }
177:
VIEW: update.php的代码,
1: <?php
2: $this->breadcrumbs=array(
3: 'Users'=>array('index'),
4: $model->id=>array('view','id'=>$model->id),
5: 'Update',
6: );
7:
8: $this->menu=array(
9: array('label'=>'List User', 'url'=>array('index')),
10: array('label'=>'Create User', 'url'=>array('create')),
11: array('label'=>'View User', 'url'=>array('view', 'id'=>$model->id)),
12: array('label'=>'Manage User', 'url'=>array('admin')),
13: );
14: ?>
15:
16: <h1>Update User <?php echo $model->id; ?></h1>
17:
18: <?php echo $this->renderPartial('_form', array('model'=>$model)); ?>
代码结构跟Rails惊人相似,而且连view都分离出了一个_form.php来给create.php和update.php复用。Rails的dry的理念已经贯穿了Yii。
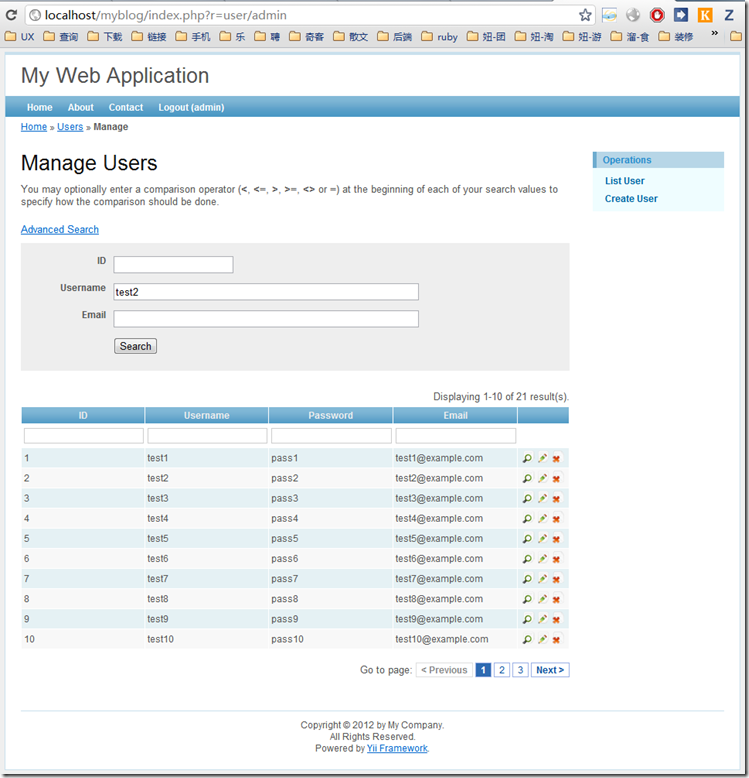
可以访问了:http://localhost/myblog/index.php?r=User
自动实现了CRUD的所有代码,并且还带search功能。还是很方便的,很节约人力的!
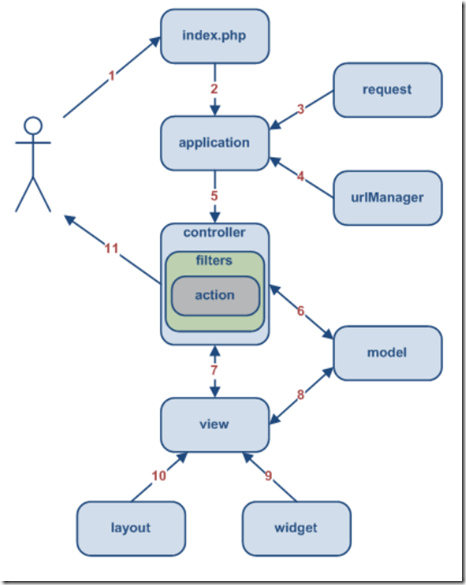
Yii 应用的典型流程
1. 用户访问 http://www.example.com/index.php?r=post/show&id=1
Web 服务器执行入口脚本index.php 来处理该请求。
2. 入口脚本建立一个应用实例并运行之。
3. 应用从一个叫 request 的应用组件获得详细的用户请求信息。
4. 在名为 urlManager 的应用组件的帮助下,应用确定用户要请求的控制器和动作。
5. 应用建立一个被请求的控制器实例来进一步处理用户请求,控制器确定由它的actionShow 方法来处理 show 动作。然后它建立并应用和该动作相关的过滤器(比如访问控制和性能测试的准备工作),如果过滤器允许的话,动作被执行。
6. 动作从数据库读取一个 ID 为 1 的 Post 模型。
7. 动作使用 Post 模型来渲染一个叫 show 的视图。
8. 视图读取 Post 模型的属性并显示之。
9. 视图运行一些widget。
10. 视图的渲染结果嵌在布局中。
11. 动作结束视图渲染并显示结果给用户。
应用的核心组件
Yii预定义了一套核心应用组件提供Web应用程序的常见功能。例如,request组件用于解析用户请求和提供信息,如网址,cookie。在几乎每一个方面,通过配置这些核心组件的属性,我们都可以更改Yii的默认行为。
下面我们列出CWebApplication预先声明的核心组件。
assetManager: CAssetManager -管理发布私有asset文件。
authManager: CAuthManager - 管理基于角色控制 (RBAC)。
cache: CCache - 提供数据缓存功能。请注意,您必须指定实际的类(例如CMemCache, CDbCache ) 。否则,将返回空当访问此元件。
clientScript: CClientScript -管理客户端脚本(javascripts and CSS)。
coreMessages: CPhpMessageSource -提供翻译Yii框架使用的核心消息。
db: CDbConnection - 提供数据库连接。请注意,你必须配置它的connectionString属性才能使用此元件。
errorHandler: CErrorHandler - 处理没有捕获的PHP错误和例外。
format: CFormatter - 为显示目的格式化数据值。已自版本 1.1.0 可用。
messages: CPhpMessageSource - 提供翻译Yii应用程序使用的消息。
request: CHttpRequest - 提供和用户请求相关的信息。
securityManager: CSecurityManager -提供安全相关的服务,例如散列(hashing), 加密(encryption)。
session: CHttpSession - 提供会话(session)相关功能。
statePersister: CStatePersister -提供全局持久方法(global state persistence method)。
urlManager: CUrlManager - 提供网址解析和某些函数。
user: CWebUser - 代表当前用户的身份信息。
themeManager: CThemeManager - 管理主题(themes)。
路由
控制器和actions通过ID标识的。控制器ID的格式: path/to/xyz对应的类文件protected/controllers/path/to/XyzController.php, 相应的 xyz应该用实际的控制器名替换 (例如 post对应 protected/controllers/PostController.php). Action ID 与 action 前辍构成 action method。例如,控制器类包含一个 actionEdit 方法, 对应的 action ID就是 edit。
用户请求一个特定的 controller 和 action 用术语即为 route. 一个 route 由一个 controller ID 和一个 action ID 连结而成,二者中间以斜线分隔. 例如, route post/edit 引用的是 PostController 和它的 edit action. 默认情况下, URLhttp://hostname/index.php?r=post/edit 将请求此 controller 和 action.
注意: 默认地, route 是大小写敏感的. 从版本 1.0.1 开始, 可以让其大小写不敏感,通过在应用配置中设置CUrlManager::caseSensitive 为 false . 当在大小写不敏感模式下, 确保你遵照约定:包含 controller 类文件的目录是小写的, controller map 和 action map 都使用小写的 keys.
自版本 1.0.3, 一个应用可以包含 模块. 一个 module 中的 controller 的 route 格式是 moduleID/controllerID/actionID.
使用 Form Builder
当创建 HTML 表单时,经常我们发现我们在写很多重复而且在不同项目中很难重用的视图代码。例如,对于每个输入框,
我们需要以一个文本标签和显示可能的验证错误来关联它。为了改善这些代码的重用性,我们可以使用自版本 1.1.0 可
用的 form builder 特征。
Yii form builder 使用一个 CForm 对象来呈现一个 HTML 表单,包括此表单关联哪些数据模型,在此表单中有哪些种
输入框, 以及如何渲染整个表单。开发者主要需要创建和配置此 CForm 对象,然后调用它的渲染方法来显示此表单。
表单输入的规格被组织为一个分层的表单元素。在分层的根部,它是 CForm 对象。根表单对象维护着它的 children 为
两个集合: CForm::buttons 和 CForm::elements。 前者包含按钮元素(例如提交按钮,重设按钮),而后者包含输入元素,
静态文本和子表单。 子表单是一个包含在另外一个表单 CForm::elements 中的 CForm 对象。它可以有自己的数据模型,
CForm::buttons 和 CForm::elements 集合。
当用户提交一个表单,整个表单输入框中填写的值被提交,包含属于子表单的输入框。CForm提供了方便的方法,可以
自动赋值输入数据到相应的模型属性并执行数据验证。
声明关联
在使用AR进行关联查询之前,我们需要让 AR 知道它和其他 AR 之间有怎样的关联。
AR类之间的关联直接反映着数据库中这个类所代表的数据表之间的关联。 从数据库的角度来说,两个数据表A,B之
间可能的关联有三种:一对多(例如tbl_user 和tbl_post),一对一(例如tbl_user 和tbl_profile),多对多(例如tbl_category
和tbl_post)。而在AR中,关联有以下四种:
BELONGS_TO: 如果数据表A和B的关系是一对多,那我们就说B属于A, 例如Post属于User。
HAS_MANY: 如果数据表A和B的关系是一对多,那我们就说A有多个B, 例如User有多个Post。
HAS_ONE: 这是„HAS_MANY‟关系中的一个特例,当A最多有一个B,例如一个User最多只有一个Profile
MANY_MANY: 这个相当于关系数据库中的多对多关系。因为绝大多数关系数据库并不直接 支持多对多的关系,
这时通常都需要一个单独的关联表,把多对多的关系分解为两个一对多的关系。 在我们的例子中,
tbl_post_category就是这个用作关联的表。用AR的术语,我们可以将 MANY_MANY解释为BELONGS_TO和
HAS_MANY的结合。例如Post属于多个Category并且 Category有多个Post。
在AR中声明关联,是通过覆盖(Override)父类CActiveRecord中的 relations() 方法来实现的。这个方法返回一个包
含了关系定义的数组,数组中的每一组键值代表一个关联:
'VarName'=>array('RelationType', 'ClassName', 'ForeignKey', ...additional options)
这里的VarName是这个关联的名称;RelationType指定了这个关联的类型,可以是下面四个常量之一:
self::BELONGS_TO,self::HAS_ONE,self::HAS_MANY和self::MANY_MANY; ClassName是这个关系关联
到的AR类的类名;ForeignKey指定了这个关联是通过哪个外键联系起来的。 后面的additional options可以
加入一些额外的设置,后面会做介绍。
下面的代码演示了如何定义User和Post之间的关联。
1: class Post extends CActiveRecord
2: {
3: public function relations()
4: { return array(
5: 'author'=>array(self::BELONGS_TO, 'User', 'author_id'),
6: 'categories'=>array(self::MANY_MANY, 'Category',
7: 'tbl_post_category(post_id, category_id)'),
8: );
9: }
10: }
11:
12: class User extends CActiveRecord
13: {
14: public function relations()
15: { return array(
16: 'posts'=>array(self::HAS_MANY, 'Post', 'author_id'),
17: 'profile'=>array(self::HAS_ONE, 'Profile', 'owner_id'),
18: );
19: }
20: }
开发流程
1. 创建目录结构。
2. 配置 application。就是修改application配置文件。这步有可能会写一些application组件(例如:用户组件)
3. 每种类型的数据都创建一个 model 类来管理。 同样,yiic可以为我们需要的数据库表自动生成active record 类。
4. 每种类型的用户请求都创建一个 controller 类。 依据实际的需求对用户请求进行分类。一般来说,如果一个model类需要用户访问,就应该对应一个controller类。yiic工具也能自动完成这步。
5. 实现 actions 和相应的 views。这是真正需要我们编写的工作。
6. 在controller类里配置需要的action filters 。
7. 如果需要主题功能,编写 themes。
8. 如果需要 internationalization 国际化功能,编写翻译语句。
9. 使用 caching 技术缓存数据和页面。
10. 最后 tune up调整程序和发布。
以上每个步骤,有可能需要编写测试案例来测试。
嗯,就到这里吧,其他的看直接看手册比较合适。另外研读代码的同学可以直接看安装包里带的几个DEMOS,试做的可以跟 Yii Blog Book v1.1.pdf 的教程 。另外介绍下中文论坛。
本文内容,大部分来源官方文档。



 浙公网安备 33010602011771号