
DirectSound---简易Wav播放器
这篇文章主要给大家介绍下如何用DirectSound打造一个简易播放器,因为篇幅有限且代码逻辑较为复杂,我们只介绍下核心技术内容。该播放器主要包括以下功能:
- 播放、暂停
- 播放进度提示。
1. DirectSound播放概念简介
1.1 播放相关概念
首先要介绍下DirectSound的设计理念:

在DirectSound中,你需要播放的音频一般需要(也可以直接放入主缓冲区,但是操作上比较困难而且对其他DirectSound程序不太友好)放入一个被称为次缓冲区(Secondary Buffer)的地址区域中,该缓冲区由开发者人为创建操控。由于DirectSound支持多个音频同时播放,所以我们可以创建多个缓冲区并同时播放。在播放时,放入次缓冲区的音频先会被送入一个叫做主缓冲区(Primary Buffer)的地方进行混音,然后在送入硬件声卡中进行播放。在Windows driver model,即WDM模式下,DirectSound实际上不能直接操作声卡硬件,所有的混音操作不是送给主缓冲区而是被送往内核混音器(Kernel Mixer)进行混音,然后由内核混音器送往硬件。在WDM模式下,内核混音器替代了主缓冲区的功能位置。
1.2 缓冲区相关概念
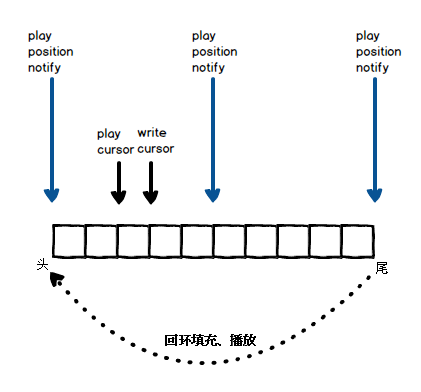
DirectSound的缓冲区类别大体可以分为两种:1) 静态缓冲区,2) 流缓冲区。静态缓冲区就是一段较短的音频全部填充到一个缓冲区中,然后从头到尾播放;流缓冲区可以描述为音频流,实际上这种流也是通过单个有长度的缓冲区来抽象模拟的。在流缓冲区模式下,单个缓冲区会被重复填充和播放,也就是说当DirectSound播放到缓冲区的最后一个尾部时,它会回到缓冲区的头部继续开始播放。因此,在播放较长的音频文件时需要开发者手动循环填充缓冲区。
DirectSound中还有游标(cursor)的概念,游标分两种:1) 播放游标(play cusror),2) 写入游标(write cursor)。顾名思义,播放游标指向当前播放的地址,写入游标指向当前可以写入的开始地址,写入游标总是在播放游标前面,且两者之间的数据块已经被DirectSound预定,不能被写入。其中,播放指针可以通过函数来更改,而写入指针由DirectSound自己控制,开发者不能操作它。一旦次缓冲区设定好音频格式,在播放中这两个游标会一直保持固定的间距:如果没记错,采样率44100Hz、2声道、8比特的音频数据,两者的位置间隔660字节,也就是1/70秒的数据。
为了在适当的时候填充下一块要播放的数据,DirectSound提供了notify的功能:当播放到某一个缓冲区位置的时候,他会提醒你。该notify功能的实现通过Windows的事件对象(Event Object)实现,也就是说你需要等待这个事件被唤醒,在GUI程序中,这通常意味着你需要另起一个线程。
2. 播放器实现
2.1 创建缓冲区
通过调用IDirectSound8::CreateSoundBuffer(...)函数,我们创建一个能够容纳seconds秒的次缓冲区。参数DSBUFFERDESC中需要指定DSBCAPS_CTRLPOSITIONNOTIFY、DSBCAPS_GETCURRENTPOSITION2,前者允许我们设置notify,后者保证我们在调用IDirectSoundBuffer8::GetCurrentPosition(...)时播放游标的位置比较准确。
void WavPlayer::createBufferOfSeconds(unsigned seconds)
{
    DSBUFFERDESC bufferDescription;
    bufferDescription.dwSize = sizeof(bufferDescription);
    bufferDescription.dwFlags = DSBCAPS_CTRLPOSITIONNOTIFY |
                                DSBCAPS_GLOBALFOCUS |
                                DSBCAPS_GETCURRENTPOSITION2 |
                                DSBCAPS_LOCDEFER ;
    bufferDescription.dwBufferBytes = m_secondaryBufferSize
                                    = m_wavFile.getWaveFormat().nAvgBytesPerSec * seconds;
    bufferDescription.dwReserved = 0;
    bufferDescription.lpwfxFormat = &m_wavFile.getWaveFormat();
    bufferDescription.guid3DAlgorithm = GUID_NULL;

    IDirectSoundBuffer* soundBuffer;
    if (m_directSound8->CreateSoundBuffer(&bufferDescription, &soundBuffer, NULL) != DS_OK) {
        throw std::exception("create secondary buffer failed:CreateSoundBuffer");
    }

    if (soundBuffer->QueryInterface(IID_IDirectSoundBuffer8, (LPVOID*)&m_soundBufferInterface)
            != S_OK) {
        throw std::exception("IDirectSoundBuffer8 interface not supported!");
    }
}
2.2 预填充缓冲区
本人尝试过直接在缓冲区头部设置notify,使数据的填充比较自然。大多数情况下这样没有问题,但是在电脑cpu负载较高时会造成音频毛刺,效果不尽如人意。因此我选择预填充数据,防止这类情况出现。
void WavPlayer::fillDataIntoBuffer()
{
    Q_ASSERT(m_bufferSliceCount > 1);

    //  fill half buffer to signal the notify event to do next data filling
    LPVOID firstAudioAddress;
    LPVOID secondAudioAddress;
    DWORD  firstAudioBytes;
    DWORD  secondAudioBytes;
    HRESULT result = m_soundBufferInterface->Lock(0,
                                    m_secondaryBufferSize / m_bufferSliceCount,
                                    &firstAudioAddress, &firstAudioBytes,
                                    &secondAudioAddress, &secondAudioBytes,
                                    0);
    if (result == DSERR_BUFFERLOST) {
        result = m_soundBufferInterface->Restore();
    }
    if (result != DS_OK) {
        throw std::exception("Cannot lock entire secondary buffer(restore tryed)");
    }

    Q_ASSERT(firstAudioBytes == m_secondaryBufferSize / m_bufferSliceCount &&
            secondAudioAddress == nullptr &&
            secondAudioBytes == 0);
    m_nextDataToPlay = static_cast<char*>(m_wavFile.getAudioData());
    CopyMemory(firstAudioAddress, m_nextDataToPlay, firstAudioBytes);
    if (m_soundBufferInterface->Unlock(firstAudioAddress, firstAudioBytes,
                                    secondAudioAddress, secondAudioBytes)
            != DS_OK) {
        throw std::exception("Unlick failed when fill data into secondary buffer");
    }

    m_nextDataToPlay += firstAudioBytes;
}
2.3 设置缓冲区notify
为了在运行时循环填充数据,我们先要设置notify,这里的notify比较复杂,包含了3种类别:
- 数据填充notify。
- 音频播放终止notify。
- 退出notify。(为了优雅的退出填充线程,我们选择在退出播放时唤醒线程)
其中,第二种notify可能会也可能不会与第一种notify重合,在不重合情况下我们才新分配一个notify:
m_additionalNotifyIndex = 0;
if (m_additionalEndNotify)
	for (unsigned i = 1; i < m_bufferSliceCount; ++i)
		if (bufferEndOffset < (m_secondaryBufferSize / m_bufferSliceCount * i)) {
			m_additionalNotifyIndex = i;
			break;
		}

//	add a stop notify count at the end of entire notifies to make the data filling
//	thread exit gracefully
++m_notifyCount;
m_notifyHandles = static_cast<HANDLE*>(malloc(sizeof(HANDLE)* (m_notifyCount)));
if (m_notifyHandles == nullptr)
	throw std::exception("malloc error");
m_notifyOffsets = static_cast<DWORD*>(malloc(sizeof(DWORD)* (m_notifyCount)));
if (m_notifyHandles == nullptr)
	throw std::exception("malloc error");

for (unsigned i = 0; i < m_notifyCount; ++i) {
	m_notifyHandles[i] = CreateEvent(NULL, FALSE, FALSE, NULL);
	if (m_notifyHandles[i] == NULL)
		throw std::exception("CreateEvent error");

	if (m_additionalEndNotify && i == m_additionalNotifyIndex) {
		//	set buffer end notify
		m_notifyOffsets[i] = bufferEndOffset;
		m_endNotifyHandle = m_notifyHandles[i];
	}
	else if (i == m_notifyCount - 1) {
		//	do nothing
	} else {
		//	NOTE:	the entire buffer size must can be devided by this `notifyCount`,
		//	or it will lost some bytes when filling data into the buffer. since the end
		//	notify is inside the notify count, we need to calculate the buffer slice index.
		unsigned bufferSliceIndex = getBufferIndexFromNotifyIndex(i);
		m_notifyOffsets[i] = m_secondaryBufferSize / m_bufferSliceCount * bufferSliceIndex;

		if (!m_additionalEndNotify && m_notifyOffsets[i] == bufferEndOffset)
			m_endNotifyHandle = m_notifyHandles[i];
	}
}
//	skip the exit notify which we toggle explicitly
setNotifyEvent(m_notifyHandles, m_notifyOffsets, m_notifyCount - 1);
2.4 创建数据填充线程、播放进度更新
该线程内包含多种类别的notify:
- 播放终止notify,则发出终止信号、退出线程。
- 数据填充notify,则填充数据、更新播放进度。
- 非终止非数据填充notify(发生在数据填充完成但播放未结束时),continue。
该线程一直等待这几个notify,并对不同情况进行不同的处理:
DWORD WINAPI WavPlayer::dataFillingThread(LPVOID param)
{
	WavPlayer* wavPlayer = reinterpret_cast<WavPlayer*>(param);

	while (!wavPlayer->m_quitDataFillingThread) {
		try {
			DWORD notifyIndex = WaitForMultipleObjects(wavPlayer->m_notifyCount, wavPlayer->m_notifyHandles, FALSE, INFINITE);
			if (!(notifyIndex >= WAIT_OBJECT_0 &&
				notifyIndex <= WAIT_OBJECT_0 + wavPlayer->m_notifyCount - 1))

				throw std::exception("WaitForSingleObject error");

			if (notifyIndex == wavPlayer->m_notifyCount - 1)
				break;

			//	each notify represents one second(or approximately one second) except the exit notify
			if (!(wavPlayer->m_additionalNotifyIndex == notifyIndex && wavPlayer->m_endNotifyLoopCount > 0)) {
				++wavPlayer->m_currentPlayingTime;
				wavPlayer->sendProgressUpdatedSignal();
			}

			//	if return false, the audio ends
			if (tryToFillNextBuffer(wavPlayer, notifyIndex) == false) {
				wavPlayer->stop();

				++wavPlayer->m_currentPlayingTime;
				wavPlayer->sendProgressUpdatedSignal();

				wavPlayer->sendAudioEndsSignal();
				//	not break the loop, we need to update the audio progress although data filling ends
			}
		}
		catch (std::exception& exception) {
			OutputDebugStringA("exception in data filling thread:");
			OutputDebugStringA(exception.what());
		}
	}
	return 0;
}
3. 运行结果
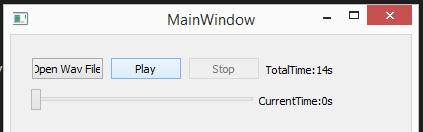
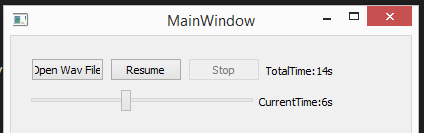
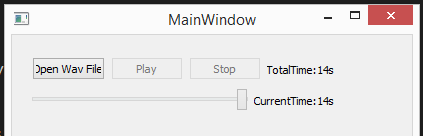
完整代码见链接。

