


ansible管理windows实践
一、前言
近期打算搞搞自动部署,因为是windows服务器,一些工具和系统支持都不是太好。最后发现ansible比较火,最重要的是他支持windows。本文主要就ansible 在windows使用环境搭建过程分享。
二、Ansible简介
(1)、连接插件connection plugins:负责和被监控端实现通信;
(2)、host inventory:指定操作的主机,是一个配置文件里面定义监控的主机;
(3)、各种模块核心模块、command模块、自定义模块;
(4)、借助于插件完成记录日志邮件等功能;
(5)、playbook:剧本执行多个任务时,非必需可以让节点一次性运行多个任务。
三、Windows下Ansible工作模式
Ansible 从1.7+版本开始支持Windows,但前提是管理机必须为Linux系统,远程主机的通信方式也由SSH变更为PowerShell,同时管理机必须预安装Python的Winrm模块,方可和远程Windows主机正常通信,但PowerShell需3.0+版本且Management Framework 3.0+版本,实测Windows 7 SP1和Windows Server 2008 R2及以上版本系统经简单配置可正常与Ansible通信。简单总结如下:
(1) 管理机必须为Linux系统且需预安装Python Winrm模块
(2) 底层通信基于PowerShell,版本为3.0+,Management Framework版本为3.0+
(3) 远程主机开启Winrm服务
四、Ansible管理机部署安装
(1). 对管理主机的要求
目前,只要机器上安装了 Python 2.6 或 Python 2.7 (windows系统不可以做控制主机),都可以运行Ansible.
主机的系统可以是 Red Hat, Debian, CentOS, OS X, BSD的各种版本,等等.
(2) 从源码运行
从项目的checkout中可以很容易运行Ansible,Ansible的运行不要求root权限,也不依赖于其他软件,不要求运行后台进程,也不需要设置数据库.因此我们社区的许多用户一直使用Ansible的开发版本,这样可以利用最新的功能特性,也方便对项目做贡献.因为不需要安装任何东西,跟进Ansible的开发版相对于其他开源项目要容易很多.
从源码安装的步骤
$ git clone git://github.com/ansible/ansible.git --recursive
$ cd ./ansible
使用 Bash:
$ source ./hacking/env-setup
如果没有安装pip, 请先安装对应于你的Python版本的pip:
$ sudo easy_install pip
以下的Python模块也需要安装:
$ sudo pip install paramiko PyYAML Jinja2 httplib2 six
一旦运行env-setup脚本,就意味着Ansible从源码中运行起来了.默认的inventory文件是 /etc/ansible/hosts。
配置hosts文件:
$ vim /etc/ansible/hosts
[windows]
192.168.1.105 ansible_ssh_user="Administrator" ansible_ssh_pass="123456" ansible_ssh_port=5985 ansible_connection="winrm" ansible_winrm_server_cert_validation=ignore
192.168.1.105是windows服务器的IP。
至此,服务端配置完毕。
和Linux发版版稍有区别,远程主机系统如为Windows需预先如下配置:
- 安装Framework 3.0+
- 更改powershell策略为remotesigned
- 升级PowerShell至3.0+
- 设置Windows远端管理,英文全称WS-Management(WinRM)
(1)安装Framework 3.0+
下载链接为:http://download.microsoft.com/download/B/A/4/BA4A7E71-2906-4B2D-A0E1-80CF16844F5F/dotNetFx45_Full_x86_x64.exe。 下载至本地后双击左键安装即可,期间可能会多次重启,电脑需正常连接Internet。
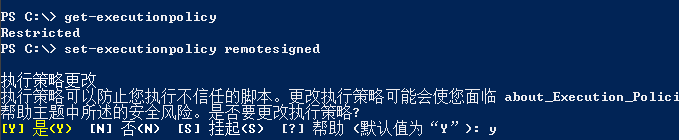
(2)更改powershell策略为remotesigned
(3)升级PowerShell至3.0+
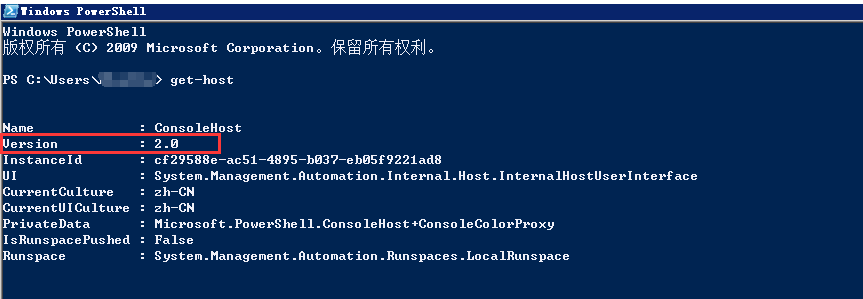
Window 7和Windows Server 2008 R2默认安装的有PowerShell,但版本号一般为2.0版本,所以我们需升级至3.0+,如下图中数字1部分表示PowerShell版本过低需3.0+版本,数字2部分表示当前PowerShell版本为2.0。


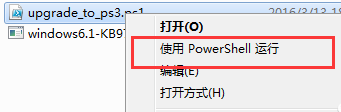
 1 # Powershell script to upgrade a PowerShell 2.0 system to PowerShell 3.0
 2 # based on http://occasionalutility.blogspot.com/2013/11/everyday-powershell-part-7-powershell.html
 3 #
 4 # some Ansible modules that may use Powershell 3 features, so systems may need
 5 # to be upgraded.  This may be used by a sample playbook.  Refer to the windows
 6 # documentation on docs.ansible.com for details.
 7 #
 8 # - hosts: windows
 9 #   tasks:
10 #     - script: upgrade_to_ps3.ps1
11
12 # Get version of OS
13
14 # 6.0 is 2008
15 # 6.1 is 2008 R2
16 # 6.2 is 2012
17 # 6.3 is 2012 R2
18
19
20 if ($PSVersionTable.psversion.Major -ge 3)
21 {
22     write-host "Powershell 3 Installed already; You don't need this"
23     Exit
24 }
25
26 $powershellpath = "C:\powershell"
27
28 function download-file
29 {
30     param ([string]$path, [string]$local)
31     $client = new-object system.net.WebClient
32     $client.Headers.Add("user-agent", "PowerShell")
33     $client.downloadfile($path, $local)
34 }
35
36 if (!(test-path $powershellpath))
37 {
38     New-Item -ItemType directory -Path $powershellpath
39 }
40
41
42 # .NET Framework 4.0 is necessary.
43
44 #if (($PSVersionTable.CLRVersion.Major) -lt 2)
45 #{
46 #    $DownloadUrl = "http://download.microsoft.com/download/B/A/4/BA4A7E71-2906-4B2D-A0E1-80CF16844F5F/dotNetFx45_Full_x86_x64.exe"
47 #    $FileName = $DownLoadUrl.Split('/')[-1]
48 #    download-file $downloadurl "$powershellpath\$filename"
49 #    ."$powershellpath\$filename" /quiet /norestart
50 #}
51
52 #You may need to reboot after the .NET install if so just run the script again.
53
54 # If the Operating System is above 6.2, then you already have PowerShell Version > 3
55 if ([Environment]::OSVersion.Version.Major -gt 6)
56 {
57     write-host "OS is new; upgrade not needed."
58     Exit
59 }
60
61
62 $osminor = [environment]::OSVersion.Version.Minor
63
64 $architecture = $ENV:PROCESSOR_ARCHITECTURE
65
66 if ($architecture -eq "AMD64")
67 {
68     $architecture = "x64"
69 }
70 else
71 {
72     $architecture = "x86"
73 }
74
75 if ($osminor -eq 1)
76 {
77     $DownloadUrl = "http://download.microsoft.com/download/E/7/6/E76850B8-DA6E-4FF5-8CCE-A24FC513FD16/Windows6.1-KB2506143-" + $architecture + ".msu"
78 }
79 elseif ($osminor -eq 0)
80 {
81     $DownloadUrl = "http://download.microsoft.com/download/E/7/6/E76850B8-DA6E-4FF5-8CCE-A24FC513FD16/Windows6.0-KB2506146-" + $architecture + ".msu"
82 }
83 else
84 {
85     # Nothing to do; In theory this point will never be reached.
86     Exit
87 }
88
89 $FileName = $DownLoadUrl.Split('/')[-1]
90 download-file $downloadurl "$powershellpath\$filename"
91
92 Start-Process -FilePath "$powershellpath\$filename" -ArgumentList /quiet

(4)设置Windows远端管理(WS-Management,WinRM)
winrm service 默认都是未启用的状态,先查看状态;如无返回信息,则是没有启动;
winrm enumerate winrm/config/listener
针对winrm service 进行基础配置:
winrm quickconfig
查看winrm service listener:
winrm e winrm/config/listener
为winrm service 配置auth:
winrm set winrm/config/service/auth @{Basic="true"}
为winrm service 配置加密方式为允许非加密:
winrm set winrm/config/service @{AllowUnencrypted="true"}
好了,远程Windows主机配置到此结束,我们验证配置的是否有问题。
六、Windows下可用模块测试
ansible windows -m win_ping

传输/etc/passwd文件至远程F:\file\目录下
执行命令:
ansible windows -m win_copy -a 'src=/etc/passwd dest=F:\file\passwd'
返回结果:
192.168.1.105 | success >> {
    "changed": true,
    "checksum": "896d4c79f49b42ff24f93abc25c38bc1aa20afa0",
    "operation": "file_copy",
    "original_basename": "passwd",
    "size": 2563
}
部分返回结果诠释:
- “operation”: “file_copy”—执行的操作为 file_copy;
- “original_basename”: “passwd”—文件名为 passwd;
- “size”: 2563—文件大小为 2563 bytes。
Playbook写法如下:
---
- name: windows module example
  hosts: windows
  tasks:
     - name: Move file on remote Windows Server from one location to another
       win_file: src=/etc/passwd dest=F:\file\passwd
删除F:\file\passwd
执行命令:
ansible windows -m win_file -a "path=F:\file\passwd state=absent"
返回结果:
192.168.1.105 | success >> {
    "changed": true
}


 浙公网安备 33010602011771号