


Entity Framework 6 Recipes 2nd Edition(13-3)译 -> 为一个只读的访问获取实体
问题
你想有效地获取只是用来显示不会更新的操作的实体.另外,你想用CodeFirst的方式来实现
解决方案
一个非常常见行为,尤其是网站,就是只是让用户浏览数据.大多数情况下,用户不会更新数据.在这种情况下,你可以通过避开上下文的缓存和修改跟踪来提高代码性能,你可以非常简单地使用AsNoTracking方法来实现.
让我们假设你一个应用程序来管理doctor(医生)的appointments(预约),你的模型如下图Figure 13-5.
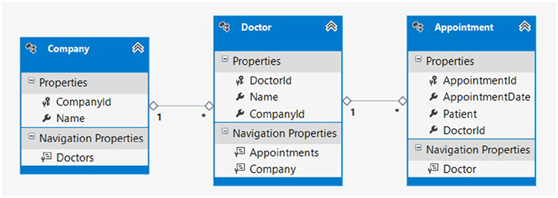
Figure 13-5. A model for managing doctors and their appointments
首先,这个例子用EF的CodeFirst方式来实现.,在Listing 13-6创建我们的实体类, Company, Doctor, 和Appointment.
Listing 13-6. The Company, Doctor,and Appointment.Entity Object
public class Company
{
public Company()
{
Doctors = new HashSet<Doctor>();
}
public int CompanyId { get; set; }
public string Name { get; set; }
public virtual ICollection<Doctor> Doctors { get; set; }
}
public class Doctor
{
public Doctor()
{
Appointments = new HashSet<Appointment>();
}
public int DoctorId { get; set; }
public string Name { get; set; }
public int CompanyId { get; set; }
public virtual ICollection<Appointment> Appointments { get; set; }
public virtual Company Company { get; set; }
}
public class Appointment
{
public int AppointmentId { get; set; }
public System.DateTime AppointmentDate { get; set; }
public string Patient { get; set; }
public int DoctorId { get; set; }
public virtual Doctor Doctor { get; set; }
}
接下来,在Listing 13-7,我们创建用CodeFirst方式时访问EF的途径,DbContext对象
Listing 13-7. DbContext Object
public class Recipe3Context : DbContext
{
public Recipe3Context()
: base("Recipe3ConnectionString")
{
// Disable Entity Framework Model Compatibility
Database.SetInitializer<Recipe3Context>(null);
}
protected override void OnModelCreating(DbModelBuilder modelBuilder)
{
modelBuilder.Entity<Appointment>().ToTable("Chapter13.Appointment");
modelBuilder.Entity<Company>().ToTable("Chapter13.Company");
modelBuilder.Entity<Doctor>().ToTable("Chapter13.Doctor");
}
public DbSet<Appointment> Appointments { get; set; }
public DbSet<Company> Companies { get; set; }
public DbSet<Doctor> Doctors { get; set; }
}
接下来我们在项目中添加App.Config,并把下列Listing 13-8的代码加入到ConnectionString节下
Listing 13-8. Connection String
<connectionStrings>
<add name="Recipe3ConnectionString"
connectionString="Data Source=.;
Initial Catalog=EFRecipes;
Integrated Security=True;
MultipleActiveResultSets=True"
providerName="System.Data.SqlClient" />
</connectionStrings>
为了获取Doctors和Companies并使他们不添加到上下文对象中,我们把AsNoTracking方法链接到获取实体的查询中,如Listing 13-9 那样.
Listing 13-9. Doing a Simple Query Using the AsNoTracking Method
using (var context = new Recipe3Context())
{
var company = new Company { Name = "Paola Heart Center" };
var doc1 = new Doctor { Name = "Jill Mathers", Company = company };
var doc2 = new Doctor { Name = "Robert Stevens", Company = company };
var app1 = new Appointment
{
AppointmentDate = DateTime.Parse("3/18/2010"),
Patient = "Karen Rodgers",
Doctor = doc1
};
var app2 = new Appointment
{
AppointmentDate = DateTime.Parse("3/20/2010"),
Patient = "Steven Cook",
Doctor = doc2
};
context.Doctors.Add(doc1);
context.Doctors.Add(doc2);
context.Appointments.Add(app1);
context.Appointments.Add(app2);
context.Companies.Add(company);
context.SaveChanges();
}
using (var context = new Recipe3Context())
{
Console.WriteLine("Entities tracked in context for Doctors...");
// 用AsNoTracking() 方法执行查询
context.Doctors.Include("Company").AsNoTracking().ToList();
Console.WriteLine("Number of entities loaded into context with AsNoTracking: {0}",
context.ChangeTracker.Entries().Count());//输出:0
// 不用AsNoTracking() 方法执行查询
context.Doctors.Include("Company").ToList();
Console.WriteLine("Number of entities loaded into context without AsNoTracking: {0}",
context.ChangeTracker.Entries().Count());//输出:3
}
输出结果如下:
Entities tracked in context for Doctors...
Number of entities loaded into context with AsNoTracking: 0
Number of entities loaded into context without AsNoTracking: 3
它是如何工作的
当我们把AsNoTracking方法链接上你的查询,从查询返回的结果不会被上下文跟踪.在我们的例子中,我们显示地Include了Doctor的Comanpies.
默认情况下,你的查询结果会被上下文跟踪,这使得更新和删除更容易,但是代价是付出更多的内存和CPU负载.为应用程序串连更多的对象,比如在电子商务网站上浏览产品,使用AsNoTracking选项,能节省更多的资源,使应用程序性能更高.
没有缓存一个查询结果,你每次都得为查询实例化.通常地,使修改跟踪可用,EF将不需要为一个上下文中已经存在的实例再实例化.
当你包含AsNoTracking选项(如我们的Listing 13-9),它只影响当前查询的实体.它不会影响后面的不包含AsNoTracking选项的查询,如Listing 13-9 演示的
kid1412声明:转载请把此段声明完整地置于文章页面明显处,并保留个人在博客园的链接:http://www.cnblogs.com/kid1412/(可点击跳转)。

 浙公网安备 33010602011771号