

Entity Framework 6 Recipes 2nd Edition(9-4)译->Web API 的客户端实现修改跟踪
9-4. Web API 的客户端实现修改跟踪
问题
我们想通过客户端更新实体类,调用基于REST的Web API 服务实现把一个对象图的插入、删除和修改等数据库操作。此外, 我们想通过EF6的Code First方式实现对数据的访问。
本例,我们模拟一个N层场景,用单独的控制台应用程序作为客户端,调用Web API服务(web api项目)。
注:每个层用一个单独的解决方案,这样有助于调试和模拟N层应用。
解决方案
假设我们一个如Figure 9-4.所示模型
Figure 9-4. A 客户和电话模型
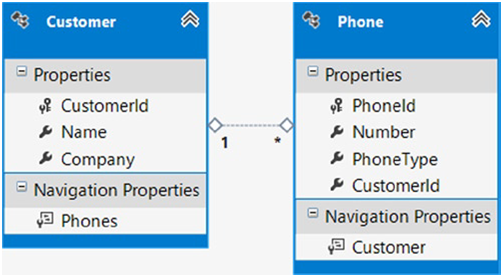
我们的模型展示了客户与对应的电话信息.我们把模型和数据库代码封装至Web Api服务之后,让客户端利用HTTP来插入,更新,删除对象。
以下步骤建立服务项目::
1.新建ASP.NET MVC 4 Web 应用程序,在向导中选择Web API模板,把项目命名为: Recipe4.Service.
2.向项目添加一个新的WEB API控制器,名为: CustomerController.
3. 添加如Listing 9-19所示的BaseEntity类,作为实体类的基类和枚举类型的TrackingState.基类包含TrackingState属性,客户端通过它操纵实体对象, 它接受一个TrackingState枚举值
注意: TrackingState不会持久化到数据库
创建我们自己的内部跟踪状态枚举是为了让客户端保存实体状态,这是EF的跟踪状态所需要的。DbContext 文件OnModelCreating方法里不映射TrackingState属性到数据库
Listing 9-19. Entity Base Class and TrackingState Enum Type
public class BaseEntity
{
protected BaseEntity()
{
TrackingState = TrackingState.Nochange;
}
public TrackingState TrackingState { get; set; }
}
public enum TrackingState
{
Nochange,
Add,
Update,
Remove,
}
4. 添加Listing 9-20所示的Customer 和Phone实体类
Listing 9-20. Customer and Phone Entity Classes
public class Customer:BaseEntity
{
public Customer()
{
Phones = new HashSet<Phone>();
}
public int CustomerId { get; set; }
public string Name { get; set; }
public string Company { get; set; }
public virtual ICollection<Phone> Phones { get; set; }
}
public class Phone :BaseEntity
{
public int PhoneId { get; set; }
public string Number { get; set; }
public string PhoneType { get; set; }
public int CustomerId { get; set; }
public virtual Customer Customer { get; set; }
}
5. 添加EF6的引用。最好是借助 NuGet 包管理器来添加。在”引用”上右击,选择”管理 NuGet 程序包.从“联机”标签页,定位并安装EF6包。这样将会下载,安装并配置好EF6库到你的项目中.
6. 添加类,名为:Recipe4Context, 键入 Listing 9-21 里的代码,
确保它继承自 DbContext 类. 注意EF6的“不映射基类型”的配置,我们定义一个”ignore“规范,指定不映射的属性。
■■注意
=======================================================================
R owan Martin,微软的EF团队主管发布了一篇名为Configuring Unmapped Base Types的博客: http://romiller.com/2013/01/29/ef6-code-first-configuringunmapped-base-types/. 也请认真阅读Rowan的其它在EF上杰出的博客文章。
=======================================================================
Listing 9-21. Context Class
public class Recipe4Context:DbContext
{
public Recipe4Context() : base("Recipe4ConnectionString") { }
public DbSet<Customer> Customers { get; set; }
public DbSet<Phone> Phones { get; set; }
protected override void OnModelCreating(DbModelBuilder modelBuilder)
{
//不要把TrackingState 属性持久化,它只是用来跟踪与Web api服务脱离的实体的状态
//该属性定义在基类里。
modelBuilder.Types<BaseEntity>().Configure(x => x.Ignore(y => y.TrackingState));
modelBuilder.Entity<Customer>().ToTable("Chapter9.Customer");
modelBuilder.Entity<Phone>().ToTable("Chapter9.Phone");
}
}
7. 把Listing 9-22所示的 “ Recipe4ConnectionString “连接字符串添加到Web.Config 文件的ConnectionStrings 节里.
Listing 9-22. Connection string for the Recipe1 Web API Service
<connectionStrings>
<add name="Recipe4ConnectionString"
connectionString="Data Source=.;
Initial Catalog=EFRecipes;
Integrated Security=True;
MultipleActiveResultSets=True"
providerName="System.Data.SqlClient" />
</connectionStrings>
8. 把Listing 9-23里的代码添加到Global.asax 文件的Application_Start 方法里. 该代码禁止EF进行模型兼容性检查,和JSON忽略序列时对象循环引用的问题。
Listing 9-23. Disable the Entity Framework Model Compatibility Check
protected void Application_Start()
{
//禁止EF进行模型兼容性检查
Database.SetInitializer<Recipe4Context>(null);
//使JSON序列化器忽略循环引用的问题 GlobalConfiguration.Configuration.Formatters.JsonFormatter.SerializerSettings.ReferenceLoopHandling
= Newtonsoft.Json.ReferenceLoopHandling.Ignore;
...
}
9. 添加一个类,名为: EntityStateFactory,插入Listing 9-24里的代码。该工厂类会把客户端TrackingState状态枚举值转译成EF里的实体状态.
Listing 9-24. Customer Web API Controller
public class EntityStateFactory
{
public static EntityState Set(TrackingState trackingState)
{
switch (trackingState)
{
case TrackingState.Add:
return EntityState.Added;
case TrackingState.Update:
return EntityState.Modified;
case TrackingState.Remove:
return EntityState.Deleted;
default:
return EntityState.Unchanged;
}
}
}
最后, 用Listing 9-25里的代码替换CustomerController里的。
Listing 9-25. Customer Web API Controller
public class CustomerController : ApiController
{
// GET api/customer
public IEnumerable<Customer> Get()
{
using (var context = new Recipe4Context())
{
return context.Customers.Include(x => x.Phones).ToList();
}
}
// GET api/customer/5
public Customer Get(int id)
{
using (var context = new Recipe4Context())
{
return context.Customers.Include(x => x.Phones).FirstOrDefault(x => x.CustomerId == id);
}
}
[ActionName("Update")]
public HttpResponseMessage UpdateCustomer(Customer customer)
{
using (var context = new Recipe4Context())
{
context.Customers.Add(customer);
//把对象图添加到Context(状态为Added),然后它在客户端被设置的基数状态枚举值翻译成相应的实体状态
//(包括父与子实体,也就是customer和phone)
foreach (var entry in context.ChangeTracker.Entries<BaseEntity>())
{
entry.State = EntityStateFactory.Set(entry.Entity.TrackingState);
if (entry.State == EntityState.Modified)
{
//先把实体状态设为'Unchanged'
//再让实体的原始副本等于从数据库里获取的副本
//这亲,EF就会跟踪每个属性的状态,会标志出被修改过的属性
entry.State = EntityState.Unchanged;
var databaseValues = entry.GetDatabaseValues();
entry.OriginalValues.SetValues(databaseValues);
}
}
context.SaveChanges();
}
return Request.CreateResponse(HttpStatusCode.OK, customer);
}
[HttpDelete]
[ActionName("Cleanup")]
public HttpResponseMessage Cleanup()
{
using (var context = new Recipe4Context())
{
context.Database.ExecuteSqlCommand("delete from chapter9.phone");
context.Database.ExecuteSqlCommand("delete from chapter9.customer");
return Request.CreateResponse(HttpStatusCode.OK);
}
}
}
10. 接下来新建一个解决方案,新建一个Recipe4.Client控制台应用程序,让它来调用上面创建的服务。
11. 用Listing 9-26.代码替换program.cs 里的代码
Listing 9-26. Our Windows Console Application That Serves as Our Test Client
class Program
{
private HttpClient _client;
private Customer _bush, _obama;
private Phone _whiteHousePhone, _bushMobilePhone, _obamaMobilePhone;
private HttpResponseMessage _response;
static void Main(string[] args)
{
Task t = Run();
t.Wait();
Console.WriteLine("\npress <enter>to continue...");
Console.ReadLine();
}
private static async Task Run()
{
var program = new Program();
program.ServiceSetup();
//等待Cleanup执行结束
await program.CleanupAsync();
program.CreateFirstCustomer();
//等待AddCustomerAsync执行结束
await program.AddCustomerAsync();
program.CreateSecondCustomer();
//等待AddSecondCustomerAsync执行结束
await program.AddSecondCustomerAsync();
//等待RemoveFirstCustomerAsync执行结束
await program.RemoveFirstCustomerAsync();
//等待FetchCustomersAsync执行结束
await program.FetchCustomersAsync();
}
private void ServiceSetup()
{
//初始化对WEB API服务调用的对象
_client = new HttpClient { BaseAddress = new Uri("http://localhost:6658/") };
//添加头部信息,设为可JSON的类型
_client.DefaultRequestHeaders.Accept.Add(new MediaTypeWithQualityHeaderValue("application/json"));
}
private async Task CleanupAsync()
{
//调用服务端的cleanup
_response = await _client.DeleteAsync("api/customer/cleanup/");
}
private void CreateFirstCustomer()
{
//创建1号客户和他的两个电话
_bush = new Customer
{
Name = "George Bush",
Company = "Ex President",
//设置状态为Add,以告知服务端该实体是新增的
TrackingState = TrackingState.Add,
};
_whiteHousePhone = new Phone
{
Number = "212 222-2222",
PhoneType = "White House Red Phone",
//设置状态为Add,以告知服务端该实体是新增的
TrackingState = TrackingState.Add,
};
_bushMobilePhone = new Phone
{
Number = "212 333-3333",
PhoneType = "Bush Mobile Phone",
//设置状态为Add,以告知服务端该实体是新增的
TrackingState = TrackingState.Add,
};
_bush.Phones.Add(_whiteHousePhone);
_bush.Phones.Add(_bushMobilePhone);
}
private async Task AddCustomerAsync()
{
//构造对服务端UpdateCustomer的调用
_response = await _client.PostAsync("api/customer/updatecustomer/", _bush,
new JsonMediaTypeFormatter());
if (_response.IsSuccessStatusCode)
{
//获取在服务端新创建的包含实际ID值的实体
_bush = await _response.Content.ReadAsAsync<Customer>();
_whiteHousePhone = _bush.Phones.FirstOrDefault(x => x.CustomerId == _bush.CustomerId);
_bushMobilePhone = _bush.Phones.FirstOrDefault(x => x.CustomerId == _bush.CustomerId);
Console.WriteLine("Successfully created Customer {0} and {1} Phone Number(s)",
_bush.Name, _bush.Phones.Count);
foreach (var phoneType in _bush.Phones)
{
Console.WriteLine("Added Phone Type:{0}", phoneType.PhoneType);
}
}
else
{
Console.WriteLine("{0} ({1})", (int)_response.StatusCode, _response.ReasonPhrase);
}
}
private void CreateSecondCustomer()
{
//创建第二号客户和他的电话
_obama = new Customer
{
Name = "Barack Obama",
Company = "President",
//设置状态为Add,以告知服务端该实体是新增的
TrackingState = TrackingState.Add,
};
_obamaMobilePhone = new Phone
{
Number = "212 444-4444",
PhoneType = "Obama Mobile Phone",
//设置状态为Add,以告知服务端该实体是新增的
TrackingState = TrackingState.Add,
};
//设置状态为update,以告知服务端实体是修改的
_whiteHousePhone.TrackingState = TrackingState.Update;
_obama.Phones.Add(_obamaMobilePhone);
_obama.Phones.Add(_whiteHousePhone);
}
private async Task AddSecondCustomerAsync()
{
//构造调用服务端UpdateCustomer的请求
_response = await _client.PostAsync("api/customer/updatecustomer/",
_obama, new JsonMediaTypeFormatter());
if (_response.IsSuccessStatusCode)
{
//获取服务端新建的含有正确ID的实体
_obama = await _response.Content.ReadAsAsync<Customer>();
_whiteHousePhone = _bush.Phones.FirstOrDefault(x => x.CustomerId == _obama.CustomerId);
_bushMobilePhone = _bush.Phones.FirstOrDefault(x => x.CustomerId == _obama.CustomerId);
Console.WriteLine("Successfully created Customer {0} and {1} Phone Numbers(s)",
_obama.Name, _obama.Phones.Count);
foreach (var phoneType in _obama.Phones)
{
Console.WriteLine("Added Phone Type: {0}", phoneType.PhoneType);
}
}
else
{
Console.WriteLine("{0} ({1})", (int)_response.StatusCode, _response.ReasonPhrase);
}
}
private async Task RemoveFirstCustomerAsync()
{
//从数据库中删除George Bush(客户)
//先获取George Bush实体,用包含一个参数的请求调用服务端的get方法
var query = "api/customer/" + _bush.CustomerId;
_response = _client.GetAsync(query).Result;
if (_response.IsSuccessStatusCode)
{
_bush = await _response.Content.ReadAsAsync<Customer>();
//标志实体为Remove,告知服务端应该删除它
_bush.TrackingState = TrackingState.Remove;
//由于在删除父实体前必须删除子实体,所以必须删除它的电话
foreach (var phoneType in _bush.Phones)
{
//标志实体为Remove,告知服务端应该删除它
phoneType.TrackingState = TrackingState.Remove;
}
_response = await _client.PostAsync("api/customer/updatecustomer/",
_bush, new JsonMediaTypeFormatter());
if (_response.IsSuccessStatusCode)
{
Console.WriteLine("Removed {0} from database", _bush.Name);
foreach (var phoneType in _bush.Phones)
{
Console.WriteLine("Remove {0} from data store", phoneType.PhoneType);
}
}
else
{
Console.WriteLine("{0} ({1})", (int)_response.StatusCode, _response.ReasonPhrase);
}
}
else
{
Console.WriteLine("{0} ({1})", (int)_response.StatusCode, _response.ReasonPhrase);
}
}
private async Task FetchCustomersAsync()
{
//获取所有现存的客户及对应的电话
_response = await _client.GetAsync("api/customer");
if (_response.IsSuccessStatusCode)
{
var customers = await _response.Content.ReadAsAsync<IEnumerable<Customer>>();
foreach (var customer in customers)
{
Console.WriteLine("Customer {0} has {1} Phone Numbers(s)",
customer.Name, customer.Phones.Count());
foreach (var phoneType in customer.Phones)
{
Console.WriteLine("Phone Type: {0}", phoneType.PhoneType);
}
}
}
else
{
Console.WriteLine("{0} ({1})", (int)_response.StatusCode, _response.ReasonPhrase);
}
}
}//end class program
12. 最后,添加与服务端同样的Customer, Phone, BaseEntity, 和TrackingState(同Listing 9-19 and 9-20).
下面Listing 9-26是控制台的输出结果:
===================================================================
Successfully created Customer Geroge Bush and 2 Phone Numbers(s)
Added Phone Type: White House Red Phone
Added Phone Type: Bush Mobile Phone
Successfully created Customer Barrack Obama and 2 Phone Numbers(s)
Added Phone Type: Obama Mobile Phone
Added Phone Type: White House Red Phone
Removed Geroge Bush from database
Remove Bush Mobile Phone from data store
Customer Barrack Obama has 2 Phone Numbers(s)
Phone Type: White House Red Phone
Phone Type: Obama Mobile Phone
===================================================================
它是如何工作的?
首先启动Web API应用程序. 当看到首页就服务已经可用,接着打开控制台应用程序,在. program.cs首行代码前加断点,运行,我们首先创建与Web API管道连接并配置头部多媒体信息类型,使它请求可以接收JSON格式.接着用HttpClient的DeleteAsyn请求,调用服务端的Cleanup方法,从而清除数据库里之前保存的结果。
接下来我们创建一个新的Customer和两个phone对象,注意我们是如何明确地为每个实体设置它的TrackingState属性来告诉EF状态跟踪为每个实体产生什么样的SQL语句。
接着利用httpclient的PostAsync方法调用服务端的UpdateCustomer方法.如果你在WEB API项目的控制器的UpdateCustomer 方法前加断点,你会看到该方法参数接收到一个Customer 对象,然后它立刻添加到context 对象里,指定实体为added,并会跟踪它的状态。
有兴的是:我们接着钩住context对象比较隐蔽的DbChangeTracker属性
DbChangeTracker用<DbEntityEntry>的方式为实体暴露一个常用的Ienumerable类型. 我们简单地分配基类的EntityType 属性给它,能这么做是因为我们所有的实体都是继承自BaseEntity
. 每次循环我们都调用一次EntityStateFactory的Set方法,来确定实体的状态,如果EntityType属性值为Add,则实体状态为Added, 如果EntityType属性值为Update, 则实体状态为Modified,如果实体状态为Modified,我们需要做些额外的处理,我们先把实体状态从Modified改为Unchanged
然后调用GetDatabaseValues 方法,获得数据库的值版本,然后赋给实体的OriginalValues ,这个EF跟踪引擎会检测到实体的哪个属性的原始值与当前值不同,并把这些属性状态设为modified
. 随后的 SaveChanges 操作将会仅更新这些修改过的属性,并生成相应的SQL语句。
再看客户端程序,演示了通过设置TrackingState属性来添加,修改,和删除实体对象
服务端的UpdateCustomer方法简单地把TrackingState翻译成了实体的状态,cotext对象会根据这些状态产生相应的SQL语句。
在本小节,我们看到了,可以将EF的数据操作封装到Web API 服务里。客户端可以通过HttpClient对象调用这些服务. 让所有实体继承于一个拥有TrackingState属性的基类,客户端通过设置这个属性,让服务端的EF跟踪引擎生成对应的SQL语句。
在实际应用中,我们可能更喜欢创建一个新的层(Visual Studio 类库),把EF的数据操作从WEB API服务里分离出来,作为一个单独的层。
本节更重要的是,我们不难做到让客户端使用普通的类型来跟踪实体的变化. 而这个功能可重用于我们其它的项目。
kid1412声明:转载请把此段声明完整地置于文章页面明显处,并保留个人在博客园的链接:http://www.cnblogs.com/kid1412/(可点击跳转)。

 浙公网安备 33010602011771号