
[React] 08 - Tutorial: evolution of code-behind
有了七篇基础学习,了解相关的知识体系,之后便是系统地再来一次。
[React] 01 - Intro: javaScript library for building user interfaces
[React] 02 - Intro: react component and Design pattern
[React] 03 - Intro: react.js in twelve demos
[React] 04 - Intro: MongoDB becomes popular
[React] 05 - Route: connect with ExpressJS 【Nodejs + Express + MongoDB 基础篇】
[React] 06 - Route: koa makes your life easier
[React] 07 - Flux: react communicates with mongodb
From [React] 08, based on React JS Tutorials.
运行起来
1.Installs webpack globally on your system, that makes it available in terminal window.
npm i webpack -g
2.运行代码:
$ webpack-dev-server --content-base src
3.UI效果:数据绑定

client.js文件的进化
(1). render()返回值的思考
client.js
如果需返回多个东东,则使用<div>标签。
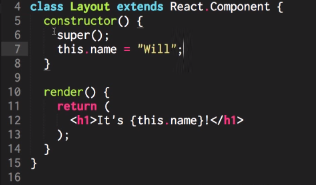
(2). Layout独立出来
client.js

import Layout from "./components/Layout";

const app = document.getElementById('app');  // html的app在哪里?
ReactDOM.render(<Layout/>, app);              // ----> 参见[对比1],第一个参数是组件内容,第二个是挂载位置
react会根据标签制定的位置来动态改变html内容。
index.html

<!DOCTYPE html>
<html>
  <head>
    <meta charset="utf-8">
    <title>React Tutorials</title>
    <!-- change this up! http://www.bootstrapcdn.com/bootswatch/ -->
    <link href="https://maxcdn.bootstrapcdn.com/bootswatch/3.3.6/cosmo/bootstrap.min.css" type="text/css" rel="stylesheet"/>
  </head>

  <body>
    <div id="app"></div>    // <---- 实际上成了一个变量,也即是react会根据标签制定的位置来动态改变
    <script src="client.min.js"></script>
  </body>
</html>
这里是 [对比1]:
ReactDOM.render(
  <div>
    <input type="text" value={value}/>        // 注意单标签一定要闭合“/”,否则会报错
    <button>{buttonName}</button>             // 在{}中插入变量
  </div>,
  document.getElementById("container")
)
(3). Louyout --> Header --> Title
将Header和Footer作为组件单独实现,也就是【复合组件】。
Layout.js

 render() {
    return (
      <div>
        <Header changeTitle={this.changeTitle.bind(this)} title={this.state.title} />
        <Footer />
      </div>
    );
  }
当然,Header也可以进一步地独立出来。
Header.js

import React from "react";
import Title from "./Header/Title";

export default class Header extends React.Component {

  handleChange(e) {
    const title = e.target.value;
    this.props.changeTitle(title);
  }

  render() {
    return (
      <div>
        <Title title={this.props.title} />
        <input value={this.props.title} onChange={this.handleChange.bind(this)} />
      </div>
    );
  }
}
Header中的标签Title的实现处。
Title.js

export default class Title extends React.Component {
  render() {
    return (
      <h1>{this.props.title}</h1>
    );
  }
}
执行流程
Header.js

import React from "react";
import Title from "./Header/Title";

export default class Header extends React.Component {

  handleChange(e) {        // e就是指:event
    // (1) 获得新的input数据
    const title = e.target.value;
    // (2) 然后改变title数据
    this.props.changeTitle(title);        // 第二步:在逻辑上,虚拟DOM需要改变title, according to input
    // (3) 之后命令layout渲染
  }

  render() {
    // input中的onChange作为listener,触发上面的handleChange()
    return (
      <div>
        <Title title={this.props.title} />
        <input value={this.props.title} onChange={this.handleChange.bind(this)} />        // 第一步:监听事件获得input改变
      </div>
    );
  }
改变title实际干活的地方,如下。
Layout.js

import React  from "react";
import Footer from "./Footer";
import Header from "./Header";

export default class Layout extends React.Component {
  constructor() {
    super();
    this.state = {
      title: "Welcome",
    };
  }

  changeTitle(title) {
    this.setState({title});
  }

  render() {
    return (
      <div>
        <Header changeTitle={this.changeTitle.bind(this)} title={this.state.title} />  // 将函数指针作为参数传给header子组件
        <Footer />
      </div>
    );
  }
}
可见,这里其实透露出的是一种“分离”的思想。

 浙公网安备 33010602011771号