
[c++] Copy Control
拷贝控制是什么
C++ allows the programmer to define how objects are to be copied, moved, assigned and destroyed. Together these are known as copy control.
拷贝控制的基础
一、复制初始化
复制初始化 de 使用
Ref: C++的一大误区——深入解释直接初始化与复制初始化的区别
#include <iostream>
#include <cstring>
using namespace std;

class ClassTest
{
public:
  ClassTest()
  {
    c[0] = '\0';
    cout<<"ClassTest()"<<endl;
  }

  ClassTest& operator=(const ClassTest &ct)
  {
    strcpy(c, ct.c);
    cout<<"ClassTest& operator=(const ClassTest &ct)"<<endl;
    return *this;
  }

  ClassTest(const char *pc)
  {
    strcpy(c, pc);
    cout<<"ClassTest (const char *pc)"<<endl;
  }

  ClassTest(const ClassTest& ct)
  {
    strcpy(c, ct.c);
    cout<<"ClassTest(const ClassTest& ct)"<<endl;
  }

private:
  char c[256];
};

编译器暗中优化
编译会帮你做很多你看不到,你也不知道的优化,
"你看到的结果,正是编译器做了优化后的代码的运行结果,并不是你的代码的真正运行结果。"
二、访问权限
复制构造函数是可以由编译默认合成的,而且是公有的(public),编译器就是根据这个特性来对代码进行优化的。
如果你自己定义这个复制构造函数,编译则不会自动生成,虽然编译不会自动生成,但是如果你自己定义的复制构造函数仍是公有的话,编译还是会为你做同样的优化。
当它是私有成员时,编译器就会有很不同的举动,因为你明确地告诉了编译器,你明确地拒绝了对象之间的复制操作,所以它也就不会帮你做之前所做的优化,你的代码的本来面目就出来了。
public 的 复制构造函数


 #include <iostream>
 #include <algorithm>
 #include <vector>
 #include <string>

 using namespace std;

 class CExample
 {
     private:
         int a;

     public:
         CExample(int b) {
             a=b;
             printf("constructor is called\n");
         }

         CExample(const CExample & c) {
             a=c.a;
             printf("copy constructor is called\n");
         }

         ~CExample() {
             cout<<"destructor is called\n";
         }

         void Show()
         {
             cout<<a<<endl;
         }
 };

  int main(void)
 {
     CExample A(100);

     CExample B=A;

     CExample C=CExample(A);

     B.Show();
     return 0;
 }
private 的 复制构造函数
编译器明确地拒绝了对象之间的复制操作。
首先,使用指定构造函数创建一个临时对象 (拷贝源),
然后,用复制构造函数将那个临时对象复制到正在创建的对象。
所以,当复制构造函数被声明为私有时,所有的复制初始化都不能使用。
   class CExample
   {
       private:
           int a;

           CExample(const CExample & c)
           {
               a=c.a;
               printf("copy constructor is called\n");
           }

       public:
           CExample(int b)
           {
               a=b;
               printf("constructor is called\n");
           }

           ~CExample()
           {
               cout<<"destructor is called\n";
           }

           void Show()
           {
               cout<<a<<endl;
           }
   };


   int main(void)
   {
       CExample A(100);

 >>    CExample B=A;

 >>    CExample C=CExample(A);

       B.Show();
       return 0;
   }
三、 赋值与拷贝控制的区别
Copy Assignment Operator
以下是赋值,但不是初始化。初始化对应的是:copy contructor。
class A {
    A& operator=(const A &a) { ... }
    /* 类的内部变量一一对应复制 */
}
Copy constructor vs assignment operator
#include<iostream>
#include<stdio.h>

using namespace std;

class Test
{
    public:
    Test() {}
    Test(const Test &t)
    {
        cout<<"Copy constructor called "<<endl;
    }

    Test& operator = (const Test &t)
    {
        cout<<"Assignment operator called "<<endl;
        return *this;
    }
};

// Driver code
int main()
{
    Test t1, t2;
    t2 = t1;       // assign (不是初始化的过程)

    Test t3 = t1;  // copy constructor (这是初始化的过程)

    return 0;
}
Output:
Assignment operator called
Copy constructor called
拷贝控制 and 资源管理
一、实例 Stack
头文件定义
其中的难点:
* move constructor, move assignment
* top函数为何有两个?
#ifndef UB_STACK_H
#define UB_STACK_H
#include <iostream>

using namespace std;

class UB_stack {

public:
    UB_stack();
    UB_stack(const UB_stack &s);
    UB_stack(UB_stack &&s);       // <-- move constructor
    ~UB_stack();                  // destructor

    UB_stack& operator=(const UB_stack &s);     // copy assignment
    UB_stack& operator=(UB_stack &&s);          // <-- move assignment

    void push(const int &item);
    void pop();
    int& top();
    const int& top() const;
    bool empty() const;
    bool full() const;

private:
    class Node;            // 节点定义
    Node *head_;           // 头指针
    void reverse(Node *);

    friend void swap(UB_stack &s1, UB_stack &s2);
};

void swap(UB_stack &s1, UB_stack &s2);     // 在类外 依然要声明一次

#endif
类的实现
delete     ptr   代表用来释放内存,且只用来释放ptr指向的内存。
delete[]   rg    用来释放rg指向的内存,!!还逐一调用数组中每个对象的destructor!!
对于像 int/char/long/int*/struct 等等简单数据类型,由于对象没有destructor,所以用delete 和delete [] 是一样的!但是如果是C++对象数组就不同了!
#include "UB_stack.h"

using namespace std;

class UB_stack::Node {
    // allow UB_stack to access private data. 但看上去Node里面也没有private的内容呀!
    friend class UB_stack;

    // methods and data in this class are private by default.
    Node(int i, Node *n = nullptr) : item_{i}, next_{n} {}
    ~Node() {delete next_; }  // destructor cleans up the memory

    int item_;
    Node *next_;
};
//--------------------------------------------------------------------//
// constructor 但仍然应该是空
UB_stack::UB_stack() : head_{nullptr} {}

// copy constructor
UB_stack::UB_stack(const UB_stack &s) : head_{nullptr} {
    reverse(s.head_);
}

// move constructor
UB_stack::UB_stack(UB_stack &&s) : head_{s.head_} {
    s.head_ = nullptr;
}

//--------------------------------------------------------------------//

// destructor
UB_stack::~UB_stack() {
    delete head_;
}

//--------------------------------------------------------------------//
// return the top of the stack
int& UB_stack::top() {
    return head_->item_;
}

const int& UB_stack::top() const {
    return head_->item_;
}

bool UB_stack::empty() const {
    return head_ == 0;
}

bool UB_stack::full() const {
    return false;
}

// method to work down a given stack
// and push items onto "this" stack correctly
void UB_stack::reverse(Node *h) {
    if (h != nullptr) {
        reverse(h->next_);
        push(h->item_);
    }
}

// method to push an int onto the stack
void UB_stack::push(const int &item) {
    head_ = new Node(item, head_);
}

// 支持了“等号”操作符
UB_stack& UB_stack::operator =(const UB_stack &s) {
    // if not already the same stack.
    if (this != &s) {
        delete head_;
        head_ = nullptr;
        reverse(s.head_);
    }
    return *this;
}

// Move Assignment.
UB_stack& UB_stack::operator =(UB_stack &&s) {
    if (this != &s) {
        delete head_;
        head_ = s.head_;
        s.head_ = nullptr;
    }
    return *this;
}

// pop off the top of the stack.
void UB_stack::pop() {
    Node *t = head_;
    head_ = head_->next_;
    t->next_ = nullptr;
    delete t;
}

void swap(UB_stack &s1, UB_stack &s2) {
    // swap the pointers to the heads of the list only.
    // much faster than swapping all the data.
    swap(s1.head_, s2.head_);
}
二、内存释放
在main.cpp中,首先不使用指针去 new。
#include <iostream>
#include <vector>
#include "UB_stack.h"

using namespace std;

int main(void)
{
    cout << "Hello world." << endl;

    UB_stack s;
    s.push(1);
    s.push(2);
    s.push(3);

    s.pop();
    cout << s.top() << endl;
  // 虽然没有delete,但系统自动调用了~UB_stack()

    return 0;
}
改为 new后的指针方式,则调用 delete才会析构。
int main(void)
{
    UB_stack *s = new UB_stack();
    s->push(1);
    s->push(2);
    s->push(3);

    s->pop();
    cout << s->top() << endl;
    delete s;

    return 0;
}
三、拷贝构造、移动构造
深拷贝 & 浅拷贝
拷贝初始化、赋值过程的区别。
// 浅拷贝
UB_stack::UB_stack(const UB_stack &s) : head_{s.head_} { }

// 深拷贝
UB_stack::UB_stack(const UB_stack &s) : head_{nullptr} {
    reverse(s.head_);
}

UB_stack s2 {s1};


// 浅拷贝
UB_stack& UB_stack::operator=(const UB_stack &s) {
    head_ = s.head_;
    return *this;
}

// 深拷贝
UB_stack& UB_stack::operator=(const UB_stack &s) {
    if (this != &s) {
        delete head_;
        head_ = nullptr;
        reverse(s.head_);
    }
    return *this;
}

s2 = s1
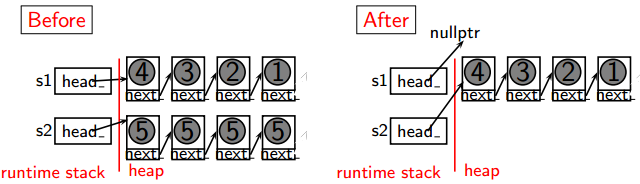
移动构造
Move Semantics.

可见,偷走了临时变量的内存空间,据为己用。节省了开辟空间的时间。
/* 思路:
 * 新类截取旧类的指针head_
 * 然后,迫使旧类放弃head_
 */

// move constructor.
UB_stack::UB_stack(UB_stack &&s) : head_{s.head_} {
    s.head_ = nullptr;
}

// move assignment.
UB_stack& UB_stack::operator =(UB_stack &&s) {
    if (this != &s) {
        delete head_;
        head_   = s.head_;
        s.head_ = nullptr;
    }
    return *this;
}
std:move()
一、基本原理
noexcept
void except_func() noexcept; 表示不抛出异常。
void except_func() noexcept (常量表达式);表达式为true不会抛出异常;flase抛出异常。
”右值“ 特性
Ref: https://www.zhihu.com/question/22111546/answer/30801982
右值中的数据可以被安全移走这一特性使得右值被用来表达移动语义。
以同类型的右值构造对象时,需要以引用形式传入参数。右值引用顾名思义专门用来引用右值,左值引用和右值引用可以被分别重载,这样确保左值和右值分别调用到拷贝和移动的两种语义实现。
对于左值,如果我们明确放弃对其资源的所有权,则可以通过std::move()来将其转为右值引用。std::move()实际上是static_cast<T&&>()的简单封装。
二、移动语义的好处
没有移动语义
以表达式的值(例为函数调用)初始化对象或者给对象赋值是这样的: (重点:红色字体)
vector<string> str_split(const string& s);

vector<string> v = str_split("1,2,3");   // 返回的vector用以拷贝构造对象v。为v申请堆内存,复制数据,然后析构临时对象(释放堆内存)。
vector<string> v2;
v2 = str_split("1,2,3");           // 返回的vector被复制给对象v(拷贝赋值操作符)。需要先清理v2中原有数据,将临时对象中的数据复制给v2,然后析构临时对象。
注:v的拷贝构造调用有可能被优化掉,尽管如此在语义上仍然是有一次拷贝操作。
支持移动语义
同样的代码,在支持移动语义的世界里就变得更美好了,可以接收右值表达式。
vector<string> str_split(const string& s);

vector<string> v = str_split("1,2,3");   // 返回的vector用以移动构造对象v。v直接取走临时对象的堆上内存,无需新申请。之后临时对象成为空壳,不再拥有任何资源,析构时也无需释放堆内存。
vector<string> v2;
v2 = str_split("1,2,3");           // 返回的vector被移动给对象v(移动赋值操作符)。先释放v2原有数据,然后直接从返回值中取走数据,然后返回值被析构。
注:v的移动构造调用有可能被优化掉,尽管如此在语义上仍然是有一次移动操作。
不用多说也知道上面的形式是多么常用和自然。而且这里完全没有任何对右值引用的显式使用,性能提升却默默的实现了。
三、触发"移动构造"
Ref: c++ 之 std::move 原理实现与用法总结
std::move函数可以以非常简单的方式将左值引用转换为右值引用。Goto: (左值 右值 引用 左值引用) 概念
(1) C++ 标准库使用比如vector::push_back 等这类函数时,会对参数的对象进行复制,连数据也会复制.这就会造成对象内存的额外创建,本来原意是想把参数push_back进去就行了,通过std::move,可以避免不必要的拷贝操作。
(2) std::move是将对象的状态或者所有权从一个对象转移到另一个对象,只是转移,没有内存的搬迁或者内存拷贝所以可以提高利用效率,改善性能。
(3) 对指针类型的标准库对象并不需要这么做。
按值传入参数
(1) 初始化
这里的序列容器,默认采用的是拷贝构建。这里通过move变为移动构造。
 #include <iostream>
 #include <vector>
 #include <list>
 #include <chrono>

 using namespace std;

 int main()
 {
     std::vector<int> vecInt = {1,2,3};             // 因为这里是左值
     std::vector<int> vecCopy = std::move(vecInt);  // 所以这里本来也会是”左值“的角色,也就无法触发"move construct",要触发,就通过std::move后,左变右
     vecCopy.at(0) = 100;

     for (auto x: vecInt)
     {
         cout << x << endl;
     }

     return 0;
 }
(2) 插入
void push_back( const T& value );  // (1) 左值调用,版本一
void push_back( T&& value );     // (2) 右值调用,版本二
如果你要往容器内放入超大对象,那么版本二自然是最佳选择。
vector<vector<string>> vv;

vector<string> v = {"123", "456"};
v.push_back("789");   // 临时构造的string类型右值被移动进容器v
vv.push_back(std::move(v)); // 显式将v移动进vv, v中便没有了内容,move给了vv.
这里的参数类型通过 move,由 "左值调用" --> "右值调用",这叫做:Argument-Dependent Lookup (ADL) 参数依赖查找
它的规则就是当编译器对无限定域的函数调用进行名字查找时,除了当前名字空间域以外,也会把函数参数类型所处的名字空间 加入查找的范围。
(3) 构造实现
这里的自定义类,通过参数的”左右“类型,从而调用不同的构造函数。
class People {
public:

  People(string name)        // 按值传入字符串,可接收左值、右值。接收左值时为复制,接收右值时为移动
  : name_(std::move(name))   // 显式移动构造,将传入的字符串移入成员变量
  {
  }
  string name_;
};

People a("Alice");   // 移动构造 name,这是个”右值“。

string bn = "Bob";
People b(bn);      // 拷贝构造 name,这是个”左值“
按值返回结果
vector<string> str_split(const string& s) {
  vector<string> v;
  // ...
  return v; // v是左值,但优先移动,不支持移动时仍可复制。
}
四、类中实现
-
容器的浅拷贝构造
使用:UB_stack s2 = std::move(s1);
UB_stack::UB_stack(UB_stack &&s) noexcept : head_{std::move(s.head_)} {

}

-
容器的真搬运构造
使用:UB_stack s2 = std::move(s1);
UB_stack::UB_stack(UB_stack &&s) : head_{std::move(s.head_)} {
    s.head = nullptr;
}

-
容器的浅拷贝赋值
s2 = std::move(s1);
UB_stack& UB_stack::operator=(UB_stack &&s) noexcept {
    head_ = std::move(s.head_);

    return *this;
}

- 容器的真搬运赋值
s2 = std::move(s1);
UB_stack& UB_stack::operator=(UB_stack &&s) {
    if (this != &s) {
        delete head_;

        head_   = std::move(s.head_);
        s.head_ = nullptr;
    }
    return *this;
}
End.

 浙公网安备 33010602011771号