OpenOCD - Using JLink For ubuntu and Windows 7(Cygwin)
OpenOCD is an open-source project aiming providing a online debugger, originating from a thesis.
for more information, please go to http://openocd.sourceforge.net/
you can compile yourself, thus you can know more and modify according to situation.
Or you can download the complied one: windows version by Freddie Choplin
http://www.freddiechopin.info/en/download/category/4-openocd
Step 0: some preparations for windows
Install cygwin and additional tools from the development package:
- autoconf: Wrapper scripts for autoconf commands
- automake: Wrapper scripts for automake and aclocals
- gcc: C compiler upgrade helper
- libusb-win32: libusb-win32: USB programming library
- make: The GNU version og the 'make' utility
- subversion: A version control system
Step1: install Jlink drivers
for Linux(ubuntu)
$./configure
if there is an error like "cannot find usb.h"
you need to install libusb:
please refer to
http://hi.baidu.com/cndx100/blog/item/2b933f19b6a8b265dbb4bdf7.html
(forcygwin, you need to use cygwin to install libusb)
because openocd talks to jlink via libusb, not the jlink.dll provided from segger.com
so you need to download the libusb-win32 driver to replace segger driver
http://cdnetworks-kr-2.dl.sourceforge.net/project/libusb-win32/libusb-win32-releases/1.2.6.0/libusb-win32-bin-1.2.6.0.zip
and run the inf-wizard.exe in its bin folder
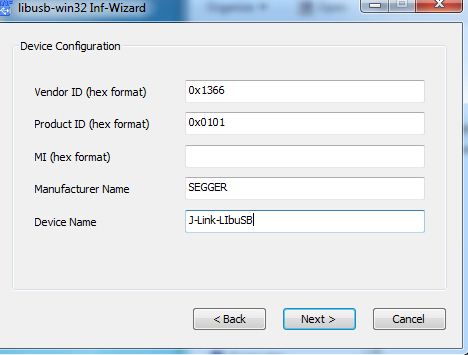
and then installation comes to you, just go ahead. or you can update your driver yourself.
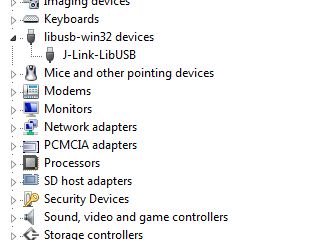
you can check in the device manager,
Step2 openocd installation
firstly, down OpenOCD files
http://sourceforge.net/projects/openocd/files/openocd/
$./configure --enable-jlink //configure to situation, generate makefiles; for more configure options,you need to refer to the official documents.
$./make
.$/make install
then you can test
$openocd -v
Open On-ChipDebugger 0.5.0 (2012-04-02-02:11)
Licensed under GNUGPL v2
For bug reports,read
http://openocd.berlios.de/doc/doxygen/bugs.html
Step 3 OpenOCD Using JLink
For Ubuntu
Platform :STM32F103VCT6 and Jlink
$~/Desktop/openocd-0.5.0$cd tcl
$~/Desktop/openocd-0.5.0/tcl$openocd -f interface/jlink.cfg -f target/stm32f1x.cfg
Open On-ChipDebugger 0.5.0 (2012-04-02-02:11)
Licensed under GNUGPL v2
For bug reports,read
http://openocd.berlios.de/doc/doxygen/bugs.html
Warn : Adapterdriver 'jlink' did not declare which transports it allows; assuming legacyJTAG-only
Info : only onetransport option; autoselect 'jtag'
1000 kHz
adapter_nsrst_delay:100
jtag_ntrst_delay:100
cortex_m3reset_config sysresetreq
Info : J-Linkinitialization started / target CPU reset initiated
Info : J-Link ARM V8compiled Dec 6 2011 18:57:44
Info : J-Link caps0xb9ff7bbf
Info : J-Link hwversion 80000
Info : J-Link hwtype J-Link
Info : J-Link maxmem block 9440
Info : J-Linkconfiguration
Info : USB-Address:0x0
Info : Kickstartpower on JTAG-pin 19: 0xffffffff
Info : Vref = 3.280TCK = 1 TDI = 0 TDO = 1 TMS = 0 SRST = 0 TRST = 0
Info : J-Link JTAGInterface ready
Info : clock speed1000 kHz
Info : JTAG tap:stm32.cpu tap/device found: 0x3ba00477 (mfg: 0x23b, part: 0xba00, ver: 0x3)
Info : JTAG tap:stm32.bs tap/device found: 0x06414041 (mfg: 0x020, part: 0x6414, ver: 0x0)
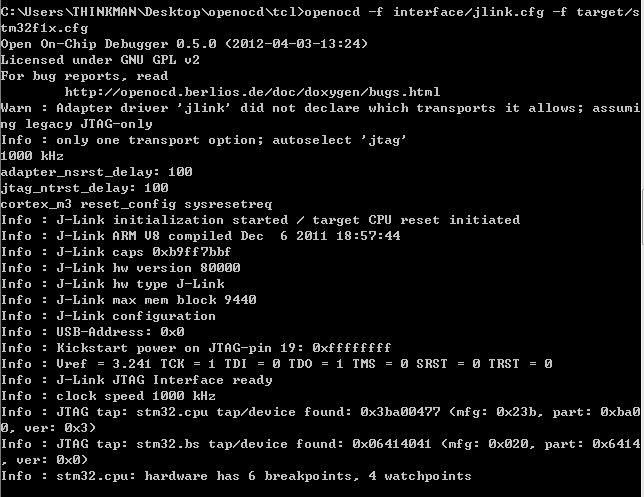
For Windows(Cygwin)
a exe file in the src folder is generated after make
type in cygwin
$openocd -f interface/jlink.cfg -f target/stm32f1x.cfg
or cmd
c:\>openocd -f interface/jlink.cfg -f target/stm32f1x.cfg
// openocd has been added to path in environmental variables and you
//you need to copy cygwin.dll and cygusb0.dll to src folder.