

Springboot+shiro配置笔记+错误小结
软件152 尹以操
springboot不像springmvc,它没有xml配置文件,那该如何配置shiro呢,其实也不难,用java代码+注解来解决这个问题。仅以此篇记录我对shiro的学习,如有对过客造成不便,实在抱歉!
一、加入jar包
既然要用到shiro,当然要加入它的jar包咯,在pom.xml中jar包依赖中加入:
        <dependency>
            <groupId>org.apache.shiro</groupId>
            <artifactId>shiro-spring</artifactId>
            <version>1.2.2</version>
        </dependency>
二、写实体类
这需要三个实体类,hibernate自动生成5个表
User实体(用户):
package com.cy.coo.bean;

import java.util.List;
import javax.persistence.Column;
import javax.persistence.Entity;
import javax.persistence.FetchType;
import javax.persistence.GeneratedValue;
import javax.persistence.Id;
import javax.persistence.JoinColumn;
import javax.persistence.JoinTable;
import javax.persistence.ManyToMany;

import com.fasterxml.jackson.annotation.JsonBackReference;

@Entity
public class User {

    @Id
    @GeneratedValue
    private Integer user_id;//用户序号

    @Column(unique=true)
    private String name;//账户

    private String password;//密码

    private String salt;//盐

    private Integer state;//用户状态

    private String createtime;//创建时间

    @ManyToMany(fetch=FetchType.EAGER)//立即从数据库中进行加载数据;
    @JoinTable(name="User_Role",joinColumns={@JoinColumn(name="user_id")},
    inverseJoinColumns={@JoinColumn(name="role_id")})
    private List<Role> roleList;

    @JsonBackReference
    public List<Role> getRoleList(){
        return roleList;
    }

    public void setRoleList(List<Role> roleList){
        this.roleList=roleList;
    }


    注:其它getter和setter省略


}
关于为什么要在getRolelist这个方法上加上@JsonBackReference注解,可以查看这篇文章http://blog.csdn.net/maxu12345/article/details/45538157
Role实体(角色):
package com.cy.coo.bean;

import java.io.Serializable;
import java.util.ArrayList;
import java.util.List;

import javax.persistence.Entity;
import javax.persistence.FetchType;
import javax.persistence.GeneratedValue;
import javax.persistence.Id;
import javax.persistence.JoinColumn;
import javax.persistence.JoinTable;
import javax.persistence.ManyToMany;

import com.fasterxml.jackson.annotation.JsonBackReference;


@Entity
public class Role implements Serializable {
    private static final long serialVersionUID = 1L;

    @Id
    @GeneratedValue
    private Integer role_id;//角色序号

    private String role_name;//角色名称

    private String role_description;//角色描述

    @ManyToMany
    @JoinTable(name = "User_Role", joinColumns = { @JoinColumn(name = "role_id") }, inverseJoinColumns = {
            @JoinColumn(name = "user_id") })
    private List<User> userList=new ArrayList<>();

    @ManyToMany(fetch=FetchType.EAGER)
    @JoinTable(name="Role_Function",joinColumns={@JoinColumn(name="role_id")},inverseJoinColumns={
            @JoinColumn(name="function_id")})
    private List<Function> functionList=new ArrayList<>();

    @JsonBackReference
    public List<Function> getFunctionList(){
        return functionList;
    }

    public void setFunctionList(List<Function> functionList){
        this.functionList=functionList;
    }

    @JsonBackReference
    public List<User> getUserList() {
        return userList;
    }

    public void setUserList(List<User> userList) {
        this.userList = userList;
    }

    public Integer getRole_id() {
        return role_id;
    }

    public void setRole_id(Integer role_id) {
        this.role_id = role_id;
    }


    public String getRole_name() {
        return role_name;
    }

    public void setRole_name(String role_name) {
        this.role_name = role_name;
    }

    public String getRole_description() {
        return role_description;
    }

    public void setRole_description(String role_description) {
        this.role_description = role_description;
    }


}
Function实体(权限):
package com.cy.coo.bean;

import java.util.List;

import javax.persistence.Entity;
import javax.persistence.GeneratedValue;
import javax.persistence.Id;
import javax.persistence.JoinColumn;
import javax.persistence.JoinTable;
import javax.persistence.ManyToMany;

@Entity
public class Function {

    @Id
    @GeneratedValue
    private Integer function_id;//功能序号

    private String permission;//权限字符串


    @ManyToMany
    @JoinTable(name = "Role_Function", joinColumns = { @JoinColumn(name = "function_id") }, inverseJoinColumns = {
            @JoinColumn(name = "role_id") })
    private List<Role> roleList;

    public List<Role> getRoleList() {
        return roleList;
    }

    public void setRoleList(List<Role> roleList) {
        this.roleList = roleList;
    }

    public Integer getFunction_id() {
        return function_id;
    }

    public void setFunction_id(Integer function_id) {
        this.function_id = function_id;
    }


    public String getPermission() {
        return permission;
    }

    public void setPermission(String permission) {
        this.permission = permission;
    }

}
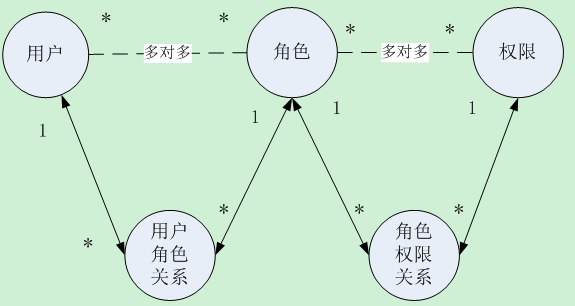
这几个实体类的具体关系如下图,也完美的解释了为什么会生成5张表:
三、写一个与前端交互的controller方法,service层的具体逻辑的方法
    @PostMapping(value = "/logon")
    public Object logon(@RequestBody Login user) {

        return userService.login(user);
    }
这个方法就是将前端传来的username和password封装到Login类中,Login类也只有这两个属性,然后调用Service层的login方法来处理。下面是service的login方法:
/**
     * 用户登录 create by yyc 2017年5月12日下午4:31:26
     */
    @Override
    public Object login(Login user) {
        String username = user.getUsername().trim();
        String password = user.getPassword().trim();

        // 检查空值
        if (!CheckObjectField.CheckField(user)) {
            throw new ResultException(CheckObjectField.FieldName + "为空!");
        }

        // 检查用户状态
        Integer userState = userRepository.findUserState(username);
        if (new Integer("1").equals(userState)) {
            throw new ResultException("该用户已锁定");
        }

        // 1、获取Subject实例对象
        Subject currentUser = SecurityUtils.getSubject();

        // 2、判断当前用户是否登录
        if (currentUser.isAuthenticated() == false) {
            // 3、将用户名和密码封装到UsernamePasswordToken
            UsernamePasswordToken token = new UsernamePasswordToken(username, password);

            // 4、认证
            try {
                currentUser.login(token);// 传到MyAuthorizingRealm类中的方法进行认证
                Session session = currentUser.getSession();
                session.setAttribute("username", username);
            } catch (AuthenticationException e) {
                throw new ResultException("密码或用户名错误");
            }
        }
        // 根据用户名查询角色信息
        List<String> RoleNames = roleService.findRoleName(username);

        return new LoginReturn(username, RoleNames);

    }
service中主要是将用户名和密码封装到shiro的UsernamePasswordToken中,然后将token对象放到SecurityUtils.getSubject()的login方法中,以便shiro认证登录使用。认证失败就会抛出AuthenticationException这个异常,就对异常进行相应的操作,这里的处理是抛出一个自定义异常ResultException。
四、写我认为的shiro的核心类
package com.cy.coo.shiro;


import org.apache.shiro.authc.AuthenticationException;
import org.apache.shiro.authc.AuthenticationInfo;
import org.apache.shiro.authc.AuthenticationToken;
import org.apache.shiro.authc.SimpleAuthenticationInfo;
import org.apache.shiro.authc.UsernamePasswordToken;
import org.apache.shiro.authz.AuthorizationInfo;
import org.apache.shiro.authz.SimpleAuthorizationInfo;
import org.apache.shiro.realm.AuthorizingRealm;
import org.apache.shiro.subject.PrincipalCollection;
import org.apache.shiro.util.ByteSource;
import org.slf4j.Logger;
import org.slf4j.LoggerFactory;
import org.springframework.beans.factory.annotation.Autowired;

import com.cy.coo.bean.Function;
import com.cy.coo.bean.Role;
import com.cy.coo.bean.User;
import com.cy.coo.service.UserService;

/**
 *
*
* @author  E-mail:34782655@qq.com
* @version 创建时间:2017年5月8日 上午10:50:50
* 类说明:
*    --
 */
public class  MyAuthorizingRealm extends AuthorizingRealm {

    private final static Logger logger=LoggerFactory.getLogger(MyAuthorizingRealm.class);

    @Autowired
    private UserService userService;
    //shiro的权限配置方法
    @Override
    protected AuthorizationInfo doGetAuthorizationInfo(PrincipalCollection principals) {

        logger.info("权限配置-->doGetAuthorizationInfo");

        SimpleAuthorizationInfo authorizationInfo = new SimpleAuthorizationInfo();
        logger.info("----------------------------->"+principals.getPrimaryPrincipal());
        User user=(User) principals.getPrimaryPrincipal();
        for(Role role:user.getRoleList()){
            authorizationInfo.addRole(role.getRole_name());
            for(Function function:role.getFunctionList()){
                authorizationInfo.addStringPermission(function.getPermission());
            }
        }

        logger.info("用户"+user.getName()+"具有的角色:"+authorizationInfo.getRoles());
        logger.info("用户"+user.getName()+"具有的权限:"+authorizationInfo.getStringPermissions());

        return authorizationInfo;
    }

        //shiro的身份验证方法
    @Override
    protected AuthenticationInfo doGetAuthenticationInfo(AuthenticationToken token) throws AuthenticationException {

        logger.info("正在验证身份...");
        SimpleAuthenticationInfo info=null;

        //将token转换成UsernamePasswordToken
        UsernamePasswordToken upToken = (UsernamePasswordToken) token;
        //从转换后的token中获取用户名
        String username= upToken.getUsername();
        logger.info("----->"+username);

        //查询数据库,得到用户
        User user=userService.findByName(username);
        if(user==null){
            return null;
        }

        //得到加密密码的盐值
        ByteSource salt = ByteSource.Util.bytes(user.getSalt());
//        logger.info("加密密码的盐:"+salt);
//        //得到盐值加密后的密码:只用于方便数据库测试,后期不会用到。
//        Object md = new SimpleHash("MD5",upToken.getPassword(),salt,1024);
//        logger.info("盐值加密后的密码:"+md);

        info = new SimpleAuthenticationInfo(
                user, //用户名
                user.getPassword(), //密码
                salt, //加密的盐值
                getName()  //realm name
        );
        return info;
    }

}
这个类继承shiro的AuthorizingRealm ,主要有两个方法,一个是权限配置,一个是身份认证,权限配置:当我们要用到权限时shiro会回调doGetAuthorizationInfo这个方法,对当前的用户分配权限,这个方法中的嵌套for循环是怎么回事呢,其实就是将数据库中的对应角色、权限放进shiro中,让他来管理,这需要实体类User中有getRoleList()、getRole_name()和getFunctionList()、getPermission这几个方法,这几个个方法就是设计数据库和实体类时的东西了,关于shiro权限相关的实体类在前面已经给出了。身份认证:在用户登录认证的时候回调,认证失败就抛出AuthenticationException。
五、shiro配置类
package com.cy.coo.shiro;

import java.util.LinkedHashMap;
import java.util.Map;

import org.apache.shiro.authc.credential.HashedCredentialsMatcher;
import org.apache.shiro.cache.ehcache.EhCacheManager;
import org.apache.shiro.mgt.SecurityManager;
import org.apache.shiro.spring.security.interceptor.AuthorizationAttributeSourceAdvisor;
import org.apache.shiro.spring.web.ShiroFilterFactoryBean;
import org.apache.shiro.web.mgt.CookieRememberMeManager;
import org.apache.shiro.web.mgt.DefaultWebSecurityManager;
import org.apache.shiro.web.servlet.SimpleCookie;
import org.slf4j.Logger;
import org.slf4j.LoggerFactory;
import org.springframework.beans.factory.annotation.Qualifier;
import org.springframework.cache.ehcache.EhCacheManagerFactoryBean;
import org.springframework.context.annotation.Bean;
import org.springframework.context.annotation.Configuration;
import org.springframework.core.io.ClassPathResource;

@Configuration // 等价于beans
public class ShiroConfig {

    private static final Logger log = LoggerFactory.getLogger(ShiroFilterFactoryBean.class);

    @Bean(name = "securityManager")
    public SecurityManager securityManager(@Qualifier("authRealm") MyAuthorizingRealm authRealm,
            @Qualifier("cookieRememberMeManager") CookieRememberMeManager cookieRememberMeManager) {
        log.info("securityManager()");
        DefaultWebSecurityManager securityManager = new DefaultWebSecurityManager();
        // 设置realm.
        securityManager.setRealm(authRealm);

        // 设置rememberMe管理器
        securityManager.setRememberMeManager(cookieRememberMeManager);

        return securityManager;
    }

    /**
     * realm
     *
     * @return
     */
    @Bean(name = "authRealm")
    public MyAuthorizingRealm myAuthRealm(
            @Qualifier("hashedCredentialsMatcher") HashedCredentialsMatcher matcher,
            @Qualifier("ehCacheManager") EhCacheManager  ehCacheManager) {
        log.info("myShiroRealm()");
        MyAuthorizingRealm myAuthorizingRealm = new MyAuthorizingRealm();
        // 设置密码凭证匹配器
        myAuthorizingRealm.setCredentialsMatcher(matcher); // myShiroRealm.setCredentialsMatcher(hashedCredentialsMatcher());
        // 设置缓存管理器
        myAuthorizingRealm.setCacheManager(ehCacheManager);

        return myAuthorizingRealm;
    }

    /**
         * 缓存管理器
         * @return
         */
        @Bean(value="ehCacheManager")
        public EhCacheManager ehCacheManager(@Qualifier("ehCacheManagerFactoryBean") EhCacheManagerFactoryBean bean) {
                log.info("ehCacheManager()");
                EhCacheManager cacheManager = new EhCacheManager();
                cacheManager.setCacheManagerConfigFile("classpath:ehcache-shiro.xml");
                return cacheManager;
        }

    /**
     * cookie对象;
     *
     * @return
     */
    @Bean
    public SimpleCookie rememberMeCookie() {
        log.info("rememberMeCookie()");
        // 这个参数是cookie的名称,对应前端的checkbox 的name = rememberMe
        SimpleCookie simpleCookie = new SimpleCookie("rememberMe");
        // <!-- 记住我cookie生效时间30天(259200) ,单位秒;-->
        simpleCookie.setMaxAge(259200);
        return simpleCookie;
    }

    /**
     * 记住我管理器 cookie管理对象;
     *
     * @return
     */
    @Bean(name = "cookieRememberMeManager")
    public CookieRememberMeManager rememberMeManager() {
        System.out.println("rememberMeManager()");
        CookieRememberMeManager cookieRememberMeManager = new CookieRememberMeManager();
        cookieRememberMeManager.setCookie(rememberMeCookie());
        return cookieRememberMeManager;
    }

    /**
     * 密码匹配凭证管理器
     *
     * @return
     */
    @Bean(name = "hashedCredentialsMatcher")
    public HashedCredentialsMatcher hashedCredentialsMatcher() {
        log.info("hashedCredentialsMatcher()");
        HashedCredentialsMatcher hashedCredentialsMatcher = new HashedCredentialsMatcher();

        hashedCredentialsMatcher.setHashAlgorithmName("MD5");// 散列算法:这里使用MD5算法;
        hashedCredentialsMatcher.setHashIterations(1024);// 散列的次数,比如散列两次,相当于
                                                            // md5(md5(""));

        return hashedCredentialsMatcher;
    }

    /**
     * 开启shiro aop注解支持. 使用代理方式;所以需要开启代码支持; Controller才能使用@RequiresPermissions
     *
     * @param securityManager
     * @return
     */
    @Bean
    public AuthorizationAttributeSourceAdvisor authorizationAttributeSourceAdvisor(
            @Qualifier("securityManager") SecurityManager securityManager) {
        log.info("authorizationAttributeSourceAdvisor()");
        AuthorizationAttributeSourceAdvisor authorizationAttributeSourceAdvisor = new AuthorizationAttributeSourceAdvisor();
        authorizationAttributeSourceAdvisor.setSecurityManager(securityManager);
        return authorizationAttributeSourceAdvisor;
    }

    @Bean
    public ShiroFilterFactoryBean shiroFilter(@Qualifier("securityManager") SecurityManager securityManager) {
        log.info("shirFilter()");
        ShiroFilterFactoryBean shiroFilterFactoryBean = new ShiroFilterFactoryBean();

        // 必须设置 SecurityManager
        shiroFilterFactoryBean.setSecurityManager(securityManager);

        // 拦截器.
        Map<String, String> map = new LinkedHashMap<String, String>();

        map.put("/logout", "logout");
        map.put("/login", "anon");
        map.put("/logon", "anon");

        map.put("/**", "authc");

        // 如果不设置默认会自动寻找Web工程根目录下的"/login.jsp"页面
        shiroFilterFactoryBean.setLoginUrl("/login");
        // 登录成功后要跳转的链接
        shiroFilterFactoryBean.setSuccessUrl("/index");
        // 未授权界面;
        shiroFilterFactoryBean.setUnauthorizedUrl("/unauthorized");

        shiroFilterFactoryBean.setFilterChainDefinitionMap(map);
        return shiroFilterFactoryBean;
    }
}
这个没什么好说的,最后一个类是shiro的过滤器配置。可以看到我在每个方法上面加了一个@Bean(name="..."),其实这是spring的注解,将这个类放到spring容器中管理,在方法形参中使用@Qualifier(...)来使用它,以致于我们在方法体中调用某个方法时就方面多了。
在这里,关于shiro在springboot中的基础配置就完成了。下面是期间遇到的错误解决方案:
@Configuration
public class HibernateConfig {
           @Bean
           public FilterRegistrationBean registerOpenEntityManagerInViewFilterBean() {
               FilterRegistrationBean registrationBean = new FilterRegistrationBean();
               OpenEntityManagerInViewFilter filter = new OpenEntityManagerInViewFilter();
               registrationBean.setFilter(filter);
               registrationBean.setOrder(5);
               return registrationBean;
           }
}
参考文章:
错误二:这个在前面也提到过了,返回json数据出现Could not write JSON document: Infinite recursion(无法编写JSON文档:无限递归 );
在后面的使用中发现这个错误也是这样解决的,java.lang.IllegalStateException: Cannot call sendError() after the response has been committed,错误页面到最后就是这样,如图:

解决方法:
