
【 Linux 网络虚拟化 】Openvswitch
openvswitch:
openvswitch: 开放的虚拟交换机,虚拟交换就是利用虚拟平台,通过软件的方式形成交换机部件。跟传统的物理交换机相比,虚拟交换机同样具备众多优点:
1. 配置灵活;
2. 成本更低
接下来通过openvswitch + netns 实现如下虚拟网络架构:
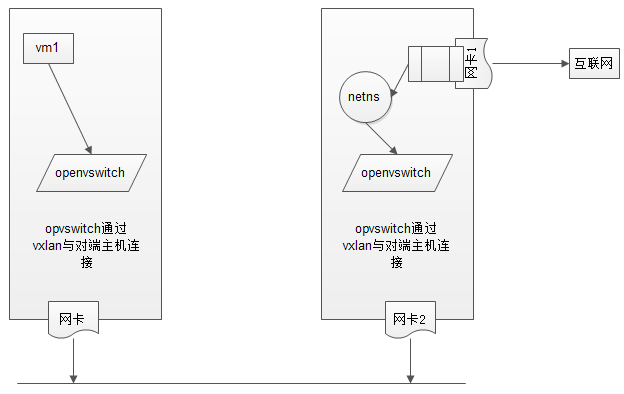
这里通过vmware来实现:
系统:centos7.2 x64
主机1 一张网卡,模式:仅主机模式
主机2 两张网卡,1: 模式:桥接模式;2: 模式:仅主机模式
主机1:
eno16777736: 192.168.190.128
主机2:
eno16777736: 192.168.190.130 eno33554992: 192.168.1.167
本文中所需附件下载:
链接:http://pan.baidu.com/s/1qYQ4BeO 密码:4h4h
1、安装Openvswitch,创建主机1的虚拟网络
    Create the repository config file /etc/yum.repos.d/naulinux-extras.repo:

    [naulinux-extras]
    name=NauLinux Extras
    baseurl=http://downloads.naulinux.ru/pub/NauLinux/7/$basearch/Extras/RPMS/
    enabled=0
    gpgcheck=1
    gpgkey=http://downloads.naulinux.ru/pub/NauLinux/RPM-GPG-KEY-linux-ink

    Install openvswitch rpm package:

    # yum --enablerepo=naulinux-extras install openvswitch
安装openvswith官方说的很清楚了 。
但是这里,我们的主机1是仅主机模式无法下载安装。
这里直接使用下载好的rpm包安装。
主机1配置:
# tar xf openvswitch.tar.gz
# rpm -ivh openvswitch/*.rpm
# systemctl start openvswitch ; systemctl enable openvswitch

创建虚拟交换机br-in
# ovs-vsctl add-br br-in

# ovs-vsctl show
de08faca-8165-4fe7-88d9-459796b5deec
    Bridge br-in
        Port br-in
            Interface br-in
                type: internal
    ovs_version: "2.5.0"

创建port vx0,并且设置vx0的类型为vxlan,vxlan相关联的对端主机是192.168.190.130(主机2)
# ovs-vsctl add-port br-in vx0 -- set interface vx0 type=vxlan options:remote_ip=192.168.190.130


ovs-vsctl show
de08faca-8165-4fe7-88d9-459796b5deec
    Bridge br-in
        Port "vx0"
            Interface "vx0"
                type: vxlan
                options: {remote_ip="192.168.190.130"}
        Port br-in
            Interface br-in
                type: internal
    ovs_version: "2.5.0"
主机2配置:
# tar xf openvswitch.tar.gz
# rpm -ivh openvswitch/*.rpm
# systemctl start openvswitch ; systemctl enable openvswitch

创建虚拟交换机br-in
# ovs-vsctl add-br br-in

# ovs-vsctl show
de08faca-8165-4fe7-88d9-459796b5deec
    Bridge br-in
        Port br-in
            Interface br-in
                type: internal
    ovs_version: "2.5.0"

创建port vx0,并且设置vx0的类型为vxlan,vxlan相关联的对端主机是192.168.190.128(主机1)
# ovs-vsctl add-port br-in vx0 -- set interface vx0 type=vxlan options:remote_ip=192.168.190.128
# ovs-vsctl show
e43bbb36-5e1f-4178-8dbc-a87bf11332ed
    Bridge br-in
        Port br-in
            Interface br-in
                type: internal
        Port "vx0"
            Interface "vx0"
                type: vxlan
                options: {remote_ip="192.168.190.128"}
    ovs_version: "2.5.0"
这样两台主机之间就建立其了vxlan的隧道传输。
2. 在主机1上创建虚拟机vm1
主机1配置:
# mkdir -pv /images/linux

通过xmanager将镜像文件上传到/images/linux目录

# cp -a cirros-0.3.5-i386-disk.img vm1.img
# yum install libvirt libvirt-client qemu-kvm virt-install -y

这里要注意,用libvirt安装虚拟机前,需要首先配置libvirt网络,因为openvswitch和brctl是不兼容的,libvirt是无法自动发现的。

# cd /etc/libvirt/qemu/networks/
不需要默认nat模式
# mv default.xml default.xml_bak

创建br-in网络
# vim br-in.xml
# vim br-in.xml

<network>
    <name>br-in</name>
    <forward mode='bridge'/>
    <bridge name='br-in'/>
    <virtualport type='openvswitch'/>
</network>

# systemctl start libvirtd ; systemctl enable libvirtd
# virsh net-list --all
 Name                 State      Autostart     Persistent
----------------------------------------------------------
 br-in                inactive   no            yes

启动br-in网络
# virsh net-start br-in
# virsh net-autostart br-in

创建vm1
# virt-install --name vm1 --ram 128 --vcpus=1 --disk path=/images/linux/vm1.img --network network:br-in,model=virtio --import --force --nographics --serial=pty --console=pty
3. 在主机2上实现netns
主机2配置:

首先将第二张做桥接。
# cd /etc/sysconfig/network-scripts/
# cp -a ifcfg-eno33554992 ifcfg-br-out
# vim ifcfg-eno33554992
修改如下:

TYPE=Ethernet
BOOTPROTO=none
DEFROUTE=yes
PEERDNS=yes
PEERROUTES=yes
IPV4_FAILURE_FATAL=no
IPV6INIT=yes
IPV6_AUTOCONF=yes
IPV6_DEFROUTE=yes
IPV6_PEERDNS=yes
IPV6_PEERROUTES=yes
IPV6_FAILURE_FATAL=no
NAME=eno33554992
UUID=2269e064-1260-426a-ba84-7d1c06e6ab0a
DEVICE=eno33554992
ONBOOT=yes
BRIDGE=br-out     # 主要添加这行

# vim ifcfg-br-out

TYPE=Bridge     # 修改类型
BOOTPROTO=none
DEFROUTE=yes
PEERDNS=yes
PEERROUTES=yes
IPV4_FAILURE_FATAL=no
IPV6INIT=no
IPV6_AUTOCONF=yes
IPV6_DEFROUTE=yes
IPV6_PEERDNS=yes
IPV6_PEERROUTES=yes
IPV6_FAILURE_FATAL=no
NAME=br-out     # 修改名称
DEVICE=br-out     # 修改设备名
ONBOOT=yes
IPADDR=192.168.1.167
NETMASK=255.255.255.0
GATEWAY=192.168.1.1
DNS1=192.168.1.1

# systemctl restart network

物理网卡此时就作为桥设备
# ifconfig eno33554992
eno33554992: flags=4163<UP,BROADCAST,RUNNING,MULTICAST>  mtu 1500
        ether 00:0c:29:d9:13:e7  txqueuelen 1000  (Ethernet)
        RX packets 270  bytes 28571 (27.9 KiB)
        RX errors 0  dropped 0  overruns 0  frame 0
        TX packets 23  bytes 2812 (2.7 KiB)
        TX errors 0  dropped 0 overruns 0  carrier 0  collisions 0


br-out就作为本机的网卡通信
# ifconfig br-out
br-out: flags=4163<UP,BROADCAST,RUNNING,MULTICAST>  mtu 1500
        inet 192.168.1.167  netmask 255.255.255.0  broadcast 192.168.1.255
        ether 00:0c:29:d9:13:e7  txqueuelen 0  (Ethernet)
        RX packets 194  bytes 15399 (15.0 KiB)
        RX errors 0  dropped 65  overruns 0  frame 0
        TX packets 10  bytes 676 (676.0 B)
        TX errors 0  dropped 0 overruns 0  carrier 0  collisions 0

安装bridge工具
# yum install bridge-utils -y
# brctl show
bridge name    bridge id        STP enabled    interfaces
br-out        8000.000c29d913e7    no        eno33554992

这样,我们的物理桥设备就完成了,接下来创建netns虚拟网络空间。

创建虚拟网络空间为ns1
# ip netns add ns1
开启本地回环网络
# ip netns exec ns1 ifconfig lo up
打开网卡间转发功能
# ip netns exec ns1 sysctl -w net.ipv4.ip_forward=1
我们需要创建两张虚拟网卡,这里的虚拟网卡可以理解成网线。
如图:
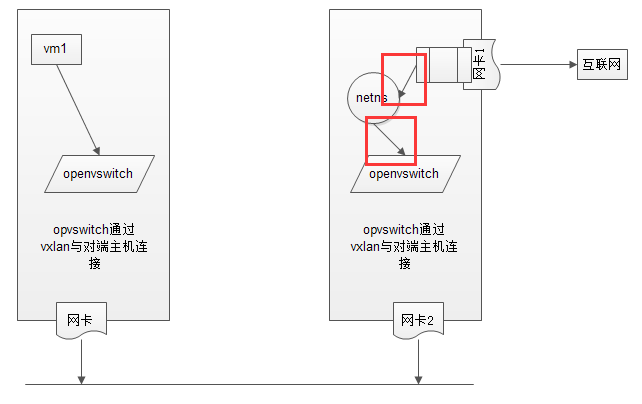
就是图中红色的两段。
首先将netns和openvswitch连接起来。
创建一对网卡,net-in是前半段,net-out是后半段,就像网线一样,前半段我们接到openvswitch上,后半段接到netns上,这样就在同一个网络里面了
# ip link add net-in type veth peer name net-out
# ifconfig net-in up
# ifconfig net-out up

将net-in添加到openvswitch

# ovs-vsctl add-port br-in net-in
# ovs-vsctl show
e43bbb36-5e1f-4178-8dbc-a87bf11332ed
    Bridge br-in
        Port br-in
            Interface br-in
                type: internal
        Port net-in
            Interface net-in
        Port "vx0"
            Interface "vx0"
                type: vxlan
                options: {remote_ip="192.168.190.128"}
    ovs_version: "2.5.0"

将net-out添加到ns1中

# ip link set dev net-out name eth0 netns ns1
该网卡现在连接到了openvswitch上,配置和vm1中通网段的ip地址。
登录上vm1主机
# ifconfig lo up
# ifconfig eth0 10.0.0.2 netmask 255.255.255.0 up
在主机2上配置:
# ip netns exec ns1 ifconfig eth0 10.0.0.1 netmask 255.255.255.0 up
# ip netns exec ns1 ping 10.0.0.2
PING 10.0.0.2 (10.0.0.2) 56(84) bytes of data.
64 bytes from 10.0.0.2: icmp_seq=1 ttl=64 time=16.2 ms
64 bytes from 10.0.0.2: icmp_seq=2 ttl=64 time=1.77 ms
现在主机1中的虚拟机vm1和netns虚拟网络空间是互通了。
再次,创建一对网卡,net1-in是前半段,net1-out是后半段,就像网线一样,前半段我们接到netns上,后半段接到br-out上,这样就在同一个网络里面了
# ip link add net1-in type veth peer name net1-out
# ifconfig net1-in up
# ifconfig net1-out up

将net1-in 添加到netns中
# ip link set dev net1-in name eth1 netns ns1
将net1-out 添加到br-out中
# brctl addif br-out net1-out
因为这里是和第二张物理网卡连接的,这张网卡直接对外网,所以netns 的第二张网卡需要配置主机同网段内地址。
# ip netns exec ns1 ifconfig eth1 192.168.1.130 netmask 255.255.255.0 up
为主机1中的vm1配置路由地址:
# ip route add default via 10.0.0.1
# ping 192.168.1.130
PING 192.168.1.130 (192.168.1.130): 56 data bytes
64 bytes from 192.168.1.130: seq=0 ttl=64 time=18.684 ms
64 bytes from 192.168.1.130: seq=1 ttl=64 time=1.212 ms
这样,就说明vm1已经达到netns中的第二张对外的网卡上。
为netns配置路由地址并添加源地址转发:
# ip netns exec ns1 ip route add default via 192.168.1.1
# ip netns exec ns1 iptables -t nat -A POSTROUTING -s 10.0.0.2/32 -j SNAT --to-source 192.168.1.130
# ip netns exec ns1 iptables -t nat -A PREROUTING -d 192.168.130/32 -j DNAT --to-destination 10.0.0.1
从vm1中ping公网地址:
# ping qq.com
PING qq.com (101.226.103.106): 56 data bytes
64 bytes from 101.226.103.106: seq=0 ttl=50 time=48.198 ms
64 bytes from 101.226.103.106: seq=1 ttl=50 time=49.612 ms
这样我们就实现了内网主机中的虚拟主机访问外网。

 浙公网安备 33010602011771号