mongodb之使用explain和hint性能分析和优化
当你第一眼看到explain和hint的时候,第一个反应就是mysql中所谓的这两个关键词,确实可以看出,这个就是在mysql中借鉴过来的,既然是借鉴
过来的,我想大家都知道这两个关键字的用处,话不多说,速速观看~~~
一:explain演示
1. 构建数据
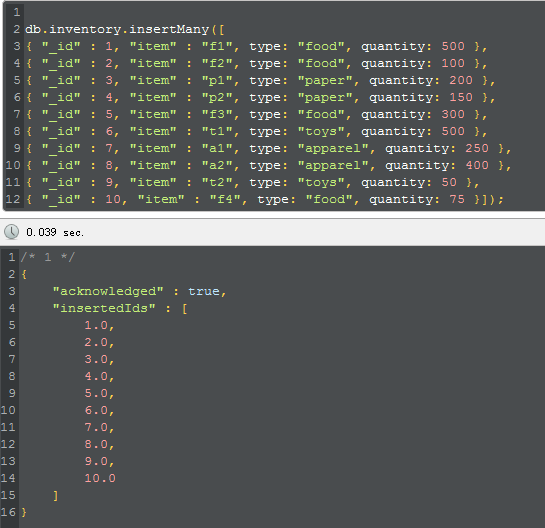
为了方便演示,我需要create ten data to inventory,而且还是要在no index 的情况下,比如下面这样:
 1 db.inventory.insertMany([
 2 { "_id" : 1, "item" : "f1", type: "food", quantity: 500 },
 3 { "_id" : 2, "item" : "f2", type: "food", quantity: 100 },
 4 { "_id" : 3, "item" : "p1", type: "paper", quantity: 200 },
 5 { "_id" : 4, "item" : "p2", type: "paper", quantity: 150 },
 6 { "_id" : 5, "item" : "f3", type: "food", quantity: 300 },
 7 { "_id" : 6, "item" : "t1", type: "toys", quantity: 500 },
 8 { "_id" : 7, "item" : "a1", type: "apparel", quantity: 250 },
 9 { "_id" : 8, "item" : "a2", type: "apparel", quantity: 400 },
10 { "_id" : 9, "item" : "t2", type: "toys", quantity: 50 },
11 { "_id" : 10, "item" : "f4", type: "food", quantity: 75 }]);
2. 无索引查询
db.inventory.find(
   { quantity: { $gte: 100, $lte: 200 } }
).explain("executionStats")
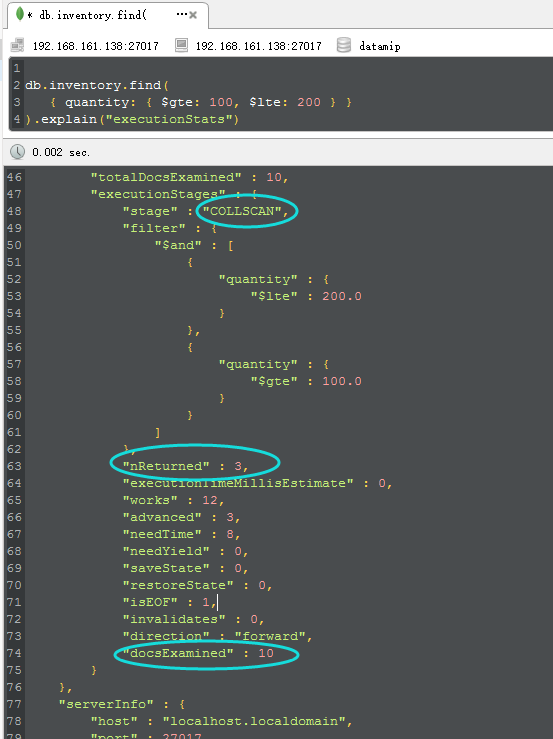
从上图中,我们看到了三个圈圈,这些都是我们在find中非常重要的信息,具体信息解释如下:
<1>COLLSCAN
这个是什么意思呢? 如果你仔细一看,应该知道就是CollectionScan,就是所谓的“集合扫描”,对不对,看到集合扫描是不是就可以直接map到
数据库中的table scan/heap scan呢??? 是的,这个就是所谓的性能最烂最无奈的由来。
<2> nReturned
这个很简单,就是所谓的numReturned,就是说最后返回的num个数,从图中可以看到,就是最终返回了三条。。。
<3> docsExamined
那这个是什么意思呢??就是documentsExamined,检查了10个documents。。。而从返回上面的nReturned。。。
ok,那从上面三个信息中,我们可以得出,原来我examine 10 条数据,最终才返回3条,说明做了7条数据scan的无用功,那么这个时候问题就来了,
如何减少examine的documents。。。
完整的plans如下:


/* 1 */
{
    "queryPlanner" : {
        "plannerVersion" : 1,
        "namespace" : "datamip.inventory",
        "indexFilterSet" : false,
        "parsedQuery" : {
            "$and" : [
                {
                    "quantity" : {
                        "$lte" : 200.0
                    }
                },
                {
                    "quantity" : {
                        "$gte" : 100.0
                    }
                }
            ]
        },
        "winningPlan" : {
            "stage" : "COLLSCAN",
            "filter" : {
                "$and" : [
                    {
                        "quantity" : {
                            "$lte" : 200.0
                        }
                    },
                    {
                        "quantity" : {
                            "$gte" : 100.0
                        }
                    }
                ]
            },
            "direction" : "forward"
        },
        "rejectedPlans" : []
    },
    "executionStats" : {
        "executionSuccess" : true,
        "nReturned" : 3,
        "executionTimeMillis" : 1,
        "totalKeysExamined" : 0,
        "totalDocsExamined" : 10,
        "executionStages" : {
            "stage" : "COLLSCAN",
            "filter" : {
                "$and" : [
                    {
                        "quantity" : {
                            "$lte" : 200.0
                        }
                    },
                    {
                        "quantity" : {
                            "$gte" : 100.0
                        }
                    }
                ]
            },
            "nReturned" : 3,
            "executionTimeMillisEstimate" : 0,
            "works" : 12,
            "advanced" : 3,
            "needTime" : 8,
            "needYield" : 0,
            "saveState" : 0,
            "restoreState" : 0,
            "isEOF" : 1,
            "invalidates" : 0,
            "direction" : "forward",
            "docsExamined" : 10
        }
    },
    "serverInfo" : {
        "host" : "localhost.localdomain",
        "port" : 27017,
        "version" : "3.2.8",
        "gitVersion" : "ed70e33130c977bda0024c125b56d159573dbaf0"
    },
    "ok" : 1.0
}
3. 使用single field 加速查找
知道前因后果之后,我们就可以进行针对性的建立索引,比如在quality字段之上,如下:
db.inventory.createIndex({ quantity: 1})

db.inventory.find(
   { quantity: { $gte: 100, $lte: 200 } }
).explain("executionStats")
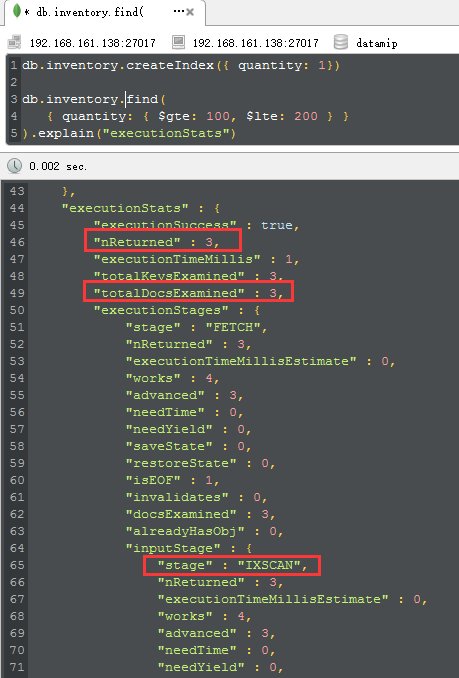
好了,这时候就有意思了,当我们执行完createindex之后,再次explain,4个重要的parameters就漂下来了:
<1> IXSCAN
这个时候再也不是所谓的COLLSCAN了,而是IndexScan,这就说明我们已经命中索引了。
<2> nReturned,totalDocsExamined,totalKeysExamined
从图中可以看到三个参数都是3,这就说明我们的mongodb查看了3个key,3个document,返回3个文档,这个就是所谓的高性能所在,对吧。
二:hint演示
说到hint,我想大家也是知道的,很好玩的一个东西,就是用来force mongodb to excute special index,对吧,为了方便演示,我们做两组复合索
引,比如这次我们在quality和type上构建一下:
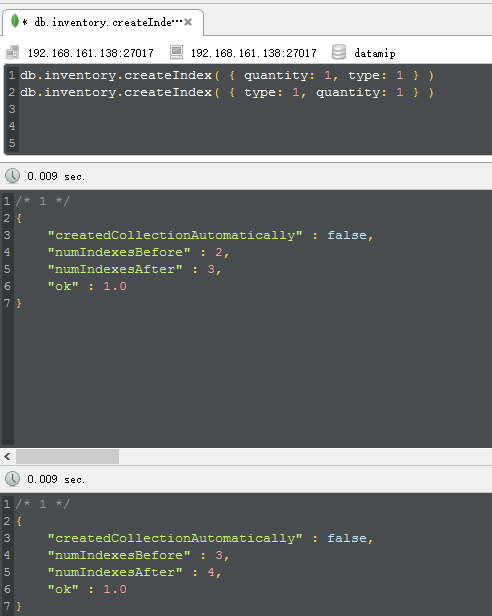
building完成之后,我们故意这一个这样的查询,针对quantity是一个范围,而type是一个定值的情况下,我们force mongodb去使用quantity开头
的复合索引,从而强制mongodb give up 那个以{type:1,quantity:1}的复合索引,很有意思哦,比如下图:
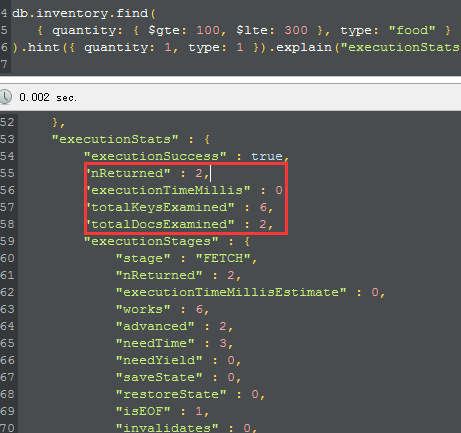
从图中,可以看到,我们检查了6个keys,而从最终找到了2个文档,现在我们就知道了,2和6之间还是有不足的地方等待我们去优化了,对吧,下面
我们不hint来看一下mongodb的最优的plan是怎么样的。

再看上面的图,你应该明白了,mongodb果然执行了那个最优的plan,是不是很好玩,好了,本篇就说到这里,希望对你有帮助~

