
(1)FluidMoveBehavior 之 ListBox 中详细内容项飞出来
在 Blend 中集成了很多行为,首先需要了解一下Behaviors(行为)的几个关键点:
(1)Behaviors(行为)是可复用代码集合,可以被任何对象附加使用;
(2)设计人员和开发人员可以使用Behaviors(行为)在不用设计任何代码的情况下,添加相关功能到XAML中;
(3)Behaviors(行为)可以通过XAML附加到任何对象元素中,无需设计任何后台代码;
(4)一个Behaviors(行为)可以被多个对象同时调用;
在 Silverlight 中已有的行为里面,FluidMoveBehavior 行为可以很方便的实现很多有趣的动画,从而大大
简化了我们的开发。
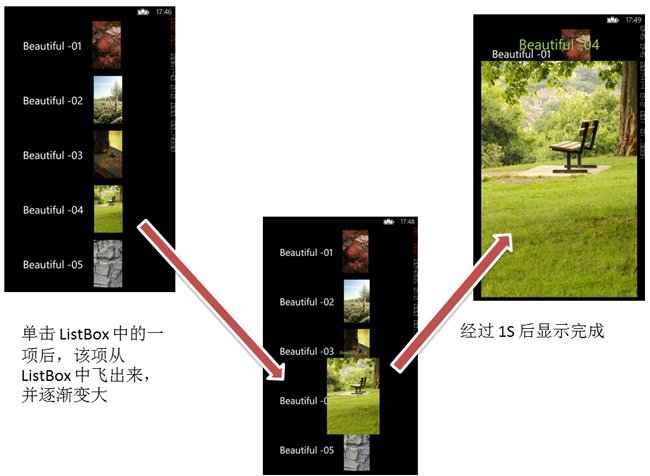
本文介绍如何实现在 Windows Phone 中的 ListBox 中,选中其中一项后,以动画的效果显示详细信息,让人
感觉内容是从 ListBox 中飞出来的,新闻列表类的应用比较常见:
步骤一:
在 MainPage 的 XAML 页面中,添加一个 ListBox,每一项包含标题和一张配图:
<ListBox x:Name="listbox">
    <ListBox.ItemTemplate>
       <DataTemplate>
          <StackPanel Orientation="Horizontal" Width="460" Margin="10">


                 <TextBlock Text="{Binding Title}" TextAlignment="Center" VerticalAlignment="Center" Margin="30"
                           FontSize="30" Foreground="AliceBlue"/>

                 <Image Source="{Binding Img}" Width="80"/>
          </StackPanel>
       </DataTemplate>
    </ListBox.ItemTemplate>
</ListBox>
第二步,添加一个 StackPanel,里面添加一个 TextBlock 用来显示选中项的标题,Image 用来显示选中项的配图:
<StackPanel x:Name="stack" Orientation="Vertical" DataContext="{Binding SelectedItem, ElementName=listbox}" Margin="10">
         <TextBlock Text="{Binding Title}" Foreground="YellowGreen" FontSize="40" Margin="10,20"
                                TextAlignment="Center" FontFamily="Buxton Sketch"/>
         <Image Source="{Binding Img}"/>
</StackPanel>
可以看出,在 StackPanel 中,给它的 DataContext 属性 绑定的是上面的 listbox 控件的 SelectItem 选项,
这样当单击 listbox 时,StackPanel 中的 Children 便能绑定到 选中项 的标题和图片。
第三步:
声明一个包含 标题 和 图片的类:
    public class News
    {
        public string Title { get; set; }
        public string Img { get; set; }
    }
在项目中添加一个名为 Images 的文件夹,里面添加 8 张示例图片,并在 MainPage 的 CodeBehind 页面中,添加相应的绑定数据:
        // 构造函数
        public MainPage()
        {

            InitializeComponent();

            this.Loaded += MainPage_Loaded;
        }


        List<News> listNews; // 数据源
        void MainPage_Loaded(object sender, RoutedEventArgs e)
        {

            listNews = new List<News>();

            listNews.Add(new News { Img = "/Images/01.jpg", Title = "Beautiful -01" });
            listNews.Add(new News { Img = "/Images/02.jpg", Title = "Beautiful -02" });
            listNews.Add(new News { Img = "/Images/03.jpg", Title = "Beautiful -03" });
            listNews.Add(new News { Img = "/Images/04.jpg", Title = "Beautiful -04" });
            listNews.Add(new News { Img = "/Images/05.jpg", Title = "Beautiful -05" });
            listNews.Add(new News { Img = "/Images/06.jpg", Title = "Beautiful -06" });
            listNews.Add(new News { Img = "/Images/07.jpg", Title = "Beautiful -07" });
            listNews.Add(new News { Img = "/Images/08.jpg", Title = "Beautiful -08" });

            listbox.ItemsSource = listNews; // 绑定到列表控件
        }
第四步,为了实现当用户单击 Back 键时,清空详细信息中的文字和图片,在页面的 OnBackKeyPress 事件中添加代码:
    protected override void OnBackKeyPress(System.ComponentModel.CancelEventArgs e)
    {
        if (listbox.SelectedIndex > -1)
        {
            listbox.SelectedIndex = -1;
            e.Cancel = true;
        }
        base.OnBackKeyPress(e);
    }
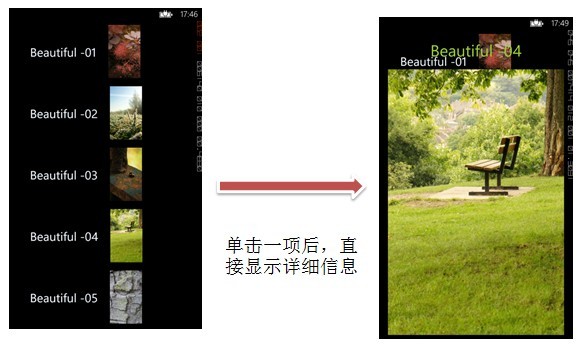
实现上面四步后,可以实现当单击 ListBox 中项的时候,可以显示项目的详细信息,不过没有动画效果,不够生动:
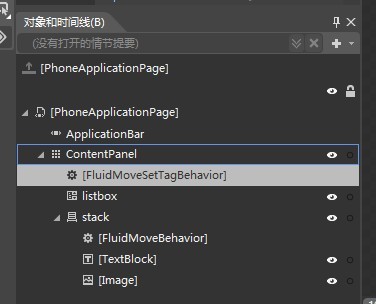
第五步,添加动画效果,此时需要用到 FluidMoveBehavior 行为了,此时需要打开 Blend 进行操作。首先选择
左侧的 资产 -> 行为 -> FluidMoveBehavior,把它拖动到 “对象与时间线” 中的 StackPanel 详细信息控件上,拖动后的效果:

在右侧的属性面板中设置该 FluidMoveBehavior:

第六步,因为 FluidMoveBehavior 的行为将尝试查找之前使用 FluidMoveSetTagBehavior 行为标记有相同数据的元素,
所以给 listbox 中 DataTemplate 里面的 StackPanel 设置 FluidMoveSetTagBehavior 行为。
因为前四步中使用的集合中的数据是运行时数据,所以并不能在 Blend 中直接看到,这里我们走一点捷径,不在这里创建示例数据,
而是把 FluidMoveSetTagBehavior 拖动到页面中的任何元素后,设置好相应属性后,在 xaml 代码中剪切到 DataTemplate 里面
的 StackPanel 节点中,比如 根节点 Grid 上:
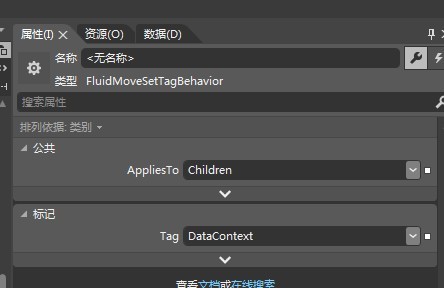
设置它的 AppliesTo 属性和 Tag 属性:
然后把 Blend 生成的代码,剪切到 ListBox 的 DataTemplate 里面的 StackPanel 节点中 。
最终 MainPage 的 XAML 页面中的代码为:
    <Grid x:Name="ContentPanel" Grid.Row="1" Margin="12,0,12,0">
            <ListBox x:Name="listbox">
                <ListBox.ItemTemplate>
                    <DataTemplate>
                        <StackPanel Orientation="Horizontal" Width="460" Margin="10">
                            <i:Interaction.Behaviors>
                                <el:FluidMoveSetTagBehavior AppliesTo="Children" Tag="DataContext"/>
                            </i:Interaction.Behaviors>
                            <TextBlock Text="{Binding Title}" TextAlignment="Center"
                                       VerticalAlignment="Center" Margin="30" FontSize="30" Foreground="AliceBlue"/>
                            <Image Source="{Binding Img}" Width="80"/>
                        </StackPanel>
                    </DataTemplate>
                </ListBox.ItemTemplate>
            </ListBox>

            <StackPanel x:Name="stack" Orientation="Vertical" DataContext="{Binding SelectedItem, ElementName=listbox}" Margin="10">
                <i:Interaction.Behaviors>
                    <el:FluidMoveBehavior InitialTag="DataContext" Duration="0:0:1">
                        <el:FluidMoveBehavior.EaseY>
                            <CircleEase EasingMode="EaseOut"/>
                        </el:FluidMoveBehavior.EaseY>
                        <el:FluidMoveBehavior.EaseX>
                            <CircleEase EasingMode="EaseOut"/>
                        </el:FluidMoveBehavior.EaseX>
                    </el:FluidMoveBehavior>
                </i:Interaction.Behaviors>
                <TextBlock Text="{Binding Title}" Foreground="YellowGreen" FontSize="40"
                            Margin="10,20" TextAlignment="Center" FontFamily="Buxton Sketch"/>
                <Image Source="{Binding Img}"/>
            </StackPanel>
        </Grid>
完成,运行实现单击后详细信息飞出 ListBox 的效果。
参考文档:
FluidMoveBehavior、FluidMoveSetTagBehavior 和数据存储
Channel9 中看到一个 wpf 的视频:http://channel9.msdn.com/Shows/Visual-Studio-Toolbox/User-Interfaces-in-WPF

