


Jetty嵌入式Web容器攻略
Jetty是一个用 Java 实现、开源、基于标准的,并且具有丰富功能的 Http 服务器和 Web 容器。Jetty中应用最广泛的一项功能就是可以作为嵌入式Web容器。
- 在开发阶段,可以使用Jetty在Eclipse里直接启动应用,而不是像Tomcat那样繁琐,先把几十兆应用打包,然后再复制到某个目录后再启动。
- 在测试阶段,可以直接在测试用例中启动Jetty,而不是先将应用打包部署到容器。
- 在运行阶段,可以将war包配置成直接能够运行的应用
本文将着重介绍如何配置使用Jetty的嵌入式Web容器功能,关于Jetty的基本配置和功能请参考http://www.ibm.com/developerworks/cn/web/wa-lo-jetty/
一、开发阶段
1、使用maven启动Jetty
我们修改了源码的时候eclipse会自动编译,Jetty Maven Plugin插件发现编译文件有变化后会自动更新到jetty容器中,非常方便我们进行开发。
首先定义Jetty的版本属性
    <properties>
        <jetty.version>8.1.9.v20130131</jetty.version>
    </properties>
然后引入Jetty依赖
    <!-- jetty -->
    <dependency>
        <groupId>org.eclipse.jetty.aggregate</groupId>
        <artifactId>jetty-webapp</artifactId>
        <version>${jetty.version}</version>
        <scope>test</scope>
    </dependency>
    <dependency>
        <groupId>org.eclipse.jetty</groupId>
        <artifactId>jetty-jsp</artifactId>
        <version>${jetty.version}</version>
        <scope>test</scope>
    </dependency>
配置Jetty Maven Plugin插件,示例如下
    <plugin>
        <groupId>org.mortbay.jetty</groupId>
        <artifactId>jetty-maven-plugin</artifactId>
        <version>${jetty.version}</version>
        <configuration>
            <systemProperties>
                <systemProperty>
                    <name>spring.profiles.active</name>
                    <value>development</value>
                </systemProperty>
            </systemProperties>
            <useTestClasspath>true</useTestClasspath>

            <webAppConfig>
                <contextPath>/${project.artifactId}</contextPath>
            </webAppConfig>
        </configuration>
    </plugin>
该配置运行jetty并指定spring的profile为development,同时设定web应用的上下文地址与应用本身的artifactId一致。
执行如下命令启动Jetty,即可通过http://localhost:8080/${project.artifactId}访问Web应用。
mvn jetty:run
Jetty Maven Plugin插件支持多个maven goals,最常用的就是run,下面的参数支持大部分的goals
(1)配置Jetty容器(支持所有goals)
- <connectors>:可选参数,配置org.eclipse.jetty.server.Connector(Jetty端口监听器)列表,如果不指定该参数,将会连接默认的8080端口。
- <jettyXml>:可选参数,指定Jetty配置文件的路径
- <scanIntervalSeconds>:可选参数,配置Web应用扫描的暂停时间,Web应用扫描如果发现修改了程序,会自动重新部署。该参数默认值为0,即不启动热部署
- <systemProperties>:可选参数,设置插件执行时的系统参数,比如上面的配置示例中指定了spring的profile为development,如果不设置该参数,就需要配置maven与spring的profile一致,同时在mvn命令中增加-Pdevelopment选项,或者直接在spring配置文件中设置spring.profiles.active为development
- <systemPropertiesFile>:可选参数,设置系统参数配置文件的位置,将会批量执行其中的系统参数配置
- <loginServices>:可选参数,配置org.eclipse.jetty.security.LoginService实现类的列表。
- <requestLog>:可选参数,配置请求日志接口:org.eclipse.jetty.server.RequestLog的实现类,配置请求日志的处理格式,
比如org.mortbay.jetty.NCSARequestLog就是一个NCSA格式((美国)国家超级计算技术应用中心 (NCSA) 公用格式,是常用的标准日志格式)的实现。
(2)配置Web应用程序(不支持run-forked、stop两个goals)
- <webApp>:从jetty6.1.6rc0起使用webAppConfig,web应用程序配置根节点
- <contextPath>:设置web应用程序的context路径,默认情况下,它被设置成该项目的pom.xml的<artifactId>
- <descriptor>:设置web应用程序主配置文件web.xml的路径,默认该配置文件位于WEB-INF目录下
- <defaultsDescriptor>:设置先于web.xml执行的webdefault.xml配置文件的路径
- <overrideDescriptor>:设置在web.xml读取之后执行的配置文件,使用该参数可以覆盖或增加web.xml中的配置
- <tempDirectory>:Web应用的临时目录,Jetty可以在此目录编译jsp文件或者复制jar包,默认路径为${project.build.outputDirectory}/tmp
- <baseResource>:指定Web应用静态资源所在的路径,默认路径为src/main/webapp
- <resourceBases>:指定多个Web应用静态资源所在的路径,使用逗号分隔
- <baseAppFirst>:可选参数,默认值为true,控制是否可以在Web应用的原始资源之前或之后叠加多个war包
- <jettyEnvXml>:可选参数,指定jetty-env.xml配置文件的路径
- <containerIncludeJarPattern>:jetty-8.1.x之后的版本可以使用,可选参数,配置加载到Jetty容器 Classloader中的Jar包的路径或匹配模式,符合条件的jar包将会被检测META-INF、资源、tld和类的继承关系
- <webInfIncludeJarPattern>:jetty-8.1.x之后的版本可以使用,可选参数,配置加载到Web应用程序的Classloader(WEB-INF classpath)中的Jar包的路径或匹配模式,符合条件的jar包将会被检测META-INF、资源、tld和类的继承关系
- <contextXml>:可选参数,指定context xml配置文件的路径
run goals将会启动Jetty并运行应用程序,不需要应用程序编译成war包。另外run还支持webapp节点的其它属性:
- <classesDirectory>:Web应用程序类编译后的路径
- <testClassesDirectory>:Web应用程序单元测试类编译后的路径,默认值为${project.build.testOutputDirectory}.
- <useTestScope>:Jetty-7之前的版本参数名称为useTestClasspath,如果设置为true,开启测试模式,<testClassesDirectory>中指定的类及其依赖将首先被加载到classpath中,默认值为false
- <useProvidedScope>:如果设置为true,依赖范围标示为“provided”的依赖将被加载到容器的classpath中,该参数很少使用。
- <webAppSourceDirectory>:Web应用程序静态资源路径,默认值为${basedir}/src/main/webapp
- <scanTargets>:配置除了插件自动扫描的位置外,其它需要扫描的目录或文件列表
- <scanTargetPatterns>:配置除了插件自动扫描的位置外,其它需要扫描的目录或文件的匹配模式
- <skip>:默认值为false,如果设置为true,将会停止执行插件
Jetty Maven Plugin插件支持的其它goals简介如下(详见http://wiki.eclipse.org/Jetty/Feature/Jetty_Maven_Plugin):
- run-war:将Web应用程序打包成war包并部署到Jetty中。
- run-exploded:使用war exploded模式(文件夹模式)将Web应用程序打包并部署到Jetty中
- deploy-war:功能与run-war类似,区别就是maven生命周期中不包含package阶段
- run-forked:jetty-7.5.2之后的版本可用,强迫Jetty使用一个新的JVM启动应用程序
- start:jetty-7.6.0之后的版本可用,一般在配合插件中的execution节点使用,test-compile阶段之后才执行构建,确保必要的类及文件都生成好了。一般用于集成测试时启动Jetty,本文第二部分测试阶段会有详细介绍
- stop:关闭运行中的Jetty容器
2、在java中启动Jetty
SpringSide4中封装了Jetty的操作提供了工具类JettyFactory ,让我们可以很简单的启动Jetty容器,JettyFactory代码如下:
    /**
     * Copyright (c) 2005-2012 springside.org.cn
     *
     * Licensed under the Apache License, Version 2.0 (the "License");
     */
    package org.springside.modules.test.jetty;

    import java.util.List;

    import org.apache.commons.lang3.StringUtils;
    import org.eclipse.jetty.server.Connector;
    import org.eclipse.jetty.server.Server;
    import org.eclipse.jetty.server.nio.SelectChannelConnector;
    import org.eclipse.jetty.webapp.WebAppClassLoader;
    import org.eclipse.jetty.webapp.WebAppContext;

    import com.google.common.collect.Lists;

    /**
     * 创建Jetty Server的工厂类.
     *
     * @author calvin
     */
    public class JettyFactory {

        private static final String DEFAULT_WEBAPP_PATH = "src/main/webapp";
        private static final String WINDOWS_WEBDEFAULT_PATH = "jetty/webdefault-windows.xml";

        /**
         * 创建用于开发运行调试的Jetty Server, 以src/main/webapp为Web应用目录.
         */
        public static Server createServerInSource(int port, String contextPath) {
            Server server = new Server();
            // 设置在JVM退出时关闭Jetty的钩子。
            server.setStopAtShutdown(true);

            SelectChannelConnector connector = new SelectChannelConnector();
            connector.setPort(port);
            // 解决Windows下重复启动Jetty居然不报告端口冲突的问题.
            connector.setReuseAddress(false);
            server.setConnectors(new Connector[] { connector });

            WebAppContext webContext = new WebAppContext(DEFAULT_WEBAPP_PATH, contextPath);
            // 修改webdefault.xml,解决Windows下Jetty Lock住静态文件的问题.
            webContext.setDefaultsDescriptor(WINDOWS_WEBDEFAULT_PATH);
            server.setHandler(webContext);

            return server;
        }

        /**
         * 设置除jstl-*.jar外其他含tld文件的jar包的名称.
         * jar名称不需要版本号,如sitemesh, shiro-web
         */
        public static void setTldJarNames(Server server, String... jarNames) {
            WebAppContext context = (WebAppContext) server.getHandler();
            List<String> jarNameExprssions = Lists.newArrayList(".*/jstl-[^/]*\\.jar$", ".*/.*taglibs[^/]*\\.jar$");
            for (String jarName : jarNames) {
                jarNameExprssions.add(".*/" + jarName + "-[^/]*\\.jar$");
            }

            context.setAttribute("org.eclipse.jetty.server.webapp.ContainerIncludeJarPattern",
                    StringUtils.join(jarNameExprssions, '|'));

        }

        /**
         * 快速重新启动application,重载target/classes与target/test-classes.
         */
        public static void reloadContext(Server server) throws Exception {
            WebAppContext context = (WebAppContext) server.getHandler();

            System.out.println("[INFO] Application reloading");
            context.stop();

            WebAppClassLoader classLoader = new WebAppClassLoader(context);
            classLoader.addClassPath("target/classes");
            classLoader.addClassPath("target/test-classes");
            context.setClassLoader(classLoader);

            context.start();

            System.out.println("[INFO] Application reloaded");
        }
    }
JettyFactory包含三个方法
- createServerInSource:以src/main/webapp为Web应用目录创建Jetty WebServer,确保jvm退出时关闭Jetty,在同一个端口启动多个jetty时报告端口冲突,并解决了javascript、css等静态文件被jetty锁定而不能修改的问题。
- setTldJarNames:Jetty,tomcat等web容器通常都会对classloader做扩展,Jetty中的org.mortbay.jetty.webapp.WebAppClassLoader负责加载一个Web应用context中的应用类。
Jetty的jsp处理引擎来自于Glassfish,要求JSF标签必须位于Jetty容器的classpath中,不能位于Web应用的classpath中,而Jetty的WebAppClassLoader优先使用父classloader加载类,导致tld文件都被加载到父classloader中,在Jetty的classpath中根本扫描不到,所以会出现找不到tld文件的情况。setTldJarNames方法可以设置将包含tld的jar包加载到Jetty的classpath中。
- reloadContext:重新加载Jetty的context
调用JettyFactory在Jetty中运行调试Maven Web应用的示例代码如下:
    package org.springside.examples.quickstart;

    import org.eclipse.jetty.server.Server;
    import org.springside.modules.test.jetty.JettyFactory;
    import org.springside.modules.test.spring.Profiles;

    /**
     * 使用Jetty运行调试Web应用, 在Console输入回车快速重新加载应用.
     *
     * @author calvin
     */
    public class QuickStartServer {

        public static final int PORT = 8080;
        public static final String CONTEXT = "/quickstart";
        public static final String[] TLD_JAR_NAMES = new String[] { "sitemesh", "spring-webmvc", "shiro-web",
                "springside-core" };

        public static void main(String[] args) throws Exception {
            // 设定Spring的profile
            Profiles.setProfileAsSystemProperty(Profiles.DEVELOPMENT);

            // 启动Jetty
            Server server = JettyFactory.createServerInSource(PORT, CONTEXT);
            JettyFactory.setTldJarNames(server, TLD_JAR_NAMES);

            try {
                server.start();

                System.out.println("[INFO] Server running at http://localhost:" + PORT + CONTEXT);
                System.out.println("[HINT] Hit Enter to reload the application quickly");

                // 等待用户输入回车重载应用.
                while (true) {
                    char c = (char) System.in.read();
                    if (c == '\n') {
                        JettyFactory.reloadContext(server);
                    }
                }
            } catch (Exception e) {
                e.printStackTrace();
                System.exit(-1);
            }
        }
    }
上段代码还提供了通过捕获在console中输入的回车自动重新载入上下文,并重新载入Class文件,提高了响应速度。
在执行main方法过程中如果发生如下错误:
class "javax.servlet.HttpConstraintElement"'s signer information does not match signer information of other classes in the same package
通过执行如下命令检查依赖
mvn dependency:tree -Dverbose|grep servlet
检查结果如图
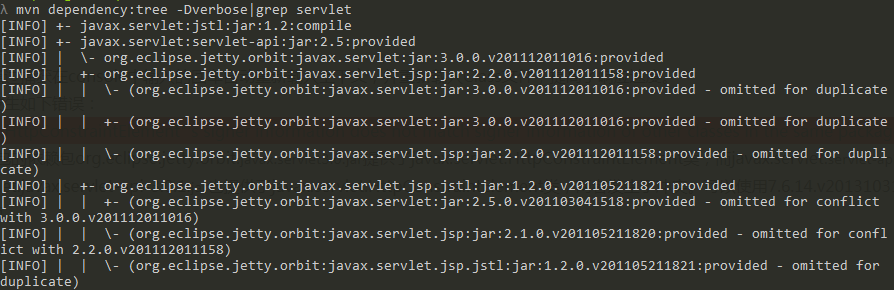
发现是因为Jetty8版本的包的依赖包org.eclipse.jetty.orbit.javax.servlet3.0.jar提供了javax.servlet.HttpConstraintElement类,而javax.servlet.servlet-api.jar的依赖包javax.servlet.javax.servlet-api-3.0.1.jar也提供了javax.servlet.HttpConstraintElement类,两者发生了冲突。可以使用7.6.14.v20131031版本的Jetty解决此问题。
二、测试阶段
在功能测试或集成测试阶段,希望在测试开始时自动运行Jetty加载项目进行测试,测试完成时停止Jetty容器。Jetty Maven Plugin插件可以帮助我们完成这种自动化工作。配置示例如下:
    <plugin>
        <groupId>org.mortbay.jetty</groupId>
        <artifactId>jetty-maven-plugin</artifactId>
        <configuration>
            <scanIntervalSeconds>10</scanIntervalSeconds>
            <stopKey>foo</stopKey>
            <stopPort>9999</stopPort>
        </configuration>
        <executions>
            <execution>
                <id>start-jetty</id>
                <phase>pre-integration-test</phase>
                <goals>
                    <goal>start</goal>
                </goals>
                <configuration>
                    <scanIntervalSeconds>0</scanIntervalSeconds>
                    <daemon>true</daemon>
                </configuration>
            </execution>
            <execution>
                <id>stop-jetty</id>
                <phase>post-integration-test</phase>
                <goals>
                    <goal>stop</goal>
                </goals>
            </execution>
        </executions>

   </plugin>
在上述配置中,通过execution来自定义运行阶段:
- 在pre-integration-test阶段运行start goals启动Jetty容器
- 在post-integration-test阶段运行stop goals停止Jetty容器。
使用<daemon>true</daemon>配置选项来预防Jetty无限期运行,迫使它只在执行Maven时才运行。
三、运行阶段
为了能够创建可以直接运行的war包,需要把jetty jar包解开,将其中的class直接编译到war包中,并需要在war中提供一个可以创建并运行Jetty的Main方法。本文提供两种实现方法:
方法一
SpringSide4中提供了一种实现方法,稍加修改优化后步骤如下:
1、使用maven-assembly-plugin重新打包
maven-assembly-plugin插件能将应用程序打包成指定格式的分发包,更重要的是能够自定义包含/排除指定的目录或文件。
为方便操作,单独建立一个Maven Profile用于打包,配置如下:
    <profile>
        <id>standalone</id>
        <build>
            <plugins>
                <plugin>
                    <groupId>org.apache.maven.plugins</groupId>
                    <artifactId>maven-assembly-plugin</artifactId>
                    <executions>
                        <execution>
                            <phase>package</phase>
                            <goals>
                                <goal>single</goal>
                            </goals>
                            <configuration>
                                <descriptors>
                                    <descriptor>assembly-standalone.xml</descriptor>
                                </descriptors>
                                <archive>
                                    <manifest>
                                        <mainClass>org.springside.examples.showcase.Main</mainClass>
                                    </manifest>
                                </archive>
                            </configuration>
                        </execution>
                    </executions>
                </plugin>
            </plugins>
        </build>
   </profile>
上述配置中,通过execution配置打包操作在package阶段开始,引入assembly-standalone.xml文件定义打包的规则,配置archive修改war包中的META-INF/Manifest.mf,替换main class为org.springside.examples.showcase.Main。
assembly-standalone.xml中的配置如下:
    <?xml version="1.0" encoding="UTF-8"?>
    <assembly xmlns="http://maven.apache.org/plugins/maven-assembly-plugin/assembly/1.1.2" xmlns:xsi="http://www.w3.org/2001/XMLSchema-instance"
        xsi:schemaLocation="http://maven.apache.org/plugins/maven-assembly-plugin/assembly/1.1.2 http://maven.apache.org/xsd/assembly-1.1.2.xsd">
        <id>standalone</id>
        <formats>
            <format>war</format>
        </formats>
        <includeBaseDirectory>false</includeBaseDirectory>

        <dependencySets>
            <dependencySet>
                <outputDirectory>/</outputDirectory>
                <includes>
                    <include>org.eclipse.jetty*:*</include>
                </includes>
                <scope>provided</scope>
                <unpack>true</unpack>
                <unpackOptions>
                    <excludes>
                        <exclude>*</exclude>
                        <exclude>META-INF/*</exclude>
                        <exclude>about_files/*</exclude>
                    </excludes>
                </unpackOptions>
            </dependencySet>
        </dependencySets>

        <fileSets>
            <fileSet>
                <directory>${project.basedir}/target/${project.build.finalName}</directory>
                <outputDirectory>/</outputDirectory>
                <excludes>
                    <exclude>META-INF/**/*</exclude>
                </excludes>
            </fileSet>
            <fileSet>
                <directory>${project.basedir}/target/classes</directory>
                <includes>
                    <include>**/*/Main.class</include>
                </includes>
                <outputDirectory>/</outputDirectory>
            </fileSet>
        </fileSets>
    </assembly>
assembly-standalone.xml涉及到几个关键点:
- formats指定打包的格式为war
- includeBaseDirectory为false表示创建的压缩包不使用应用程序的名称创建根目录
- dependencySets用来定义选择依赖并定义最终打包到什么目录,这里我们通过include设置打包过程中包含Jetty的所有jar包,unpack设置将Jetty的jar包解压缩,unpackOptions中的exclude将根目录、META-INF、about_files里的内容排除,避免签名冲突同时减小war包的大小
- fileSets允许用户通过文件或目录的粒度来控制打包,这里第一个fileSet指定将${project.basedir}/target/${project.build.finalName}中的所有静态资源打包到根目录下,并排除META-INF目录下的所有文件,第二个fileSet将${project.basedir}/target/classes中的所有class及配置文件打包到根目录下,并将org.springside.examples.showcase.Main编译后的Main.class添加到war包中
2、使用代码创建Jetty容器
    package org.springside.examples.quickstart;

    import java.io.File;
    import java.net.URL;
    import java.security.ProtectionDomain;

    import org.eclipse.jetty.server.Server;
    import org.eclipse.jetty.webapp.WebAppContext;

    /**
     * Main Class for standalone running.
     *
     * @author calvin
     */
    public class Main {

        public static void main(String[] args) throws Exception {

            String contextPath = "/";
            int port = Integer.getInteger("port", 8080);

            Server server = createServer(contextPath, port);

            try {
                server.start();
                server.join();
            } catch (Exception e) {
                e.printStackTrace();
                System.exit(100);
            }
        }

        private static Server createServer(String contextPath, int port) {
            // use Eclipse JDT compiler
            System.setProperty("org.apache.jasper.compiler.disablejsr199", "true");

            Server server = new Server(port);
            server.setStopAtShutdown(true);

            ProtectionDomain protectionDomain = Main.class.getProtectionDomain();
            URL location = protectionDomain.getCodeSource().getLocation();

            String warFile = location.toExternalForm();
            WebAppContext context = new WebAppContext(warFile, contextPath);
            context.setServer(server);

            // 设置work dir,war包将解压到该目录,jsp编译后的文件也将放入其中。
            String currentDir = new File(location.getPath()).getParent();
            File workDir = new File(currentDir, "work");
            context.setTempDirectory(workDir);

            server.setHandler(context);
            return server;
        }
    }
createServer方法负责创建Jetty服务,获取war包路径,创建context及工作目录
main方法负责调用createServer方法创建Jetty服务,设置上下文路径及启动端口,并启动Jetty服务,另外如果war包所在的路径包含中文,则获取路径的代码应修改为:
    ProtectionDomain protectionDomain = Main.class.getProtectionDomain();
    URL location = protectionDomain.getCodeSource().getLocation();
    location = java.net.URLDecoder.decode(location , "utf-8");
3、注意事项
通过以上配置,已经可以在Web应用程序内嵌入Jetty容器了,但还需要注意以下几点
- Maven Pom中的Jetty依赖注意scope修改为provided,防止Jetty的Jar包被打到WEB-INF/lib中。
- 如果需要解析jsp页面,需要在依赖中加入jsp-2.1-glassfish包的引用,注意其scope不能设置为provided
    <dependency>
        <groupId>org.mortbay.jetty</groupId>
        <artifactId>jsp-2.1-glassfish</artifactId>
        <version>2.1.v20100127</version>
    </dependency>
- 由于Jetty只会在容器的classpath中寻找jstl tags,所以需要注意将jstl包拆包到Jetty容器的classpath中,但是jetty-7 (7.6.9)、jetty-8 (8.1.9)、jetty-9 (9.0.0.M4)之后的版本内嵌了jstl包,不需要添加jstl包。
4、运行
执行如下命令将Web应用打包成war包,在${project.basedir}/target目录下将会生成嵌入Jetty容器的war包。
mvn package -Pstandalone
通过如下命令运行war包。
Java -Xms2048m -Xmx2048m -XX:MaxPermSize=128m -jar xxx.war
方法二
方法一中主要是使用了maven-assembly-plugin进行自定义打包,除此之外还可以使用maven-war-plugin、maven-antrun-plugin、maven-dependency-plugin、maven-compiler-plugin共同实现创建可执行的war包
Maven POM配置示例如下:
    <profile>
        <id>standalone</id>
        <build>
            <finalName>quickstart</finalName>
            <plugins>
                <plugin>
                    <groupId>org.apache.maven.plugins</groupId>
                    <artifactId>maven-war-plugin</artifactId>
                    <version>2.3</version>
                    <configuration>
                        <archive>
                            <manifest>
                                <mainClass>org.springside.examples.quickstart.Main</mainClass>
                            </manifest>
                        </archive>
                        <warName>${project.artifactId}-standalone</warName>
                    </configuration>
                </plugin>

                <plugin>
                    <groupId>org.apache.maven.plugins</groupId>
                    <artifactId>maven-antrun-plugin</artifactId>
                    <version>1.7</version>
                    <executions>
                        <execution>
                            <id>main-class-placement</id>
                            <phase>prepare-package</phase>
                            <configuration>
                                <target>
                                    <move todir="${project.build.directory}/${project.artifactId}/">
                                        <fileset dir="${project.build.directory}/classes/">
                                            <include name="**/*/Main.class" />
                                        </fileset>
                                    </move>
                                </target>
                            </configuration>
                            <goals>
                                <goal>run</goal>
                            </goals>
                        </execution>
                    </executions>
                </plugin>
                <plugin>
                    <groupId>org.apache.maven.plugins</groupId>
                    <artifactId>maven-dependency-plugin</artifactId>
                    <version>2.5.1</version>
                    <executions>
                        <execution>
                            <id>jetty-classpath</id>
                            <phase>prepare-package</phase>
                            <goals>
                                <goal>unpack-dependencies</goal>
                            </goals>
                            <configuration>
                                <includeGroupIds>org.eclipse.jetty, org.eclipse.jetty.orbit,
                                    javax.servlet</includeGroupIds>
                                <includeScope>provided</includeScope>
                                <!-- remove some files in order to decrease size -->
                                <excludes>*, about_files/*, META-INF/*</excludes>
                                <!-- <excludeArtifactIds>jsp-api,jstl</excludeArtifactIds> -->
                                <outputDirectory>
                                    ${project.build.directory}/${project.artifactId}
                                </outputDirectory>
                            </configuration>
                        </execution>
                    </executions>
                </plugin>
                <!-- to support compilation in linux -->
                <plugin>
                    <groupId>org.apache.maven.plugins</groupId>
                    <artifactId>maven-compiler-plugin</artifactId>
                    <version>2.5.1</version>
                    <configuration>
                        <target>1.6</target>
                        <source>1.6</source>
                        <encoding>UTF-8</encoding>
                    </configuration>
                </plugin>
            </plugins>
        </build>
    </profile>
- maven-war-plugin负责打包,并设置Main方法实现类为org.springside.examples.quickstart.Main
- maven-antrun-plugin执行ant的target任务,将org.springside.examples.quickstart.Main类转移到war包的跟路径下
- maven-dependency-plugin负责将jetty相关的jar包进行拆包并重新输出到war包根路径下,以便重新打包
- maven-compiler-plugin负责编译web应用
注意事项、org.springside.examples.showcase.Main类实现及运行方法同方法一。


 浙公网安备 33010602011771号