CAS 5.1.x 的搭建和使用(一)—— 通过Overlay搭建服务端
CAS单点登录系列:
CAS 5.1.x 的搭建和使用(一)—— 通过Overlay搭建服务端

CAS 5.1.x 的搭建和使用(二)—— 通过Overlay搭建服务端-其它配置说明

CAS 5.1.x 的搭建和使用(三)—— 官方示例来熟悉客户端搭建

CAS 5.1.x 的搭建和使用(四)—— 配置使用HTTP协议访问的服务端
先放上官网文档地址:https://apereo.github.io/cas/5.1.x/index.html
然后说一下用到的东西:
jdk1.8、tomcat8.5、maven3.3、windows操作系统
1、下载Overlay
通过阅读官网文档(https://apereo.github.io/cas/5.1.x/planning/Getting-Started.html)了解到官方建议我们:
It is recommended to build and deploy CAS locally using the WAR Overlay method.
通过使用一个名叫Overlay的项目来生成一个可以直接用的war包,来部署服务端,于是我们先下载这个项目,官网给出了两个构筑格式的:

我这里使用Maven的,下载地址:https://github.com/apereo/cas-overlay-template,或者使用我上传的网盘地址下载:
链接:https://pan.baidu.com/s/1c4wu6UVZIs1DTjbKRa17cw
提取码:fm2o
2、构筑Overlay
下载下来的Overlay默认配置就可以直接构筑能用的war包,直接使用它下边的build脚本执行
build package
第一次构筑比较慢,可以在pom的repositories里加一个ali源,构筑会快一些。
构筑完后在target下找到一个war包,放到你的tomcat8.5(官方建议8.0以上版本,我建议使用8.5,如果你用8.0跑不起来,记得换成8.5以上版本)下跑起来试试吧:
http://localhost:8080/cas/login 默认账号:casuser 默认密码:Mellon 目前的配置仅有这一个用户
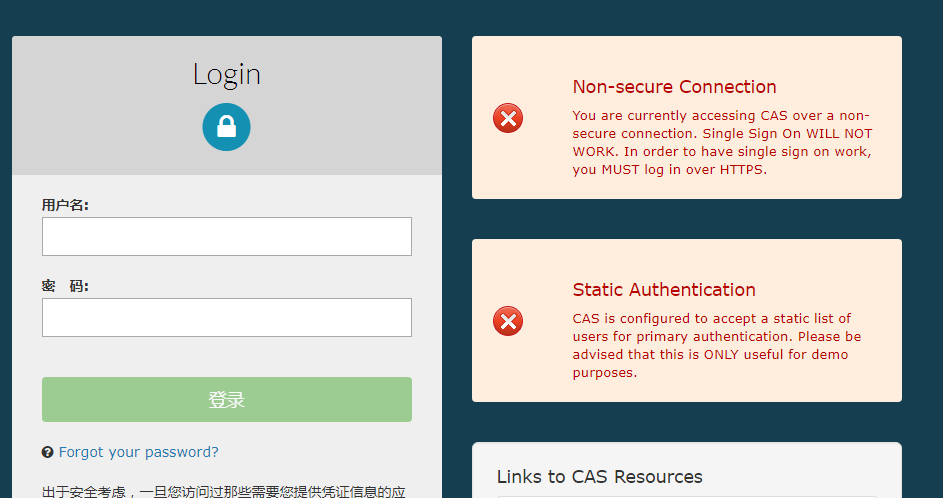
第一次会有两个红色警告,一个就是说你没用HTTPS登录,另一个就是你现在只有一个写死的用户,目前这个服务端只能看看,没什么实际用途。
别急,我们下边开始解决这两个问题。
这里先不要急着删掉你Tomcat下war包刚刚解压出来的内容
3、生成真正有用的服务端
这一节里面我们有两件事情要做:
第一个就是做一个keystore,Tomcat配置HTTPS访问的时候会用到;
第二个就是把我们的用户改成从数据库的表中读取的。
先说keystore:
使用jdk自带的keytool即可生成keystore,命令如下:
keytool -genkey -alias cas -keyalg RSA -keysize 2048 -keypass 123456 -storepass 123456 -keystore D:/liuyx.keystore -dname "CN=cas.example.org,OU=liuyx.com,O=liuyx,L=JiNan,ST=JiNan,C=CN"
别名密码什么的都可以改,需要指出的是:
CN=cas.example.org这段内容,后边配置客户端的时候需要用到,一定要确保能通过这个域名访问到你的CAS服务端。
并且不能使用IP作为域(上文的CN),使用IP虽然可以生成keystore,但是在客户端使用的时候,如果服务端地址配置成IP会报错。
这里我的CAS服务端是部署在本地的,所以需要做一个本地映射——
用管理员身份修改C:\Windows\System32\drivers\etc\hosts文件,在其最后加上以下内容:
127.0.0.1 cas.example.org
这样,我们在本地访问这个域名,其实访问的就是我们本机了。
再说https:
Tomcat8.5配置https的方式相较之前的版本有所调整,不过也差不太多,修改server.xml文件,如下:
    <Connector port="8443" protocol="org.apache.coyote.http11.Http11NioProtocol"
               maxThreads="150" SSLEnabled="true">
        <SSLHostConfig>
            <Certificate certificateKeystoreFile="D:/liuyx.keystore"
                         type="RSA" certificateKeystoreType="JKS" certificateKeystorePassword="123456"/>
        </SSLHostConfig>
    </Connector>
注意,别忘了把8080端口的Connector注释掉:
<!-- <Connector port="8080" protocol="HTTP/1.1"
               connectionTimeout="20000"
               redirectPort="8443" />-->
最后是从数据库中读取用户:
这里我们要做这么几件事:
1、在pom中引入数据库相关的jar包,注释掉用不到的jar包
pom如下:
<?xml version="1.0" encoding="UTF-8"?>
<project xmlns="http://maven.apache.org/POM/4.0.0"
         xmlns:xsi="http://www.w3.org/2001/XMLSchema-instance"
         xsi:schemaLocation="http://maven.apache.org/POM/4.0.0 http://maven.apache.org/xsd/maven-4.0.0.xsd ">
    <modelVersion>4.0.0</modelVersion>
    <groupId>org.apereo.cas</groupId>
    <artifactId>cas-overlay</artifactId>
    <packaging>war</packaging>
    <version>1.0</version>

    <build>
        <plugins>
            <!--STEP1 注释掉无用组件
            <plugin>
                <groupId>com.rimerosolutions.maven.plugins</groupId>
                <artifactId>wrapper-maven-plugin</artifactId>
                <version>0.0.4</version>
                <configuration>
                    <verifyDownload>true</verifyDownload>
                    <checksumAlgorithm>MD5</checksumAlgorithm>
                </configuration>
            </plugin>-->
            <plugin>
                <groupId>org.springframework.boot</groupId>
                <artifactId>spring-boot-maven-plugin</artifactId>
                <version>${springboot.version}</version>
                <configuration>
                    <mainClass>org.springframework.boot.loader.WarLauncher</mainClass>
                    <addResources>true</addResources>
                </configuration>
            </plugin>
            <plugin>
                <groupId>org.apache.maven.plugins</groupId>
                <artifactId>maven-war-plugin</artifactId>
                <version>2.6</version>
                <configuration>
                    <warName>cas</warName>
                    <failOnMissingWebXml>false</failOnMissingWebXml>
                    <recompressZippedFiles>false</recompressZippedFiles>
                    <archive>
                        <compress>false</compress>
                        <manifestFile>${project.build.directory}/war/work/org.apereo.cas/cas-server-webapp${app.server}/META-INF/MANIFEST.MF
                        </manifestFile>
                    </archive>
                    <overlays>
                        <overlay>
                            <groupId>org.apereo.cas</groupId>
                            <artifactId>cas-server-webapp${app.server}</artifactId>
                        </overlay>
                    </overlays>
                </configuration>
            </plugin>
            <plugin>
                <groupId>org.apache.maven.plugins</groupId>
                <artifactId>maven-compiler-plugin</artifactId>
                <version>3.3</version>
            </plugin>
        </plugins>
        <finalName>cas</finalName>
    </build>

    <dependencies>
        <dependency>
            <groupId>org.apereo.cas</groupId>
            <artifactId>cas-server-webapp${app.server}</artifactId>
            <version>${cas.version}</version>
            <type>war</type>
            <scope>runtime</scope>
        </dependency>
        <!--STEP2 引入数据库认证相关 start-->
        <dependency>
            <groupId>org.apereo.cas</groupId>
            <artifactId>cas-server-support-jdbc</artifactId>
            <version>${cas.version}</version>
        </dependency>
        <dependency>
            <groupId>org.apereo.cas</groupId>
            <artifactId>cas-server-support-jdbc-drivers</artifactId>
            <version>${cas.version}</version>
        </dependency>
        <dependency>
            <groupId>mysql</groupId>
            <artifactId>mysql-connector-java</artifactId>
            <version>5.1.36</version>
        </dependency>
        <!--数据库认证相关 end-->

        <!--<dependency>
            <groupId>org.jasig.cas</groupId>
            <artifactId>cas-server-core-authentication</artifactId>
            <version>4.2.7</version>
        </dependency>-->
        <!--<dependency>
            <groupId>org.apereo.cas</groupId>
            <artifactId>cas-server-core-util</artifactId>
            <version>${cas.version}</version>
        </dependency>-->
    </dependencies>

    <properties>
        <cas.version>5.1.1</cas.version><!--STEP3 修改版本,高版本目前暂时没有相应的JDBC支持-->
        <springboot.version>1.5.3.RELEASE</springboot.version>
        <!-- app.server could be -jetty, -undertow, -tomcat, or blank if you plan to provide appserver -->
        <app.server>-tomcat</app.server>
        <maven.compiler.source>1.8</maven.compiler.source>
        <maven.compiler.target>1.8</maven.compiler.target>
        <project.build.sourceEncoding>UTF-8</project.build.sourceEncoding>
    </properties>

    <repositories>
        <repository>
            <id>sonatype-releases</id>
            <url>http://oss.sonatype.org/content/repositories/releases/</url>
            <snapshots>
                <enabled>false</enabled>
            </snapshots>
            <releases>
                <enabled>true</enabled>
            </releases>
        </repository>
        <repository>
            <id>sonatype-snapshots</id>
            <url>https://oss.sonatype.org/content/repositories/snapshots/</url>
            <snapshots>
                <enabled>true</enabled>
            </snapshots>
            <releases>
                <enabled>false</enabled>
            </releases>
        </repository>
        <repository>
            <id>shibboleth-releases</id>
            <url>https://build.shibboleth.net/nexus/content/repositories/releases</url>
        </repository>
        <repository>
            <id>spring-milestones</id>
            <url>https://repo.spring.io/milestone</url>
        </repository>
    </repositories>
    <!--STEP4 注释掉无用组件
        <profiles>
            <profile>
                <activation>
                    <activeByDefault>false</activeByDefault>
                </activation>
                <id>pgp</id>
                <build>
                    <plugins>

                        <plugin>
                            <groupId>com.github.s4u.plugins</groupId>
                            <artifactId>pgpverify-maven-plugin</artifactId>
                            <version>1.1.0</version>
                            <executions>
                                <execution>
                                    <goals>
                                        <goal>check</goal>
                                    </goals>
                                </execution>
                            </executions>
                            <configuration>
                                <pgpKeyServer>hkp://pool.sks-keyservers.net</pgpKeyServer>
                                <pgpKeysCachePath>${settings.localRepository}/pgpkeys-cache</pgpKeysCachePath>
                                <scope>test</scope>
                                <verifyPomFiles>true</verifyPomFiles>
                                <failNoSignature>false</failNoSignature>
                            </configuration>
                        </plugin>
                </plugins>
            </build>
        </profile>

    </profiles>-->
</project>
注意这里我用的cas.version是5.1.1,是因为现在的maven仓库里没有更高版本的cas-server-support-jdbc和cas-server-support-jdbc-drivers,为了保持统一选用的5.1.1,你如果能处理好这些jar包,也可以用高版本。
2、修改配置文件
观察刚才war包解压出的文件,可以在WEB-INF下发现很多配置文件,
通过阅读:https://apereo.github.io/cas/5.1.x/installation/Configuration-Server-Management.html 得知,我们可以通过修改其中一个application.properties配置文件来使服务端支持从数据库的某张表来验证用户。
具体的配置信息也可以从https://apereo.github.io/cas/5.1.x/installation/Configuration-Server-Management.html 来了解。
为了防止再次打war包的时候,修改的配置被覆盖,我在cas-overlay这个maven项目下新建了src,resources等目录,然后把配置文件复制到相应的目录进行修改,结构如下:
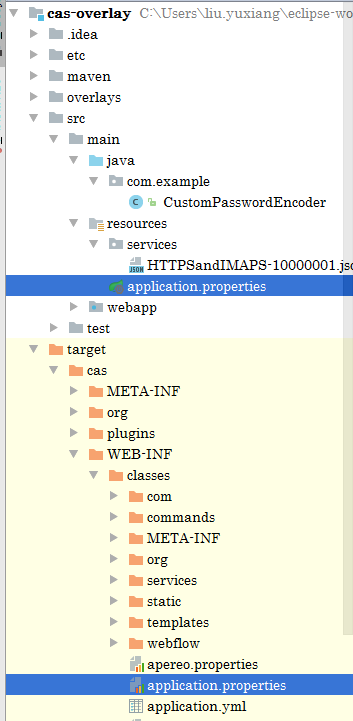
当然你也可以直接在war包解压出来的内容上改。
修改后的application.properties内容如下(在原基础上修改,注释掉一部分用不到的东西):
#STEP 3 在TOMCAT8.5中跑一个模板然后将其war包中解压出来的的application.properties复制出来,放到手动创建的src下的resources里面

##
# CAS Server Context Configuration
#
server.context-path=/cas
server.port=8443

#STEP 5添加认证服务
cas.serviceRegistry.initFromJson=true

#STEP 4签发证书,如果是用spring boot之类嵌入式的容器,则需要改这里的配置,如果是直接部在tomcat中,则需要把tomcat改成https的
#server.ssl.key-store=file:/etc/cas/thekeystore
#server.ssl.key-store-password=changeit
#server.ssl.key-password=changeit
# server.ssl.ciphers=
# server.ssl.client-auth=
# server.ssl.enabled=
# server.ssl.key-alias=
# server.ssl.key-store-provider=
# server.ssl.key-store-type=
# server.ssl.protocol=
# server.ssl.trust-store=
# server.ssl.trust-store-password=
# server.ssl.trust-store-provider=
# server.ssl.trust-store-type=

#server.max-http-header-size=2097152
#server.use-forward-headers=true
#server.connection-timeout=20000
#server.error.include-stacktrace=NEVER

#server.tomcat.max-http-post-size=2097152
#server.tomcat.basedir=build/tomcat
#server.tomcat.accesslog.enabled=true
#server.tomcat.accesslog.pattern=%t %a "%r" %s (%D ms)
#server.tomcat.accesslog.suffix=.log
#server.tomcat.max-threads=10
#server.tomcat.port-header=X-Forwarded-Port
#server.tomcat.protocol-header=X-Forwarded-Proto
#server.tomcat.protocol-header-https-value=https
#server.tomcat.remote-ip-header=X-FORWARDED-FOR
#server.tomcat.uri-encoding=UTF-8

spring.http.encoding.charset=UTF-8
spring.http.encoding.enabled=true
spring.http.encoding.force=true

##
# CAS Cloud Bus Configuration
#
spring.cloud.bus.enabled=false
# spring.cloud.bus.refresh.enabled=true
# spring.cloud.bus.env.enabled=true
# spring.cloud.bus.destination=CasCloudBus
# spring.cloud.bus.ack.enabled=true

endpoints.enabled=false
endpoints.sensitive=true

endpoints.restart.enabled=false
endpoints.shutdown.enabled=false

management.security.enabled=true
management.security.roles=ACTUATOR,ADMIN
management.security.sessions=if_required
management.context-path=/status
management.add-application-context-header=false

security.basic.authorize-mode=role
security.basic.enabled=false
security.basic.path=/cas/status/**

##
# CAS Web Application Session Configuration
#
server.session.timeout=300
server.session.cookie.http-only=true
server.session.tracking-modes=COOKIE

##
# CAS Thymeleaf View Configuration
#
spring.thymeleaf.encoding=UTF-8
spring.thymeleaf.cache=false
spring.thymeleaf.mode=HTML
##
# CAS Log4j Configuration
#
# logging.config=file:/etc/cas/log4j2.xml
server.context-parameters.isLog4jAutoInitializationDisabled=true

##
# CAS AspectJ Configuration
#
spring.aop.auto=true
spring.aop.proxy-target-class=true

##
# CAS Authentication Credentials
#
#STEP4 注释掉写死的用户 改用jdbc的用户 START
#cas.authn.accept.users=casuser::Mellon

cas.authn.jdbc.query[0].sql=select * from cms_auth_user where user_name=?
cas.authn.jdbc.query[0].healthQuery=
cas.authn.jdbc.query[0].isolateInternalQueries=false
cas.authn.jdbc.query[0].url=jdbc:mysql://127.0.0.1:3306/CASTEST?useUnicode=true&characterEncoding=UTF-8&autoReconnect=true&useSSL=false
cas.authn.jdbc.query[0].failFast=true
cas.authn.jdbc.query[0].isolationLevelName=ISOLATION_READ_COMMITTED
cas.authn.jdbc.query[0].dialect=org.hibernate.dialect.MySQLDialect
cas.authn.jdbc.query[0].leakThreshold=10
cas.authn.jdbc.query[0].propagationBehaviorName=PROPAGATION_REQUIRED
cas.authn.jdbc.query[0].batchSize=1
cas.authn.jdbc.query[0].user=root
#cas.authn.jdbc.query[0].ddlAuto=create-drop
cas.authn.jdbc.query[0].maxAgeDays=180
cas.authn.jdbc.query[0].password=123456
cas.authn.jdbc.query[0].autocommit=false
cas.authn.jdbc.query[0].driverClass=com.mysql.jdbc.Driver
cas.authn.jdbc.query[0].idleTimeout=5000
# cas.authn.jdbc.query[0].credentialCriteria=
# cas.authn.jdbc.query[0].name=
# cas.authn.jdbc.query[0].order=0
# cas.authn.jdbc.query[0].dataSourceName=
# cas.authn.jdbc.query[0].dataSourceProxy=false
cas.authn.jdbc.query[0].fieldPassword=password

# cas.authn.jdbc.query[0].fieldExpired=
# cas.authn.jdbc.query[0].fieldDisabled=
# cas.authn.jdbc.query[0].principalAttributeList=sn,cn:commonName,givenName

#cas.authn.jdbc.query[0].passwordEncoder.type=DEFAULT
#cas.authn.jdbc.query[0].passwordEncoder.type=com.example.CustomPasswordEncoder
#cas.authn.jdbc.query[0].passwordEncoder.characterEncoding=UTF-8
#cas.authn.jdbc.query[0].passwordEncoder.encodingAlgorithm=MD5

#cas.authn.jdbc.query[0].passwordEncoder.secret=
#cas.authn.jdbc.query[0].passwordEncoder.strength=16

# cas.authn.jdbc.query[0].principalTransformation.suffix=
# cas.authn.jdbc.query[0].principalTransformation.caseConversion=NONE|UPPERCASE|LOWERCASE
# cas.authn.jdbc.query[0].principalTransformation.prefix=
# STEP4 END


##
# CAS Delegated Authentication
#
#cas.authn.pac4j.bitbucket.clientName=Bitbucket
#cas.authn.pac4j.dropbox.clientName=Dropbox
#cas.authn.pac4j.facebook.clientName=Facebook
#cas.authn.pac4j.foursquare.clientName=Foursquare
#cas.authn.pac4j.github.clientName=Github
#cas.authn.pac4j.google.clientName=Google
#cas.authn.pac4j.linkedIn.clientName=LinkedIn
#cas.authn.pac4j.paypal.clientName=PayPal
#cas.authn.pac4j.twitter.clientName=Twitter
#cas.authn.pac4j.yahoo.clientName=Yahoo
#cas.authn.pac4j.windowsLive.clientName=Windows Live
#cas.authn.pac4j.wordpress.clientName=WordPress

#多属性
cas.authn.attributeRepository.jdbc[0].singleRow=true
cas.authn.attributeRepository.jdbc[0].order=0
cas.authn.attributeRepository.jdbc[0].url=jdbc:mysql://127.0.0.1:3306/CASTEST?useUnicode=true&characterEncoding=UTF-8&autoReconnect=true&useSSL=false
cas.authn.attributeRepository.jdbc[0].username=user_name
cas.authn.attributeRepository.jdbc[0].user=root
cas.authn.attributeRepository.jdbc[0].password=123456
cas.authn.attributeRepository.jdbc[0].sql=select * from cms_auth_user where {0}
cas.authn.attributeRepository.jdbc[0].dialect=org.hibernate.dialect.MySQLDialect
cas.authn.attributeRepository.jdbc[0].ddlAuto=none
cas.authn.attributeRepository.jdbc[0].driverClass=com.mysql.jdbc.Driver
cas.authn.attributeRepository.jdbc[0].leakThreshold=10
cas.authn.attributeRepository.jdbc[0].propagationBehaviorName=PROPAGATION_REQUIRED
cas.authn.attributeRepository.jdbc[0].batchSize=1
cas.authn.attributeRepository.jdbc[0].healthQuery=SELECT 1
cas.authn.attributeRepository.jdbc[0].failFast=true
其中加粗标蓝的都是我修改的内容,简单说一下:
cas.authn.accept.users=casuser::Mellon这个配置记得删掉,这就是那个写死的用户
cas.authn.jdbc.query[0]这些配置就是数据库验证相关的内容
在cas.authn.jdbc.query[0].sql中,程序会把你登录时输入的用户名作为参数传进去
cas.authn.jdbc.query[0].fieldPassword则是指明那一列对应的是你输入的密码,目前没有做MD5,怎么做MD5下一篇一起说。
至此这节该说的说完了,有些朋友可能会纳闷配置文件中的其它标蓝加粗内容是干什么的,不要急我们下节再讲,你可以先把这些我没提到的标蓝内容删掉,跑起来试试现在服务端是否真的通过数据库验证了。

 浙公网安备 33010602011771号