
Aras Innovator如何配置SMTP中转Office365
如何设置SMTP中转Office365发送email;
首先,安装SMTP,这一步不再描述,
主要说明SMTP配置

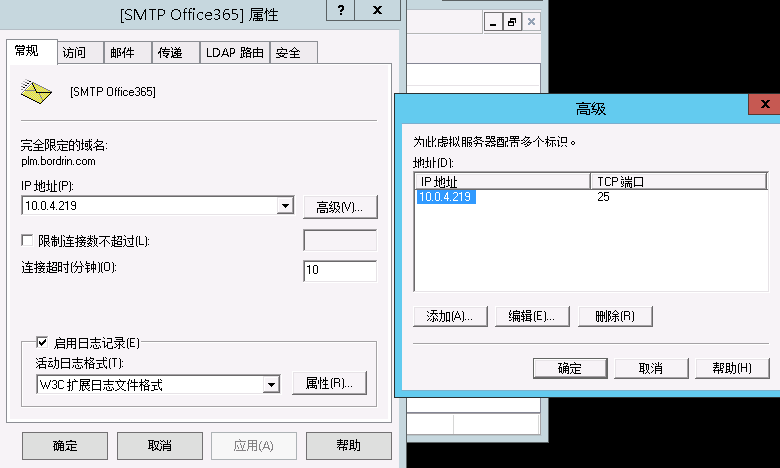
常规里IP地址填写本地的IP地址:
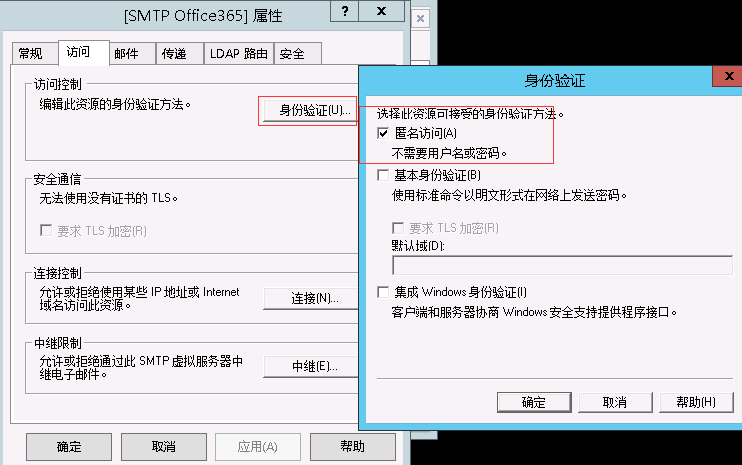
访问→身份验证→匿名访问
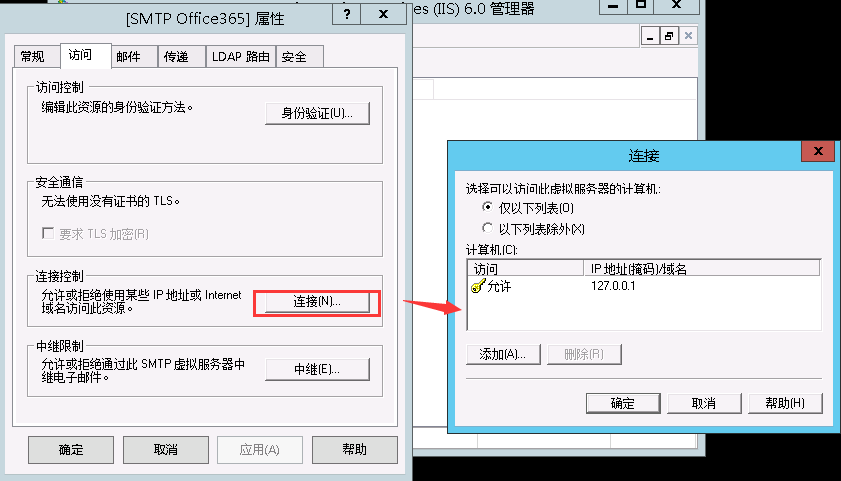
连接
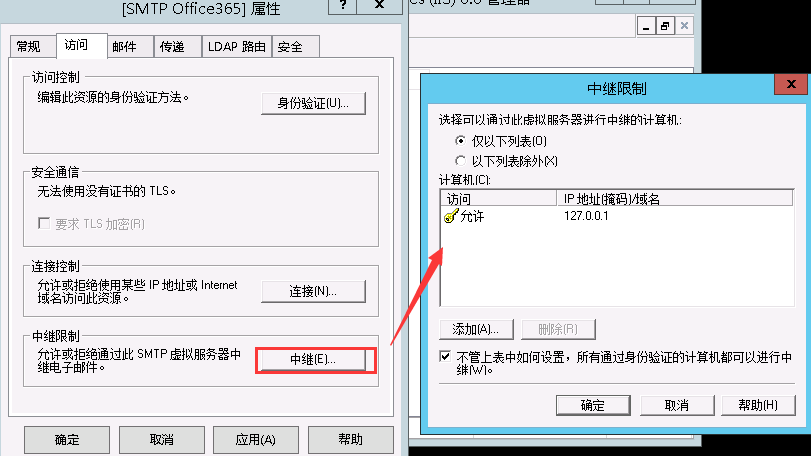
中继
出站安全
出站链接
高级

更多详情请关注微信公众号:

Configure an SMTP Server in Windows IIS for Aras Innovator Outbound Email
Below I describe how to configure an SMTP email server using Windows Server 2012 for use with Aras Innovator. I also describe how to configure an SMTP email relay using an Office 365 email account.
For these instructions, the SMTP server must be on the same server that is hosting Aras Innovator.
If you prefer, download a PDF document with this process.
Set up SMTP Using Windows Server 2012
These instructions were modified from https://technet.microsoft.com/en-us/library/dn592151(v=exchg.150).aspx (Text in italics denote my modifications.)
- Install Internet Information Services (IIS)
- In Server Manager, select Add Roles.
- On the Before you begin page in the Add Roles Wizard, select Next.
- On the Select Installation Type page, select Role-based or Feature-based installation.
- On the Select destination server page, choose Select a server from the server pool, and select the server that will be running SMTP services. Select Next.
- On the Select Server Roles page, select Web Server (IIS), and then select Next. If a page that requests additional features is displayed, select Add Features and then select Next.
- On the Select Role Services page, make sure that Basic Authentication under Security is selected, and then select Next.
- On the Confirm Installation Steps page, select Install.
- Install SMTP
- Open Server Manager and select Add Roles and Features.
- Select Server Selection and make sure that the server that will be running the SMTP server is selected and then select Features.
- On the Select Features screen, choose SMTP Server. You may be prompted to install additional components. If that’s the case, select Add Required Features and select Next.
- Select Install. After the installation is finished, you may have to start the SMTP service by using the Services snap-in for the Microsoft Management Console (MMC).
- Set up SMTP
- Open Server Manager, select Tools, and then select Internet Information Services (IIS) 6.0.
- Expand the current server, right-click the SMTP Virtual Server, and then select Properties.
- On the General tab, select Advanced > Add.
- In the IP Address box, specify the address of the server that’s hosting the SMTP server.
- I left this as "(All Unassigned)", port 25
- In the Port box, enter 25 and select OK.
- Aras Innovator is hard-coded to use port 25, so do not use port 587 as suggested by Microsoft
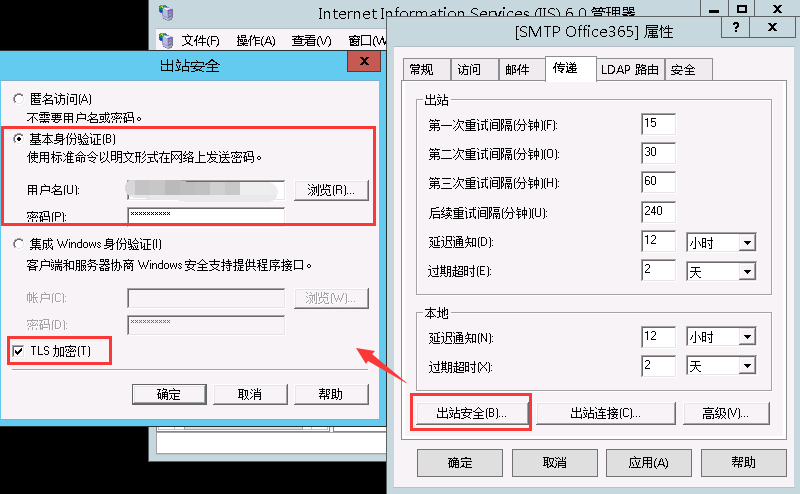
- Set up SMTP Security
- On the Access tab, do the following:
- Select Authentication and make sure that Anonymous Access is selected.
- Select Connection > Only the List Below, and then specify the IP addresses of the devices that will be connecting to the SMTP server.
- Enter "127.0.0.1" so that only the local server can use the email server
- Select Relay > Only the List Below, and then specify the IP address of the devices relaying through this SMTP server
- Enter "127.0.0.1" so that only the local server can use the email server
- On the Access tab, do the following:
- Set up Office 365 SMTP Relay
- NOTE: You can skip step 5 if you want to use the Windows SMTP Server to send email in Aras. Step 5 is only used if you want to use another SMTP server (e.g. Office 365 or Gmail) to relay mail through the local SMTP virtual server. If you skip step 5, read the section "The DNS side of sending mail" here: http://www.sherweb.com/blog/installing-microsoft-smtp-server/.
- On the Delivery tab, select Outbound Security, and then do the following:
- Select Basic Authentication.
- Enter the credentials of the Office 365 user who you want to use to relay SMTP mail.
- This *must* be the same email account as the "Innovator Admin" in Aras.
- In Aras Innovator, under Administration > Users, find "Innovator Admin" and add the Office 365 email address to this user
- In Aras Innovator, under Administration > Notification > E-mail Message, view all E-mail messages and look at the "From User" column
- Best practice is for all E-mail Messages to come from a single user, e.g. "Innovator Admin". But if you want to send email from another user, then login into Office 365 as an Admin, go to Exchange admin center > recipients > mailboxes; select that email account, go to Mailbox Delegation > Send As, and then add the SMTP server relay mail account to the list.
- Otherwise, Aras will attempt to send an email from an account that will be rejected by Office 365 as "Client does not have permissions to send as this sender"
- Check "TLS Encryption", click OK to close Outbound Security
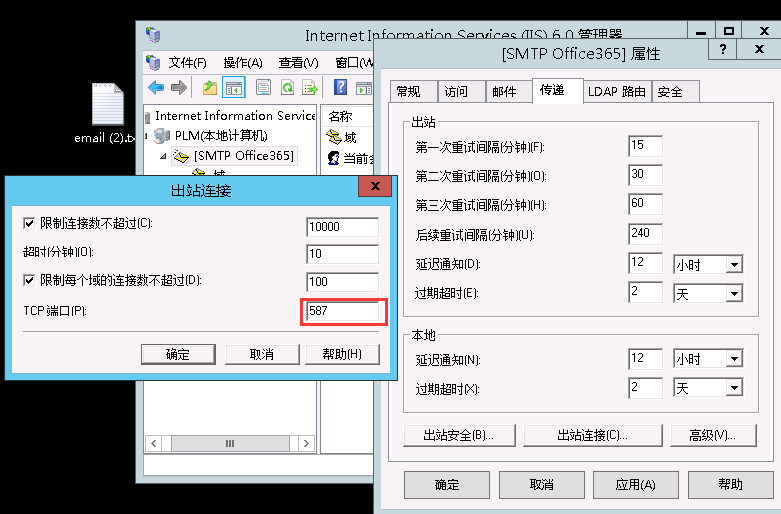
- On the Delivery tab, select Outbound Connections, and in the TCP Port box, enter 587 and select OK.
- NOTE: One of our clients set up an SMTP Relay using a Gmail account, by setting the TCP Port box to 25 (not 587 as suggested by Microsoft).
- On the Delivery tab, Select Advanced and specify "SMTP.office365.com" as the Smart Host.
- Restart the IIS service and the SMTP service.
Test SMTP Server
I used 2 methods to test the SMTP Server on Windows Server, before proceeding to Aras Innovator configuration.
1. Test SMTP relay server without using a separate application.
FROM: <source email address> [Must be the Office 365 SMTP Relay Email or Authorized "Send As" email]
TO: <destination email address>
SUBJECT: Test email
This is a test email sent from my SMTP server
.
- Create a text file using Notepad or another text editor. The file should contain the above code. Replace the source and destination email addresses with the addresses you will use to relay SMTP:
- Save the text file as Email.txt.
- Copy the Email.txt file into the following folder: C:\InetPub\MailRoot\Pickup.
- After a short time, the file should automatically be moved to the C:\InetPub\MailRoot\Queue folder. When the SMTP server delivers the mail, the file is automatically deleted from the local folder.
- (Reference: See https://technet.microsoft.com/en-us/library/dn592151(v=exchg.150).aspx)
- TROUBLESHOOT: If the SMTP server can’t deliver the message, a non-delivery report (NDR) is created in the C:\InetPub\MailRoot\BadMail folder. Open the *.BAD file with Notepad to use this NDR to diagnose delivery issues.
- TROUBLESHOOT: If the email won’t send, check the "FROM" <source email address> - it must be the Office 365 SMTP Relay Email you are using, or an authorized "Send As" email (as described in the Office 365 SMTP Relay setup).
2. Test the SMTP relay server using Telnet
- Open a Command Prompt on the server.
- Connect to the server using Telnet by typing telnet localhost 25 and pressing enter.
- (If telnet is not installed, see https://technet.microsoft.com/en-us/library/cc771275(v=ws.10).aspx)
- Type helo
- Type mail from:youremail@domain.com using your SMTP Relay email address
- Type rcpt to:testemail@domain.com using a test email address
- Type data
- Type something that will serve as the body of the email then enter a period ‘.’ on a line by itself to send the email
- You should receive the email at the test email address confirming that everything is setup properly.
- (Reference: www.sherweb.com/blog/installing-microsoft-smtp-server/)
- TROUBLESHOOT: Telnet connects to localhost, but as soon as I type the first character it comes out of telnet and reverts to a standard command prompt.
- This is caused by using an internal or invalid IP address in the Virtual SMTP Server configuration. In IIS 6.0, right-click the SMTP Virtual Server, select Properties, on the General tab, select Advanced > Edit; in the IP Address box, change the address to "(All Unassigned)", port 25
- Troubleshooting:
- Email doesn’t send: First thing to try is in the SMTP Relay setup, enter "25" for Delivery > Outbound Connections > TCP Port instead of 587.
- Microsoft is blocking your SMTP Server from Office 365. Contact Microsoft at the listed email address. Also, the group that deals with blacklist at Microsoft can be reached at (866) 291-7726. It takes about 24 hours to get delisted.
- Error received: Diagnostic-Code: smtp;550 5.7.1 Service unavailable; Client host [199.227.38.90] blocked using FBLW15; To request removal from this list please forward this message to delist@messaging.microsoft.com.
- Email doesn’t send: First thing to try is in the SMTP Relay setup, enter "25" for Delivery > Outbound Connections > TCP Port instead of 587.
Configure Aras Innovator
After the SMTP server works, make the following change on the Aras Innovator installation:
- Open the InnovatorServerConfig XML file in a text editor, e.g. C:\Program Files (x86)\Aras\Innovator\InnovatorServerConfig.xml
- Change < Mail SMTPServer="queue"/> to <Mail SMTPServer="127.0.0.1"/>
Test Aras Innovator with the SMTP Server
I used 2 methods to test the SMTP Server on Aras Innovator.
- Test E-mail notification messages with the Change Management module
- Login to Aras Innovator as a user with an email address that you have access to
- Go to Change Management > PRs
- Create a new PR, save and unlock
- Aras should initiate the PR Workflow, and send an email to both the user and Admin
- Test E-mail notification messages using a Server Method
- (You should have completed Aras Developing Solutions training to do this)
- First, create a test E-Mail Message (in the Administration tab) named "simpleTest" (use this exact name). Enter a Subject and a Body Plain as anything you would like. Enter the From User as Innovator Admin. Save and lock.
- Make sure the Innovator Admin has an email address entered in their user information. (And the email address is the same as the SMTP relay account email.
- Create a Method (server-side, C#). Use the following code:
Innovator inn = this.getInnovator();
Item myResult;

// First grab an identity to send the mail to.
// You can find the ID by right clicking on an identity and selecting
//"Properties" and then selecting "copy"
// Make sure that the user(s) in that identity have valid email addresses.
// Also, make sure that you use the ID of the *Identity*, not the *User*

Item idnt = inn.getItemById("Identity", "7974A0D1114A4F649A13894749DC4FC9");
//Next, grab the email we want
myResult = inn.applyAML("<AML>"+
"<Item type='Email Message' action='get'>"+
"<name>simpleTest</name>"+
"</Item></AML>");

Item myEmail = myResult.getItemByIndex(0);
idnt.email( myEmail, idnt );
return inn.newResult("email sent, worked great");
- Save and Unlock
- Now you should be free to right-click and select actions, "Run Server Method" from your test email method and get an email sent to yourself.
- Reference: www.aras.com/Community/forums/t/1612.aspx
- TROUBLESHOOT: If you run the method and get the error "Object reference not set to an instance of an object.", then you have selected the ID of a User; you need to select the ID of a corresponding Identity.
Appendix
- Windows Server 2008 SMTP Server installation instructions:
- Instructions on DNS setup and testing the server:
- www.sherweb.com/blog/installing-microsoft-smtp-server/
- Install Telnet (not installed by default on Windows Server 2012): https://technet.microsoft.com/en-us/library/cc771275(v=ws.10).aspx
- Search > cmd > (open Command prompt)
- pkgmgr /iu:"TelnetClient"
- SMTP "Send As" permission in Office 365:
- How to set up a multifunction device or application to send email using Office 365: https://technet.microsoft.com/en-us/library/dn554323(v=exchg.150).aspx
- Aras documentation on setting up an email server during installation:
- How to set up a multifunction device or application to send email using Office 365: https://technet.microsoft.com/en-us/library/dn554323(v=exchg.150).aspx
- Page 17 of the Installation guide covers setup on the Innovator side:
- Other resources
- Step-by-step instructions to add SMTP Service to Windows Server 2012, Set up SMTP and firewall ports: http://blog.hyperfive.com/2013/07/how-to-setup-internal-smtp-service-for.html
- http://blog.powerbiz.net.au/exchange/how-to-set-up-an-internal-smtp-service-for-windows-server-2012-essentials/
- http://systemspecialist.net/2012/11/02/create-smtp-relay-for-office-365-with-windows-server-2012-essentials/
- https://technet.microsoft.com/en-us/library/cc772058(WS.10).aspx
- http://serverfault.com/questions/455724/what-replaces-iis-smtp-server-in-windows-server-2012


