
py17day11
一、Mysql
1.下载安装:
MySQL是一个关系型数据库管理系统,由瑞典MySQL AB 公司开发,目前属于 Oracle 旗下公司。MySQL 最流行的关系型数据库管理系统,在 WEB 应用方面MySQL是最好的 RDBMS (Relational Database Management System,关系数据库管理系统) 应用软件之一。
想要使用MySQL来存储并操作数据,则需要做几件事情:
a. 安装MySQL服务端
b. 安装MySQL客户端
b. 【客户端】连接【服务端】
c. 【客户端】发送命令给【服务端MySQL】服务的接受命令并执行相应操作(增删改查等)
windows下安装mysql:
1.下载:http://dev.mysql.com/downloads/mysql/
2.解压:如果想要让MySQL安装在指定目录,那么就将解压后的文件夹移动到指定目录,如:C:\mysql-5.7.16-winx64
3.初始化:MySQL解压后的 bin 目录下有一大堆的可执行文件,执行如下命令初始化数据
cd c:\mysql-5.7.16-winx64\bin

mysqld --initialize-insecure
4.启动mysql服务:
# 进入可执行文件目录
cd c:\mysql-5.7.16-winx64\bin

# 启动MySQL服务
mysqld
5.启动MySQL客户端并连接MySQL服务:
由于初始化时使用的【mysqld --initialize-insecure】命令,其默认未给root账户设置密码
# 进入可执行文件目录
cd c:\mysql-5.7.16-winx64\bin

# 连接MySQL服务器
mysql -u root -p

# 提示请输入密码,直接回车
6.添加环境变量:将MySQL可执行文件添加到环境变量中,从而执行命令即可
【右键计算机】--》【属性】--》【高级系统设置】--》【高级】--》【环境变量】--》【在第二个内容框中找到 变量名为Path 的一行,双击】 --> 【将MySQL的bin目录路径追加到变值值中,用 ; 分割】

如:
C:\Program Files (x86)\Parallels\Parallels Tools\Applications;%SystemRoot%\system32;%SystemRoot%;%SystemRoot%\System32\Wbem;%SYSTEMROOT%\System32\WindowsPowerShell\v1.0\;C:\Python27;C:\Python35;C:\mysql-5.7.16-winx64\bin
再次启动服务:
# 启动MySQL服务,在终端输入
mysqld

# 连接MySQL服务,在终端输入:
mysql -u root -p
7.将MySQL服务制作成windows服务:
在执行【mysqd】启动MySQL服务器时,当前终端会被hang住,那么做一下设置即可解决此问题:
# 制作MySQL的Windows服务,在终端执行此命令:
"c:\mysql-5.7.16-winx64\bin\mysqld" --install

# 移除MySQL的Windows服务,在终端执行此命令:
"c:\mysql-5.7.16-winx64\bin\mysqld" --remove
注册成服务之后,以后再启动和关闭MySQL服务时,仅需执行如下命令:
# 启动MySQL服务
net start mysql

# 关闭MySQL服务
net stop mysql
Liunx下安装Mysql:


安装环境
# yum -y remove mysql mysql-server cmake
# rm -rf /etc/my.cnf
# yum -y groupinstall "Development tools"
# yum -y install ncurses ncurses-devel openssl-devel bison gcc gcc-c++ make

Cmake:
# tar xvf cmake-2.8.10.2.tar.gz
# cd cmake-2.8.10.2
# ./bootstrap
# make
# make install
# cmake -version

MySQL:
# groupadd mysql
# useradd -M -g mysql -s /sbin/nologin mysql
# tar xvf mysql-5.5.33.tar.gz
# cd mysql-5.5.33
# cmake \
-DCMAKE_INSTALL_PREFIX=/usr/local/mysql \
-DSYSCONFDIR=/etc \
-DMYSQL_DATADIR=/usr/local/mysql/data \
-DINSTALL_MANDIR=/usr/share/man \
-DMYSQL_TCP_PORT=3306 \
-DMYSQL_UNIX_ADDR=/tmp/mysql.sock \
-DDEFAULT_CHARSET=utf8 \
-DEXTRA_CHARSETS=all \
-DDEFAULT_COLLATION=utf8_general_ci \
-DWITH_READLINE=1 \
-DWITH_SSL=system \
-DWITH_EMBEDDED_SERVER=1 \
-DENABLED_LOCAL_INFILE=1 \
-DWITH_INNOBASE_STORAGE_ENGINE=1
-DWITH_BLACKHOLE_STORAGE_ENGINE=1
# make
# make install

===MySQL初始化
1. 初始化
# cd /usr/local/mysql
# chown -R mysql:mysql .
# ./scripts/mysql_install_db --user=mysql --basedir=/usr/local/mysql/ --datadir=/usr/local/mysql/data

2. 生成MySQL主配置文件
# cp support-files/my-huge.cnf /etc/my.cnf         mysql5.5
# cp support-files/my-default.cnf  /etc/my.cnf     mysql5.6

3. 生成MySQL Sys V脚本
# cp support-files/mysql.server /etc/rc.d/init.d/mysqld
# chmod 755 /etc/rc.d/init.d/mysqld
# chkconfig --add mysqld
# chkconfig mysqld on
# service mysqld start

4. 配置MySQL环境变量
# echo "export PATH=$PATH:/usr/local/mysql/bin" >> /etc/profile
# source /etc/profile

5. 登录MySQL:
# mysqladmin -uroot password 'mysql123'
# mysql
ERROR 1045 (28000): Access denied for user 'root'@'localhost' (using password: NO)
# mysql -uroot -pmysql123
mysql> show databases;
+--------------------+
| Database           |
+--------------------+
| information_schema |
| mysql              |
| performance_schema |
| test               |
+--------------------+
rows in set (0.00 sec)

========================================================

官方参考:
# Preconfiguration setup
shell> groupadd mysql
shell> useradd -r -g mysql mysql
# Beginning of source-build specific instructions
shell> tar zxvf mysql-VERSION.tar.gz
shell> cd mysql-VERSION
shell> cmake .
shell> make
shell> make install
# End of source-build specific instructions
# Postinstallation setup
shell> cd /usr/local/mysql
shell> chown -R mysql .
shell> chgrp -R mysql .
shell> scripts/mysql_install_db --user=mysql
shell> chown -R root .
shell> chown -R mysql data
# Next command is optional
shell> cp support-files/my-medium.cnf /etc/my.cnf
shell> bin/mysqld_safe --user=mysql &
# Next command is optional
shell> cp support-files/mysql.server /etc/init.d/mysql.server
#二进制rpm包安装
yum -y install mysql-server mysql
2.数据库操作:
1)显示数据库:
SHOW DATABASES;
mysql自带数据库:

  mysql - 用户权限相关数据
  test - 用于用户测试数据
  information_schema - MySQL本身架构相关数据
2)创建数据库:
# utf-8
CREATE DATABASE 数据库名称 DEFAULT CHARSET utf8 COLLATE utf8_general_ci;

# gbk
CREATE DATABASE 数据库名称 DEFAULT CHARACTER SET gbk COLLATE gbk_chinese_ci;
3)使用数据库:
USE db_name;
SHOW TABLES; #显示当前使用的数据库中所有表
4)用户管理:
#创建用户
    create user '用户名'@'IP地址' identified by '密码';
#删除用户
    drop user '用户名'@'IP地址';
#修改用户
    rename user '用户名'@'IP地址'; to '新用户名'@'IP地址';;
#修改密码
    set password for '用户名'@'IP地址' = Password('新密码')

PS:用户权限相关数据保存在mysql数据库的user表中,所以也可以直接对其进行操作(不建议)
5)授权管理:
show grants for '用户'@'IP地址'                  -- 查看权限
grant  权限 on 数据库.表 to   '用户'@'IP地址'      -- 授权
revoke 权限 on 数据库.表 from '用户'@'IP地址'      -- 取消权限
all privileges 除grant外的所有权限 select 仅查权限 select,insert 查和插入权限 ... usage 无访问权限 alter 使用alter table alter routine 使用alter procedure和drop procedure create 使用create table create routine 使用create procedure create temporary tables 使用create temporary tables create user 使用create user、drop user、rename user和revoke all privileges create view 使用create view delete 使用delete drop 使用drop table execute 使用call和存储过程 file 使用select into outfile 和 load data infile grant option 使用grant 和 revoke index 使用index insert 使用insert lock tables 使用lock table process 使用show full processlist select 使用select show databases 使用show databases show view 使用show view update 使用update reload 使用flush shutdown 使用mysqladmin shutdown(关闭MySQL) super 使用change master、kill、logs、purge、master和set global。还允许mysqladmin调试登陆 replication client 服务器位置的访问 replication slave 由复制从属使用
            对于目标数据库以及内部其他:
            数据库名.*           数据库中的所有
            数据库名.表          指定数据库中的某张表
            数据库名.存储过程     指定数据库中的存储过程
            *.*                所有数据库
            用户名@IP地址         用户只能在该IP下才能访问
            用户名@192.168.1.%   用户只能在该IP段下才能访问(通配符%表示任意)
            用户名@%             用户可以再任意IP下访问(默认IP地址为%)
            grant all privileges on db1.tb1 TO '用户名'@'IP'

            grant select on db1.* TO '用户名'@'IP'

            grant select,insert on *.* TO '用户名'@'IP'

            revoke select on db1.tb1 from '用户名'@'IP'
特殊操作:
flush privileges,将数据读取到内存中,从而立即生效。
# 启动免授权服务端
mysqld --skip-grant-tables

# 客户端
mysql -u root -p

# 修改用户名密码
update mysql.user set authentication_string=password('666') where user='root';
flush privileges;
3.数据表基本:
1)创建表:
create table 表名(
    列名  类型  是否可以为空,
    列名  类型  是否可以为空
)ENGINE=InnoDB DEFAULT CHARSET=utf8
#是否可空,null表示空,非字符串
            not null    - 不可空
            null        - 可空
#默认值,创建列时可以指定默认值,当插入数据时如果未主动设置,则自动添加默认值
            create table tb1(
                nid int not null defalut 2,
                num int not null
            )
 # 自增,如果为某列设置自增列,插入数据时无需设置此列,默认将自增(表中只能有一个自增列)
            create table tb1(
                nid int not null auto_increment primary key,
                num int null
            )
            或
            create table tb1(
                nid int not null auto_increment,
                num int null,
                index(nid)
            )
            注意:1、对于自增列,必须是索引(含主键)。
                     2、对于自增可以设置步长和起始值
                     show session variables like 'auto_inc%';
                     set session auto_increment_increment=2;
                     set session auto_increment_offset=10;

                     show global  variables like 'auto_inc%';
                     set global auto_increment_increment=2;
                     set global auto_increment_offset=10;
# 主键,一种特殊的唯一索引,不允许有空值,如果主键使用单个列,则它的值必须唯一,如果是多列,则其组合必须唯一。
            create table tb1(
                nid int not null auto_increment primary key,
                num int null
            )
            或
            create table tb1(
                nid int not null,
                num int not null,
                primary key(nid,num)
            )
# 外键,一个特殊的索引,只能是指定内容
            creat table color(
                nid int not null primary key,
                name char(16) not null
            )

            create table fruit(
                nid int not null primary key,
                smt char(32) null ,
                color_id int not null,
                constraint fk_cc foreign key (color_id) references color(nid)
            )
2)删除表:
drop table 表名
3)清空表:
delete from 表名
truncate table 表名
4)修改表:
添加列:alter table 表名 add 列名 类型
删除列:alter table 表名 drop column 列名
修改列:
        alter table 表名 modify column 列名 类型;  -- 类型
        alter table 表名 change 原列名 新列名 类型; -- 列名,类型

添加主键:
        alter table 表名 add primary key(列名);
删除主键:
        alter table 表名 drop primary key;
        alter table 表名  modify  列名 int, drop primary key;

添加外键:alter table 从表 add constraint 外键名称(形如:FK_从表_主表) foreign key 从表(外键字段) references 主表(主键字段);
删除外键:alter table 表名 drop foreign key 外键名称

修改默认值:ALTER TABLE testalter_tbl ALTER i SET DEFAULT 1000;
删除默认值:ALTER TABLE testalter_tbl ALTER i DROP DEFAULT;
4.基本数据类型:
MySQL的数据类型大致分为:数值、时间和字符串
        bit[(M)]
            二进制位(101001),m表示二进制位的长度(1-64),默认m=1

        tinyint[(m)] [unsigned] [zerofill]

            小整数,数据类型用于保存一些范围的整数数值范围:
            有符号:
                -128 ~ 127.
            无符号:
                0 ~ 255

            特别的: MySQL中无布尔值,使用tinyint(1)构造。

        int[(m)][unsigned][zerofill]

            整数,数据类型用于保存一些范围的整数数值范围:
                有符号:
                    -2147483648 ~ 2147483647
                无符号:
                    0 ~ 4294967295

            特别的:整数类型中的m仅用于显示,对存储范围无限制。例如: int(5),当插入数据2时,select 时数据显示为: 00002

        bigint[(m)][unsigned][zerofill]
            大整数,数据类型用于保存一些范围的整数数值范围:
                有符号:
                    -9223372036854775808 ~ 9223372036854775807
                无符号:
                    0  ~  18446744073709551615

        decimal[(m[,d])] [unsigned] [zerofill]
            准确的小数值,m是数字总个数(负号不算),d是小数点后个数。 m最大值为65,d最大值为30。

            特别的:对于精确数值计算时需要用此类型
                   decaimal能够存储精确值的原因在于其内部按照字符串存储。

        FLOAT[(M,D)] [UNSIGNED] [ZEROFILL]
            单精度浮点数(非准确小数值),m是数字总个数,d是小数点后个数。
                无符号:
                    -3.402823466E+38 to -1.175494351E-38,
                    0
                    1.175494351E-38 to 3.402823466E+38
                有符号:
                    0
                    1.175494351E-38 to 3.402823466E+38

            **** 数值越大,越不准确 ****

        DOUBLE[(M,D)] [UNSIGNED] [ZEROFILL]
            双精度浮点数(非准确小数值),m是数字总个数,d是小数点后个数。

                无符号:
                    -1.7976931348623157E+308 to -2.2250738585072014E-308
                    0
                    2.2250738585072014E-308 to 1.7976931348623157E+308
                有符号:
                    0
                    2.2250738585072014E-308 to 1.7976931348623157E+308
            **** 数值越大,越不准确 ****


        char (m)
            char数据类型用于表示固定长度的字符串,可以包含最多达255个字符。其中m代表字符串的长度。
            PS: 即使数据小于m长度,也会占用m长度
        varchar(m)
            varchars数据类型用于变长的字符串,可以包含最多达255个字符。其中m代表该数据类型所允许保存的字符串的最大长度,只要长度小于该最大值的字符串都可以被保存在该数据类型中。

            注:虽然varchar使用起来较为灵活,但是从整个系统的性能角度来说,char数据类型的处理速度更快,有时甚至可以超出varchar处理速度的50%。因此,用户在设计数据库时应当综合考虑各方面的因素,以求达到最佳的平衡

        text
            text数据类型用于保存变长的大字符串,可以组多到65535 (2**16 − 1)个字符。

        mediumtext
            A TEXT column with a maximum length of 16,777,215 (2**24 − 1) characters.

        longtext
            A TEXT column with a maximum length of 4,294,967,295 or 4GB (2**32 − 1) characters.


        enum
            枚举类型,
            An ENUM column can have a maximum of 65,535 distinct elements. (The practical limit is less than 3000.)
            示例:
                CREATE TABLE shirts (
                    name VARCHAR(40),
                    size ENUM('x-small', 'small', 'medium', 'large', 'x-large')
                );
                INSERT INTO shirts (name, size) VALUES ('dress shirt','large'), ('t-shirt','medium'),('polo shirt','small');

        set
            集合类型
            A SET column can have a maximum of 64 distinct members.
            示例:
                CREATE TABLE myset (col SET('a', 'b', 'c', 'd'));
                INSERT INTO myset (col) VALUES ('a,d'), ('d,a'), ('a,d,a'), ('a,d,d'), ('d,a,d');

        DATE
            YYYY-MM-DD(1000-01-01/9999-12-31)

        TIME
            HH:MM:SS('-838:59:59'/'838:59:59')

        YEAR
            YYYY(1901/2155)

        DATETIME

            YYYY-MM-DD HH:MM:SS(1000-01-01 00:00:00/9999-12-31 23:59:59    Y)

        TIMESTAMP

            YYYYMMDD HHMMSS(1970-01-01 00:00:00/2037 年某时)
二进制数据:TinyBlob、Blob、MediumBlob、LongBlob
5.表内容操作:
1)增:
insert into 表名 (列1名,列2名...) values (列1值,列2值...)
insert into 表名 (列1名,列2名...) values (列1值,列2值...),(列1值,列2值...)
insert into 表名 (列1名,列2名...) select 列1名,列2名... from 表
INSERT into app01_host (Hostname,IP) VALUES ('Elaine&Dylan3.com','1.1.1.3')
INSERT into app01_host (Hostname,IP) VALUES ('Elaine&Dylan3.com','1.1.1.4'),('Elaine&Dylan5.com','1.1.1.5')
INSERT into app01_host (Hostname,IP) SELECT Hostname,IP FROM app01_host_copy WHERE ID BETWEEN 1 AND 7
2)删:
delete from 表
delete from 表 where id=1 and name='user1'
3) 改:
update 表 set name = 'user1' where id>1
4)查:
select * from 表
select * from 表 where id > 1
select nid,name,gender as gg from 表 where id > 1
a.条件:
    select * from 表 where id > 1 and name != 'alex' and num = 12;

    select * from 表 where id between 5 and 16;

    select * from 表 where id in (11,22,33)
    select * from 表 where id not in (11,22,33)
    select * from 表 where id in (select nid from 表)
b.通配符:
    select * from 表 where name like 'ela%'  - ela开头的所有(%代表0个或者多个任意字符)
    select * from 表 where name like 'ela_'  - ela开头的所有(_代表一个任意字符)
c.限制:
    select * from 表 limit 5;            - 取前5行
    select * from 表 limit 4,2;          - 取从第4行开始往后2行(也就是取5,6两行)
    select * from 表 limit 3 offset 1  - 从第1条(不包括)开始取后面的3条数据(即2,3,4)
d.排序:
    select * from 表 order by 列 asc              - 根据 “列” 从小到大排列
    select * from 表 order by 列 desc             - 根据 “列” 从大到小排列
    select * from 表 order by 列1 desc,列2 asc    - 根据 “列1” 从大到小排列,如果相同则按列2从小到大排序
e. 分组:
/*
Navicat MySQL Data Transfer

Source Server         : localhost_3306
Source Server Version : 50716
Source Host           : localhost:3306
Source Database       : s17day11homework

Target Server Type    : MYSQL
Target Server Version : 50716
File Encoding         : 65001

Date: 2017-07-12 17:25:04
*/

SET FOREIGN_KEY_CHECKS=0;

-- ----------------------------
-- Table structure for g2h
-- ----------------------------
DROP TABLE IF EXISTS `g2h`;
CREATE TABLE `g2h` (
  `id` int(11) NOT NULL AUTO_INCREMENT,
  `group_id` int(11) DEFAULT NULL,
  `host_id` int(11) DEFAULT NULL,
  PRIMARY KEY (`id`),
  KEY `fk_d11_4` (`group_id`),
  KEY `fk_d11_5` (`host_id`),
  CONSTRAINT `fk_d11_4` FOREIGN KEY (`group_id`) REFERENCES `group_info` (`gid`),
  CONSTRAINT `fk_d11_5` FOREIGN KEY (`host_id`) REFERENCES `host_info` (`hid`)
) ENGINE=InnoDB AUTO_INCREMENT=18 DEFAULT CHARSET=utf8;

-- ----------------------------
-- Records of g2h
-- ----------------------------
INSERT INTO `g2h` VALUES ('1', '1', '1');
INSERT INTO `g2h` VALUES ('2', '1', '2');
INSERT INTO `g2h` VALUES ('3', '1', '3');
INSERT INTO `g2h` VALUES ('4', '1', '4');
INSERT INTO `g2h` VALUES ('5', '1', '5');
INSERT INTO `g2h` VALUES ('6', '2', '1');
INSERT INTO `g2h` VALUES ('7', '2', '2');
INSERT INTO `g2h` VALUES ('8', '2', '3');
INSERT INTO `g2h` VALUES ('9', '2', '6');
INSERT INTO `g2h` VALUES ('10', '2', '7');
INSERT INTO `g2h` VALUES ('11', '3', '1');
INSERT INTO `g2h` VALUES ('12', '3', '2');
INSERT INTO `g2h` VALUES ('13', '3', '3');
INSERT INTO `g2h` VALUES ('14', '3', '4');
INSERT INTO `g2h` VALUES ('15', '3', '5');
INSERT INTO `g2h` VALUES ('16', '3', '6');
INSERT INTO `g2h` VALUES ('17', '3', '7');

-- ----------------------------
-- Table structure for group_info
-- ----------------------------
DROP TABLE IF EXISTS `group_info`;
CREATE TABLE `group_info` (
  `gid` int(11) NOT NULL AUTO_INCREMENT,
  `gname` char(32) NOT NULL,
  PRIMARY KEY (`gid`,`gname`)
) ENGINE=InnoDB AUTO_INCREMENT=5 DEFAULT CHARSET=utf8;

-- ----------------------------
-- Records of group_info
-- ----------------------------
INSERT INTO `group_info` VALUES ('1', 'IT');
INSERT INTO `group_info` VALUES ('2', 'DEV');
INSERT INTO `group_info` VALUES ('3', 'ADMIN');
INSERT INTO `group_info` VALUES ('4', 'SUPER');

-- ----------------------------
-- Table structure for host_info
-- ----------------------------
DROP TABLE IF EXISTS `host_info`;
CREATE TABLE `host_info` (
  `hid` int(11) NOT NULL AUTO_INCREMENT,
  `host` char(32) DEFAULT NULL,
  `ip` char(32) DEFAULT NULL,
  `user` char(32) DEFAULT NULL,
  `pwd` char(64) DEFAULT NULL,
  PRIMARY KEY (`hid`)
) ENGINE=InnoDB AUTO_INCREMENT=8 DEFAULT CHARSET=utf8;

-- ----------------------------
-- Records of host_info
-- ----------------------------
INSERT INTO `host_info` VALUES ('1', 'host1', '192.168.35.128', 'root', 'wqq19870422');
INSERT INTO `host_info` VALUES ('2', 'host2', '192.168.35.129', 'root', 'wqq19870422');
INSERT INTO `host_info` VALUES ('3', 'host3', '192.168.35.130', 'root', 'wqq19870422');
INSERT INTO `host_info` VALUES ('4', 'host4', '192.168.35.131', 'root', 'wqq19870422');
INSERT INTO `host_info` VALUES ('5', 'host5', '192.168.35.132', 'root', 'wqq19870422');
INSERT INTO `host_info` VALUES ('6', 'host6', '192.168.35.133', 'root', 'wqq19870422');
INSERT INTO `host_info` VALUES ('7', 'host7', '192.168.35.134', 'root', 'wqq19870422');

-- ----------------------------
-- Table structure for u2h
-- ----------------------------
DROP TABLE IF EXISTS `u2h`;
CREATE TABLE `u2h` (
  `id` int(11) NOT NULL AUTO_INCREMENT,
  `user_id` int(11) DEFAULT NULL,
  `host_id` int(11) DEFAULT NULL,
  PRIMARY KEY (`id`),
  KEY `fk_d11_2` (`user_id`),
  KEY `fk_d11_3` (`host_id`),
  CONSTRAINT `fk_d11_2` FOREIGN KEY (`user_id`) REFERENCES `user_info` (`uid`),
  CONSTRAINT `fk_d11_3` FOREIGN KEY (`host_id`) REFERENCES `host_info` (`hid`)
) ENGINE=InnoDB AUTO_INCREMENT=11 DEFAULT CHARSET=utf8;

-- ----------------------------
-- Records of u2h
-- ----------------------------
INSERT INTO `u2h` VALUES ('1', '1', '1');
INSERT INTO `u2h` VALUES ('2', '1', '2');
INSERT INTO `u2h` VALUES ('3', '1', '3');
INSERT INTO `u2h` VALUES ('4', '1', '4');
INSERT INTO `u2h` VALUES ('5', '1', '5');
INSERT INTO `u2h` VALUES ('6', '2', '1');
INSERT INTO `u2h` VALUES ('7', '2', '2');
INSERT INTO `u2h` VALUES ('8', '2', '3');
INSERT INTO `u2h` VALUES ('9', '1', '6');
INSERT INTO `u2h` VALUES ('10', '2', '7');

-- ----------------------------
-- Table structure for user_info
-- ----------------------------
DROP TABLE IF EXISTS `user_info`;
CREATE TABLE `user_info` (
  `uid` int(11) NOT NULL AUTO_INCREMENT,
  `uname` char(32) NOT NULL DEFAULT '',
  `pwd` char(64) DEFAULT NULL,
  `group_id` int(11) DEFAULT NULL,
  PRIMARY KEY (`uid`,`uname`),
  KEY `fk_d11_1` (`group_id`),
  CONSTRAINT `fk_d11_1` FOREIGN KEY (`group_id`) REFERENCES `group_info` (`gid`)
) ENGINE=InnoDB AUTO_INCREMENT=9 DEFAULT CHARSET=utf8;

-- ----------------------------
-- Records of user_info
-- ----------------------------
INSERT INTO `user_info` VALUES ('1', 'user1', '123', '1');
INSERT INTO `user_info` VALUES ('2', 'user2', '456', '2');
INSERT INTO `user_info` VALUES ('3', 'admin', '123456', '3');
INSERT INTO `user_info` VALUES ('4', 'user4', '123', null);
--  按 group_id 分组
SELECT group_id from g2h GROUP BY group_id

-- 特别的:group by 必须在where之后,order by之前
SELECT group_id from g2h WHERE group_id > 1 GROUP BY group_id ORDER BY group_id DESC

-- count(id),sum(id),max(id),min(id)
SELECT group_id,count(id),sum(id),max(id),min(id) from g2h GROUP BY group_id

例:
--  获取每个组的主机数量并筛选数量多于5的组
SELECT group_id as "组ID",count(host_id) as "主机数量" from g2h GROUP BY group_id HAVING COUNT(group_id) > 5

结果:
组ID    主机数量
    3              7
f.连表:
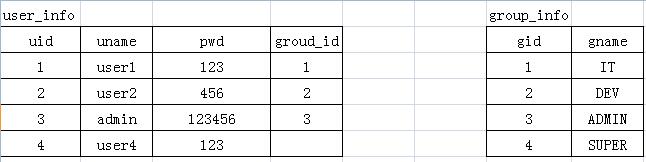
-- LEFT JOIN 时user_info为主表,显示user_info中所有,group_info中无对应关系的显示为NULL
SELECT user_info.group_id,user_info.uname,group_info.gid,group_info.gname from user_info
LEFT JOIN group_info on user_info.group_id = group_info.gid
结果:

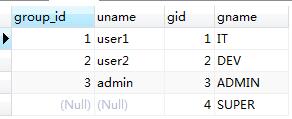
-- RIGHT JOIN 时group_info为主表,group_info显示中所有,user_info中无对应关系的显示为NULL
SELECT user_info.group_id,user_info.uname,group_info.gid,group_info.gname from user_info
RIGHT JOIN group_info on user_info.group_id = group_info.gid
结果:
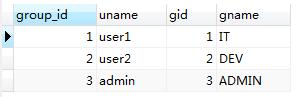
-- INNER JOIN 主表,次表无对应关系的均不显示
SELECT user_info.group_id,user_info.uname,group_info.gid,group_info.gname from user_info
INNER JOIN group_info on user_info.group_id = group_info.gid
结果:
g.组合:
-- 组合,自动处理重合
    select nickname
    from A
    union
    select name
    from B

-- 组合,不处理重合
    select nickname
    from A
    union all
    select name
    from B
组合应用:
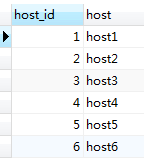
-- 找出用户user1管理的主机
  -- 先找到user1用户管理主机:
SELECT u2h.host_id,host_info.`host` from u2h
LEFT JOIN host_info on u2h.host_id = host_info.hid
WHERE user_id = (SELECT uid from user_info WHERE uname = 'user1')

UNION -- 去除重复主机

 -- 再找到user1属组管理主机:
SELECT g2h.host_id,host_info.`host` from g2h
LEFT JOIN host_info on g2h.host_id = host_info.hid
LEFT JOIN group_info on g2h.group_id = group_info.gid
LEFT JOIN user_info on group_info.gid = user_info.group_id
WHERE user_info.uname = 'user1'
结果:
二、使用python操作Mysql
1.pymysql:
pymsql是Python中操作MySQL的模块,其使用方法和MySQLdb几乎相同。
1)下载安装:
pip3 install pymysql
2)使用操作:
a.执行SQL:
import pymysql

# 创建连接
conn = pymysql.connect(host='127.0.0.1', port=3306, user='root', passwd='123', db='t1')
# 创建游标
cursor = conn.cursor()

# 执行SQL,并返回受影响行数
effect_row = cursor.execute("update hosts set host = '1.1.1.2'")

# 执行SQL,并返回受影响行数
#effect_row = cursor.execute("update hosts set host = '1.1.1.2' where nid > %s", (1,))

# 执行SQL,并返回受影响行数
#effect_row = cursor.executemany("insert into hosts(host,color_id)values(%s,%s)", [("1.1.1.11",1),("1.1.1.11",2)])


# 提交,不然无法保存新建或者修改的数据
conn.commit()

# 关闭游标
cursor.close()
# 关闭连接
conn.close()
b.获取新创建数据自增ID:
import pymysql

conn = pymysql.connect(host='127.0.0.1', port=3306, user='root', passwd='123456', db='py17day11')
cursor = conn.cursor()
cursor.executemany("insert into class(caption)values(%s)", [("class4"), ("class5")])
conn.commit()
cursor.close()
conn.close()

# 获取最新自增ID
new_id = cursor.lastrowid

print(new_id)

运行结果:
8 # 最后一条插入数据的自增ID
c.获取查询数据:
import pymysql

conn = pymysql.connect(host='127.0.0.1', port=3306, user='root', passwd='123456', db='py17day11')
cursor = conn.cursor()
cursor.execute("select * from class")

# 获取第一行数据
row_1 = cursor.fetchone()

# 获取前n行数据
# row_2 = cursor.fetchmany(3)
# 获取所有数据
# row_3 = cursor.fetchall()

conn.commit()
cursor.close()
conn.close()
注:在fetch数据时按照顺序进行,可以使用cursor.scroll(num,mode)来移动游标位置,如:
- cursor.scroll(1,mode='relative') # 相对当前位置移动
- cursor.scroll(2,mode='absolute') # 相对绝对位置移动
import pymysql

conn = pymysql.connect(host='127.0.0.1', port=3306, user='root', passwd='123456', db='py17day11')
cursor = conn.cursor()
cursor.execute("select * from class")

row_1 = cursor.fetchone()
cursor.scroll(1,mode='relative')
row_3 = cursor.fetchall()
print(row_3)
conn.commit()
cursor.close()
conn.close()

# 运行结果:
((3, 'class3'), (7, 'class4'), (8, 'class5'))
import pymysql

conn = pymysql.connect(host='127.0.0.1', port=3306, user='root', passwd='123456', db='py17day11')
cursor = conn.cursor()
cursor.execute("select * from class")

row_1 = cursor.fetchone()
cursor.scroll(1,mode='absolute')
row_3 = cursor.fetchall()
print(row_3)
conn.commit()
cursor.close()
conn.close()

# 运行结果:
((2, 'class2'), (3, 'class3'), (7, 'class4'), (8, 'class5'))
d.fetch数据类型:
关于fetch到的默认获取的数据是元祖类型,如果想要或者字典类型的数据,即:
import pymysql

conn = pymysql.connect(host='127.0.0.1', port=3306, user='root', passwd='123456', db='py17day11')
# 游标设置为字典类型
cursor = conn.cursor(cursor=pymysql.cursors.DictCursor)
cursor.execute("select * from class")

data = cursor.fetchall()
print(data)
conn.commit()
cursor.close()
conn.close()

# 运行结果:
[{'cid': 1, 'caption': 'class1'}, {'cid': 2, 'caption': 'class2'}, {'cid': 3, 'caption': 'class3'}, {'cid': 7, 'caption': 'class4'}, {'cid': 8, 'caption': 'class5'}]
三、

