


一、引言
最近摆弄了一段时间的Arduino,发现Arduino做一些电子类项目、监控、机器人、电子玩具比较容易,并且Arduino与.NET程序集成也不难。接下来介绍一个简单的小程序,C#做的一个Windows Form程序,通过.NET串口编程与Arduino通信,来控制LED灯的状态,以此演示C#与Arduino串口通信的方法。
二、功能演示
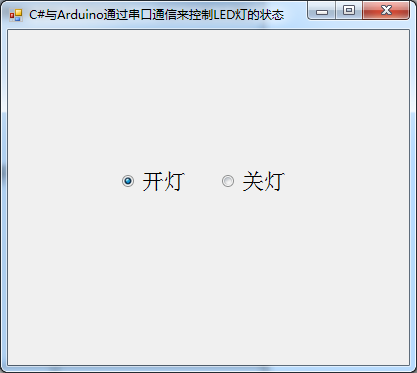
这个小程序功能极其简单,运行Windows Form程序,点击“开灯”单选框则点亮与Arduino相连的LED灯,点击“关灯”单选框则熄灭LED灯,图下2图所示:
三、实现机制
- C#程序向Arduino使用的串口COM4(可通过操作系统的控制面板查看Arduino使用的串口号)输出命令字符:1—表示点亮,0—表示熄灭;
- Arduino读取串口接收到的命令字符,如果读到的字符为1则向LED所在针脚pin 13输出高电平点亮LED灯,如果读到的字符为0则输出低电平熄灭LED灯。
四、开发环境
- Arduino 1.0.5 IDE
- Visual studio 2010
五、所需元件
- Arduino UNO板1块(必需)
- Arduino UNO板与电脑相连的USB线1根(必需)
- LED灯1个(可选)
- 面包板1块(可选)
- 10K电阻1个(可选)
- 跳线2根(可选)
注:Arduino UNO板在pin 13自带了1个LED灯,可以用此灯代替单独的LED灯,所以面包板、LED灯等为可选元件。
六、元件连接
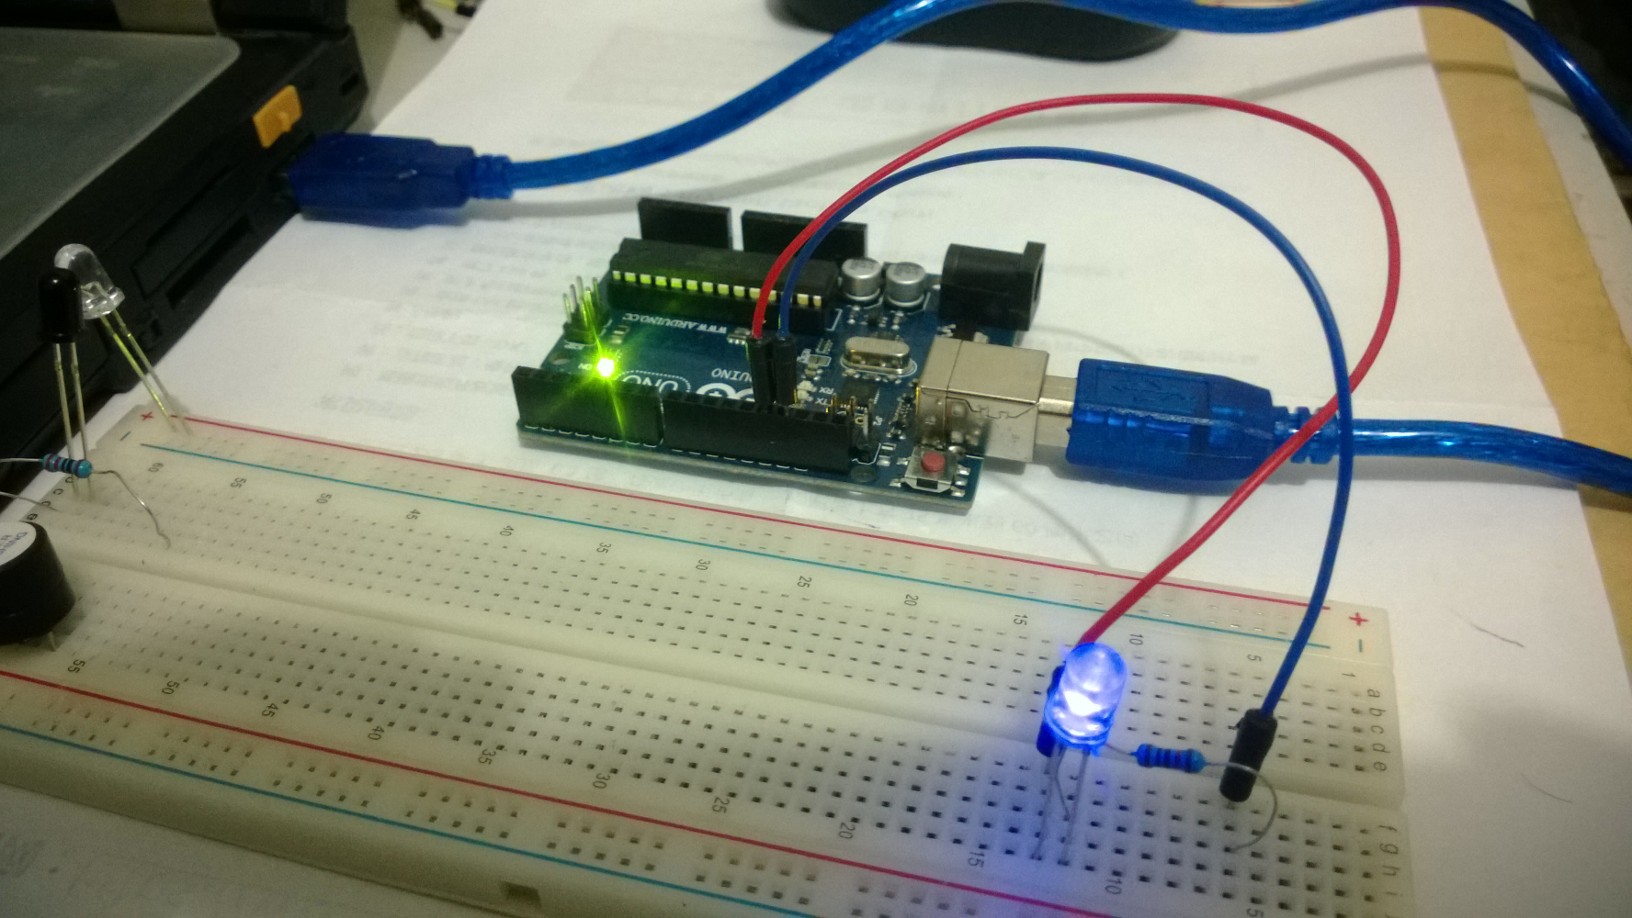
元件连接很简单:LED灯的正极与Arduino的数字针脚pin 13相连,电阻与LED串联,然后接回Arduino的GND,最后用USB线把Arduino板与电脑相连,如上图所示。
七、C#实现代码
创建一个Windows Form,拖放2个单选框,编写Windows Form后台代码,利用.NET的SerialPort类进行串口操作:
 1 public partial class Form1 : Form
 2     {
 3         SerialPort port;
 4
 5         public Form1()
 6         {
 7             InitializeComponent();
 8
 9             this.FormClosed += new FormClosedEventHandler(Form1_FormClosed);
10
11             if (port == null)
12             {
13                 //COM4为Arduino使用的串口号,需根据实际情况调整
14                 port = new SerialPort("COM4", 9600);
15                 port.Open();
16             }
17         }
18
19         void Form1_FormClosed(object sender, FormClosedEventArgs e)
20         {
21             if (port != null && port.IsOpen)
22             {
23                 port.Close();
24             }
25         }
26
27         //点亮
28         private void rbOpen_CheckedChanged(object sender, EventArgs e)
29         {
30             if (this.rbOpen.Checked)
31             {
32                 PortWrite("1");
33             }
34         }
35
36         //熄灭
37         private void rbClose_CheckedChanged(object sender, EventArgs e)
38         {
39             if (this.rbClose.Checked)
40             {
41                 PortWrite("0");
42             }
43         }
44
45         //向串口输出命令字符
46         private void PortWrite(string message)
47         {
48             if (port != null && port.IsOpen)
49             {
50                 port.Write(message);
51                 //port.WriteLine(message);
52             }
53         }
54     }
八、Arduino Sketch代码
读取串口接收到的字符,并根据字符向pin 13输出高电平或低电平,对LED灯进行点亮或熄灭控制:
const int LedPin = 13;
int ledState = 0;

void setup()
{
  pinMode(LedPin, OUTPUT);

  Serial.begin(9600);
}

void loop()
{
    char receiveVal;

    if(Serial.available() > 0)
    {
        receiveVal = Serial.read();

       if(receiveVal == '1')
          ledState = 1;
       else
          ledState = 0;
    }

    digitalWrite(LedPin, ledState);

    delay(50);
}
九、总结
本文通过一个简单的例子,演示了C#与Arduino通过串口通信来控制LED灯状态的机制,总共几十行代码就搞定,体现了Arduino开发简单的宗旨。当然本例子只实现了C#程序向Arduino发数据的单向通信,真实的系统还可根据需要实现Arduino向C#发送数据的双向通信。
Arduino与.NET两者集成可以发挥两个平台的长处:Arduino擅长控制硬件设备与各类传感器;而.NET则拥有强大的数据处理能力、通信功能、以及美观的程序界面。当然,通过USB线实现Arduino与PC之间的串口通信,由于需要与PC连线且USB线的长度往往有限,所以这些因素制约了其应用。但是,Arduino与PC之间还有其他的通信方式,比如以太网线、Wifi、蓝牙等,极大的提高了Arduino的应用范围。
写文章真的比较耗时间,所以一直就不怎么喜欢写文章。今天就写到这,后面有时间的话会陆陆续续写一些关于Arduino应用与开发等各个方面的文章。
十、参考资料
- Arduino官网
- Arduino Cookbook
- Arduino in Action
- Beginning Arduino
- Arduino Internals
- Arduino Workshop: A Hands-On Introduction with 65 Projects
- Exploring Arduino: Tools and Techniques for Engineering Wizardry
- Pro Arduino
- Arduino Robotics
- Building Wireless Sensor Networks: with ZigBee, XBee, Arduino, and Processing
- Arduino and Kinect Projects: Design, Build, Blow Their Minds
- Arduino Wearables

 浙公网安备 33010602011771号