Premiere&After Effects的实时预览插件开发
一、介绍
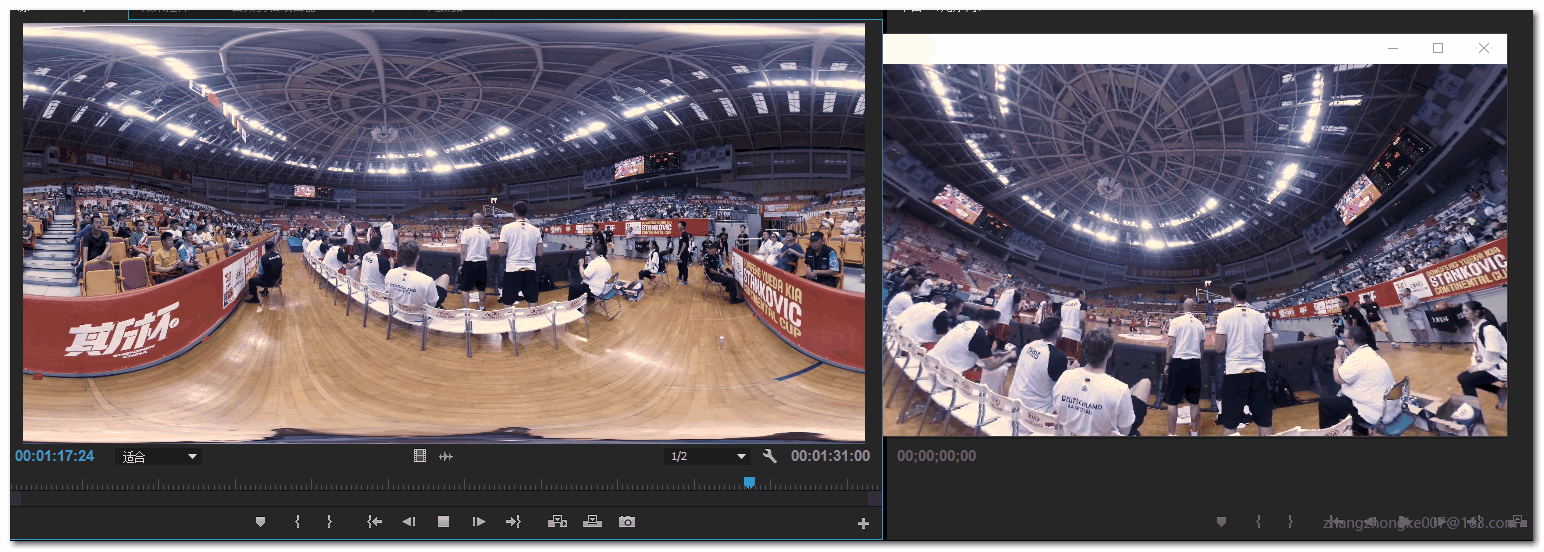
Adobe Premiere和After Effects在影视编辑、渲染领域已经得到广泛应用。全景视频在相应工具拼接好后也可以导入Premiere/After Effects后也可进行剪辑、渲染。但由于全景视频存在畸变、视角、拼接技术等因素,即使平铺时也无法很好的查看场景细节。这对于视频剪辑带来一定的不变。如果能一边剪辑视频一边在全景播放器中查看效果,那便再好不过了。gopro旗下的Kolor eye视频播放器就实现了这样的一种功能。实际上这个功能做起来并不难,其实就是基于Adobe Premiere Transmitter插件实现的。当然,Kolor Eye播放器插件也不例外。

二、插件开发
下面就聊聊如何开发吧。Adobe Premiere插件开发使用C++语言,并且依赖官方提供的开发包。因此在正式动手前需要下载好Adobe Plugin SDK。在SDK中的Projects目录下即可打开Demo工程:
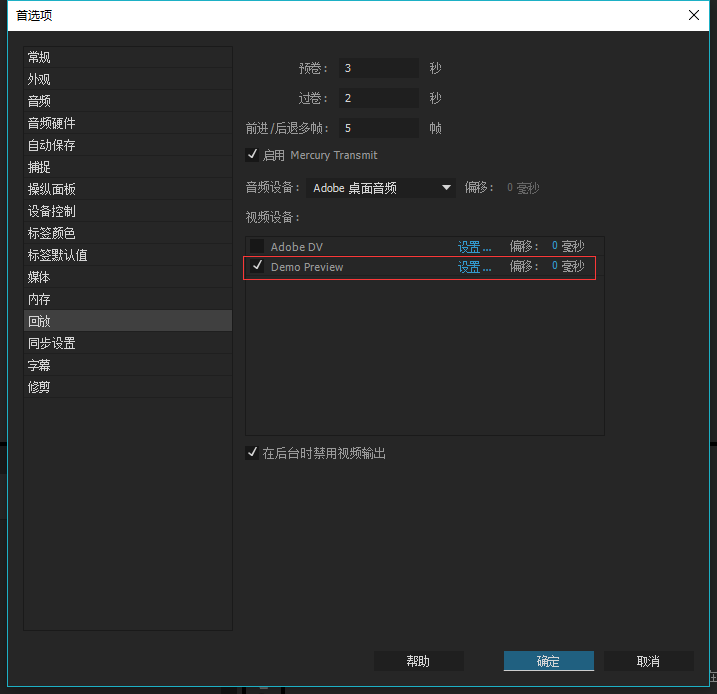
在TransmitterPlugin.h文件中,我们先把插件名称修改成自己需要的名字:
#define PLUGIN_DISPLAY_NAME L"Demo Preview"
其他地方保持原样。然后打开对应的cpp文件进行修改。这里要实现两个功能:
- 在恰当的时候启动外部全景播放器。
- 将视频流持续转发给外部全景播放器。
那么应该怎么做呢。TransmitterPlugin.cpp文件中主要注意两个方法即可:StartPlaybackClock()及PushVideo()方法。StartPlaybackClock()方法在即将播放视频的时候调用,我们选择在这个时候启动外部播放器是再自然不过了。这里通过进程枚举来判断外部播放器是否启动了。如果安装了外部播放器且没有启动,则启动播放器;否则直接利用已启动的播放器进行播放。
tmResult TransmitInstance::StartPlaybackClock(
    const tmStdParms* inStdParms,
    const tmInstance* inInstance,
    const tmPlaybackClock* inClock)
{
    ...
    frameTimeInSeconds = (float)inClock->inStartTime / mTicksPerSecond;
    // If not yet playing, and called to play,
    // then register our UpdateClock function that calls the audio callback asynchronously during playback
    // Note that StartPlaybackClock can be called multiple times without a StopPlaybackClock,
    // for example if changing playback speed in the timeline.
    // If already playing, we the callbackContext doesn't change, and we let the current clock continue.
    if (!mPlaying && inClock->inPlayMode == playmode_Playing)
    {
        mPlaying = kPrTrue;
        if (installFlag && !FindProcessByName(wcsrchr(mLocation, L'/') + 1))
        {
            HINSTANCE hInstance;
            hInstance = ShellExecute(NULL, TEXT("open"), mLocation, TEXT("previewplugin 2048 1024"), NULL, SW_SHOWNORMAL);
            LOGINFO(L"ShellExecute returns %d", (int)hInstance);
        }
        // Initialize the ClockInstanceData that the UpdateClock function will need
        // We allocate the data here, and the data will be disposed at the end of the UpdateClock function
       ...
    }
    return tmResult_Success;
}
而PushVideo()根据字面意思就可以知道,是用来转发视频帧数据的,这也是为啥工程名叫Transmitter的原因。接下来,如何将视频帧数据传递给外部播放器呢?这里选择了Windows平台的内存共享技术。
tmResult TransmitInstance::PushVideo(
	const tmStdParms* inStdParms,
	const tmInstance* inInstance,
	const tmPushVideo* inPushVideo)
{
    ....
	frameTimeInSeconds = (float)inPushVideo->inTime / mTicksPerSecond;
	mSuites.PPixSuite->GetBounds(inPushVideo->inFrames[0].inFrame, &frameBounds);
	videoSize[0] = (frameBounds.right - frameBounds.left);
	videoSize[1] = (frameBounds.bottom - frameBounds.top);
	// Since we have ARGB color space mode.
	mSuites.PPixSuite->GetPixelAspectRatio(inPushVideo->inFrames[0].inFrame, &parNum, &parDen);
	mSuites.PPixSuite->GetPixelFormat(inPushVideo->inFrames[0].inFrame, &pixelFormat);

	mSuites.SequenceInfoSuite->GetZeroPoint(inInstance->inTimelineID, &zeroPointTime);
	mSuites.SequenceInfoSuite->GetTimecodeDropFrame(inInstance->inTimelineID, &dropFrame);
	mSuites.PPixSuite->GetPixels(inPushVideo->inFrames[0].inFrame, PrPPixBufferAccess_ReadWrite, &pixelsBuffer);

	if (videoSize[0] <= 0 || videoSize[1] <= 0)
	{
		// Dispose of the PPix(es) when done!
		for (int i = 0; i < inPushVideo->inFrameCount; i++)
		{
			mSuites.PPixSuite->Dispose(inPushVideo->inFrames[i].inFrame);
		}

		return tmResult_Success;
	}
	resizePixels((unsigned int*)pixelsBuffer, videoSize[0], videoSize[1], SCALED_WIDTH, SCALED_HEIGHT);

	if (!startupFlag)
	{
		startupFlag = 1;
		// read registry and launch the player
		HKEY hKey;
		DWORD dwSize = MAX_PATH;
		DWORD dwType = REG_SZ;
		LPCTSTR studioPath = TEXT("studio");
		LPCTSTR playerPath = TEXT("player");
		if (ERROR_SUCCESS == RegOpenKeyEx(HKEY_CLASSES_ROOT, studioPath, 0, KEY_READ, &hKey) ||
			ERROR_SUCCESS == RegOpenKeyEx(HKEY_CLASSES_ROOT, playerPath, 0, KEY_READ, &hKey))
		{
			if (ERROR_SUCCESS == RegQueryValueEx(hKey, TEXT("install_location"), 0, &dwType, (LPBYTE)&mLocation, &dwSize))
			{
				installFlag = 1;
			}
			RegCloseKey(hKey);
		}
		else
		{
			ret = MessageBox(NULL, TEXT("We failed to find your Studio/Player installation。"), TEXT("Information"), MB_ICONINFORMATION | MB_OKCANCEL);

		}
		if (installFlag)
		{
			HINSTANCE hInstance;
			hInstance = ShellExecute(NULL, TEXT("open"), mLocation, TEXT("previewplugin 2048 1024"), NULL, SW_SHOWNORMAL);
			LOGINFO(L"ShellExecute returns %d", (int)hInstance);
		}
	}

	// get memory file mapping for pixels buffer.
	if (hPixelsMappingFile == NULL)
	{
		hPixelsMappingFile = CreateFileMapping(INVALID_HANDLE_VALUE,
			NULL,
			PAGE_READWRITE,
			0, RESIZED_BUFFER_SIZE,
			TEXT("pixels_buffer"));
		pbPixelsFile = (void*)MapViewOfFile(hPixelsMappingFile, FILE_MAP_ALL_ACCESS, 0, 0, 0);
	}

	if (hPixelsMappingFile != NULL && pbPixelsFile != NULL)
	{
		if (videoSize[0] / videoSize[1] == 2)
		{
			CopyMemory(pbPixelsFile, resizedBuffer, RESIZED_BUFFER_SIZE);
			FlushViewOfFile(pbPixelsFile, RESIZED_BUFFER_SIZE);
		}
	}

	...
	return tmResult_Success;
}
通过查找注册表判断是否安装外部全景播放器。如果已安装则通过安装路径直接启动,否则提示用户。每一帧的数据通过内存共享暴露给外部全景播放器。播放器只需读取这块共享内存即可。至此编码工作完成,简单的不能再简单。将编译好的插件复制到Premiere的插件目录即可查看效果。
三、注意事项
- 依赖库。如果插件依赖外部程序库,在安装的时候也要复制到插件安装目录,或者是windows系统目录,否则插件是无法正常加载的。要查看插件依赖哪些外部程序库,可以使用VS附带的dumpbin命令:dumpbin /imports。有的时候安装可能会混淆32位和64位程序,那么还阔以通过dumpbin /headers查看程序库的版本。
- Premiere/After Effects使用的是ARGB颜色模型。因此在利用外部程序库处理时,可能需要进行适当的转换。
- 权限问题。在高版本的windows上,VS调试系统盘的程序时需要以管理员权限运行打开工程,否则是无法启动程序调试的。
四、参考链接
1. https://forums.adobe.com/thread/1661575
2. http://www.kolor.com/kolor-eyes/
作者:24K纯开源
Email: zhangzhongke007@163.com
出处:http://www.cnblogs.com/csuftzzk/
本文版权归24K纯开源和博客园共同拥有,欢迎转载,但未经作者同意必须保留此声明,且在文章明显位置给出原文链接,否则保留追究法律责任的权利。

