


非刚性人脸跟踪 —— 人脸检测与初始化
一、如何初始化第一帧及检测人脸
迄今为止所介绍的人脸跟踪方法都是假设图像中所找到的面部特征与当前的估计比较接近。虽然整个跟踪过程中帧之间的人脸变化相当小,这样的假设可认为很合理,但必须要面对的问题是,如何用视频序列的第一帧来初始化模型。解决该问题的简单方法是使用 OpenCV 内置的级联检测器来搜索人脸。按照数据驱动的思路,通过学习训练使我们的系统能够学习人脸外界矩形与人脸跟踪特征之间的几何关系detector_offset 向量,然后利用该向量对人脸参考形状矩阵 reference 进行仿射变换,获得外界矩形区域内的人脸特征点。
face_detector 类完全实现了该解决方案。下面这段代码描述了该类的主要功能:
 1 class face_detector{                       //face detector for initialisation
 2 public:
 3   string detector_fname;                   // 级联分类器名称
 4   Vec3f detector_offset;                   //offset from center of detection,用来将之前训练好的形状模型镶嵌到人脸上
 5   Mat reference;                           // 参考形状模型
 6   CascadeClassifier detector;              //face detector
 7
 8   vector<Point2f>                          //points for detected face in image
 9   detect(const Mat &im,                    //image containing face
10      const float scaleFactor = 1.1,    //scale increment
11      const int minNeighbours = 2,      //minimum neighbourhood size
12      const Size minSize = Size(30,30));//minimum detection window size
13
14   void
15   train(ft_data &data,                     //training data
16     const string fname,                //cascade detector
17     const Mat &ref,                    //reference shape
18     const bool mirror = false,         //mirror data?
19     const bool visi = false,           //visualise training?
20     const float frac = 0.8,            //fraction of points in detected rect
21     const float scaleFactor = 1.1,     //scale increment
22     const int minNeighbours = 2,       //minimum neighbourhood size
23     const Size minSize = Size(30,30)); //minimum detection window size
24     ...
25 };
face_detector::detect 函数将一幅图像作为输入,还有一些 cv::CascadeClassifier 类使用的标准参数,该函数返回对图像中面部特征位置的粗略估计。detect 函数的具体实现如下:
 1 vector<Point2f>
 2 face_detector::
 3 detect(const Mat &im,
 4        const float scaleFactor,
 5        const int minNeighbours,
 6        const Size minSize)
 7 {
 8   //convert image to greyscale
 9   Mat gray; if(im.channels()==1)gray = im; else cvtColor(im,gray,CV_RGB2GRAY);
10
11   //detect faces
12   vector<Rect> faces; Mat eqIm; equalizeHist(gray,eqIm);
13   detector.detectMultiScale(eqIm,faces,scaleFactor,minNeighbours,0
14                 |CV_HAAR_FIND_BIGGEST_OBJECT    // 只跟踪图像中最明显的人脸
15                 |CV_HAAR_SCALE_IMAGE,minSize);
16   if(faces.size() < 1){return vector<Point2f>();}
17
18   // 根据人脸检测方框来将参考模型放置到图像中
19   Rect R = faces[0];    // 人脸外界矩形
20   Vec3f scale = detector_offset*R.width;
21   int n = reference.rows/2; vector<Point2f> p(n);
22   for(int i = 0; i < n; i++){
23     p[i].x = scale[2]*reference.fl(2*i  ) + R.x + 0.5 * R.width  + scale[0];
24     p[i].y = scale[2]*reference.fl(2*i+1) + R.y + 0.5 * R.height + scale[1];
25   }return p;
26 }
学习外界矩形与人脸特征点之间的几何关系 detector_offset 可用 face_detector::train 函数实现,具体过程如下:
1. 加载级联分类器
2. 对手工标注的每一幅图片,使用级联分类器搜索人脸区域
3. 判断人脸的外接矩阵内是否包含足够多的标注点(防止错误学习)
4. 如果包含足够的标注点,则计算 detector_offset
代码如下:
 1 void
 2 face_detector::
 3 train(ft_data &data,            // 包含了手工标注信息
 4       const string fname,        // 级联分类器名称
 5       const Mat &ref,            // 参考形状矩阵
 6       const bool mirror,        // 镜像样本图像标记
 7       const bool visi,            // 训练过程可视化标记
 8       const float frac,            // 有效特征点比率阈值
 9       const float scaleFactor,
10       const int minNeighbours,
11       const Size minSize)
12 {
13   // 载入级联分类器
14   detector.load(fname.c_str());
15   detector_fname = fname; reference = ref.clone();
16   vector<float> xoffset(0),yoffset(0),zoffset(0);
17   for(int i = 0; i < data.n_images(); i++){
18       // 获取每一张训练图片
19     Mat im = data.get_image(i,0); if(im.empty())continue;
20     // 获取训练图片对应的特征点
21     vector<Point2f> p = data.get_points(i,false); int n = p.size();
22     Mat pt = Mat(p).reshape(1,2*n);
23     vector<Rect> faces; Mat eqIm;
24     // 直方图均衡化
25     equalizeHist(im,eqIm);
26     // 人脸检测
27     detector.detectMultiScale(eqIm,faces,scaleFactor,minNeighbours,0
28                   |CV_HAAR_FIND_BIGGEST_OBJECT
29                   |CV_HAAR_SCALE_IMAGE,minSize);
30     if(faces.size() >= 1){
31       if(visi){
32     // 框出人脸区域
33     Mat I; cvtColor(im,I,CV_GRAY2RGB);
34     for(int i = 0; i < n; i++)circle(I,p[i],1,CV_RGB(0,255,0),2,CV_AA);
35     rectangle(I,faces[0].tl(),faces[0].br(),CV_RGB(255,0,0),3);
36     imshow("face detector training",I); waitKey(10);
37       }
38       //check if enough points are in detected rectangle
39       if(this->enough_bounded_points(pt,faces[0],frac)){
40     Point2f center = this->center_of_mass(pt); float w = faces[0].width;
41     // X,Y 平移 Z 缩放比例
42     xoffset.push_back((center.x - (faces[0].x+0.5*faces[0].width ))/w);
43     yoffset.push_back((center.y - (faces[0].y+0.5*faces[0].height))/w);
44     zoffset.push_back(this->calc_scale(pt)/w);
45       }
46     }
47     if(mirror){
48       im = data.get_image(i,1); if(im.empty())continue;
49       p = data.get_points(i,true);
50       pt = Mat(p).reshape(1,2*n);
51       equalizeHist(im,eqIm);
52       detector.detectMultiScale(eqIm,faces,scaleFactor,minNeighbours,0
53                   |CV_HAAR_FIND_BIGGEST_OBJECT
54                 |CV_HAAR_SCALE_IMAGE,minSize);
55       if(faces.size() >= 1){
56     if(visi){
57       Mat I; cvtColor(im,I,CV_GRAY2RGB);
58       for(int i = 0; i < n; i++)circle(I,p[i],1,CV_RGB(0,255,0),2,CV_AA);
59       rectangle(I,faces[0].tl(),faces[0].br(),CV_RGB(255,0,0),3);
60       imshow("face detector training",I); waitKey(10);
61     }
62     //check if enough points are in detected rectangle
63     if(this->enough_bounded_points(pt,faces[0],frac)){
64       Point2f center = this->center_of_mass(pt); float w = faces[0].width;
65       xoffset.push_back((center.x - (faces[0].x+0.5*faces[0].width ))/w);
66       yoffset.push_back((center.y - (faces[0].y+0.5*faces[0].height))/w);
67       zoffset.push_back(this->calc_scale(pt)/w);
68     }
69       }
70     }
71   }
72   //choose median value
73   // 对 X、Y、Z集合分别按升序排序,取各自的中值
74   Mat X = Mat(xoffset),Xsort,Y = Mat(yoffset),Ysort,Z = Mat(zoffset),Zsort;
75   cv::sort(X,Xsort,CV_SORT_EVERY_COLUMN|CV_SORT_ASCENDING); int nx = Xsort.rows;
76   cv::sort(Y,Ysort,CV_SORT_EVERY_COLUMN|CV_SORT_ASCENDING); int ny = Ysort.rows;
77   cv::sort(Z,Zsort,CV_SORT_EVERY_COLUMN|CV_SORT_ASCENDING); int nz = Zsort.rows;
78   detector_offset = Vec3f(Xsort.fl(nx/2),Ysort.fl(ny/2),Zsort.fl(nz/2)); return;
79 }
在文件 train_face_detector.cpp 中有一个简单的示例程序,该程序展示如何得到 face_detector 对象并保存这些对象以便用于后面的跟踪系统。主要代码如下:
 1 //load data
 2 ft_data data = load_ft<ft_data>(argv[2]);
 3 shape_model smodel = load_ft<shape_model>(argv[3]);
 4 smodel.set_identity_params();
 5 vector<Point2f> r = smodel.calc_shape();
 6 Mat ref = Mat(r).reshape(1,2*r.size());
 7
 8 //train face detector
 9 face_detector detector;
10 detector.train(data,argv[1],ref,mirror,true,frac);
11
12 //save detector
13 save_ft<face_detector>(argv[4],detector);
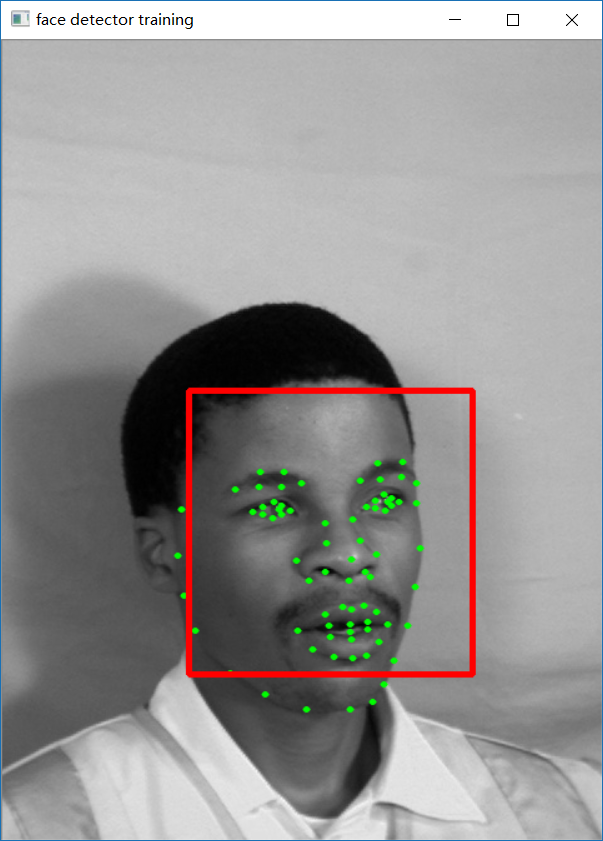
下面是其中两张样本图像以及对应的标注点与人脸位置示意图:

下面是保存 face_detector 对象的 detector_model.yaml 文件:

为了检测形状放置程序的性能,文件 visualize_face_detector.cpp 中的程序会调用 face_detector::detect 函数来处理视频文件或摄像机输入的视频流,并将结果显示在屏幕上。主要代码如下:
 1 //detect until user quits
 2 namedWindow("face detector");
 3 while(cam.get(CV_CAP_PROP_POS_AVI_RATIO) < 0.999999){
 4 Mat im; cam >> im;
 5 vector<Point2f> p = detector.detect(im);
 6 if(p.size() > 0){
 7     for(int i = 0; i < int(p.size()); i++)
 8 circle(im,p[i],1,CV_RGB(0,255,0),2,CV_AA);
 9 }
10 imshow("face detector",im);
11 if(waitKey(10) == 'q')break;
12 }
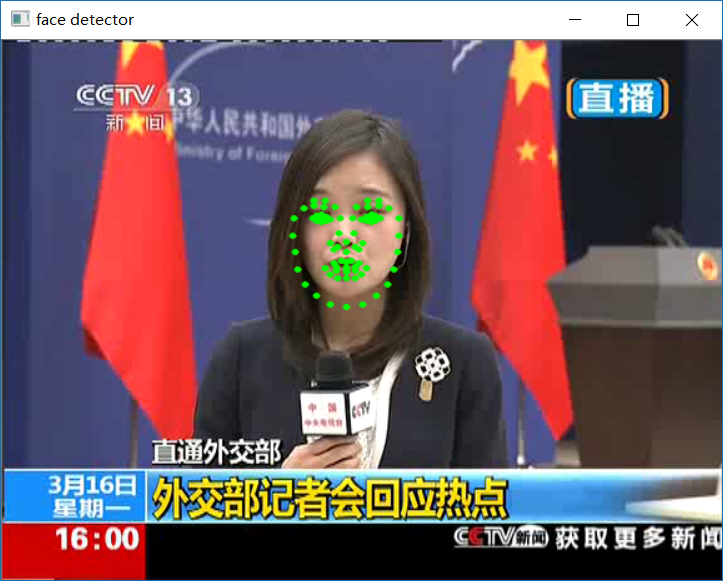
运行效果图如下:


 浙公网安备 33010602011771号