打通前后端全栈开发node+vue进阶【课程学习系统项目实战详细讲解】(3):用户添加/修改/删除 vue表格组件 vue分页组件
第三章 建议学习时间8小时 总项目预计10章
学习方式:详细阅读,并手动实现相关代码(如果没有node和vue基础,请学习前面的vue和node基础博客【共10章】
演示地址:后台:demoback.lalalaweb.com 前台:demo.lalalaweb.com
演示过程中可能会发现bug,希望即时留言反馈,谢谢
源码下载:https://github.com/sutianbinde/classweb //不是全部的代码,每次更新博客才更新代码
学习目标:此教程将教会大家 如何一步一步实现一个完整的课程学习系统(包括课程管理后台/Node服务器/学习门户三个模块)。
上次node基础课程博客大家反响很好,时隔3个月,才更新项目部分,预计2~3天更新一章,我尽量20天更新完毕,学完这个项目Nodejs和vue就基本熟悉了,如发现教程有误的地方,请及时留言反馈
视频教程地址:www.lalalaweb.com,后期会上传教学视频,大家可前往视频学习(暂时还没有视频)
用户添加/修改/删除 表格组件 分页组件
首先我们通过命令行启动前面已经写完的项目
由于要用到表格,我们这里就得封装 表格和分页组件
先在componets中创建分页组件 pagebar.vue,写入以下代码(功能是传入分页信息,然后展示分页,点击分页的时候,会向上触发goto()跳转到第几页,具体参数的解释在代码中,对于组件不熟悉的,可以再去看看前面的基础教程)
<template> <ul class="pagination"> <li :class="{hideLi:current == 1}" @click="goto(current-1)"> <a href="javascript:;" aria-label="Previous"> <span aria-hidden="true">«</span> </a> </li> <li v-for="index in pages" @click="goto(index)" :class="{'active':current == index}" :key="index"> <a href="javascript:;" >{{index}}</a> </li> <!--<li><a href="javascript:;">10</a></li>--> <li :class="{hideLi:(allpage == current || allpage == 0)}" @click="goto(current+1)"> <a href="javascript:;" aria-label="Next"> <span aria-hidden="true">»</span> </a> </li> </ul> </template> <script> /* 分页组件 设置props current 当前页 默认1 showItem 显示几页 默认5 allpage 共多少页 10 **/ export default { name: 'page', data () { return {} }, props:{ current:{ type:Number, default:1 }, showItem:{ type:Number, default:5 }, allpage:{ type:Number, default:10 } }, computed:{ pages:function(){ var pag = []; if( this.current < this.showItem ){ //如果当前的激活的项 小于要显示的条数 //总页数和要显示的条数那个大就显示多少条 var i = Math.min(this.showItem,this.allpage); while(i){ pag.unshift(i--); } }else{ //当前页数大于显示页数了 var middle = this.current - Math.floor(this.showItem / 2 ),//从哪里开始 i = this.showItem; if( middle > (this.allpage - this.showItem) ){ middle = (this.allpage - this.showItem) + 1 } while(i--){ pag.push( middle++ ); } } return pag } }, methods:{ /*editHandler(item){ this.$emit("on-edit",item); }*/ goto:function(index){ if(index == this.current) return; //this.current = index; //这里可以发送ajax请求 this.$emit("on-gopage",index); } } } </script> <!-- Add "scoped" attribute to limit CSS to this component only --> <style scoped> /*分页*/ .pagination{ margin: 10px; display: inline-block; } .pagination >li{ display: inline; } .pagination>li>a, .pagination>li>span{ float: left; padding: 6px 12px; margin-left: -1px; line-height: 1.42857143; color: #4187db; text-decoration: none; background-color: #fff; border: 1px solid #f8f9fb; } .pagination>li>a:hover{ background-color: #f8f9fb; } .pagination>.active>a{ background-color: #4187db !important; color: #fff; } .hideLi a{ visibility: hidden; } </style>
然后在componets中创建 grid.vue ,表格组件,然后写入以下代码,我们在表格组件中,引入了分页组件,这样就不用在主页面中两次引入了,参数的注释在代码中,这里我们需要传入表格数据的头信息和列表信息
<template>
    <div class="">

        <table border="" cellspacing="" cellpadding="">
            <thead>
                <tr><th>序号</th>
                    <th v-for="(item, index) in theadData">{{item.title}}</th>
                </tr>
            </thead>
            <tbody>
                <tr v-if="!listData.length">
                    <td>1</td><td>没有数据 . . .</td>
                    <td v-for="(item, index) in theadData" v-if="index<=theadData.length-2"></td>
                </tr>
                <tr v-for="(item, index) in listData">
                    <td>{{index+1}}</td>
                    <!--按照头部的-->
                    <td  v-for="(item2, index2) in theadData">
                        <span v-if="index2 === 0" style="float: right;">
                            <i title="编辑" v-if="ifEdit" class="fa fa-edit" aria-hidden="true" @click="editHandler(item)"></i>
                            <i title="删除" v-if="ifDelete" class="fa fa-trash" aria-hidden="true" @click="deleteHandler(item)"></i>
                            <i title="下移" v-if="ifDown" class="fa fa-arrow-circle-o-down" aria-hidden="true" @click="downHandler(item)"></i>
                            <i title="上移" v-if="ifUp" class="fa fa-arrow-circle-o-up" aria-hidden="true" @click="upHandler(item)"></i>
                            <i title="封号"v-if="ifReset" class="fa fa-unlock-alt" aria-hidden="true" @click="resetHandler(item)"></i>
                        </span>
                        {{item[item2.keyname]}}
                    </td>
                </tr>

            </tbody>
        </table>

        <pagebar v-if="ifpage" :current="pageInfo.current" :showItem="pageInfo.showItem" :allpage="pageInfo.allpage" @on-gopage="gopage"></pagebar>
    </div>
</template>

<script>
    /*
     表格组件
     设置props
         theadData 表头数据    默认[]
         listData 表格数据    默认[]
         ifpage    是否分页     默认true
         ifEdit/ifDelete/ifUp/ifDown    是否可编辑/删除/上下移动  默认false

      定制模板
          slot为grid-thead 定制表格头部
          slot为grid-handler 定制表格操作

      监听状态变化
          on-delete 删除
          on-edit   编辑
          on-up     上移
          on-down   下移

      分页
      pageInfo 分页信息如下  默认{}   --  或者单独使用 pagebar.vue
      {
          current:当前第几页     1
          showItem:显示多少页 5
          allpage:共多少页        10
      }

    **/

    import pagebar from './pagebar.vue'
    export default {
        name: 'grid',
        data () {
            return {

            }
        },
        props:{
            listData:{
                type:Array,
                default:function(){
                    return [{
                        name:"没有数据 . . ."
                    }]
                }
            },
            theadData:{
                type:Array,
                default:function(){
                    return [{
                        title:"名字",
                        keyname:"name"
                    }]
                }
            },
            ifpage:{
                type:Boolean,
                default:true
            },
            ifEdit:{
                type:Boolean,
                default:false
            },
            ifDelete:{
                type:Boolean,
                default:false
            },
            ifUp:{
                type:Boolean,
                default:false
            },
            ifDown:{
                type:Boolean,
                default:false
            },
            ifReset:{
                type:Boolean,
                default:false
            },
            pageInfo:{
                type:Object,
                default:function(){
                    return {}
                }
            }
        },
        methods:{
            editHandler(item){
                this.$emit("on-edit",item);
            },
            deleteHandler(item){
                this.$emit("on-delete",item);
            },
            downHandler(item){
                this.$emit("on-down",item);
            },
            upHandler(item){
                this.$emit("on-up",item);
            },
            resetHandler(item){
                this.$emit("on-reset",item);
            },
            gopage(index){
                this.$emit("on-gopage",index);
            }
        },
        components:{pagebar}
    }
</script>

<!-- Add "scoped" attribute to limit CSS to this component only -->
<style scoped>

    table{
        border: none 0;
        border-collapse: collapse;
        color: #51555a;
        width: 100%;
        border-bottom: 1px solid #DFE3EA;
    }
    td, th{
        padding: 10px 20px;
        text-align: left;
        border-width:0;
    }
    thead tr, tr:nth-of-type(even){
        background: #f8f9fb;
    }
    /*tbody tr:hover{
        background: #f4f6fb;
    }*/
    td .fa{
        padding:0 5px;
        cursor: pointer;
        opacity: 0;
        transition: all 0.3s ease;
    }
    td .fa:first-child{
        margin-left: 10px;
    }
    tr:hover .fa{
        opacity: 1;
    }
    td .fa:hover{
        color: #4187db;
        transform: scale(1.2);
    }


</style>
表格头信息和列表数据 需要传入的数据格式 如下(这只是展示,帮助大家理解上面的代码的,不用写到页面中)
    var listData = [
        {
            name:"css+html基础",
            duration:"30h",
            teacher:"小豆子",
            videoNb:"20",
            sysId:1
        },{
            name:"javascript进阶",
            duration:"20h",
            teacher:"小豆子",
            videoNb:"12",
            sysId:2
        },{
            name:"移动端全解析 ",
            duration:"10h",
            teacher:"小豆子",
            videoNb:"3",
            sysId:3
        },{
            name:"10分钟系列 ",
            duration:"23h",
            teacher:"小豆子",
            videoNb:"2",
            sysId:4
        },{
            name:"移动端动态网页编程",
            duration:"10h",
            teacher:"小豆子",
            videoNb:"10",
            sysId:5
        }
    ];
    var theadData = [
        {
            title:"课程名称",
            keyname:"name"
        },{
            title:"时长",
            keyname:"duration"
        },{
            title:"视频数量",
            keyname:"videoNb"
        },{
            title:"老师",
            keyname:"teacher"
        }
    ];
然后我们修改系统管理员列表组件(我们上一章中建立的 adminList.vue),修改其中的代码如下,我们这里代码比较多,包括了增删该,分页等功能,确实不好分步骤讲解,这里就直接上代码了,整体来说,方法都很明确,希望大家能看懂,中间的ajax接口我们下一步再去Node端写。
注:这里我们没有对输入数据进行严格的正则验证,是因为此后台功能设定为内部人员使用,所以不需要像前台用户注册页面那样写非常复杂的验证
<template>
  <div class="adminList main">
    <div class="input_box">
            <input v-model="Admin.name" class="myinput" type="text" placeholder="用户名" />
            <input v-model="Admin.phone" class="myinput" type="text" placeholder="手机号" />
            <input v-if="!editAdminObj" v-model="Admin.password" class="myinput" type="password" placeholder="密码" />
            <button v-if="!editAdminObj" class="btn" @click="addAdmin()"><i class="fa fa-plus" aria-hidden="true"></i>添加</button>
            <button v-if="editAdminObj" class="btn" @click="saveEditAdmin()"><i class="fa fa-save" aria-hidden="true"></i>保存</button>
            <button style="opacity: 0.8;" v-if="editAdminObj" class="btn" @click="cancelEditAdmin()"><i class="fa fa fa-times-circle-o" aria-hidden="true"></i>取消</button>
        </div>
        <grid
            :listData="listData"
            :theadData="theadData"
            :ifEdit="true"
            :ifDelete="true"
            :ifpage="true"
            :pageInfo="pageInfo"
            @on-delete="deleteAdmin"
            @on-edit="editAdmin"
            @on-gopage="gopage"
        ></grid>
  </div>
</template>

<script>
    var theadData = [
        {
            title:"用户名",
            keyname:"name"
        },{
            title:"手机号",
            keyname:"phone"
        }
    ];
    import grid from './grid.vue'
    export default {
        name: 'adminList',
        data () {
            return {
                listData:[],
                theadData:theadData,
                Admin:{ //用户信息
                    name:"",
                    phone:"",
                    password:"",
                },
                editAdminObj:null,  //用于存放正在编辑的用户
                pageInfo:{}
            }
        },
        mounted:function(){
            this.getAdminList(1);
        },
        methods:{
            getAdminList(page){
                var _this = this;

                this.$reqs.post('/users/AdminList',{
                    page:page
                }).then(function(result){
                    //成功
                    _this.listData = result.data.data;
                    _this.pageInfo.allpage = Math.ceil( result.data.total/5 );
                }).catch(function (error) {
                    //失败
                    console.log(error)
                });
            },
            addAdmin(){ //添加用户
                if(!this.Admin.name || !this.Admin.phone || !this.Admin.password){
                    alert("不能为空");
                    return false;
                }
                this.$reqs.post('/users/add',this.Admin)
                .then((result)=>{
                    //成功
                    this.getAdminList();
                    this.emptyAdmin();
                }).catch(function (error) {
                    //失败
                console.log(error)
                });

            },
            editAdmin(item){ //编辑用户
                this.editAdminObj = item;
                this.Admin = JSON.parse(JSON.stringify(item));
            },
            saveEditAdmin(){
                if(!this.Admin.name || !this.Admin.phone){
                    alert("不能为空");
                    return false;
                }
                this.$reqs.post('/users/update', this.Admin)
                .then((result)=>{
                    //成功
                    this.gopage(this.pageInfo.current);

                    this.editAdminObj = null;
                    this.emptyAdmin();
                }).catch(function (error) {
                    //失败
                console.log(error)
                });


            },
            cancelEditAdmin(){
                this.editAdminObj = null;
                this.emptyAdmin();
            },
            emptyAdmin(){ //清空输入框(多次使用,所以封装到这里)
                this.Admin.name = "";
                this.Admin.phone = "";
                this.Admin.password = "";
            },
            deleteAdmin(item){
                this.$reqs.post('/users/delete',item)
                .then((result)=>{
                    //成功
                    this.gopage(this.pageInfo.current);
                    this.emptyAdmin();
                }).catch(function (error) {
                    //失败
                console.log(error)
                });
            },
            gopage(index){
                this.pageInfo.current = index;
                //查询数据
                this.getAdminList(index)

            }
        },
        components:{grid}
    }
</script>

<!-- Add "scoped" attribute to limit CSS to this component only -->
<style scoped>
    .main{
        border-radius: 4px;
        background: #fff;
        margin-top: 10px;
    }


    .input_box{
        padding: 0 10px;
    }
    .input_box .myinput{
        width: 25%;
    }
</style>
vue部分我们就写好了,然后我们编写node接口
我们修改 routes中的 users.js,添加增删改用户的接口 ,由于需要对 _id进行转化,我们还需要引入mongodb的ObjectId模块,修改后的users.js如下
var express = require('express');
var router = express.Router();
var handler = require('./dbhandler.js');
var crypto = require('crypto');
var ObjectId = require('mongodb').ObjectId;

/* POST users listing. */
//登录
router.post('/login', function(req, res, next) {
    var md5 = crypto.createHash('md5');
  var password = md5.update(req.body.password).digest('base64');

    handler(req, res, "user", {name: req.body.username},function(data){
        if(data.length===0){
            res.end('{"err":"抱歉,系统中并无该用户,如有需要,请向管理员申请"}');
        }else if(data[0].password !== password){
            res.end('{"err":"密码不正确"}');
        }else if(data.length!==0&&data[0].password===password){

            req.session.username = req.body.username; //存session
            req.session.password = password;

            res.end('{"success":"true"}');
        }

    });

});

//退出
router.post('/logout', function(req, res, next) {

    req.session.username = ""; //清除session中的用户信息
    req.session.password = "";
    res.end('{"success":"true"}');
});


//管理员列表
router.post('/AdminList', function(req, res, next) {
    //console.log(req.body);
    req.route.path = "/page"; //修改path来设定 对 数据库的操作
    var page = req.body.page || 1;
    var rows = req.body.rows || 5;
    handler(req, res, "user", [{},{limit: rows, skip:(page-1)*rows}] ,function(data,count){
        var obj = {
          data:data,
          total:count,
          success:"成功"
        };
        var str = JSON.stringify(obj);
        res.end(str);
    });
});


//添加管理员
router.post('/add', function(req, res, next) {
    //console.log(req.body);
    var md5 = crypto.createHash('md5');
    req.body.password = md5.update(req.body.password).digest('base64');
    handler(req, res, "user", req.body,function(data){

        //console.log(data);
        if(data.length==0){
            res.end('{"err":"抱歉,添加失败"}');
        }else{
            res.end('{"success":"添加成功"}');
        }
    });
});


//删除用户
router.post('/delete', function(req, res, next) {

    handler(req, res, "user", {"_id" : ObjectId(req.body._id)},function(data){

        console.log(data);
        if(data.length==0){
            res.end('{"err":"抱歉,删除失败"}');
        }else{
            var obj = {
              success:"删除成功"
            };
            var str = JSON.stringify(obj);
            res.end(str);
        }

    });
});


//编辑更新用户
router.post('/update', function(req, res, next) {
    //console.log(req.body);

    var selectors = [
        {"_id":ObjectId(req.body._id)},
        {"$set":{
                name:req.body.name, //用户名称
                phone:req.body.phone //联系电话
            }
        }
    ];
    handler(req, res, "user", selectors,function(data){

        //console.log(data);
        if(data.length==0){
            res.end('{"err":"抱歉,修改失败"}');
        }else{
            res.end('{"success":"修改成功"}');
        }

    });

});


module.exports = router;
这里我们用的分页查询page方法,在原来的 dbhander.js中没有,所以需要修改 dbhandler.js,修改后的如下,(添加的方法在63行 和 123行)
var mongo=require("mongodb");
var MongoClient = mongo.MongoClient;
var assert = require('assert');
var url = require('url');
var host="localhost";
var port="27017";
var Urls = 'mongodb://localhost:27017/classweb';
// classweb  ===> 自动创建一个


//add一条数据
var add = function(db,collections,selector,fn){
  var collection = db.collection(collections);
  collection.insertMany([selector],function(err,result){
    try{
        assert.equal(err,null)
        }catch(e){
      console.log(e);
      result = [];
    };

    fn(result);
    db.close();
  });
}
//delete
var deletes = function(db,collections,selector,fn){
  var collection = db.collection(collections);
  collection.deleteOne(selector,function(err,result){
    try{
        assert.equal(err,null);
        assert.notStrictEqual(0,result.result.n);
        }catch(e){
      console.log(e);
      result.result = "";
    };

    fn( result.result ? [result.result] : []); //如果没报错且返回数据不是0,那么表示操作成功。
    db.close;
  });
};
//find
var find = function(db,collections,selector,fn){
  //collections="hashtable";
  var collection = db.collection(collections);

    collection.find(selector).toArray(function(err,result){
      //console.log(docs);
      try{
        assert.equal(err,null);
      }catch(e){
        console.log(e);
        result = [];
      }

      fn(result);
      db.close();
    });

}

//page
var page = function(db,collections,selector,fn){

  var collection = db.collection(collections);
  var count = 0;
  collection.count({},function(err1,count1){
      try{
        assert.equal(err1,null);
      }catch(e){
        console.log(e);
      }
      count = count1;
  });
    collection.find(selector[0],selector[1]).toArray(function(err,result){
      try{
        assert.equal(err,null);
      }catch(e){
        console.log(e);
        result = [];
      }

      fn(result,count); //回掉函数可接收两个参数,查询的数据 和 总数据条数
      db.close();
    });


}

//update
var updates = function(db,collections,selector,fn){
  var collection = db.collection(collections);

  collection.updateOne(selector[0],selector[1],function(err,result){
      try{
        assert.equal(err,null);
        assert.notStrictEqual(0,result.result.n);
        }catch(e){
      console.log(e);
      result.result = "";
    };

    fn( result.result ? [result.result] : []); //如果没报错且返回数据不是0,那么表示操作成功。
    db.close();
  });

}
var methodType = {
    // 项目所需
  login:find,
  //   type ---> 不放在服务器上面
  //  放入到服务器
  //  请求---> 根据传入进来的请求 数据库操作
  //  req.query    req.body
  show:find, //后台部分
  add:add,
  update:updates,
  delete:deletes,
  updatePwd:updates,
  //portal部分
  showCourse:find,
  register:add,
  page:page //分页
};
//主逻辑    服务器  , 请求    --》
// req.route.path ==》 防止前端的请求 直接操作你的数据库
module.exports = function(req,res,collections,selector,fn){
  MongoClient.connect(Urls, function(err, db) {
    assert.equal(null, err);
    console.log("Connected correctly to server");
    // 根据 请求的地址来确定是什么操作  (为了安全,避免前端直接通过请求url操作数据库)
    methodType[req.route.path.substr(1)](db,collections,selector,fn);

    db.close();
  });

};
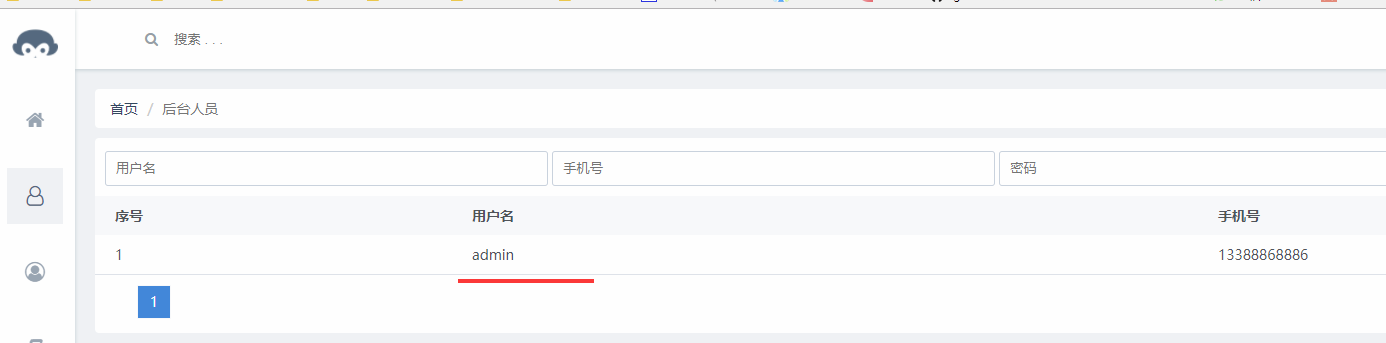
然后重启node端服务,可以看到人员增删改查功能已经实现,原来的admin显示出来了,你也可以进行添加,修改,删除
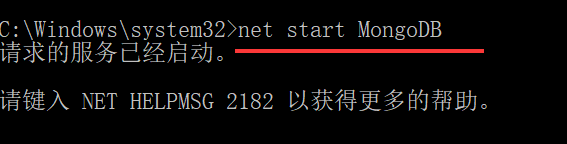
由于mongodb其实不太稳定,所以我们操作过程中,可能会出错停止,如果出现下面报错,就表示Mongodb数据库停了
报错

只需要 重启 mongodb 并重启 node端 即可
等以后上线那一章,我们再讲如何在服务器上让 mongodb和node稳定运行,现阶段运行出错我们都手动重启。
到这里,我们发现,貌似不登陆也能请求列表数据呀,这不科学,所以,我们需要对所有的请求进行拦截,只有当登录了,才能请求数据
我们在vue端的 app.js中加入拦截代码,在session设置的后面添加吧,位置和代码如下
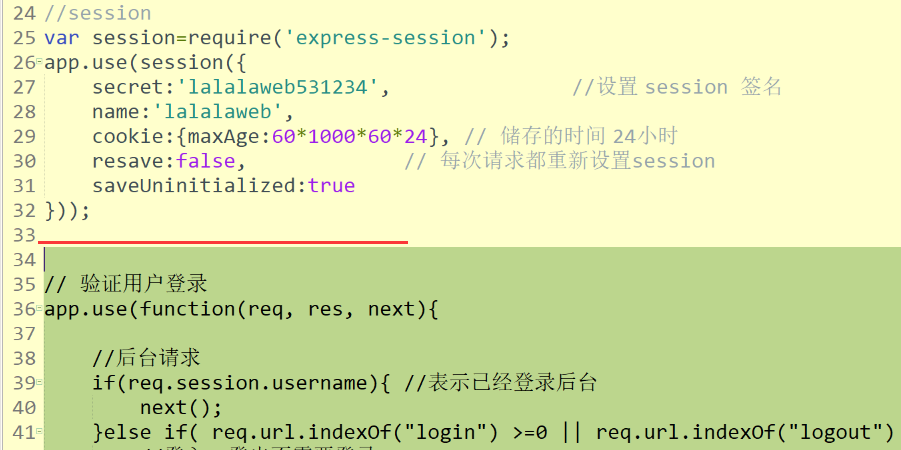
这里我们看到,只有当session中有username的时候,才表示已经登录的(大家还记得吗,这个我们在登录的时候有设置session.username,就是用来这里作判断的),判断中,如果不是登录/登出/已登录三种状态,就直接返回 redirect:true,来告诉浏览器端,需要重定位到登录页面
// 验证用户登录
app.use(function(req, res, next){

    //后台请求
    if(req.session.username){ //表示已经登录后台
        next();
    }else if( req.url.indexOf("login") >=0 || req.url.indexOf("logout") >= 0){
        //登入,登出不需要登录
        next();
    }else{
        //next(); //TODO:这里是调试的时候打开的,以后需要删掉
        res.end('{"redirect":"true"}');

    };

});
然后我们来在vue的main.js中 作redirect跳转,还有当后台返回err的处理,代码和位置如下
这里在axios中作响应前拦截,就是所有的响应到达$req.post的then(){}之前执行的代码,具体的axios配置项大家可以查查axios官网

// 添加响应拦截器
axios.interceptors.response.use(function (response) {
    // 对响应数据做点什么
    if(response.data.err){
        alert(response.data.err);
        return Promise.reject(response);
    }else if(response.data.redirect){
        alert("请先登录..");
        window.location.href = "#/"; //跳转到登录页
        return Promise.reject(response);
    }else{
        //返回response继续执行后面的操作
        return response;
    }
  }, function (error) {
    // 对响应错误做点什么
    return Promise.reject(error);
  });
重启node端,然后访问列表数据,就会提示登录并跳转了,如果已登录,就不会提示这个

好啦,今天就讲到这里。下一篇将讲解 学员列表,课程列表(暂时可能停更项目一段时间,基本的框架和操作都已经实现了,如果看到这里能弄懂的后面的功能应该都能自己写出来了)
关注公众号,博客更新即可收到推送