CSharpGL(35)用ViewPort实现类似3DMax那样的把一个场景渲染到4个视口
CSharpGL(35)用ViewPort实现类似3DMax那样的把一个场景渲染到4个视口
开始
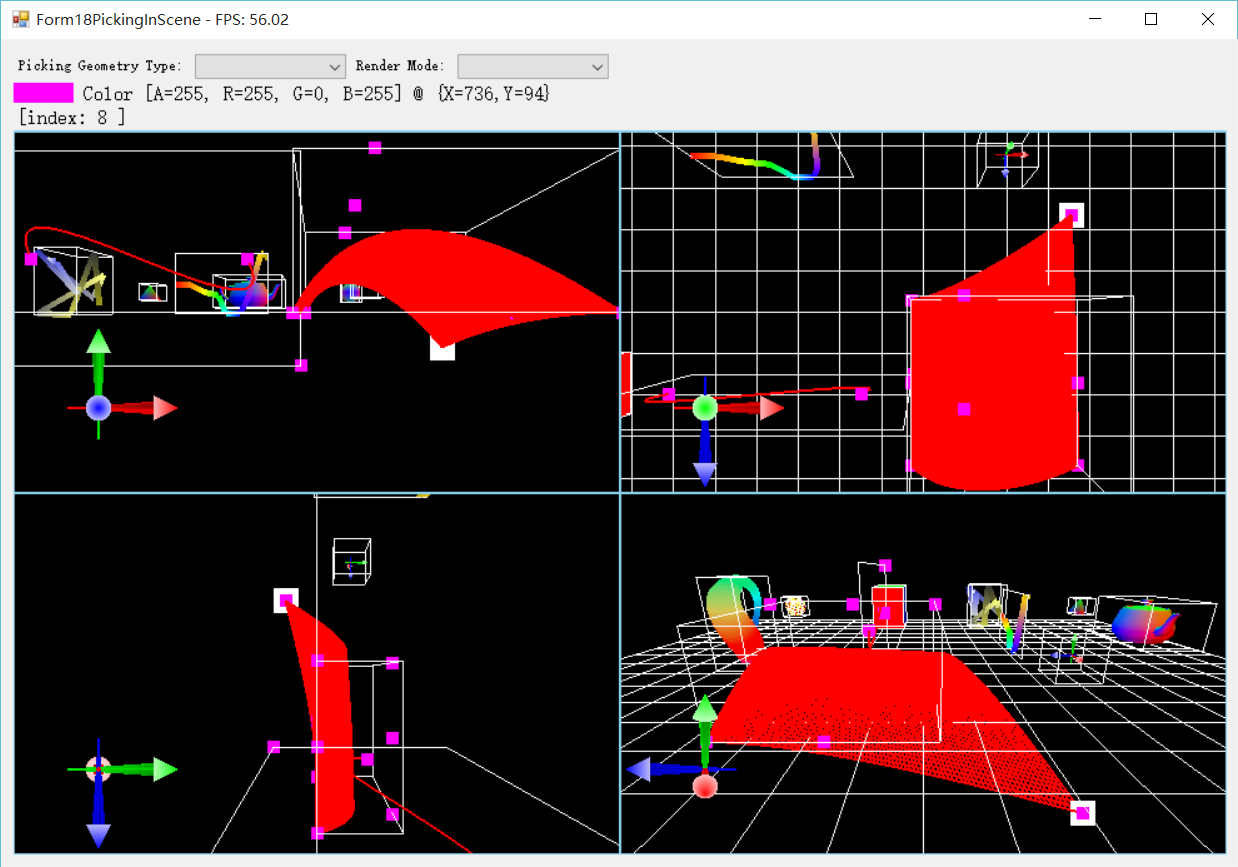
像下面这样的四个视口的功能是很常用的,所以我花了几天时间在CSharpGL中集成了这个功能。

在CSharpGL中的多视口效果如下。效果图是粗糙了些,但是已经实现了拖拽图元时4个视口同步更新的功能,算是一个3D模型编辑器的雏形了。
原理
ViewPort
多视口的任务,是在不同的区域用不同的摄像机渲染同一个场景。这个“区域”我们称其为 ViewPort 。(实际上 ViewPort 是强化版的 glViewport() ,它附带了摄像机等其他成员)
为了渲染多个视口,就应该有一个 ViewPort 列表,保存所有的视口。这就是 Scene 里新增的RootViewPort属性。
 1     public class Scene : IDisposable
 2     {
 3         /// <summary>
 4         /// Root object of all viewports to be rendered in the scene.
 5         /// </summary>
 6         [Category(strScene)]
 7         [Description("Root object of all viewports to be rendered in the scene.")]
 8         [Editor(typeof(PropertyGridEditor), typeof(UITypeEditor))]
 9         public ViewPort RootViewPort { get; private set; }
10         // other stuff …
11     }
为了让视口也能像UIRenderer那样使用ILayout接口的树型布局功能,我们也让ViewPort实现ILayout接口。
 1     public partial class ViewPort : ILayout<ViewPort>
 2     {
 3         private const string viewport = "View Port";
 4
 5         /// <summary>
 6         ///
 7         /// </summary>
 8         [Category(viewport)]
 9         [Description("camera of the view port.")]
10         [Editor(typeof(PropertyGridEditor), typeof(UITypeEditor))]
11         public ICamera Camera { get; private set; }
12
13         /// <summary>
14         /// background color.
15         /// </summary>
16         [Category(viewport)]
17         [Description("background color.")]
18         public Color ClearColor { get; set; }
19
20         /// <summary>
21         /// Rectangle area of this view port.
22         /// </summary>
23         [Category(viewport)]
24         [Description("Rectangle area of this view port.")]
25         public Rectangle Rect { get { return new Rectangle(this.location, this.size); } }
26
27         public ViewPort(ICamera camera, AnchorStyles anchor, Padding margin, Size size)
28         {
29             this.Children = new ChildList<ViewPort>(this);
30
31             this.Camera = camera;
32             this.Anchor = anchor;
33             this.Margin = margin;
34             this.Size = size;
35         }
36     }
有了这样的设计,CSharpGL在渲染上述效果图时就有了5个视口。如下图所示,其中根结点上的ViewPort.Visible属性为false,表示这个ViewPort不会参与渲染,即不会显示到最终的窗口上。而此根结点下属的4个子结点,各自代表一个ViewPort,他们分别以Top\Front\Left\Perspecitve的角度渲染了一次整个场景,并将渲染结果放置到自己的范围内。
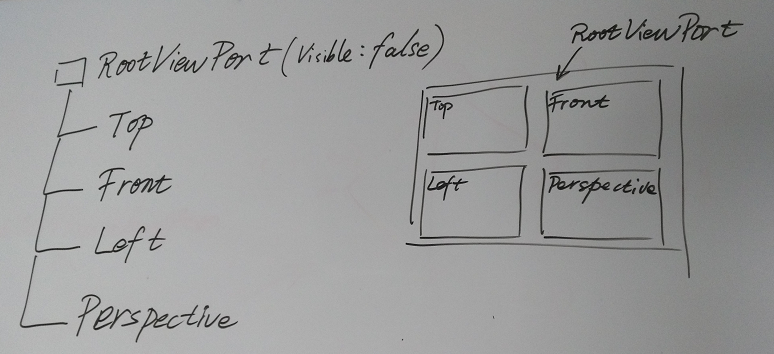
树型结构的ViewPort,其布局就和UIRenderer、Winform控件的布局方式是一样的。你可以像安排控件一样安排ViewPort的Location和Size。因此ViewPort是支持重叠、支持任意多个的。
渲染
有多少个ViewPort,就要渲染多少次。同时,ViewPort修改了glViewport()的值,这个情况也要反映到每个Renderer的渲染过程。
 1     public partial class Scene
 2     {
 3         private object synObj = new object();
 4
 5         // Render this scene.
 6         public void Render(RenderModes renderMode,
 7             bool autoClear = true,
 8             GeometryType pickingGeometryType = GeometryType.Point)
 9         {
10             lock (this.synObj)
11             {
12                 // update view port's location and size.
13                 this.rootViewPort.Layout();
14                 // render scene in every view port.
15                 this.RenderViewPort(this.rootViewPort, this.Canvas.ClientRectangle, renderMode, autoClear, pickingGeometryType);
16             }
17         }
18
19         // Render scene in every view port.
20         private void RenderViewPort(ViewPort viewPort, Rectangle clientRectangle, RenderModes renderMode, bool autoClear, GeometryType pickingGeometryType)
21         {
22             if (viewPort.Enabled)
23             {
24                 // render in this view port.
25                 if (viewPort.Visiable)
26                 {
27                     viewPort.On();// limit rendering area.
28                     // render scene in this view port.
29                     this.Render(viewPort, clientRectangle, renderMode, autoClear, pickingGeometryType);
30                     viewPort.Off();// cancel limitation.
31                 }
32
33                 // render children viewport.
34                 foreach (ViewPort item in viewPort.Children)
35                 {
36                     this.RenderViewPort(item, clientRectangle, renderMode, autoClear, pickingGeometryType);
37                 }
38             }
39         }
40     }
坐标系
再次强调一个问题,Winform的坐标系,是以左上角为(0, 0)原点的。OpenGL的窗口坐标系,是以左下角为(0, 0)原点的。
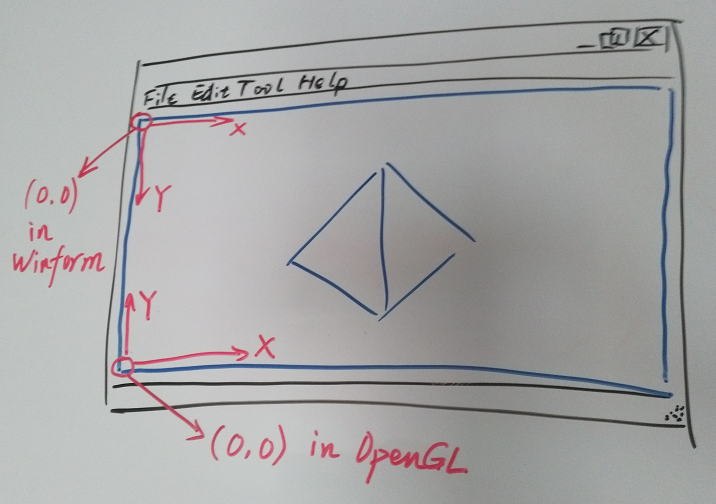
那么一个良好的习惯就是,通过Winform获取的鼠标坐标,应该第一时间转换为OpenGL下的坐标,然后再参与OpenGL的后续计算。等OpenGL部分的计算完毕时,应立即转换回Winform下的坐标。
保持这个好习惯,再遇到鼠标坐标时就不会有便秘的感觉了。
拾取
为了适应新出现的ViewPort功能,原有的Picking功能也要调整了。
之前没有ViewPort树的时候,其本质上是只有一个覆盖整个窗口的'ViewPort'。现在,新出现的ViewPort可能只覆盖窗口的一部分,那么拾取时也要修改为只在这部分内进行。
只在一个ViewPort内拾取
现在有了多个ViewPort。很显然,即使ViewPort之间有重叠,也只应在一个ViewPort内执行Picking操作。因为鼠标不会同时出现在2个地方。即使鼠标位于重叠的部分,也只应在最先(后序优先搜索顺序)接触到的ViewPort上执行Picking操作。
注意,这里先用 int y = clientRectangle.Height - mousePosition.Y - 1; 得到了OpenGL坐标系下的鼠标位置,然后才开始OpenGL方面的计算。
 1     public partial class Scene
 2     {
 3         /// <summary>
 4         /// Get geometry at specified <paramref name="mousePosition"/> with specified <paramref name="pickingGeometryType"/>.
 5         /// <para>Returns null when <paramref name="mousePosition"/> is out of this scene's area or there's no active(visible and enabled) viewport.</para>
 6         /// </summary>
 7         /// <param name="mousePosition">mouse position in Windows coordinate system.(Left Up is (0, 0))</param>
 8         /// <param name="pickingGeometryType">target's geometry type.</param>
 9         /// <returns></returns>
10         public List<Tuple<Point, PickedGeometry>> Pick(Point mousePosition, GeometryType pickingGeometryType)
11         {
12             Rectangle clientRectangle = this.Canvas.ClientRectangle;
13             // if mouse is out of window's area, nothing picked.
14             if (mousePosition.X < 0 || clientRectangle.Width <= mousePosition.X || mousePosition.Y < 0 || clientRectangle.Height <= mousePosition.Y) { return null; }
15
16             int x = mousePosition.X;
17             int y = clientRectangle.Height - mousePosition.Y - 1;
18             // now (x, y) is in OpenGL's window cooridnate system.
19             Point position = new Point(x, y);
20             List<Tuple<Point, PickedGeometry>> allPickedGeometrys = null;
21             var pickingRect = new Rectangle(x, y, 1, 1);
22             foreach (ViewPort viewPort in this.rootViewPort.DFSEnumerateRecursively())
23             {
24                 if (viewPort.Visiable && viewPort.Enabled && viewPort.Contains(position))
25                 {
26                     allPickedGeometrys = ColorCodedPicking(viewPort, pickingRect, clientRectangle, pickingGeometryType);
27
28                     break;
29                 }
30             }
31
32             return allPickedGeometrys;
33         }
34     }
Picking的过程
Picking的步骤比较长,分支情况也超级多。这里只大体认识一下即可。
首先,如果depth buffer在鼠标所在的像素点上的深度为1(最深),就说明鼠标没有点中任何东西,因此直接返回即可。
然后,我们在给定的 ViewPort 范围内,用color-coded方式渲染一遍整个场景。
然后,用 glReadPixels() 获取鼠标所在位置的颜色值。
最后,由于这个颜色值是与图元的编号一一对应的,我们就可以通过这个颜色值辨认出它到底是属于哪个Renderer里的哪个图元。


 1         /// <summary>
 2         /// Pick primitives in specified <paramref name="viewPort"/>.
 3         /// </summary>
 4         /// <param name="viewPort"></param>
 5         /// <param name="pickingRect">rect in OpenGL's window coordinate system.(Left Down is (0, 0)), size).</param>
 6         /// <param name="clientRectangle">whole canvas' rectangle.</param>
 7         /// <param name="pickingGeometryType"></param>
 8         /// <returns></returns>
 9         private List<Tuple<Point, PickedGeometry>> ColorCodedPicking(ViewPort viewPort, Rectangle pickingRect, Rectangle clientRectangle, GeometryType pickingGeometryType)
10         {
11             var result = new List<Tuple<Point, PickedGeometry>>();
12
13             // if depth buffer is valid in specified rect, then maybe something is picked.
14             if (DepthBufferValid(pickingRect))
15             {
16                 lock (this.synObj)
17                 {
18                     var arg = new RenderEventArgs(RenderModes.ColorCodedPicking, clientRectangle, viewPort, pickingGeometryType);
19                     // Render all PickableRenderers for color-coded picking.
20                     List<IColorCodedPicking> pickableRendererList = Render4Picking(arg);
21                     // Read pixels in specified rect and get the VertexIds they represent.
22                     List<Tuple<Point, uint>> stageVertexIdList = ReadPixels(pickingRect);
23                     // Get all picked geometrys.
24                     foreach (Tuple<Point, uint> tuple in stageVertexIdList)
25                     {
26                         int x = tuple.Item1.X;
27                         int y = tuple.Item1.Y;
28
29                         uint stageVertexId = tuple.Item2;
30                         PickedGeometry pickedGeometry = GetPickGeometry(arg,
31                            x, y, stageVertexId, pickableRendererList);
32                         if (pickedGeometry != null)
33                         {
34                             result.Add(new Tuple<Point, PickedGeometry>(new Point(x, y), pickedGeometry));
35                         }
36                     }
37                 }
38             }
39
40             return result;
41         }
这其中包含了太多的细节,关键详情可参看这6篇介绍(这里,这里,这里,这里,这里,还有这里)
自定义布局方式
虽然ViewPort实现了ILayout接口,但是这难以完成按比例布局的功能。(即:当窗口Size改变时,Top\Front\Left\Perspective始终保持各占窗口1/4大小)
这时可以通过自定义布局的方式来实现这个功能。
具体方法就是自定义 ViewPort.BeforeLayout 和 ViewPort.AfterLayout 事件。
例如,对于Top,我们想让它始终保持在窗口的左上角,且占窗口1/4大小。
        private void Form_Load(object sender, EventArgs e)
        {
           // other stuff ...
           // ‘top’ view port
           var camera = new Camera(
           new vec3(0, 0, 15), new vec3(0, 0, 0), new vec3(0, 1, 0),
           CameraType.Perspecitive, this.glCanvas1.Width, this.glCanvas1.Height);
           ViewPort viewPort = new ViewPort(camera, AnchorStyles.None, new Padding(), new Size());
           viewPort.BeforeLayout += viewPort_BeforeLayout;
           viewPort.AfterLayout += topViewPort_AfterLayout;
           this.scene.RootViewPort.Children.Add(viewPort);
           // other stuff ...
        }

        private void viewPort_BeforeLayout(object sender, System.ComponentModel.CancelEventArgs e)
        {
            // cancel ILayout's layout action for this view port.
            e.Cancel = true;
        }

        private void topViewPort_AfterLayout(object sender, EventArgs e)
        {
            var viewPort = sender as ViewPort;
            ViewPort parent = viewPort.Parent;
            viewPort.Location = new Point(0 + 1, parent.Size.Height / 2 + 1);
            viewPort.Size = new Size(parent.Size.Width / 2 - 2, parent.Size.Height / 2 - 2);
        }
如果你查看一下实现了布局机制的 ILayoutHelper 的代码,会发现 e.Cancel = true; 这句话取消了 ILayout 对此 ViewPort 的布局操作。(我们要自定义布局操作,因此ILayout原有的布局操作就没有必要实施了。)
 1         public static void Layout<T>(this ILayout<T> node) where T : ILayout<T>
 2         {
 3             ILayout<T> parent = node.Parent;
 4             if (parent != null)
 5             {
 6                 bool cancelTreeLayout = false;
 7
 8                 var layoutEvent = node.Self as ILayoutEvent;
 9                 if (layoutEvent != null)
10                 { cancelTreeLayout = layoutEvent.DoBeforeLayout(); }
11
12                 if (!cancelTreeLayout)
13                 { NonRootNodeLayout(node, parent); }
14
15                 if (layoutEvent != null)
16                 { layoutEvent.DoAfterLayout(); }
17             }
18
19             foreach (T item in node.Children)
20             {
21                 item.Layout();
22             }
23
24             if (parent != null)
25             {
26                 node.ParentLastSize = parent.Size;
27             }
28         }
总结
ViewPort在Scene里是一个树型结构,支持ILayout布局和Before/AfterLayout自定义布局。有一个Visible的ViewPort,场景就要渲染一次。

|
微信扫码,自愿捐赠。四海同道,共谱新篇。
微信捐赠不显示捐赠者个人信息,如需要,请注明联系方式。 |

 浙公网安备 33010602011771号