

本文讲述了在一个ItemsControl内部,ListView内部,以及两者之间互相拖动item的实现。
涉及到了DataTemplate、Style、Adorner、ContentPresenter、VisualTreeHelper、AttachedProperty等知识,个人认为非常的好。原文地址:http://www.beacosta.com/blog/?m=200802,下面是原文:
How can I drag and drop items between data bound ItemsControls?
In this blog post, I will explain how I implemented a sample that allows you to drag and drop items between data bound ItemsControls. Imagine you have two or more data bound (or not data bound) ItemsControls in the same Window. You may want to drag an item from an ItemsControl and drop it on another one. Or maybe you want to drag and drop it in a different position within the same ItemsControl. The code in this blog post allows you to do those operations.
Use this code
You don’t need to understand the implementation details of this sample to take advantage of its functionality. If you want to use this code in your app, you should copy three files from the project at the end of the post - DraggedAdorner.cs, InsertionAdorner.cs and DragDropHelper.cs. You may want to change the namespace in these files. Then, within your app, you simply need to add three attached properties:
- IsDropTarget should be set on the ItemsControl that you want to drag items to. This property is of type boolean and should be set to true. Don’t forget to add a namespace mapping on the top window that maps to the namespace you chose for DragDropHelper.
<Window …
xmlns:local=”clr-namespace:DragDropListBox” … />
<ItemsControl …
local:DragDropHelper.IsDropTarget=”true” …/>
- IsDragSource should be set on the ItemsControl that you want to drag items from. This property should also be set to true.
- DragDropTemplate should also be set on the drag source ItemsControl (where you want to drag the items from). This property should be set to a DataTemplate that controls how the data item should be displayed while it is dragged around. If you want it to be displayed exactly the same way as in the source ItemsControl, the DragDropTemplate and ItemTemplate properties can share the same template.
<ItemsControl …
local:DragDropHelper.IsDragSource=”true” local:DragDropHelper.DragDropTemplate=”{StaticResource pictureTemplate}”/>
And that’s all there is to it. Next I will show the list of features and limitations of this solution.
Features
- The code in this sample enables the user to drag and drop between ItemsControls and any controls that derive from it (see exception for TreeView in the limitations section).
- This solution supports dragging and dropping within the same ItemsControl.
- This solution supports dragging and dropping between non data bound and data bound ItemsControls.
- I’ve added support for ItemsControls that use FlowPanel and StackPanel (with both horizontal and vertical orientation). Support for other panels can be added easily.
- This sample prevents the user from dropping a data item into a target ItemsControl when its data items are of an incompatible type. For example, if the drag source ItemsControl contains a collection of Potatoes but the drop target ItemsControl is data bound to a collection of Squirrels, the app will prevent the user from doing the drop.
- This sample provides visual feedback of where the dragged item will go if dropped. For example, when dragging a data item over a ListBox, this sample shows a horizontal line between the two items where the item will go if dropped.
Limitations
- This solution doesn’t drag and drop data items across Windows.
- It also doesn’t work across Applications.
- It allows drag and drop to work between ItemsControls, but it does not allow you to drag or drop to a ContentControl.
- This sample works as expected for the first level of a TreeView, but not for nested levels of the hierarchy.
Overview
To implement a drag and drop operation, we need to attach handlers for several events on the drag source and drop target elements. In this scenario, I decided that I am going to support only ItemsControls as the source and target of the drag and drop operation. All the events that I need to provide handlers for are public, so I could have easily done that in the Window1.xaml.cs file. However, I wanted an easily reusable solution that would allow all the drag-and-drop-specific code to be abstracted in one place. I thought of three different solutions to this problem (although I’m sure there are more):
- I could derive from ItemsControl and override “OnPreviewMouseLeftButtonDown” and all the other “On” methods that correspond to the events I care about. I don’t like this solution so much because users would have to replace their ItemsControls with my custom “DragAndDropItemsControl”.
- I could create a DragHelper class that takes an instance of the drag source ItemsControl as a parameter, and a DropHelper class that takes the drop target. The only disadvantage of this solution is that it needs to be set up from code.
- Instead, I decided to create a DragDropHelper class that defines properties to be attached to the drag source and drop target IsDragSource and IsDropTarget. The main advantages of this solution are that it can be implemented entirely in XAML, and that the XAML changes are minimal (you only need to set these properties). I’ll explain below how this works.
These two attached properties are of type boolean, and should be attached to the drag source and drop target. When they’re set to false, dragging/dropping is not allowed, otherwise it is. If your application requires drag and drop operations to be allowed sometimes but not other times, you can simply change the properties on the fly.
When registering the attached properties, I made sure I passed change handlers called IsDragSourceChanged and IsDropTargetChanged to the UIPropertyMetadata. These methods are responsible for adding and removing handlers for the desired events, depending on the value of the attached property. I will show here the code for IsDragSourceChanged (the code for the target is similar):
private static void IsDragSourceChanged(DependencyObject obj, DependencyPropertyChangedEventArgs e)
{
var dragSource = obj as ItemsControl;
if (dragSource != null)
{
if (Object.Equals(e.NewValue, true))
{
dragSource.PreviewMouseLeftButtonDown += Instance.DragSource_PreviewMouseLeftButtonDown;
dragSource.PreviewMouseLeftButtonUp += Instance.DragSource_PreviewMouseLeftButtonUp;
dragSource.PreviewMouseMove += Instance.DragSource_PreviewMouseMove;
}
else
{
dragSource.PreviewMouseLeftButtonDown -= Instance.DragSource_PreviewMouseLeftButtonDown;
dragSource.PreviewMouseLeftButtonUp -= Instance.DragSource_PreviewMouseLeftButtonUp;
dragSource.PreviewMouseMove -= Instance.DragSource_PreviewMouseMove;
}
}
}
I describe below the events that I provided handlers for. I had to use the preview versions of these events to make sure I handle them before other controls do (for example, ListBox handles MouseLeftButtonDown).
ItemsControl Drag Source
- PreviewMouseLeftButtonDown Its main responsibility is to remember the data item that the user clicked on.
this.sourceItemContainer = Utilities.GetItemContainer(this.sourceItemsControl, visual);
if (this.sourceItemContainer != null)
{
this.draggedData = this.sourceItemContainer.DataContext;
}
- PreviewMouseMove For a drag to happen, the user needs to click on the drag source and move the mouse by a significant amount. When a user performs a button click, there is a pretty high likelihood that the mouse will move inadvertently by a small amount, and I want to ignore those situations. Fortunately, there is a SystemParameter that can be used in these situations, so I make sure that the mouse has moved by at least SystemParameters.MinimumHorizontalDragDistance or SystemParameters.MinimumVerticalDragDistance before I consider it a drag. Once I decide a drag has started, I initiate the drag-and-drop operation. Notice below that I am initiating the drag operation with the data that I determined in the PreviewMouseLeftButtonDown handler (draggedData).
DataObject data = new DataObject(this.format.Name, this.draggedData);
…
DragDropEffects effects = DragDrop.DoDragDrop((DependencyObject)sender, data, DragDropEffects.Move);
- PreviewMouseLeftButtonUp This happens when the user releases the mouse without initiating a drag-and-drop operation. In this case, I simply set the draggedData field to null.
this.draggedData = null;
ItemsControl Drop Target
- PreviewDragEnter This event fires every time the user first drags a data item into an element with AllowsDrop=true (I set this property on the drop target ItemsControl within the IsDropTargetChanged method, so you don’t have to). Since this property is inherited, this handler will be called every time the mouse enters any element that belongs to the visual tree of the drop target ItemsControl. Among other things, within this handler I have code that updates the two adorners that I will explain later in this post.
- PreviewDragOver This event fires when the user drags the data item over elements with AllowsDrop=true. Similarly to the previous handler, the adorners are updated in this handler.
- PreviewDragLeave As expected, this event fires when the mouse leaves an element that has AllowsDrop=true. Here, I remove one of the adorners. More details on the adorners later.
- PreviewDrop This event notifies us that the drop operation has actually occurred. Here, I remove the data item from the drag source ItemsControl’s collection and add it to the drop target.
object movedItem = e.Data.GetData(this.format.Name);
…
indexRemoved = Utilities.RemoveItemFromItemsControl(this.sourceItemsControl, movedItem);
…
Utilities.InsertItemInItemsControl(this.targetItemsControl, movedItem, this.insertionIndex);
Dragging and dropping data
There are several problems that are particular to dragging and dropping data items between ItemsControls. I will discuss a few of those next.
When dragging a data item over the target ItemsControl, I need to determine where the item will go if dropped. I broke down this scenario into three possible different situations:
- The mouse is over an empty ItemsControl. In this case, if the ItemsControl is data bound to an empty collection the item gets added as the first and only item of that collection; similarly, if the ItemsControl is empty and not data bound, the item is added to the Items collection of the ItemsControl.
- The ItemsControl has items, although the mouse is over the empty part of the ItemsControl, after the last item. In this case, the item should be added to the end of the ItemsSource or Items collection.
- Last, the mouse could be over an item container. In this case, I need to determine whether I should insert the dragged data before or after the item under the mouse. If the ItemsControl uses a panel with vertical orientation, I check to see whether the mouse is over the top half or bottom half of the item container. Similarly, if the panel is laid out horizontally, I check to see whether the mouse is over the left half or right half of the item container.
This leads me to the next topic: I had to store the orientation of the panel so that I could calculate the insertion location when dropping over an item container. This calculation is done in the following method:
public static bool HasVerticalOrientation(FrameworkElement itemContainer)
{
bool hasVerticalOrientation = true;
if (itemContainer != null)
{
Panel panel = VisualTreeHelper.GetParent(itemContainer) as Panel;
StackPanel stackPanel;
WrapPanel wrapPanel;
if ((stackPanel = panel as StackPanel) != null)
{
hasVerticalOrientation = (stackPanel.Orientation == Orientation.Vertical);
}
else if ((wrapPanel = panel as WrapPanel) != null)
{
hasVerticalOrientation = (wrapPanel.Orientation == Orientation.Vertical);
}
// You can add support for more panel types here.
}
return hasVerticalOrientation;
}
Notice that I am providing support only for StackPanel and WrapPanel here, but you can easily add more “if” statements to support other panels.
Once I have the panel’s orientation information, I can determine whether the dragged data should be inserted before or after the item container under the mouse. In the code below, “first half” means the left half for a horizontally oriented panel, and top half for a vertically oriented one.
public static bool IsInFirstHalf(FrameworkElement container, Point clickedPoint, bool hasVerticalOrientation)
{
if (hasVerticalOrientation)
{
return clickedPoint.Y < container.ActualHeight / 2;
}
return clickedPoint.X < container.ActualWidth / 2;
}
Finally, I wanted to give the user feedback when a certain data item type can not be added to the drop target collection. To achieve this, I wrote a method called IsDropDataTypeAllowed, from which the following code snippet was taken. The drop operation is allowed if the target collection is of type IList
Type draggedType = draggedItem.GetType();
Type collectionType = collectionSource.GetType();
Type genericIListType = collectionType.GetInterface(”IList`1″);
if (genericIListType != null)
{
Type[] genericArguments = genericIListType.GetGenericArguments();
isDropDataTypeAllowed = genericArguments[0].IsAssignableFrom(draggedType);
}
else if (typeof(IList).IsAssignableFrom(collectionType))
{
isDropDataTypeAllowed = true;
}
else
{
isDropDataTypeAllowed = false;
}
Dragged Adorner
As I mentioned earlier, the DragDropHelper class contains a DragDropTemplate attached property that should be set to the DataTemplate responsible for determining the look of the dragged data item. The DraggedAdorner’s main responsibility is to provide a representation for the dragged data using that DataTemplate. To achieve this behavior, I decided that the adorner’s only child should be a ContentPresenter with its Content set to the dragged data, and its ContentTemplate set to the DataTemplate specified in the DragDropTemplate attached property. I also decided to give the adorner a bit of transparency, so I set the Opacity of the ContentPresenter to 0.7. Here is the constructor for this adorner:
public DraggedAdorner(object dragDropData, DataTemplate dragDropTemplate, UIElement adornedElement, AdornerLayer adornerLayer)
: base(adornedElement)
{
this.adornerLayer = adornerLayer;
this.contentPresenter = new ContentPresenter();
this.contentPresenter.Content = dragDropData;
this.contentPresenter.ContentTemplate = dragDropTemplate;
this.contentPresenter.Opacity = 0.7;
this.adornerLayer.Add(this);
}
And here is what this adorner looks like, with the template I specified in this blog’s project:
There’s a bit more logic in this adorner class, such as the code that allows the adorner to follow the position of the mouse and the code that sets up the ContentPresenter as the adorner’s child visual.
Next I will explain briefly when this adorner is created, removed, and updated.
The DraggedAdorner is created:
- When the user first drags data into an element belonging to the drop target DropTarget_PreviewDragEnter. This event is fired every time we enter a new element in the target’s tree, but we only need to create the Dragged Adorner the first time.
- Every time we re-enter the Window TopWindow_DragEnter.
The DraggedAdorner is removed:
- When dropping the item in a valid area DropTarget_PreviewDrop.
- When leaving the window TopWindow_DragLeave.
- If I drop the item in an invalid area, the drop handler doesn’t get called but the Window’s leave handler does, so this scenario is covered.
The DraggedAdorner is updated:
- Every time the cursor moves over the drop target or anywhere else within the window. DropTarget_PreviewDragOver, TopWindow_DragOver.
In summary, I create the adorner once, the first time it is needed. I remove the adorner every time the mouse leaves the window and recreate it when the mouse re-enters the window. And I remove the adorner again at the end of the drag-and-drop operation.
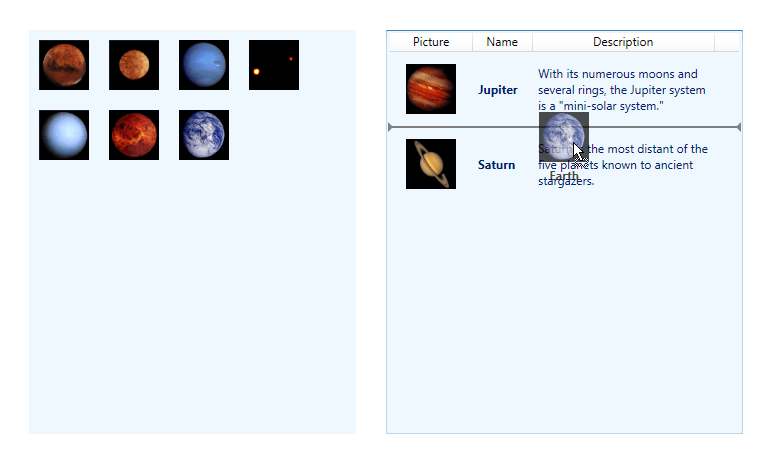
Insertion Adorner
The insertion adorner is responsible for the visual feedback that indicates the insertion point of a dropped data item. For example, if you drag a data item over a ListBox, you will see a line between two of the items indicating the position where the dragged item will be inserted if dropped. The visual appearance of an insertion adorner is a line with two triangles facing inwards at the ends:
In order to make this adorner as performant as possible, I wrote a static constructor where I create a triangle and freeze all Freezable objects involved in its creation:
static InsertionAdorner()
{
pen = new Pen { Brush = Brushes.Gray, Thickness = 2 };
pen.Freeze();
LineSegment firstLine = new LineSegment(new Point(0, -5), false);
firstLine.Freeze();
LineSegment secondLine = new LineSegment(new Point(0, 5), false);
secondLine.Freeze();
PathFigure figure = new PathFigure { StartPoint = new Point(5, 0) };
figure.Segments.Add(firstLine);
figure.Segments.Add(secondLine);
figure.Freeze();
triangle = new PathGeometry();
triangle.Figures.Add(figure);
triangle.Freeze();
}
I need two triangles in this adorner. Because their positions and orientations vary according to the ItemsControl’s layout, I created just one triangle object and draw it twice after applying the appropriate translate and rotate transforms. The method below is called twice with different parameters:
private void DrawTriangle(DrawingContext drawingContext, Point origin, double angle)
{
drawingContext.PushTransform(new TranslateTransform(origin.X, origin.Y));
drawingContext.PushTransform(new RotateTransform(angle));
drawingContext.DrawGeometry(pen.Brush, null, triangle);
drawingContext.Pop();
drawingContext.Pop();
}
Next I will explain briefly when this adorner is created, removed, and updated.
The InsertionAdorner is created:
- Every time the cursor enters a new element in the target’s tree. It needs to be created this frequently because different elements can have different sizes DropTarget_PreviewDragEnter.
The InsertionAdorner is removed:
- Every time the cursor leaves the current element or the item is dropped DropTarget_PreviewDragLeave, DropTarget_PreviewDrop.
The InsertionAdorner is updated:
- Every time the cursor moves over the drop target DropTarget_PreviewDragOver.
Windows events
The fact that I’m providing handlers for the window’s drag drop events may seem a little strange at first.
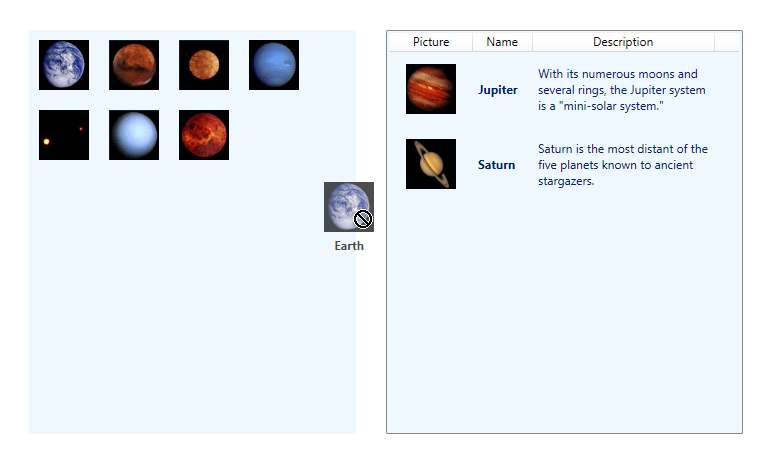
Imagine I provide handlers for the ItemsControl drop target only. Since I have code in these handlers that displays the preview adorner (which is where DragDropTemplate gets applied), the preview would only come up when the mouse cursor enters the drop target. Anywhere else in the window, the mouse cursor would turn into a crossed circle, indicating that it’s not an allowed drop location.
I like the crossed circle to come up in those areas, but I would like the adorner to be displayed anywhere I drag the item within the window.
To achieve the effect I wanted, I set the AllowDrop property of the window to true, and hooked up handlers for its drag events. I used the preview versions of the drop events for the target, but not for the window. This way, when the cursor is within the drop target I get the drop target events (and set Handled to true), but when the cursor is anywhere else in the window, I get the window’s events instead. I used these events to ensure the creation and removal of the preview dragged adorner, and to make sure that the mouse cursor is set to the crossed circle.
Other similar solutions available
Other developers have blogged about similar drag-and-drop solutions in the past. I will link to some of those solutions here, although there are probably more that I haven’t come across.
Pavan Podila has a great series of four blog posts about a similar scenario, which I highly recommend reading. The main difference between our two solutions is that his code can be used to drag UI elements from one panel to another, while my solution is used to drag data from one ItemsControl to another. I was very glad to see that Pavan Podila is also a fan of the attached properties solution for extending functionality.
Jaime Rodriguez also talked about this topic in a great three part series blog post. As in this post, he provides a solution for dragging and dropping data items.
If you need drag-and-drop functionality in your app, you will probably end up using a combination of the features from many blog posts. I hope you find my solution useful!
Here you can find the project with this code built using VS 2008 RTM.

