Hello,Views(五)自动填充文字AutoCompleteTextView(附源码)
前言
本文根据官方教程适当翻译而来。(源码下载)
1.新建工程HelloAutoComplete
2.在res/layout/目录下见一个xml文件作为填充文字的textview样式,list_item.xml:
<?xml version="1.0" encoding="utf-8"?>
<TextView xmlns:android="http://schemas.android.com/apk/res/android"
    android:layout_width="fill_parent"
    android:layout_height="fill_parent"
    android:padding="10dp"
    android:textSize="16sp"
    android:textColor="#000">
</TextView>
3.修改main.xml文件,包含一个textview和AutoCompleteTextView
<?xml version="1.0" encoding="utf-8"?>
<LinearLayout xmlns:android="http://schemas.android.com/apk/res/android"
    android:layout_width="fill_parent"
    android:layout_height="wrap_content"
    android:orientation="horizontal"
    android:padding="5dp" >

    <TextView
        android:layout_width="wrap_content"
        android:layout_height="wrap_content"
        android:text="国家" />

    <AutoCompleteTextView
        android:id="@+id/autocomplete_country"
        android:layout_width="fill_parent"
        android:layout_height="wrap_content"
        android:layout_marginLeft="5dp" />

</LinearLayout>
4.打开HelloAutoCompleteActivity文件,修改onCreate()方法
@Override
    public void onCreate(Bundle savedInstanceState)
    {
        super.onCreate(savedInstanceState);
        setContentView(R.layout.main);
        AutoCompleteTextView textView = (AutoCompleteTextView) findViewById(R.id.autocomplete_country);
        // 通过外部string数组资源绑定到适配器,便于维护
        String[] countries = getResources().getStringArray(R.array.countries_array);
        ArrayAdapter<String> adapter = new ArrayAdapter<String>(this, R.layout.list_item, countries);
        // 硬编码,直接在代码里声明用到的资源
        // ArrayAdapter<String> adapter = new ArrayAdapter<String>(this,
        // R.layout.list_item, COUNTRIES);
        textView.setAdapter(adapter);
    }
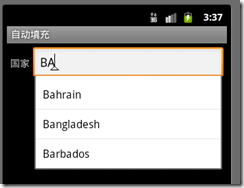
5.OK,运行。(源码下载)
作者:小文字
本文版权归作者和博客园共有,欢迎转载,但未经作者同意必须保留此段声明,且在文章页面明显位置给出原文连接,否则保留追究法律责任的权利.


 浙公网安备 33010602011771号