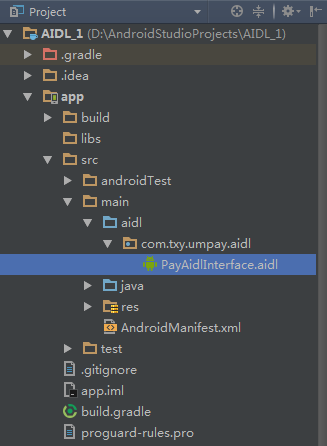
最近公司需要开发一个项目用的到aidl,之前研究过eclipse版本的,但是好久了一直没用,现在需要捡起来,但是现在都用android studio了,所以查了下资料 都不是很全,我在这里总结一下,方便后续忘了在用到。
第一步:通过as创建一个aidl文件,在app右键,如下图:

输入自己想要的名字,别的都默认,点击Finish 我这里的名字叫 PayAidlInterface 创建好如下:

在看看 PayAidlInterface.aidl 里面怎么写的,其实就一个计算的方法 客户端传2个int类型的值,服务端计算和
// PayAidlInterface.aidl
package com.txy.umpay.aidl;

// Declare any non-default types here with import statements

interface PayAidlInterface {
    /**
     * Demonstrates some basic types that you can use as parameters
     * and return values in AIDL.
     */
    int calculation(int anInt, int bnInt);
}
第二步: PayAidlInterface.aidl 编写完成之后 需要Build-->Make Module app,生成相应的java文件,如下图:

在来看看生成的java文件的位置:

第三步:接下来,就该完成我们的MAIDLService逻辑部分了,MAIDLService.java代码如下:
先说下我遇到的坑,我是通过as右键创建的service 他自动会加上下面2个属性 就会导致客户端调用不起来,所以记得一定要删除
android:enabled="false"
android:exported="false"、
public class MAIDLService extends Service {
    private void Log(String str) {
        Log.e("123", "----------" + str + "----------");
    }
    public void onCreate() {
        Log("service created");
    }
    public void onStart(Intent intent, int startId) {
        Log("service started id = " + startId);
    }
    public IBinder onBind(Intent t) {
        Log("service on bind");
        return mBinder;
    }
    public void onDestroy() {
        Log("service on destroy");
        super.onDestroy();
    }
    public boolean onUnbind(Intent intent) {
        Log("service on unbind");
        return super.onUnbind(intent);
    }
    public void onRebind(Intent intent) {
        Log("service on rebind");
        super.onRebind(intent);
    }
    PayAidlInterface.Stub mBinder = new PayAidlInterface.Stub() {
        @Override
        public int calculation(int anInt, int bnInt) throws RemoteException {
            Log(anInt + "--" + bnInt);
            return 1;
        }
    };
}
在来看下AndroidManifest.xml中MAIDLService 的配置:action是客户端调用用到的
<service android:name=".MAIDLService">
            <intent-filter>
                <action android:name="com.txy.umpay.aidl.MAIDLService" />
                <category android:name="android.intent.category.DEFAULT" />
            </intent-filter>
        </service>
服务端就已经完成了。接下来我们来看一下客户端的:
同样可以需要可服务端一样创建aidl文件

其实和服务端是一样的,把服务端的 PayAidlInterface.aidl 文件复制过来 再次执行 Build-->Make Module app
在来看下客户端怎么调用的
第一步先创建一个ServiceConnection 对象:
private ServiceConnection mServiceConnection = new ServiceConnection() {
            @Override
            public void onServiceDisconnected(ComponentName arg0) {
                Log.e("123", "onServiceDisconnected:" + arg0.getPackageName());
            }
            @Override
            public void onServiceConnected(ComponentName name, IBinder binder) {
                Log.e("123", "onServiceConnected:" + name.getPackageName());
                // 获取远程Service的onBinder方法返回的对象代理
                service = PayAidlInterface.Stub.asInterface(binder);
            }
        };
第二步绑定:
//使用意图对象绑定开启服务
Intent intent = new Intent();
//在5.0及以上版本必须要加上这个
intent.setPackage("com.txy.umpay.aidl");
intent.setAction("com.txy.umpay.aidl.MAIDLService");//这个是上面service的action
bindService(intent, mServiceConnection, Context.BIND_AUTO_CREATE);
第三步调用:
 if(service != null){
     int calculation = service.calculation(1, 2);
     text.setText("calculation:"+calculation);
 }
第四部不用的时候解除绑定:
@Override
    protected void onDestroy () {
        super.onDestroy();
        if (mServiceConnection != null) {
            unbindService(mServiceConnection);
        }
    }


